I have been, or can be if you click on a link and make a purchase, compensated via a cash payment, gift, or something else of value for writing this post. As an Amazon Associate, I earn from qualifying purchases. Please read my full Affiliate Disclosure for more information.
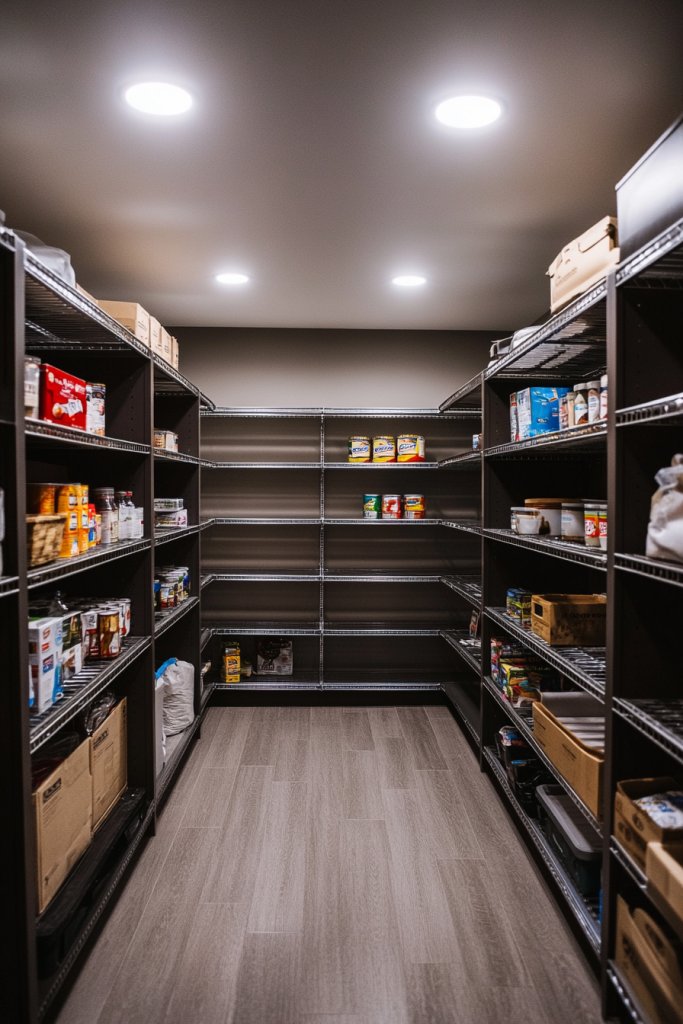
Ever wish you had more storage space without sacrificing style? Small walk-in pantries are the perfect solution for maximizing your kitchen organization while fitting into compact areas. Their popularity is soaring because they offer a practical yet charming way to keep everything accessible and tidy.
In this article, you’ll discover a variety of clever ideas to transform even the tiniest pantry into an efficient storage haven. From innovative shelving solutions to space-saving accessories, these ideas will inspire you to make the most of your small pantry and turn it into a functional, beautiful part of your home.
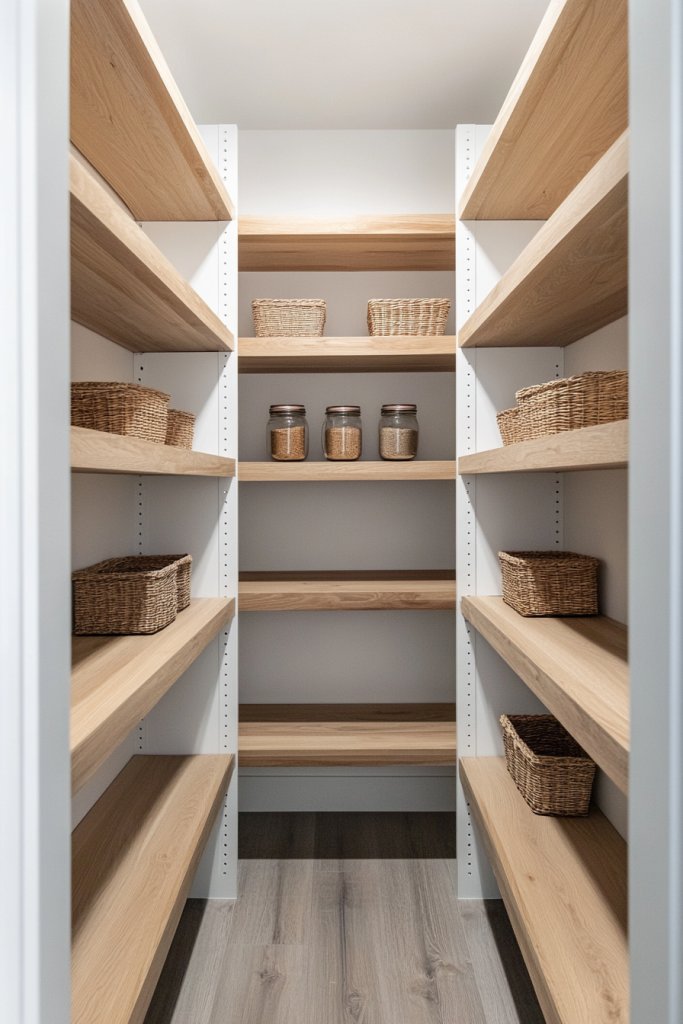
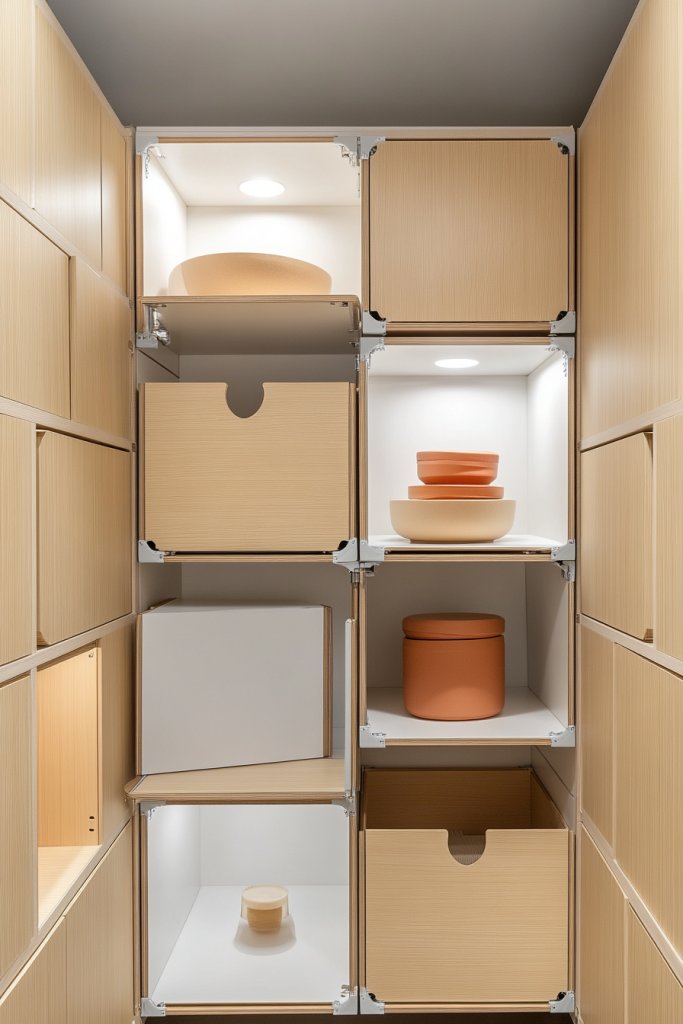
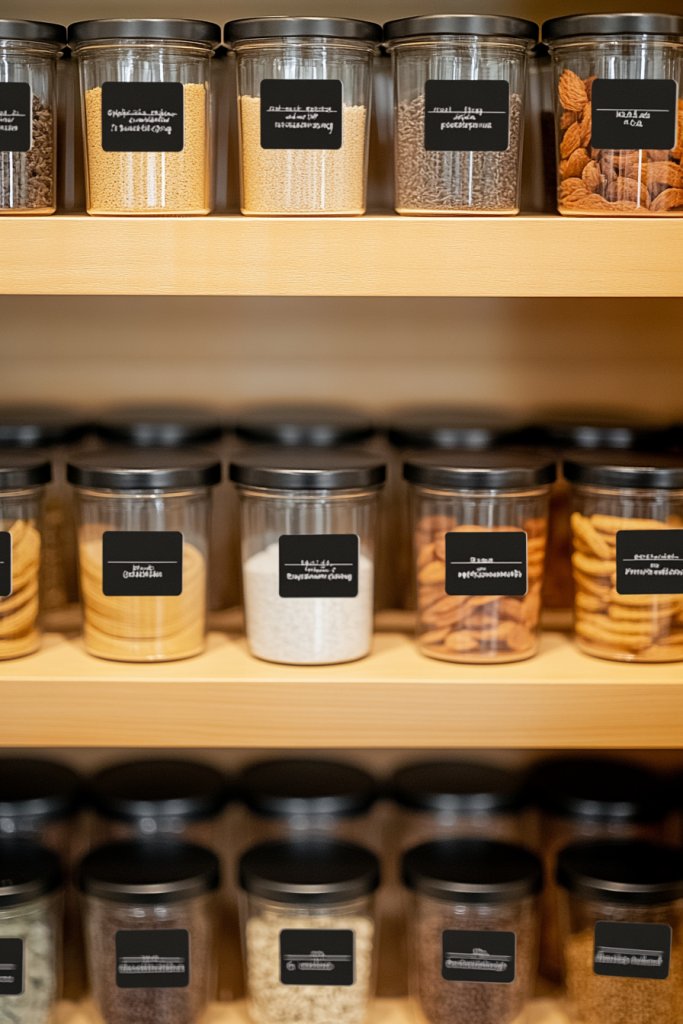
1. Install Open Shelving with Adjustable Racks for Customizable Storage
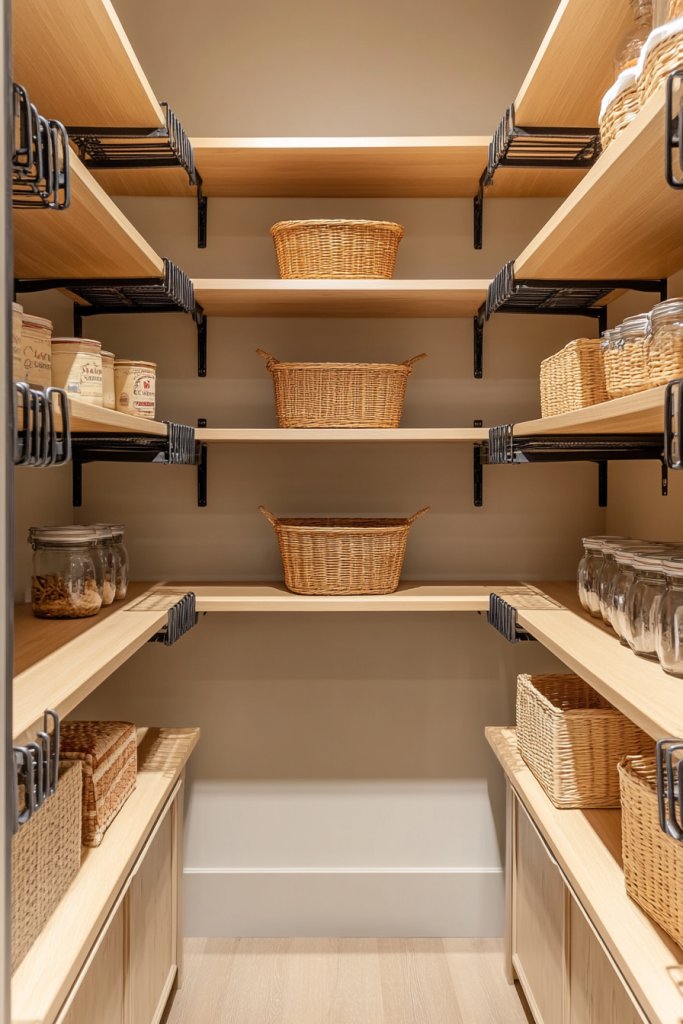
Ever struggle to fit all your pantry essentials into tiny spaces? Finding a way to organize efficiently without sacrificing style can feel like a puzzle. Adjustable open shelving offers a flexible solution that adapts as your needs change. It turns cluttered chaos into a clean, accessible setup you actually enjoy looking at.
Picture sleek wooden or metal shelves mounted on the wall, with some adjustable racks that slide or lift easily. Bright light filters over the open surfaces, highlighting colorful jars and neatly stacked cans. The shelves tower vertically, making use of every inch of wall space. You can see everything at a glance, with no bulky cabinets blocking your view.
Choose from modern, rustic, or industrial styles to match your home decor. For seasonal changes, swap out shelf liners or add decorative edging. You can also incorporate baskets or small containers on the open racks for specific items like spices or snacks. Narrow spaces benefit from slim, wall-mounted units, while larger kitchens can host multiple levels.
Start by measuring your wall space and selecting adjustable racks that suit your height and storage needs. Use a level to ensure even installation, and secure brackets into studs for stability. Opt for materials that resist moisture and stains, like treated wood or powder-coated metal. Install the racks at varying heights to maximize vertical space, and add labels if needed. Regularly check the mounting for safety.
Add personal touches with decorative hardware, colored shelf liners, or themed containers. Incorporate hooks beneath the shelves for hanging utensils or small tools. Use labels or chalkboard tags for easy identification, especially if you store bulk items. Play with different textures—mix wood with metal or glass for a layered look that’s uniquely yours.
Open shelving is a versatile, budget-friendly way to make your pantry both functional and visually appealing. It encourages neat habits and makes everyday access effortless. Plus, it’s a trend that’s here to stay, so your pantry will look stylish for years to come. Ready to ditch the clutter and embrace the open shelf revolution?
2. Use Clear, Stackable Storage Bins for Visually Appealing Organization
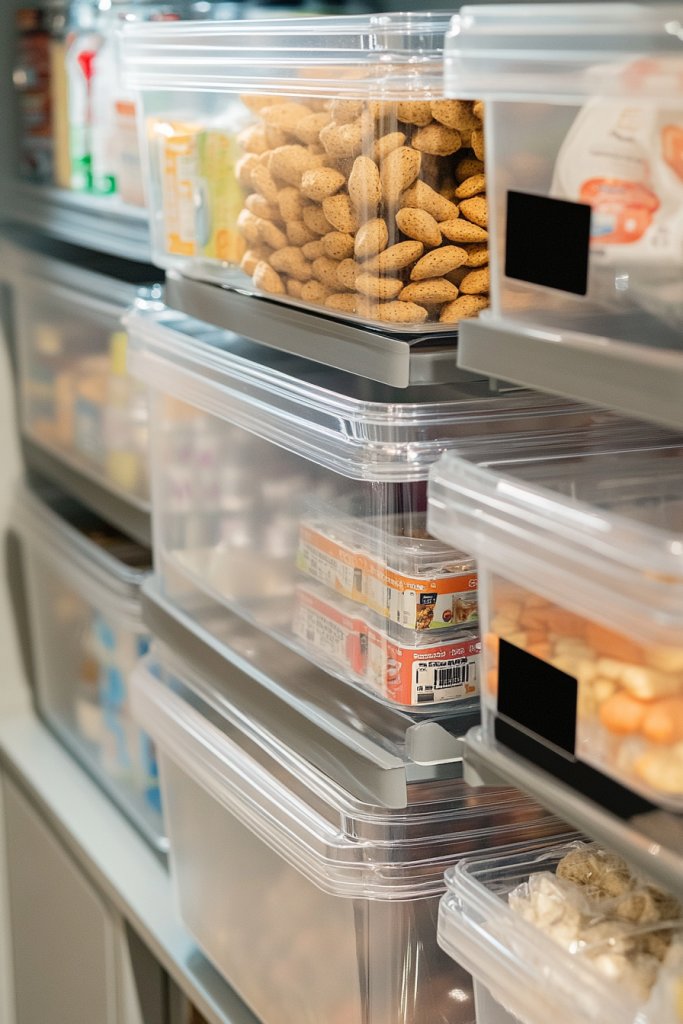
Tired of digging through opaque bags and mismatched boxes just to find that one snack? Clear storage bins are a game-changer for quick visibility and tidy organization. They make your pantry look like a professional setup, even if you’re just winging it at home. Plus, stacking them saves precious space.
Imagine transparent containers filled with colorful pasta, rice, or cereal, all neatly stacked on a shelf. Labels face outward, making it easy to identify contents at a glance. The uniformity creates a calming, orderly aesthetic, and the clear plastic showcases your favorite snacks or baking ingredients. They sit snugly, minimizing wasted space.
Use different sizes to accommodate small spice jars or large bags of flour. For a more cohesive look, choose containers with matching lids or labels. Incorporate small dividers inside bins for separating baking supplies, or add decorative touches like patterned liners or colored seals to match your decor. You can also mix and match with woven baskets or vintage crates for a rustic vibe.
Select sturdy, BPA-free plastic or glass containers that are safe for food storage. Measure your shelves to choose appropriate sizes—stackable bins should fit comfortably while maximizing space. Label each bin with a clear, durable sticker or write directly on the container with a permanent marker. Stack in a way that allows easy access to the most-used items. Periodically review contents and replace worn labels.
Personalize your bins with fun labels, color-coding by food type, or monogrammed tags. Use decorative washi tape or ribbon around the lids for a pop of color. Incorporate a lazy Susan or turntable within larger bins for easy spinning access. Consider adding small chalkboard stickers for quick notes or expiration dates. This makes the pantry both practical and cheerful.
Using clear, stackable bins turns your pantry into a sleek, magazine-worthy space. It reduces clutter and waste, helping you see what needs replenishing. Plus, it keeps your ingredients fresh and organized, making cooking less stressful. You’ll be surprised how much more enjoyable pantry duty becomes when everything’s in plain sight.
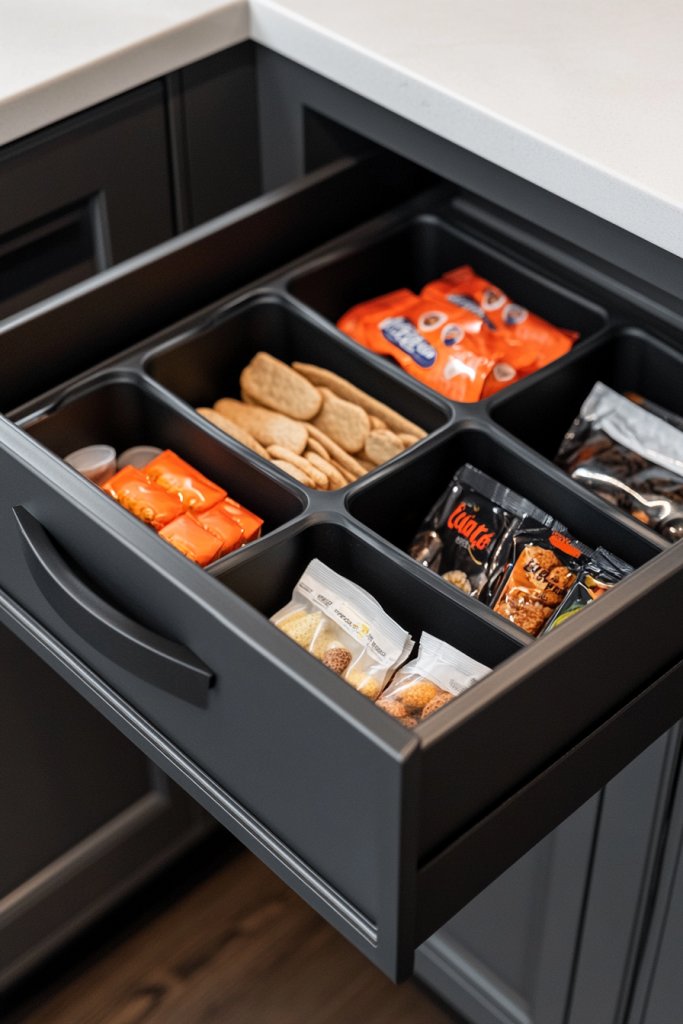
3. Incorporate Pull-Out Drawers and Baskets for Easy Access

Reaching into deep shelves or awkward corners for that elusive bag of chips can be a pain. Pull-out drawers and baskets solve this frustration by bringing items directly to you. They make your pantry more accessible, especially for those hard-to-reach spots. No more messy digging or accidental spills.
Visualize smooth-gliding drawers installed beneath shelves or within cabinet frames, revealing neatly stacked cans or baking supplies. Baskets with handles sit on sliding rails, allowing you to pull them out effortlessly. The entire setup looks organized and inviting, with everything at arm’s reach. The soft sound of drawers opening adds a touch of luxury.
Choose between wire baskets for air circulation or fabric-lined drawers for a softer look. For small spaces, slim drawers fit perfectly into narrow gaps. Large baskets hold bulk items like rice or snacks, while smaller ones categorize spices or tea. Incorporate labels or color-coded bins to enhance the visual order, matching your overall decor style.
Start by measuring the depth and width of your pantry areas to select appropriate pull-out hardware. Install sturdy rails or tracks on the sides, ensuring they can handle the weight of your stored items. Use durable materials like metal or plastic for longevity. For drawers, add soft-close mechanisms for quiet operation. Regularly check for smooth sliding and reinforce if necessary.
Personalize drawers with custom labels, or add decorative liners for a pop of style. Use colorful baskets or bins to designate categories, making it easy to find what you need. Consider installing a small label holder on the front of each basket for quick identification. Incorporate a small step stool nearby for reaching upper drawers comfortably.
Pull-out drawers turn a cluttered mess into a sleek, organized haven. They save time and reduce frustration during busy mornings or meal prep. Plus, they give your pantry a polished look that’s both functional and stylish. Once installed, you’ll wonder how you ever managed without them—goodbye chaos, hello efficiency!
4. Create a Slim, Vertical Pantry with Tall Shelves for Narrow Spaces
Living in a tiny apartment or condo often means sacrificing pantry space. But vertical, slim shelving units can turn narrow gaps into smart storage solutions. They maximize every inch without crowding your space. It’s a clever way to keep essentials close at hand without feeling overwhelmed.
Imagine a tall, narrow shelf unit tucked into a corner, with multiple levels filled with jars, cans, and boxes. The sleek lines and minimalist design blend seamlessly into your decor. Brightly colored labels and containers pop against a neutral backdrop, making everything easy to find. The shelves stretch from floor to ceiling, creating an illusion of spaciousness.
Opt for adjustable or modular units to customize shelf height. Use stackable containers or baskets for smaller items. Incorporate pull-out trays or baskets for easy access in tight spaces. For seasonal storage, swap out contents or add decorative touches like fabric liners or decorative film. This flexibility makes it suitable for various room sizes and styles.
Measure the available space carefully, including height and width. Choose slim, durable shelving units made from lightweight materials like metal or composite. Secure the units to the wall for safety, especially in high-traffic areas. Organize items by category, stacking cans or boxes vertically. Use labels or color coding to streamline your workflow. Regularly reassess to optimize space usage.
Add decorative contact paper or paint the shelves for a custom look. Incorporate small, decorative storage bins or jars to break up monotony. Use hooks or clips on the sides for hanging lightweight items like utensils or cleaning cloths. Keep a small step ladder nearby for easy access to the top shelves. Play with color schemes to match your overall decor.
A slim, vertical pantry is a lifesaver in tight spaces, proving that good organization isn’t about size but clever design. It makes your essentials accessible without cluttering the room. Plus, it’s a stylish upgrade that adds value and functionality. Small spaces can be stylish and efficient—just like you!
5. Use Modular Storage Units to Flexibly Reconfigure Space
Flexibility is key when your storage needs change or you want to update your style. Modular storage units allow you to reconfigure your pantry layout easily. They’re perfect for those who love to experiment or have a space that evolves over time. No more stuck with fixed setups that don’t suit your current needs.
Imagine stackable cubes or connectable shelves that can be assembled into various configurations. Visualize a mix of open and closed units, with some featuring drawers or doors. You can create an eclectic look or a sleek, uniform style—whatever suits your taste. The modules fit together seamlessly, forming a flexible storage landscape.
Choose from materials like wood, plastic, or metal for different aesthetics. Mix and match sizes for larger or smaller items, or create custom heights for specific products. Incorporate wheels for easy moving or stacking for space-saving. Seasonal reconfigurations, like adding baskets or trays, keep your pantry fresh and functional.
Start by assessing your space and listing your storage needs. Select modular units that can be stacked or linked, ensuring compatibility. Use connectors, clips, or screws to secure units together if needed. Arrange the modules in a way that allows easy access and visibility. Regularly revisit and adjust the configuration as your needs evolve.
Customize the look with paint, decals, or decorative hardware. Add labels or color-coded bins within modules for quick sorting. Incorporate a few decorative elements like textured liners or fabric baskets to add warmth. Use modular units to create zones for different categories—baking, snacks, canned goods—making everything intuitive.
Modular storage turns chaos into harmony with minimal effort. It’s a dynamic system that grows with you, reducing the need for constant reorganization. Plus, it looks polished and professional, elevating your entire space. Embrace the freedom to change things up—your pantry will thank you.
6. Add a Lazy Susan Turntable for Spices and Small Jars
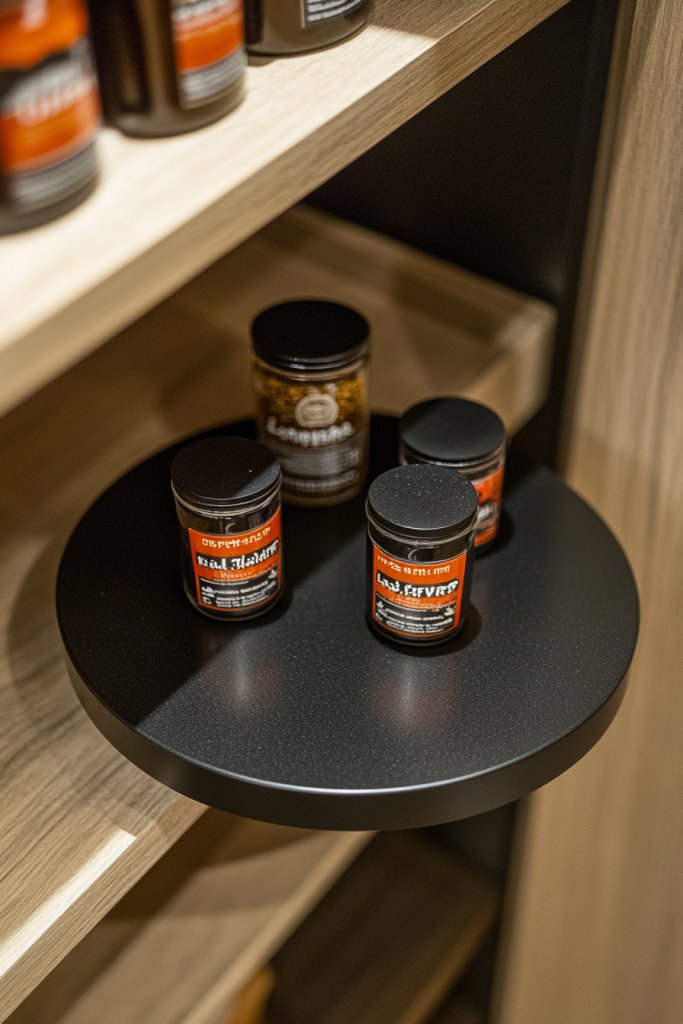
Spices, small jars, and tiny bottles can quickly become a nightmare to organize. Finding what you need without knocking over everything is a challenge. A Lazy Susan turntable offers a simple, elegant solution that keeps everything within easy reach. It transforms cluttered corners into highly functional spots.
Picture a smooth, rotating tray filled with colorful spice jars, oils, or tiny snack packs. The glossy surface spins effortlessly, making each item visible without rummaging. The turntable sits on a shelf or inside a cabinet, creating a mini display of your favorite ingredients. It’s a smart way to add a touch of elegance to your pantry.
Opt for materials like glass, wood, or plastic to match your decor. Use different sizes and shapes to separate spices from oils or small snacks. Incorporate a non-slip base to keep the turntable stable. For aesthetic appeal, choose a patterned or textured surface that complements your overall design.
Select a size that fits your space and the quantity of items you need to organize. Place the turntable on a shelf, inside a cabinet, or on a countertop. Fill it with your most-used spices or small jars, and rotate to access. Clean regularly to prevent buildup of dust or spills. Consider multi-tiered versions for even more storage.
Add labels or color-coded stickers to each section for quick identification. Incorporate matching containers or lids for a cohesive look. Use decorative trim or edging to elevate the aesthetic. For a personal touch, consider a custom engraved or painted surface that reflects your style.
A Lazy Susan isn’t just practical; it’s a stylish upgrade for any pantry corner. It makes cooking more efficient and adds a sophisticated touch. Once you see how easily everything spins into place, you’ll wonder how you managed before. Small details like this make a big difference!
7. Incorporate Under-Desk or Under-Shelf Bins for Hidden Storage
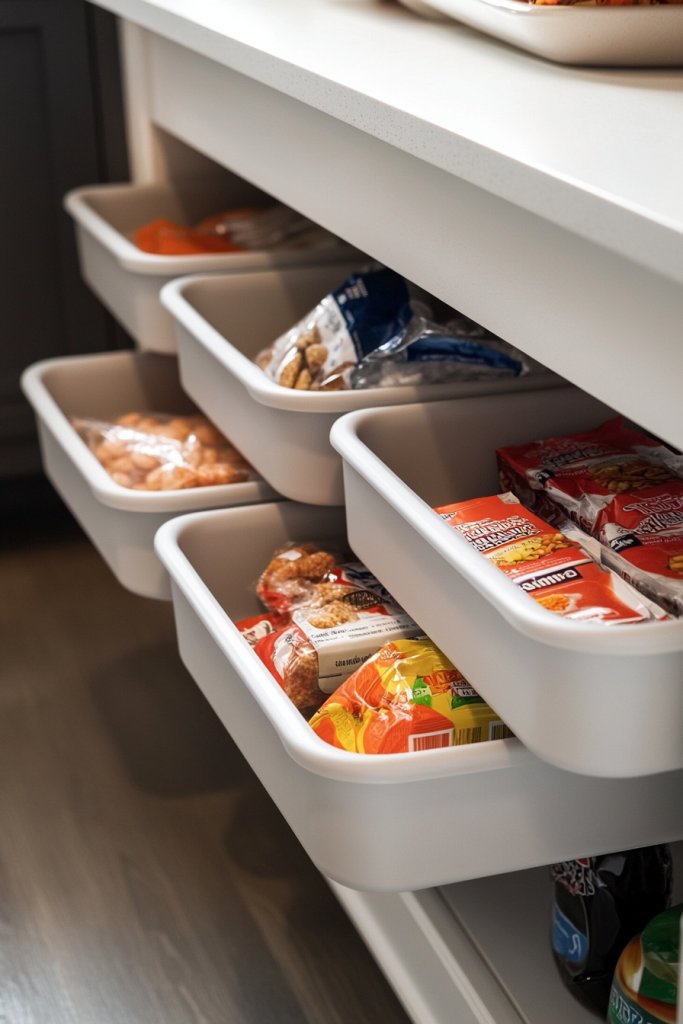
Clutter often hides in the corners or underneath shelves, making your pantry look messy even if it’s full of organized items. Under-shelf bins add hidden storage space that’s out of sight but within easy reach. They’re perfect for maximizing space without overcrowding your main shelves.
Envision slim, discreet bins sliding underneath existing shelves or desks, hiding behind neatly stacked cans or boxes. When pulled out, they reveal a treasure trove of extra snacks or baking supplies. The bins are designed to blend seamlessly into the space, maintaining a clean look while adding extra capacity.
Choose from fabric, plastic, or wire-based bins depending on your style and needs. For a cohesive look, match the bins’ color to your wall or shelving unit. They can be used for seasonal storage, or to hide less attractive items like cleaning supplies or bulk packages. Stackable options maximize vertical space.
Measure the depth and height of available spaces to select suitable bins. Install or slide the bins under shelves or desks, ensuring they have enough clearance to pull out fully. Organize contents by category and label each bin for quick access. Regularly reassess to keep things tidy and optimize space.
Decorate the bins with stickers or fabric covers that match your decor. Use different colors for different categories—like green for snacks, red for baking, etc. Incorporate small dividers or trays inside for better organization. This adds a personal touch while boosting functionality.
Hidden storage transforms underutilized spaces into valuable assets. It helps keep your main shelves clean and clutter-free, making your entire pantry more functional. Once you see how much extra room you gain, you’ll be motivated to keep everything tidy and accessible.
8. Use Over-the-Door Organizers for Extra Storage
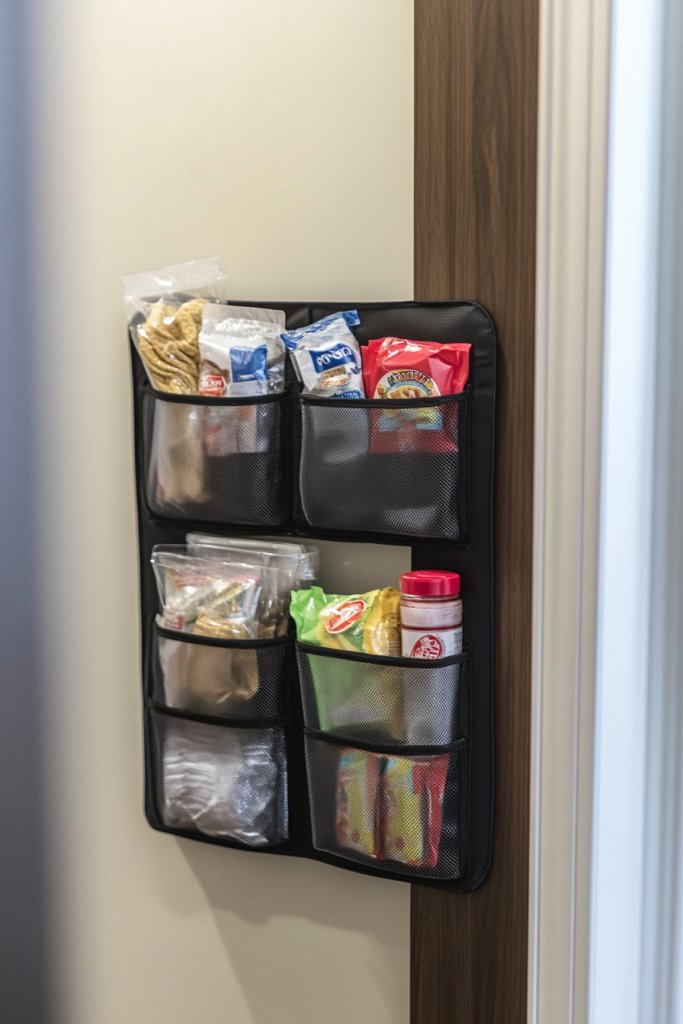
Door space is often wasted or cluttered with hooks and magnets. Over-the-door organizers turn this unused area into a storage powerhouse. They’re perfect for small items like snacks, wraps, or cleaning supplies, freeing up shelf space for bulkier goods. Why not make every inch count?
Imagine a slim, fabric or plastic pocket organizer hanging from your pantry door. Each pocket holds bottles, packets, or small tools, visible at a glance. The door stays sleek while offering a ton of extra storage. It’s a tidy, space-saving solution that keeps essentials within easy reach.
Choose from clear, mesh, or fabric pockets based on your style preference. For a coordinated look, match the organizer to your door or wall color. Use larger pockets for bulky items like foil or plastic wrap, and smaller ones for spices or utensils. Consider waterproof or washable options for easy cleaning.
Pick an organizer that fits your door’s dimensions and holds your most-needed items. Install hooks or adhesive strips that won’t damage the surface, or hang the organizer directly on the door handle. Fill the pockets with categorized items, and label if desired. Regularly review and reorganize for efficiency.
Decorate the pockets with stickers or fabric covers for a personalized touch. Use color-coded or themed organizers to match your overall decor. Add small hooks or clips inside pockets for utensils or keys. Keep it fun and functional—your pantry will thank you.
Over-the-door organizers are a quick, affordable way to boost storage without a remodel. They keep small items visible and accessible, reducing clutter and stress. Once you see how much extra space you have, you’ll wonder why you didn’t do it sooner—easy, effective, and stylish!
9. Install Built-In Labeling Systems for Clear Identification
Searching for that one elusive ingredient or snack can turn into a treasure hunt. Clear labeling systems eliminate confusion and save time. They help you quickly find what you need and keep your pantry looking neat and professional. Labels are the finishing touch for an organized space.
Visualize stylish labels on jars, bins, and shelves—maybe handwritten, printed, or vinyl stickers—that instantly tell you what’s inside. Uniform font and size create a cohesive look, while contrasting colors make labels pop. This visual harmony makes your pantry feel more curated and less chaotic.
Use chalkboard labels, printable vinyl stickers, or engraved tags depending on your style. For a rustic look, go with handwritten tags on kraft paper or wood. Modern spaces benefit from sleek, minimalist fonts in vinyl. Update labels seasonally or as items change to keep things fresh and accurate.
Choose a labeling method that suits your style and budget. Prepare your labels with clear fonts and durable materials. Attach them to containers with adhesive, or write directly on jars with waterproof markers. Arrange items logically and consistently, then step back to see a beautifully organized pantry. Periodically refresh labels for clarity.
Add decorative elements like colored tapes or borders to labels for extra flair. Incorporate themed labels for holidays or special occasions. Use labels to create zones—baking, snacks, canned goods—so everything has a designated spot. This not only improves function but adds personality.
A clear labeling system makes your pantry easier to manage and more inviting. It encourages everyone in the household to keep things tidy. Over time, it becomes second nature, turning what once was a chore into a satisfying habit. Stylish labels are a small detail that makes a big difference.
10. Incorporate Decorative Baskets for a Charming, Cohesive Look
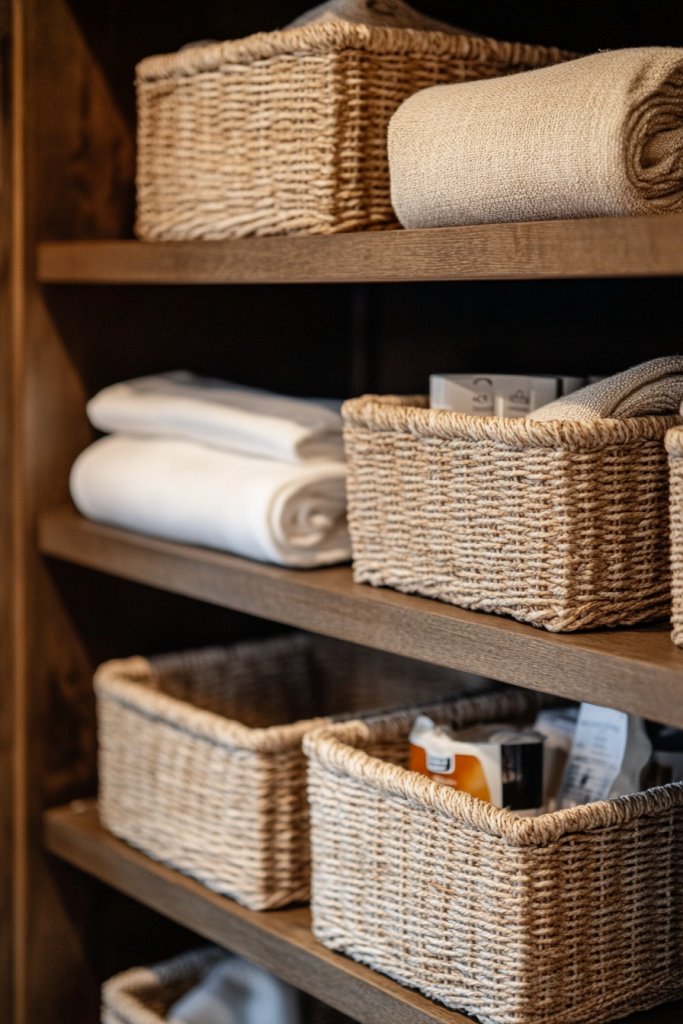
Cluttered shelves can ruin the vibe of an otherwise beautiful pantry. Decorative baskets offer a charming way to hide messes while adding texture and style. They create a cohesive look that feels warm and inviting. Plus, baskets are super versatile for organizing different items.
Envision woven or fabric baskets in neutral tones or bold patterns, neatly stacked or grouped on shelves. Inside, you can store fruits, snacks, or baking supplies, all concealed yet easily accessible. They add visual interest through texture and color, transforming your pantry from plain to picturesque. The soft shapes contrast nicely with rigid containers.
Select baskets that match your decor theme—rattan for rustic, fabric for cozy, or wire for industrial. Use different sizes for varied storage needs, from small for spices to large for bulk items. Layer baskets with decorative liners or tags to organize by category. Incorporate a few decorative elements like faux greenery or ribbons for a personalized touch.
Start by measuring your shelves and choosing baskets accordingly. Place heavier or bulkier items at the bottom or in larger baskets for stability. Use labels or tags for quick identification. Arrange baskets in a way that maximizes space and maintains visual harmony. Regularly review and rotate contents to keep everything fresh.
Add decorative touches such as fabric liners, painted patterns, or personalized tags. Use a consistent color scheme for a tidy look or mix textures for visual interest. Incorporate some decorative accents like small faux plants or vintage jars nearby. This elevates your storage from functional to fashionable.
Decorative baskets make your pantry feel cozy and curated, encouraging regular tidying. They hide clutter while adding character and warmth. Once you see how they unify your storage, you’ll enjoy reorganizing and maintaining your space. It’s a simple upgrade with a big impact.
11. Use Stackable Can Racks and Food Containers for Bulk Storage

Bulk buying is economical but can turn your pantry into a chaotic mess. Stackable can racks and uniform food containers help tame the chaos. They keep everything organized, easy to access, and looking neat. Plus, they save space and reduce waste.
Imagine a tidy shelf filled with cans aligned in neat rows on a sturdy rack. Adjacent, clear, stackable containers hold grains, pasta, or snacks, all labeled and uniform in size. The uniformity creates a clean, streamlined look, while the stacking maximizes vertical space. It’s like a mini warehouse at home.
Select can racks that fit your shelf width and hold multiple cans securely. Use food containers with airtight seals to keep ingredients fresh. Opt for modular or stackable designs that grow with your pantry. Color-code or label containers for quick identification, and vary sizes based on contents.
Arrange cans on racks grouped by category—vegetables, soups, or beverages. Inside your containers, transfer dry goods into uniform, airtight jars or bins. Label each container clearly, and stack for maximum efficiency. Regularly check expiration dates and rotate stock. This systematic approach keeps everything fresh and accessible.
Decorate containers with custom labels, or add decorative tape for a pop of color. Use matching lids or accents to create a cohesive look. Incorporate small risers or tiered trays inside larger containers to add layers of storage. Play with color schemes to match your overall design theme.
Using stackable racks and containers makes bulk storage manageable and stylish. It reduces clutter and makes shopping and meal prep more efficient. Your pantry will look like a professional setup, boosting your confidence in your organizational skills. Small changes lead to big improvements!
12. Maximize Corner Space with Lazy Susan or Corner Shelves
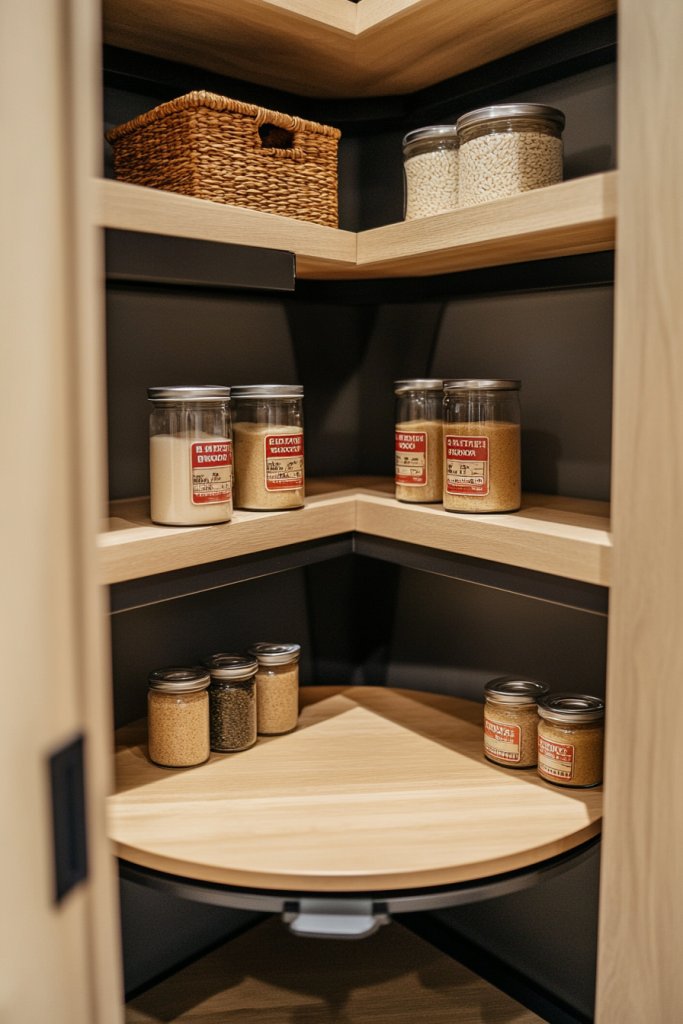
Corners are often wasted or cluttered, wasting valuable storage real estate. Using a Lazy Susan or corner shelves transforms these awkward areas into practical spaces. They make accessing seldom-used items easier and keep everything visible. It’s a smart way to optimize every inch.
Picture a round, rotating tray filled with spice jars, oils, or small canned goods, spinning smoothly when needed. Or imagine a set of sleek corner shelves that extend from one wall to another, neatly holding jars and boxes. The design fits snugly into tight corners, creating a tidy, accessible spot that blends seamlessly into your decor.
Choose between different sizes, shapes, and materials—wood, metal, or plastic—to match your aesthetic. Multi-tiered Lazy Susans maximize vertical storage, while open corner shelves provide display space. Incorporate dividers or small containers for better organization. Seasonal or decorative accents can be added for a personalized look.
Measure the corner space carefully, then select a Lazy Susan or corner shelf that fits perfectly. Install the rotating tray on a sturdy base, ensuring smooth operation. Organize items by category, keeping frequently used ones at the front. Regularly clean and check for stability and wobbling. Use labels or dividers if needed.
Decorate the edges of shelves with paint or decorative tape. Add small hooks or clips for hanging utensils or cleaning tools. Use matching containers or jars to create a cohesive look. Incorporate a small step stool or ladder nearby for easy access to top shelves. Play with colors that complement your overall decor.
Corner storage solutions turn wasted space into valuable real estate, making your pantry more efficient. They keep everything within reach and add a stylish touch. Once you experience the convenience, you’ll wonder how you ever managed without them. Smart, space-saving, and stylish—what’s not to love?
13. Incorporate a Small Folding Step Stool for Reaching High Shelves
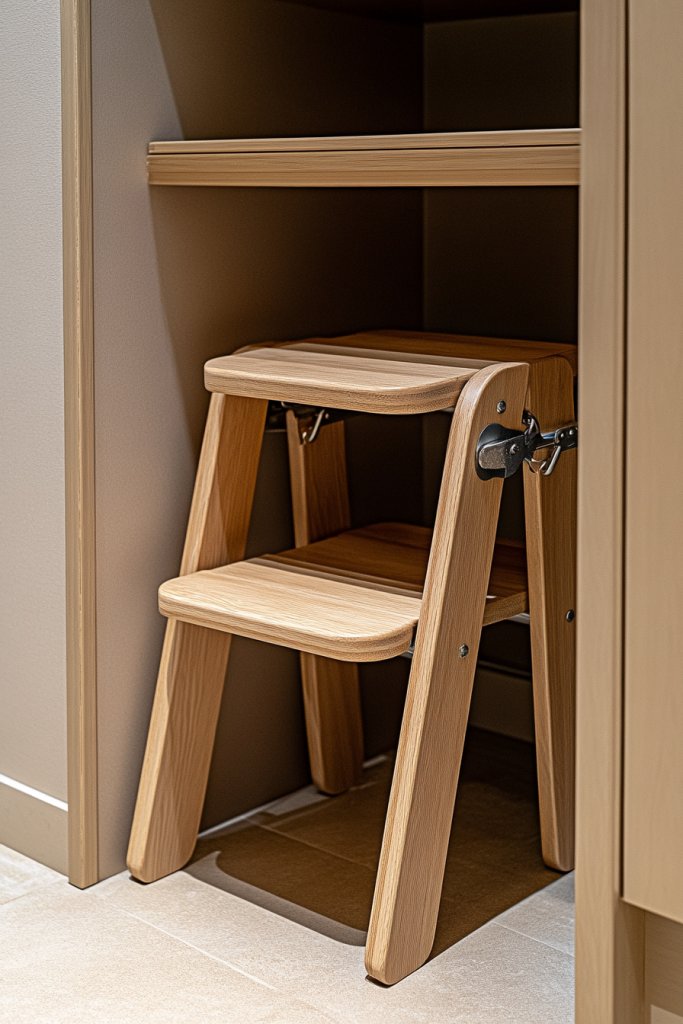
Reaching the top shelves in your pantry often requires a chair or dangerous stretch. A small folding step stool solves this problem safely and conveniently. It brings the items within reach without risking a fall or knocking things over. Plus, it folds away when not in use, keeping your space sleek.
Imagine a compact, lightweight stool tucked into a corner or stored under a shelf. When needed, it unfolds easily, revealing a sturdy platform to stand on. You can access high jars or boxes with confidence, knowing you’re stable. The stool’s simple design blends into your space, ready for action whenever needed.
Choose from different colors, materials, or patterns to match your decor. Some stools feature anti-slip surfaces or adjustable height options. Opt for lightweight, foldable models for portability and ease of storage. Decorate with decals or paint for a personalized touch, or keep it minimal for a clean look.
Place the stool near your main storage area or in a designated spot. Test its stability before use, especially when reaching for heavy or fragile items. Use it regularly to ensure it remains in good condition. Fold it flat and store behind doors or under shelves to keep it out of sight. Check for signs of wear periodically.
Add grip tape or non-slip pads to the top for extra safety. Customize it with your favorite colors or patterns for a fun touch. Use a label or small hook to keep it in place or to hang keys or small accessories. It’s a small addition that makes a big difference in safety and convenience.
A folding step stool boosts your independence and safety in the pantry. It makes reaching the highest spots effortless and reduces the need for risky stretches. Once you have one, you’ll wonder how you ever managed without it—simple, effective, and essential.
14. Use Drawer Dividers for Partitioned Storage of Packaged Goods
Messy, tangled packages of snacks or tea bags make pantry maintenance a nightmare. Drawer dividers help create neat, separate compartments for each item. They transform chaos into order, making it easy to find exactly what you need without rummaging. It’s an instant upgrade for clutter-free storage.
Imagine a drawer filled with sorted snack packs, neatly divided by colorful, adjustable partitions. Each section holds a specific category—baking supplies, tea, or small cans. The dividers keep everything in place, preventing spills and mixing. The organized look makes your pantry feel calm and inviting.
Choose between adjustable, expandable, or fixed dividers to suit your needs. Use different materials—plastic, wood, or silicone—for durability and style. Incorporate labels or color-coding to identify categories easily. Flexible dividers allow you to customize compartments as your collection grows or changes.
Select dividers that fit your drawer size and storage needs. Install in clean, dry drawers, ensuring they stay in place during use. Organize items into sections, grouping similar products together. Label compartments if desired, and regularly tidy to avoid clutter buildup. Adjust dividers as your collection evolves.
Decorate dividers with stickers or paint to match your decor. Use color-coded or themed labels for quick sorting. Incorporate small baskets or trays within compartments for extra organization. Regularly update labels or arrangements to keep the system functional and appealing.
Drawer dividers turn a cluttered drawer into a model of efficiency. They save time and reduce frustration, especially during busy mornings. Once you master this simple trick, maintaining a tidy pantry becomes second nature. Small organizational details make your entire space more enjoyable.
15. Install a Small Wine Rack or Beverage Holder for Compact Bottled Goods
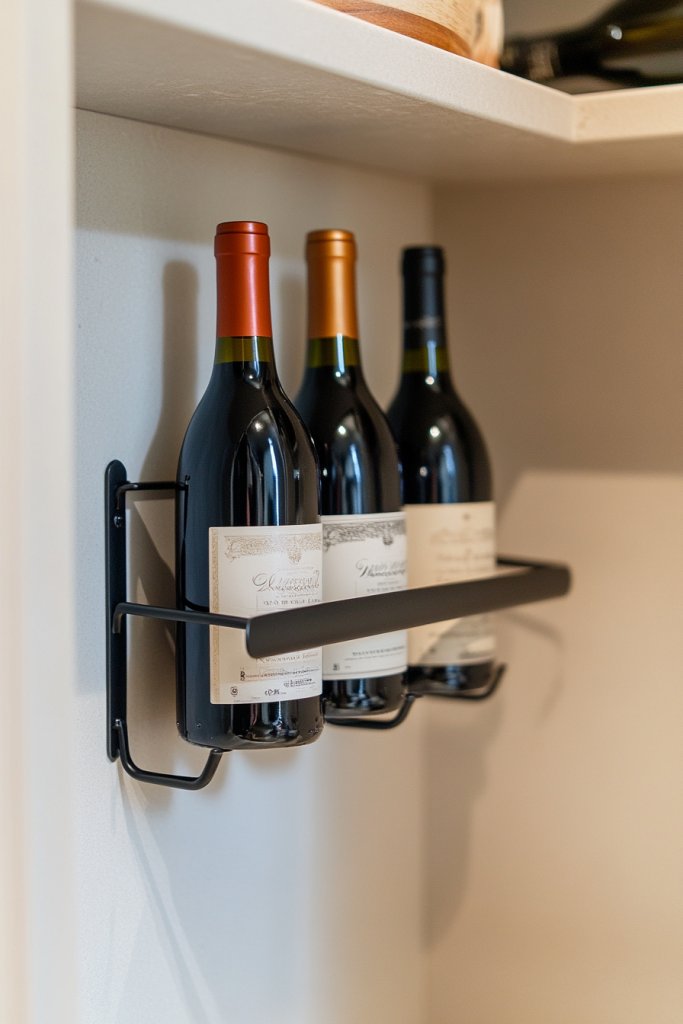
Bottled beverages, oils, or specialty drinks can clutter your pantry or fridge. A small wine rack or beverage holder offers a stylish way to store these items compactly. It keeps bottles organized, accessible, and adds a decorative element. Who knew storage could be so chic?
Picture a sleek, metal or wooden rack sitting on a shelf or countertop, holding bottles horizontally or vertically. The bottles are neatly arranged, with labels visible for quick selection. The rack’s minimalist design complements modern kitchens, while its compact size saves space. It’s both functional and fashionable.
Select racks with adjustable slots or tiers to fit different bottle sizes. Use for wine, craft sodas, or cooking oils—whatever suits your taste. Incorporate decorative elements like wrought iron or painted finishes. Place in a corner or on a countertop for a charming, accessible display.
Measure your bottles and available space before choosing a rack. Install or place the rack on a stable surface, ensuring it’s level. Organize bottles by type or frequency of use for efficiency. Clean regularly to prevent dust or residue buildup. Consider stacking options for multiple tiers.
Decorate the rack with stickers, decals, or paint to match your kitchen style. Add small labels or tags for specific categories, like reds or whites. Incorporate decorative accents like faux greenery or stone coasters nearby. Keep it fun and functional, making storage a delight.
A wine rack or beverage holder elevates your storage game, turning bottles into decorative elements. It simplifies access and reduces clutter, making your space more inviting. Once you see how organized and attractive your bottles look, you’ll be motivated to keep everything in order—style meets practicality!
16. Add a Pegboard Wall for Hanging Tools and Small Accessories
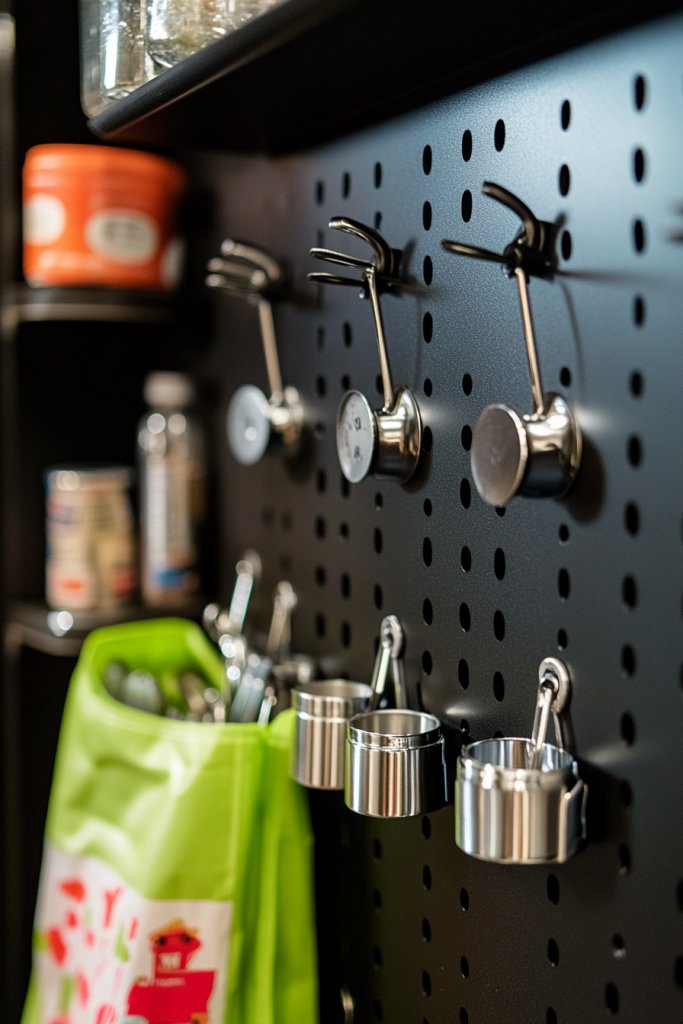
Small kitchen tools, measuring cups, or reusable bags often end up scattered or lost. A pegboard wall offers a versatile, customizable solution for hanging and organizing these essentials. It keeps everything in sight and within easy reach, making your workflow smoother. Why hide what you can display?
Visualize a sturdy pegboard mounted on your pantry wall, with hooks holding utensils, measuring spoons, or small baskets. It creates a functional display that adds industrial charm. The open design makes tools quick to grab, while keeping your workspace tidy and uncluttered. It’s a practical art piece.
Choose from metal, wood, or composite boards depending on your decor style. Use a mix of hooks, baskets, or shelves to customize storage. Color-code or label hooks for categories, such as baking, cooking, or cleaning. Incorporate decorative elements like painted accents or themed accessories.
Mount the pegboard at a comfortable height, ensuring it’s securely fixed into studs or anchors. Arrange hooks and accessories to suit your needs, grouping similar tools together. Keep frequently used items at the front for quick access. Regularly update the layout as your collection grows or changes.
Decorate the pegboard with stencils, paint, or decorative tape for a personalized look. Use labels or tags to identify tool categories. Add small planters or decorative clips for extra flair. Keep it fun and functional to encourage ongoing organization.
Pegboards turn cluttered drawers or counters into a stylish, efficient display. They boost productivity and reduce frustration during meal prep. Once you see how neat and accessible your tools become, you’ll be inspired to maintain order. Practical, pretty, and totally customizable!
17. Incorporate Light Fixtures for Bright, Functional Illumination
Poor lighting can make even the best-organized pantry feel dull and hard to navigate. Installing proper light fixtures brightens the space and makes it easier to find what you need. Good lighting isn’t just practical—it elevates the whole look and feel of your storage area. Who wants to fumble in the dark?
Imagine sleek LED strip lights running along the underside of shelves or puck lights installed in corners. The bright, even illumination highlights your organized containers and labels. Warm or cool light tones can change the vibe, from cozy to modern. The lighting complements your decor, making everything pop.
Choose energy-efficient LED strips, puck lights, or motion-activated fixtures based on your needs. Install dimmers or adjustable settings for ambiance control. Use waterproof or heat-resistant options in humid or kitchen environments. Combine multiple types of lighting for layered effects.
Plan your lighting layout to evenly illuminate all areas. Install fixtures securely into ceilings, walls, or shelves, following manufacturer instructions. Use remote controls or smart systems for convenience. Test the lighting at different times of day and adjust as needed. Regularly check for flickering or dimming.
Decorate fixtures with covers, diffusers, or decorative trims to match your style. Use color-changing LEDs for mood lighting or highlight specific zones. Incorporate motion sensors to turn lights on automatically. Add small, battery-powered puck lights for portable accent lighting.
Bright, well-placed lighting transforms your pantry into a welcoming, functional space. It saves time and reduces frustration, especially in low-light conditions. Once installed, you’ll love how much easier and more inviting your pantry feels—lighting truly makes a difference.
Conclusion
With these diverse small walk-in pantry ideas, you can create a customized storage space that meets your needs and complements your home’s style. Whether you opt for pull-out shelves, hanging organizers, or clever use of vertical space, the possibilities are endless. Don’t hesitate—start implementing these ideas today and enjoy a more organized, efficient kitchen. Your perfect pantry is just a few creative steps away!
Leave a Reply