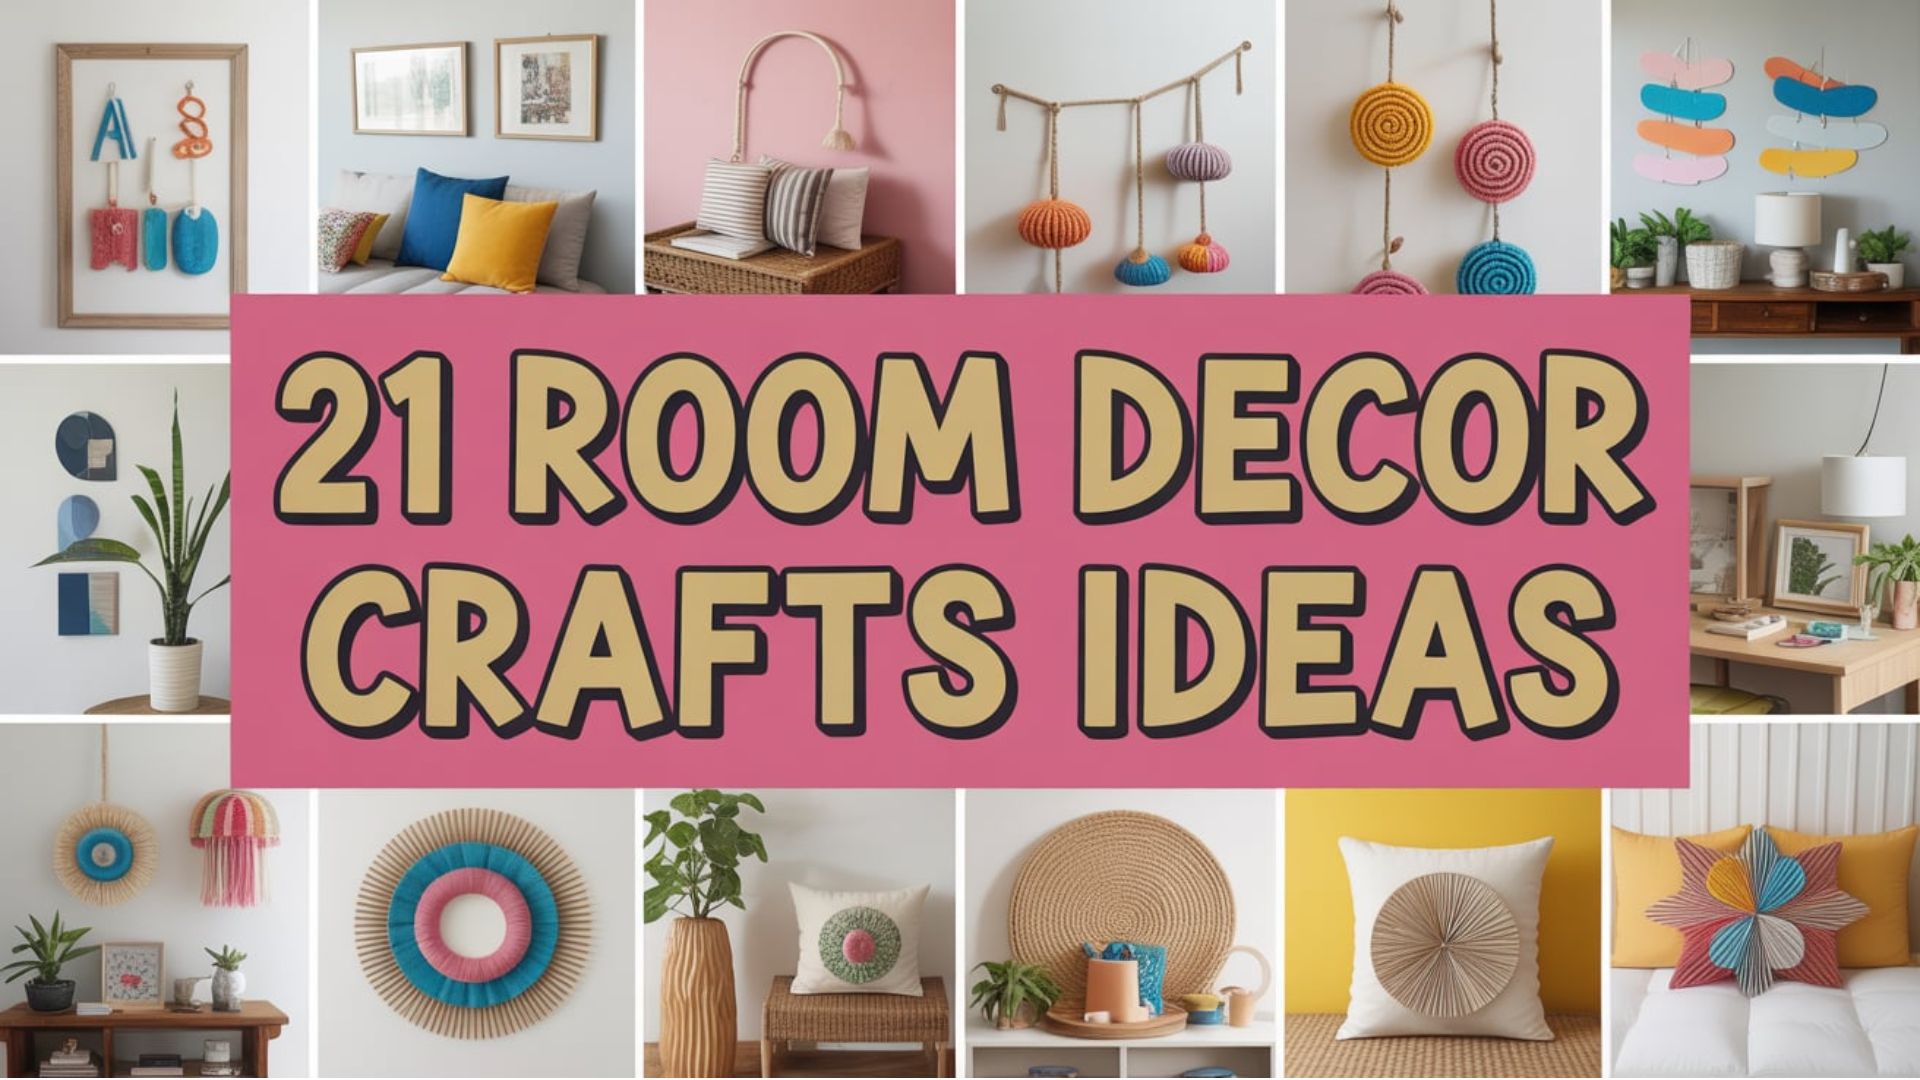
21 Room decor crafts Ideas to Elevate Your Home Style
I have been, or can be if you click on a link and make a purchase, compensated via a cash payment, gift, or something else of value for writing this post. As an Amazon Associate, I earn from qualifying purchases. Please read my full Affiliate Disclosure for more information.
Ever wondered how a simple craft project can transform your entire living space? Room decor crafts have become wildly popular because they offer a fun, affordable way to add personality, warmth, and style to any home. Whether you’re a DIY enthusiast or just looking for creative ways to refresh your decor, these handcrafted touches allow you to express your unique taste while saving money and creating meaningful, personalized accents.
In this article, you’ll discover a wealth of inspiring ideas and practical tips to elevate your home’s aesthetic with easy-to-make decor crafts. From boho wall hangings and chic painted furniture to cozy rope rugs and decorative lighting, we’ve curated a diverse range of projects suitable for all skill levels. Get ready to unleash your creativity and turn everyday items into stunning home accents that truly reflect your style!
1. DIY Macramé Wall Hangings for Boho Charm
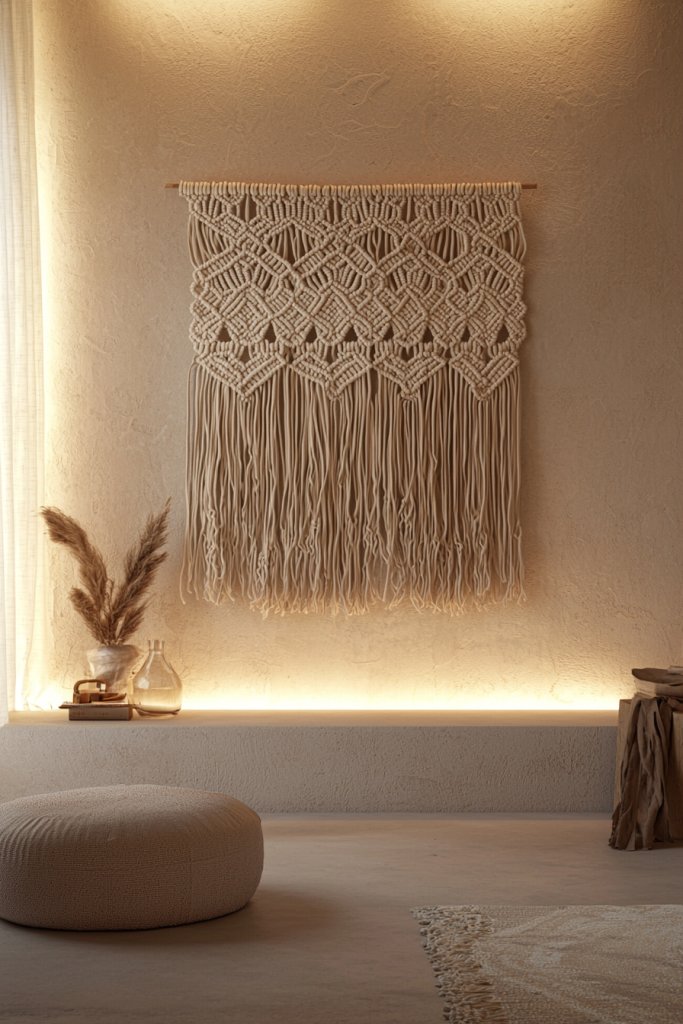
Adding a DIY macramé wall hanging instantly introduces a relaxed, bohemian vibe to any room, making your space feel warm and inviting. These handcrafted textiles serve as both art and conversation pieces, elevating your decor with texture and personality.
Recommended Products to replicate this idea
| # | Preview | Product | |
|---|---|---|---|
| 1 |

|
NOANTA Natural Macrame Cord 3mm x 109Yards, Beige Macrame Rope, Cotton Cord for Wall Hanging, Plant... | Check Latest Price |
| # | Preview | Product | |
|---|---|---|---|
| 1 |
|
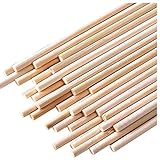
HOPELF 25PCS Wooden Dowel Rods - 1/4 x 12 Inch Bamboo Sticks - for Crafts, Cake Dowels and DIY... | Check Latest Price |
Imagine a large, intricate piece crafted from soft, cream-colored cotton cords, knotted into geometric patterns and fringed at the bottom. It hangs gracefully against a neutral wall, with the tactile cords inviting touch.
The knots create subtle shadows that dance across the surface, adding depth, while the natural fiber scent subtly fills the air. The overall effect is cozy yet stylish, perfectly suited for a chill living room or bedroom corner.
To create your own macramé wall hanging, start by choosing a sturdy wooden dowel or driftwood as your support. Cut lengths of cotton cord (about 3-4 times the desired finished length).
Use basic knotting techniques like square knots and half-hitches to form your design—numerous tutorials are available online for beginners. Secure your cords to the dowel with lark’s head knots, then proceed with your pattern, adding fringe at the end. Finish with a neat trim, and hang it on a prominent wall for instant boho charm.
2. Upcycled Fabric Banners to Add Color and Texture
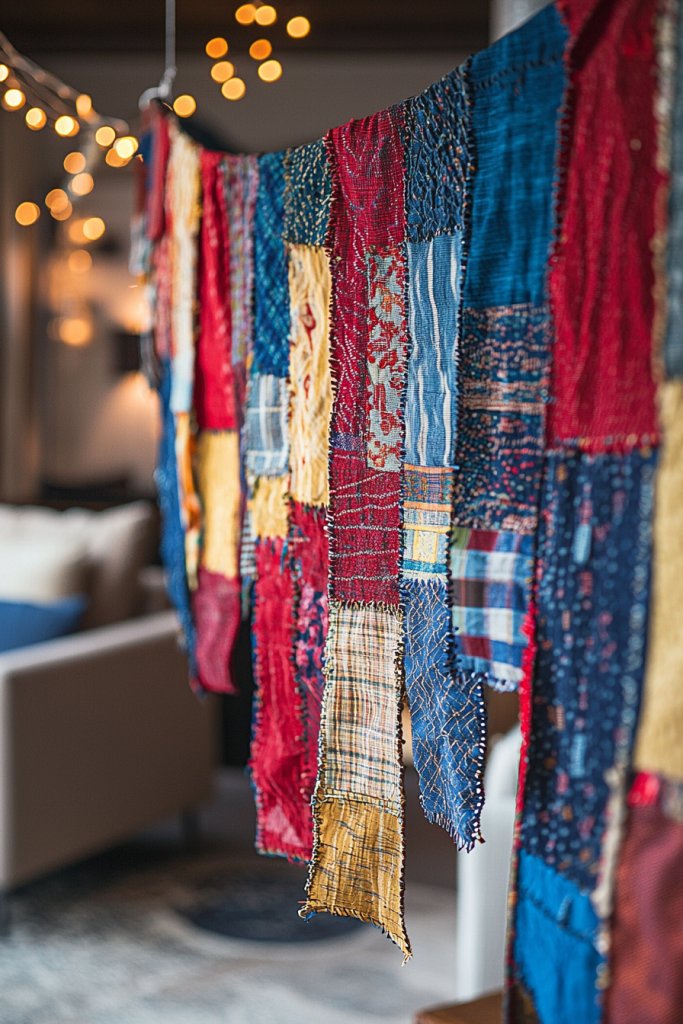
Crafting upcycled fabric banners is a fantastic way to introduce vibrant color and playful texture into your home while giving new life to old textiles. These banners are perfect for celebrations or everyday decor, adding a personalized, artsy touch.
Recommended Products to replicate this idea
| # | Preview | Product | |
|---|---|---|---|
| 1 |
|
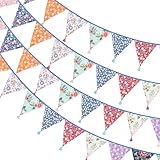
G2PLUS 10.8Ft Cotton Triangle Bunting Banner – 12pcs Multicolor Floral Fabric Pennant Flag with... | Check Latest Price |
| # | Preview | Product | |
|---|---|---|---|
| 1 |

|
XFasten Fluorescent Flagging Tape Assorted Colors 12-Pack Colorfast Survey Tape (Orange Green Blue... | Check Latest Price |
Picture a cascade of fabric triangles or rectangles in cheerful hues—mustard yellow, blush pink, deep teal—strung along a rustic jute or satin ribbon. The fabrics vary in texture, from smooth cotton to cozy flannel, giving the banner a dynamic, layered look.
As sunlight filters through, the different materials create a lively, textured visual, while the gentle sway adds movement and a sense of whimsy. It’s a cheerful, inviting focal point that can brighten up any wall or window frame.
To make your own, gather recycled fabric scraps or old clothing, cut them into uniform shapes, and attach each piece to a length of sturdy ribbon or twine using hot glue or sewing techniques. Mix and match patterns and textures for a lively effect, or keep it monochrome for a more subdued look. Hang your banner across a mantel, wall, or window, and enjoy a quick, budget-friendly decor upgrade that’s full of personality.
3. Handmade Ceramic Vases and Centerpieces
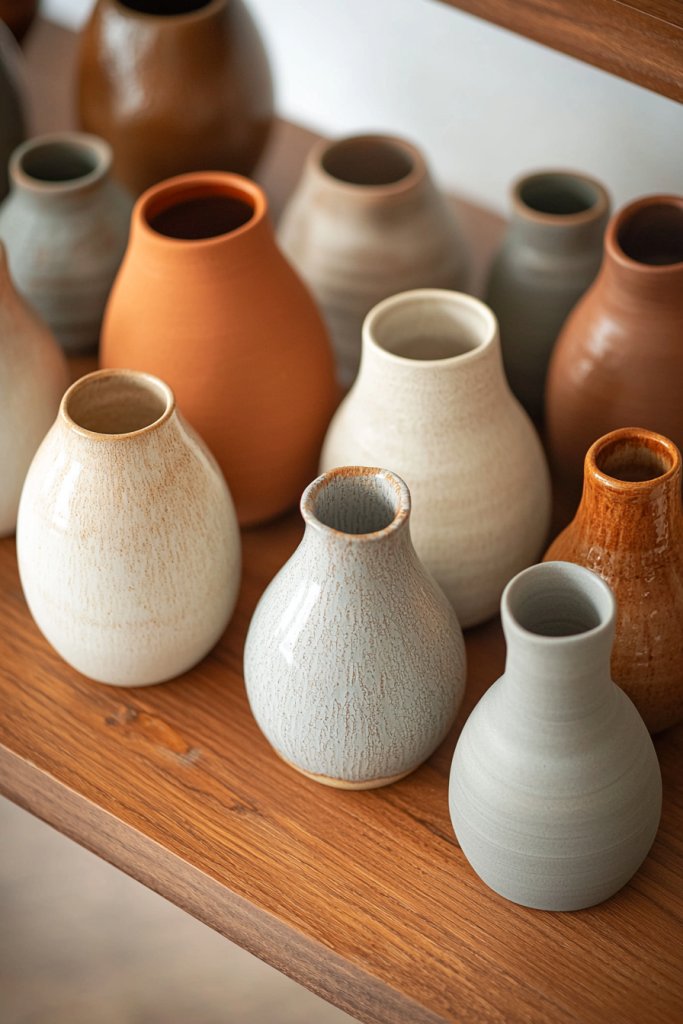
Custom ceramic vases and centerpieces bring a handcrafted, artisanal touch to your decor, infusing warmth and individuality into your space. These pieces serve as both functional containers and statement decor objects.
Recommended Products to replicate this idea
| # | Preview | Product | |
|---|---|---|---|
| 1 |

|
Vanselia Ceramic Flower Vase Home Decor - Farmhouse Table Vases Rustic Vintage Living Room Kitchen... | Check Latest Price |
| # | Preview | Product | |
|---|---|---|---|
| 1 |

|
Amitofo Free-Form Edge Small Ceramic Bowl with Handles, Retro Distressed Style Glazed for Fruit... | Check Latest Price |
Visualize a set of ceramic vases in soft, earthy tones—terracotta, matte white, or speckled gray—with subtle texture from hand-formed ridges or smooth finishes. They sit on a wooden table or shelf, holding dried flowers, branches, or even standing alone as sculptural elements.
The tactile quality of the ceramics invites touch, while their muted colors complement natural or modern decor styles. These handcrafted pieces evoke a cozy, curated aesthetic that feels both timeless and unique.
To create your own, start with inexpensive clay or pre-made ceramic blank forms. Use simple hand-building techniques like pinching or coiling to shape your vases, then smooth or texture as desired.
Finish with non-toxic glazes in your chosen colors, and fire in a kiln—many local studios offer beginner classes or firing services. Alternatively, customize plain ceramic pieces from craft stores with acrylic paints or decals for a DIY approach. Once glazed and fired, display your vases with fresh or dried botanicals for a personalized touch that elevates any room.
4. Customized Wooden Wall Art with Stenciled Designs
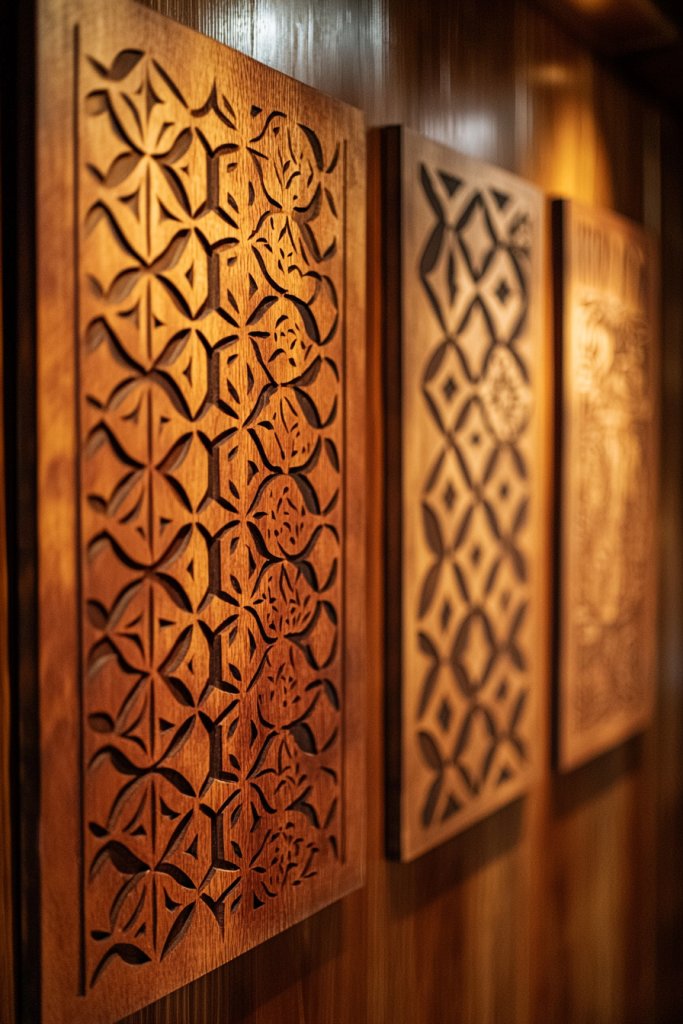
Personalized wooden wall art combines rustic charm with modern design, making it a versatile decor piece that adds warmth and character. Custom stenciling allows you to tailor the piece to your style and message.
Recommended Products to replicate this idea
| # | Preview | Product | |
|---|---|---|---|
| 1 |

|
3D Wooden Floral Bathroom Wall Decor (Set of 4) Lightweight, Ready-to-Hang Framed Wall Art For... | Check Latest Price |
| # | Preview | Product | |
|---|---|---|---|
| 1 |

|
Stencils for Painting on Wood, Reusable Flower Stencils Painting Crafts Templates Drawing Stencil... | Check Latest Price |
Imagine a reclaimed wood panel or plywood sheet painted in a neutral hue—white, soft gray, or natural wood tones. Over it, stenciled patterns or inspiring quotes in bold or delicate fonts stand out, accented with metallic or matte paints.
The grain of the wood shows through, adding texture, while the crisp stenciled design offers a clean, contemporary look. This piece can serve as a focal point over a sofa, bed, or entryway, blending rustic appeal with personalized flair.
To craft your own, select a wooden board (up to 24×36 inches), sand it smooth, and paint your background color if desired. Use stencils and acrylic or chalk paint to add your chosen design or message—painter’s tape can help with straight lines.
For more intricate patterns, consider using a cutting machine or hiring a local artist. Finish with a clear sealant for durability, then hang it with sturdy hooks or picture wire. This simple project offers a customizable and meaningful addition to your decor.
5. Creative Shelving with Painted Crate Boxes
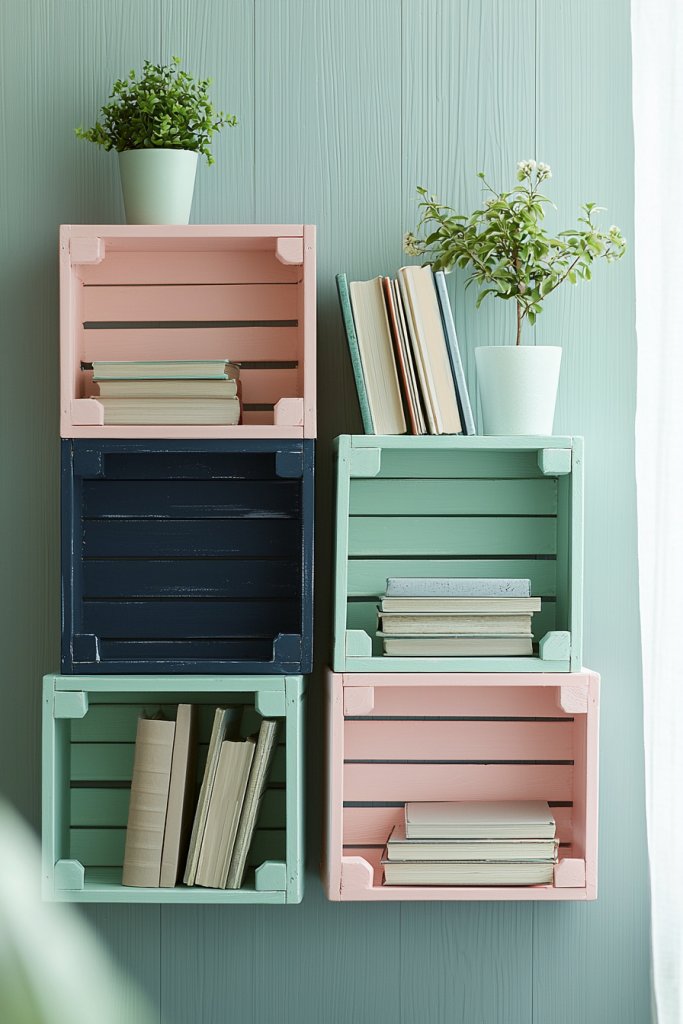
Transforming simple wooden crates into stylish shelving units is a fantastic way to add both storage and personality to your space. This idea offers a versatile and budget-friendly approach to organizing books, plants, or decorative objects while creating a striking visual feature.
Recommended Products to replicate this idea
| # | Preview | Product | |
|---|---|---|---|
| 1 |

|
Moicstiy 6 Pack Wall Hanger Fastener, Stainless Steel Wall Mount Brackets Hook with 25 mm Inner... | Check Latest Price |
| # | Preview | Product | |
|---|---|---|---|
| 1 |

|
BOY MCOWBOY Wooden Crates for Display 6 Pack Large Rustic Nesting Wooden Basket with Handle,... | Check Latest Price |
Picture a wall-mounted arrangement of vintage-style crate boxes painted in soft pastel shades like blush pink, mint green, or light gray. Each crate is stacked or hung in an eye-catching pattern, revealing the natural wood grain or a bold splash of color.
The textures of the painted surfaces contrast beautifully with the rustic edges of the crates, and the open fronts invite you to display curated collections of your favorite items. As light hits the surfaces, subtle shadows dance across the arrangement, adding depth to your wall.
This setup lends a cozy, eclectic charm that feels inviting and personalized, perfect for living rooms, bedrooms, or even kitchens. Getting started is simple.
First, gather wooden crate boxes—these can be purchased or repurposed from vintage stores or online marketplaces. Clean and lightly sand the surfaces, then choose your preferred paint colors—acrylic or chalk paint work well.
For a more durable finish, apply a clear sealant after painting. Decide on your layout and attach the crates to the wall using sturdy brackets or wall anchors. For a more dynamic look, mix different sizes and orientations, and add small decorative accessories inside to complete the display.
6. Decorated Mason Jars as Elegant Candle Holders
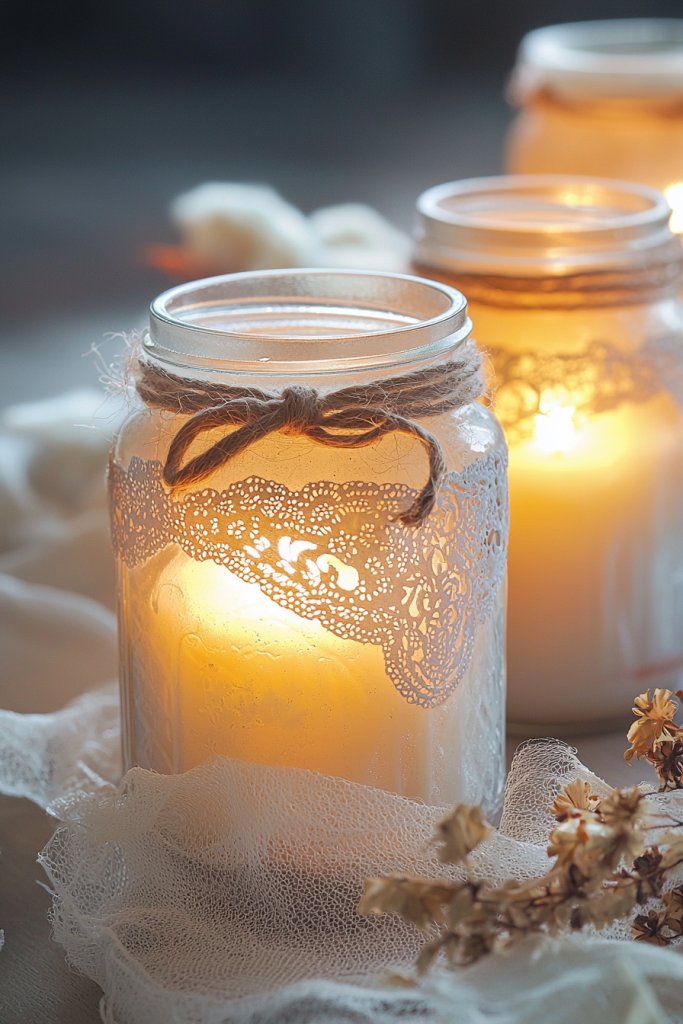
Mason jars are a charming, versatile craft supply that can be transformed into beautiful candle holders, instantly elevating your home’s ambiance with a warm, inviting glow. Their timeless appeal makes them a favorite for both rustic and modern decor styles.
Recommended Products to replicate this idea
| # | Preview | Product | |
|---|---|---|---|
| 1 |

|
NETANY 6-pack 16 oz Overnight Oats Containers with Lids, Glass jars with Airtight Lids, Wide mouth... | Check Latest Price |
| # | Preview | Product | |
|---|---|---|---|
| 1 |
|
Stonebriar Unscented Long Burning White Tealight Candles, Bulk Pack, 6-7 Hour Burn Time, Smokeless... | Check Latest Price |
Visualize a collection of clear Mason jars adorned with delicate metallic or fabric accents. Some might be wrapped with jute twine or lace ribbons, while others could feature hand-painted designs or faux botanical embellishments.
When filled with tea light or pillar candles, the jars cast flickering shadows that dance across nearby surfaces, creating a cozy atmosphere. The textured ribbons and subtle decorations add a touch of sophistication, making each jar look like a custom piece of decor.
Whether grouped on a dining table, mantle, or side table, these candle holders add a layer of warmth and charm to any room. To craft your own, start with clean Mason jars—available at most grocery or craft stores.
Wrap the rims with twine, ribbon, or burlap, securing with hot glue if needed. For a more artistic touch, use stencils and paint to add patterns or initials.
Insert small candles—preferably LED for safety—and arrange your jars in a cluster or line for maximum impact. You can also fill the jars with dried flowers, fairy lights, or decorative stones to customize their look further. These DIY candle holders make thoughtful, budget-friendly decor accents that bring a soft glow to your home.
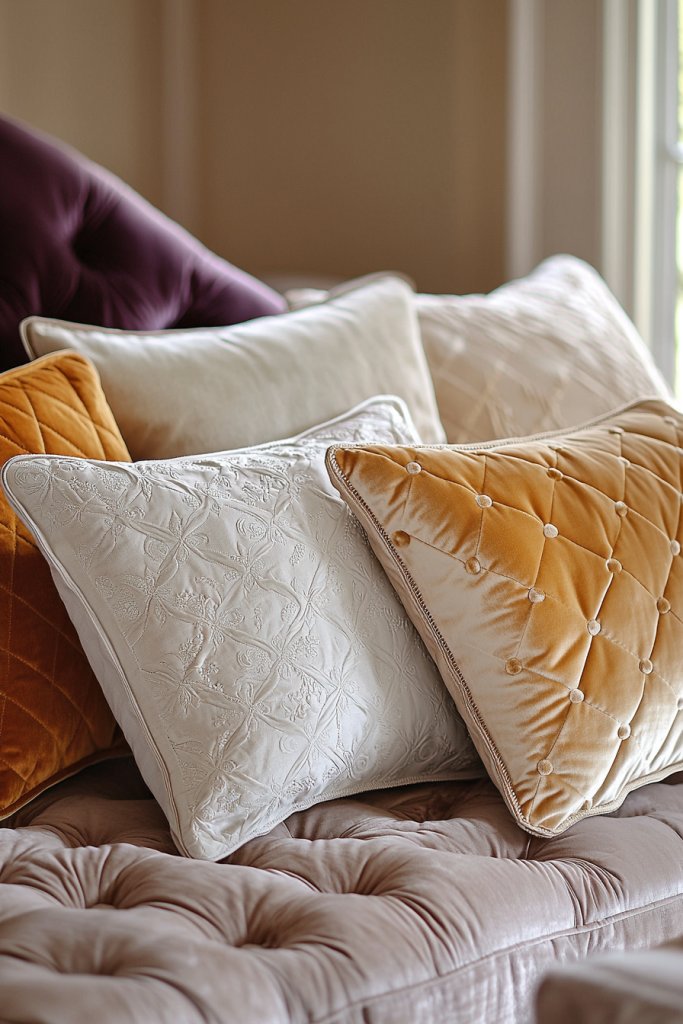
7. Elegant Fabric-Covered Throw Pillows with Unique Textures
Adding textured, fabric-covered throw pillows is one of the easiest ways to instantly refresh your living space and introduce a layer of comfort and style. Unique textures and carefully chosen fabrics can turn simple cushions into statement pieces.
Recommended Products to replicate this idea
| # | Preview | Product | |
|---|---|---|---|
| 1 |

|
MIULEE Pack of 2 Corduroy Decorative Throw Pillow Covers 18x18 Inch Soft Boho Striped Pillow Covers... | Check Latest Price |
| # | Preview | Product | |
|---|---|---|---|
| 1 |

|
Utopia Bedding 18x18 Pillow Inserts, Set of 2, White – Indoor Decorative Throw Pillows for Bed,... | Check Latest Price |
Imagine plush pillows in a rich velvet, chunky knit, or embroidered fabric, nestled on your sofa or bed. Think of a soft cream throw pillow with a chunky cable-knit cover, or a deep navy velvet cushion with subtle sheen that catches the light.
Combining different textures—smooth silk, fuzzy faux fur, or woven patterns—creates visual interest and a tactile experience that invites you to touch and relax. The color palette can be neutral for understated elegance or bold and vibrant for a lively pop of color.
These pillows not only add comfort but also serve as decorative focal points, making your space feel cozy yet stylish. To make your own, select fabric types based on your desired look and feel.
For beginners, pre-made pillow covers are available, or you can sew your own using simple patterns. Use inserts or old pillows as the filling, adjusting size for the perfect plumpness.
For a more textured effect, consider sewing in decorative elements like fringe, tassels, or embroidery. Cover the pillows with your chosen fabrics, then arrange them on your sofa or bed, mixing textures and colors for a layered, inviting look. This DIY project is accessible, customizable, and instantly elevates your home decor.
8. Painted Furniture Accents to Refresh and Style
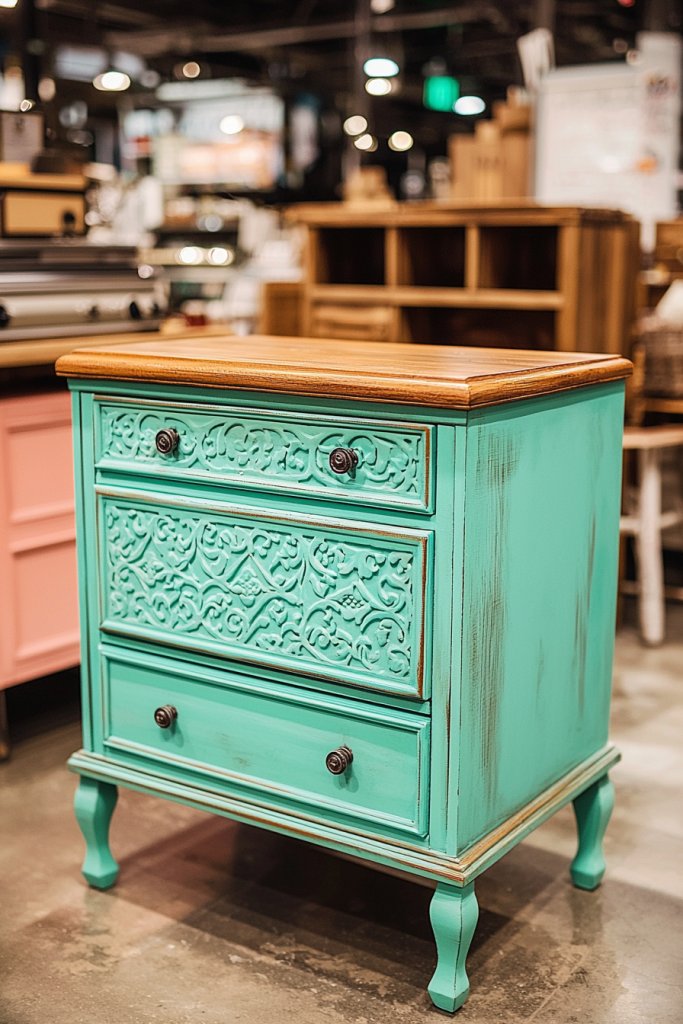
Giving your existing furniture a fresh coat of paint is an easy, transformative way to update your home decor with minimal cost and effort. Adding painted accents—like stenciled details or bold color blocks—can breathe new life into tired pieces and complement your overall aesthetic.
Imagine a classic wooden side table or dresser painted in a soft pastel hue such as blush pink or muted teal. You might add geometric patterns or stenciled motifs in contrasting shades to create visual interest.
The texture of the paint can be matte, satin, or even chalky to match your style. These painted accents create a focal point, tie your room’s color palette together, and give your furniture a modern or vintage-inspired look.
The result is a cohesive, stylish space that feels both curated and personal. To implement, choose a piece of furniture that needs a refresh—like an old chair, table, or cabinet.
Sand lightly to smooth any rough areas, then wipe clean. Use primer if necessary, especially for dark or glossy surfaces.
Select your paint colors—latex or chalk paint are popular choices—and apply with brushes or rollers, using painter’s tape to create clean lines or patterns. Finish with a clear sealer or wax for durability. This simple DIY can be done over a weekend and offers a satisfying way to personalize your home while saving money on new furniture.
9. DIY Rope Rugs for Cozy and Stylish Floors

Transforming a plain floor into a warm, inviting space can be effortlessly achieved with a handmade rope rug. This craft adds texture and a splash of rustic charm, perfect for living rooms, bedrooms, or cozy reading nooks.
Recommended Products to replicate this idea
| # | Preview | Product | |
|---|---|---|---|
| 1 |

|
Nourison Home Courtyard Jute 9' x 12' Area Rug - Easy Clean, Non Shedding, Bed Room, Living Room,... | Check Latest Price |
| # | Preview | Product | |
|---|---|---|---|
| 1 |
|
GORILLA GRIP Strong Rug Pad Gripper, US Designed, Grips Help Keep Area Rugs Safe and in Place, Slip... | Check Latest Price |
It’s a simple project that makes a big visual impact, especially when crafted with love. Imagine a thick, chunky rug woven from natural jute or cotton ropes, arranged in a circular or rectangular shape.
The ropes are tightly coiled and stitched together with strong, matching thread, creating a plush surface that feels soft underfoot. The natural fibers lend an earthy tone, while colorful dyed ropes can add a playful pop of color.
The texture invites touch, and the handmade quality adds personality to any room. Whether you choose a neutral beige, warm terracotta, or vibrant hues, this rug becomes a focal point that complements boho, coastal, or modern decor styles.
To make your own rope rug, gather jute or cotton ropes, a hot glue gun or heavy-duty needle and thread, and a non-slip rug backing (or double-sided tape). Start by coiling the ropes tightly into your chosen shape, securing each layer with glue or stitching as you go.
For added durability, attach a backing material underneath. If you’re new to sewing, hot glue provides a quick, secure option. This project is budget-friendly and highly customizable, allowing you to experiment with colors and sizes that fit your space perfectly.
10. Decoratively Wrapped String Lights for Ambient Glow
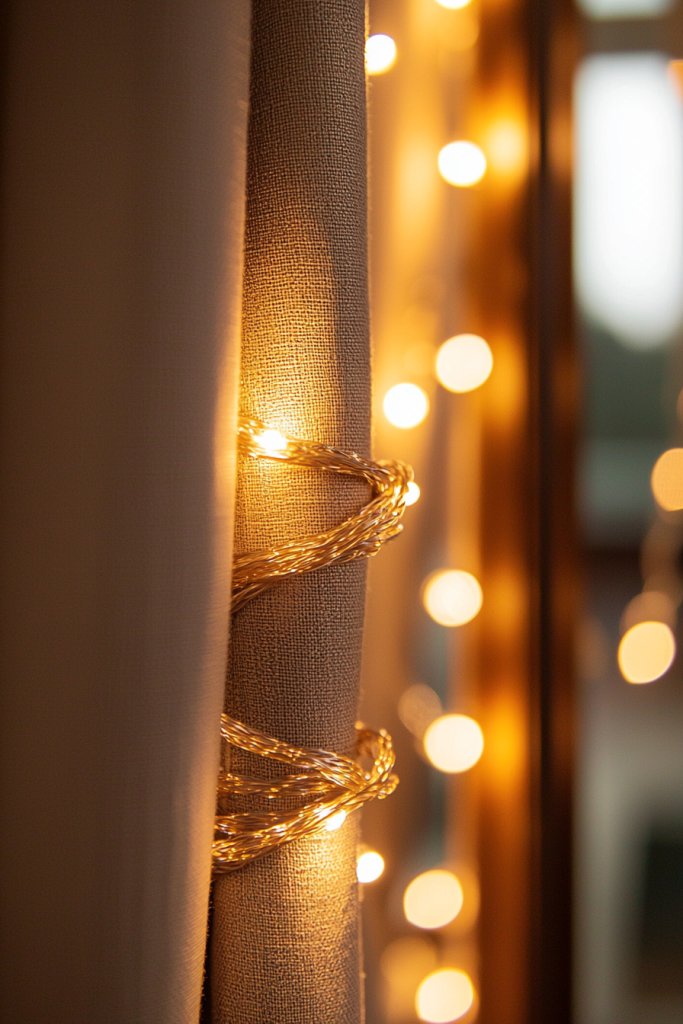
Elevate your room’s atmosphere with beautifully wrapped string lights that add a soft, cozy glow. This craft transforms simple fairy lights into eye-catching decor, perfect for creating warm ambiance in beds, shelves, or wall corners—ideal for relaxing evenings or festive occasions.
Visualize delicate, warm-white or color-changing LED string lights wrapped around a decorative object like a wicker basket, glass jar, or driftwood branch. The lights are evenly spiraled, with the wires hidden beneath twine, colorful yarn, or metallic ribbon, giving a textured, layered look.
You might also incorporate beads, shells, or small charms along the string for added visual interest. The result is a charming, handcrafted piece that radiates a gentle, inviting light, casting subtle shadows and creating a dreamy, intimate space.
The overall effect is both rustic and whimsical, blending natural textures with gentle illumination. To create your own decorative string lights, you’ll need LED string lights, twine or yarn, and optional decorative elements like beads or shells.
Carefully wrap the lights around your chosen object, securing the wire at intervals with small dots of hot glue or by weaving it into the twine. If you want to hang the lights on a wall or ceiling, attach the wrapped object with command hooks or suction cups for easy removal. This project is quick, inexpensive, and highly customizable to match your decor style, whether boho, coastal, or modern chic.
11. Handcrafted Clay or Resin Coasters with Artistic Designs
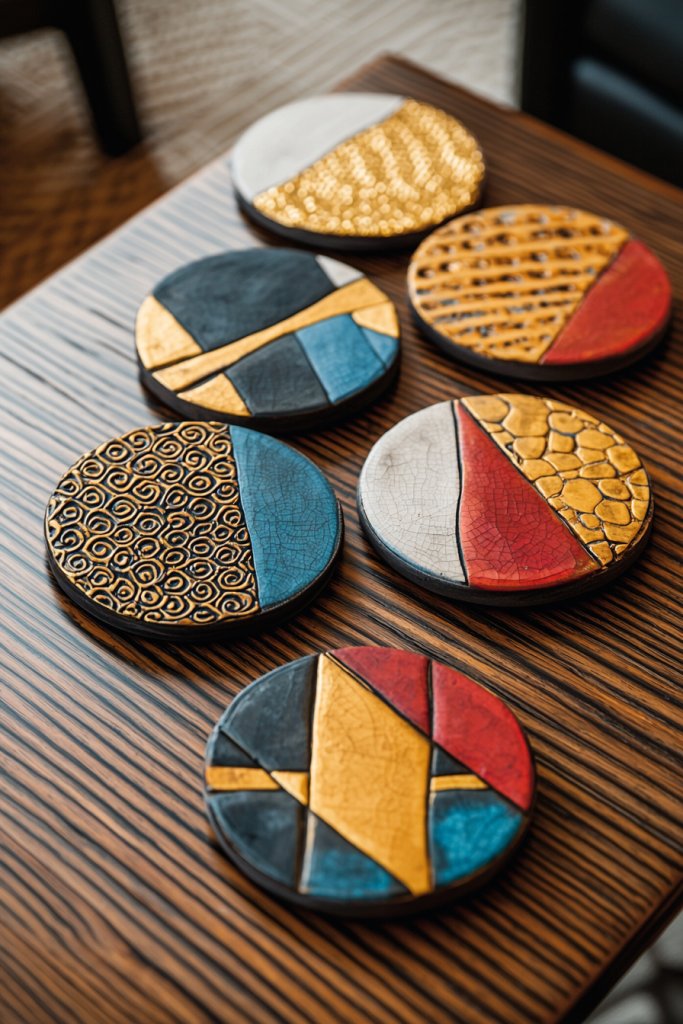
Adding personalized coasters to your home protects surfaces while showcasing your creative flair. Handcrafted from clay or resin, these coasters serve as functional art pieces, elevating your coffee table or dining space with unique, artistic designs.
Recommended Products to replicate this idea
| # | Preview | Product | |
|---|---|---|---|
| 1 |

|
LET'S RESIN 18 Pcs Coaster Resin Molds Silicone, Coaster Molds with Round Square Octagon Shape... | Check Latest Price |
| # | Preview | Product | |
|---|---|---|---|
| 1 |
|
LET'S RESIN 18 Pcs Coaster Resin Molds Silicone, Coaster Molds with Round Square Octagon Shape... | Check Latest Price |
Picture a set of square, round, or hexagonal coasters with vibrant colors, marbled patterns, or textured surfaces. Clay coasters are soft to the touch, with smooth or embossed details, while resin coasters can capture intricate designs like pressed flowers, metallic flakes, or abstract swirls.
The edges are polished for a sleek finish, and the surface can be sealed for durability. These coasters become conversation starters, blending practicality with a touch of artistry.
Whether you opt for minimalist monochrome styles or bold, colorful patterns, they add a custom touch to your decor. To craft your own coasters, gather air-dry clay or epoxy resin, molds or silicone mats, acrylic paints, pigments, or pressed decorations, and sealant spray.
Shape the clay into your desired form, decorating with stamps or textures before drying. For resin, mix according to instructions, pour into molds, and embed decorations if desired.
Once hardened, sand edges for a smooth finish and seal the surface for water resistance. This project is accessible for beginners with patience and allows you to customize designs to match your room’s aesthetic.
12. Framed Textile Art Using Tapestry or Embroidery
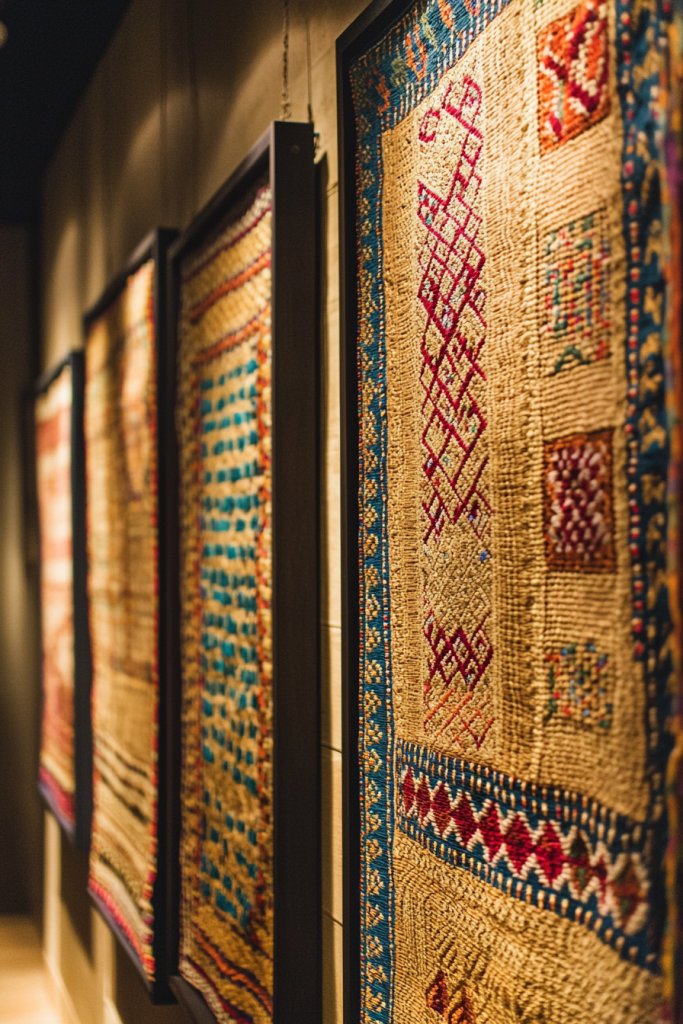
Elevate your wall decor with framed textile art—an easy way to introduce texture, color, and a handmade touch to any room. Whether a woven tapestry, embroidered piece, or fabric collage, this craft adds warmth and personality to your walls.
Recommended Products to replicate this idea
| # | Preview | Product | |
|---|---|---|---|
| 1 |
|
Janinka Embroidery Hoop 3 Pcs Cross Stitch Hoops and Frames White Rectangular Cross Stitch... | Check Latest Price |
| # | Preview | Product | |
|---|---|---|---|
| 1 |

|
Primitives by Kathy Gypsy Hand Woven Wall Hanging, 14" x 25", Yellow/Green, 8541857714 | Check Latest Price |
Imagine a vibrant, patterned fabric or an intricate embroidery scene stretched within a stylish frame. The textile features rich textures—knitted, woven, or embroidered with thread, beads, or metallic accents—creating a tactile, visual focal point.
Soft, muted tones like blush pink, warm terracotta, or cool teal work well, but bold patterns and vibrant colors can make a statement. Framing the textile elevates it, giving it a gallery-quality appearance that beautifully complements modern, boho, or eclectic decor styles.
To create your own textile art, you’ll need fabric or textile pieces, embroidery floss, yarn, or beads, a sturdy frame or embroidery hoop, and basic sewing or embroidery tools. Start by selecting a fabric that suits your style, then add embroidered or woven details.
Stretch the finished piece within the frame or hoop, ensuring it’s taut and smooth. For a polished look, attach the textile to a backing board before framing. This project is beginner-friendly and encourages creativity, offering a personalized art piece that adds texture and depth to your home.
13. Decorated Mirror Frames with Beads, Shells, or Paint
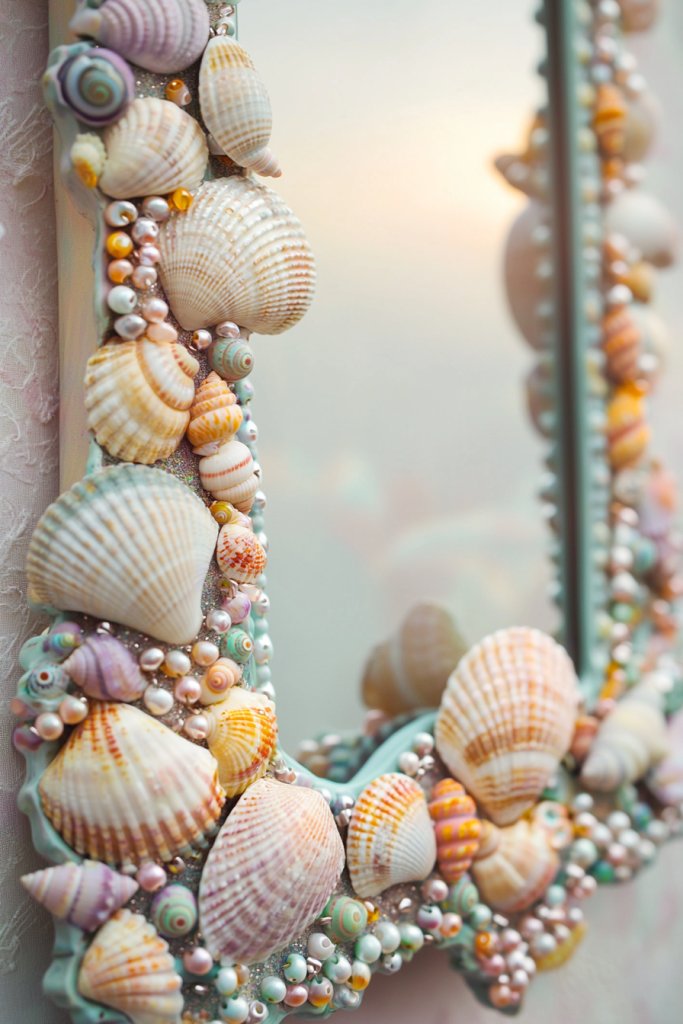
Transforming a simple mirror into a decorative masterpiece is a fantastic way to add personality and charm to your space. Embellishing mirror frames with beads, shells, or paint creates a custom look that complements your decor style—be it coastal, boho, or glam.
Visualize a plain frame painted in a soft matte hue like blush pink or matte black, then decorated with clusters of beads, seashells, or metallic accents glued along the edges. You might also use glitter or metallic paint to highlight intricate details or create patterns.
The embellishments add texture and visual interest, framing your reflection with a bespoke touch. The overall effect is a statement piece that captures attention and elevates the room’s aesthetic, whether placed in a bedroom, entryway, or bathroom.
To decorate your mirror frame, gather a plain mirror with a suitable frame, hot glue or craft adhesive, beads, shells, metallic paints, and brushes. Clean the frame thoroughly, then plan your design layout.
Attach beads or shells with glue, ensuring they’re securely fixed and evenly spaced if desired. For painted accents, carefully apply metallic or glitter paint with a fine brush.
Allow everything to dry completely before rehanging. This straightforward project is perfect for adding a personalized, textured touch to your mirrors without needing advanced skills.
14. Modern Geometric Wall Sculptures with 3D Elements
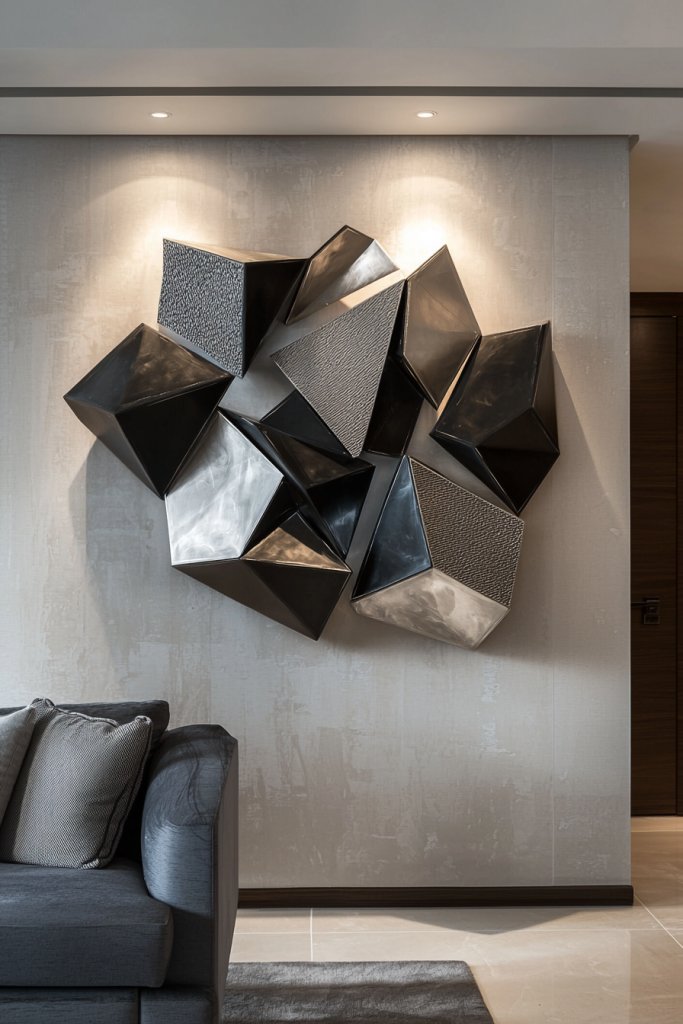
Adding a modern geometric wall sculpture can instantly elevate your home’s aesthetic with a bold, contemporary statement. These pieces bring depth and texture, transforming a flat wall into an eye-catching focal point that combines art and design seamlessly.
Recommended Products to replicate this idea
| # | Preview | Product | |
|---|---|---|---|
| 1 |

|
Glamativity 4 Pack Black Abstract Metal Wall Art, Minimalist Décor Single Line Art Wall Décor, 3D... | Check Latest Price |
| # | Preview | Product | |
|---|---|---|---|
| 1 |
|
3D Wooden Floral Bathroom Wall Decor (Set of 4) Lightweight, Ready-to-Hang Framed Wall Art For... | Check Latest Price |
Imagine a large, multi-layered sculpture composed of interconnected geometric shapes—triangles, hexagons, and polygons—crafted from materials like metal, wood, or acrylic. The sculpture’s colors might range from sleek matte black and metallic gold to soft neutrals, creating a sophisticated contrast against a crisp white or muted wall.
The 3D elements cast subtle shadows as natural light filters in, adding visual interest and a sense of movement. Textures vary from smooth, polished surfaces to rough, carved details, offering a tactile dimension that invites touch.
The overall effect is a modern, dynamic piece that adds depth and sophistication to any room. To create your own geometric wall sculpture, start by selecting your preferred materials—wood, foam board, or lightweight metal sheets work well for DIY projects.
Sketch out your geometric design on paper or directly onto the backing surface. Cut out the shapes with a craft saw, box cutter, or scissors, then assemble them using strong adhesive, mounting brackets, or nails.
For a sleek finish, paint the pieces in your chosen colors or leave them in their natural state for a more organic look. Mount the sculpture on your wall using appropriate anchors, ensuring it’s securely attached. This project is accessible for beginners with basic tools, and the result is a stunning, personalized decor piece.
15. Custom Painted Plant Stands and Holders (without live plants)
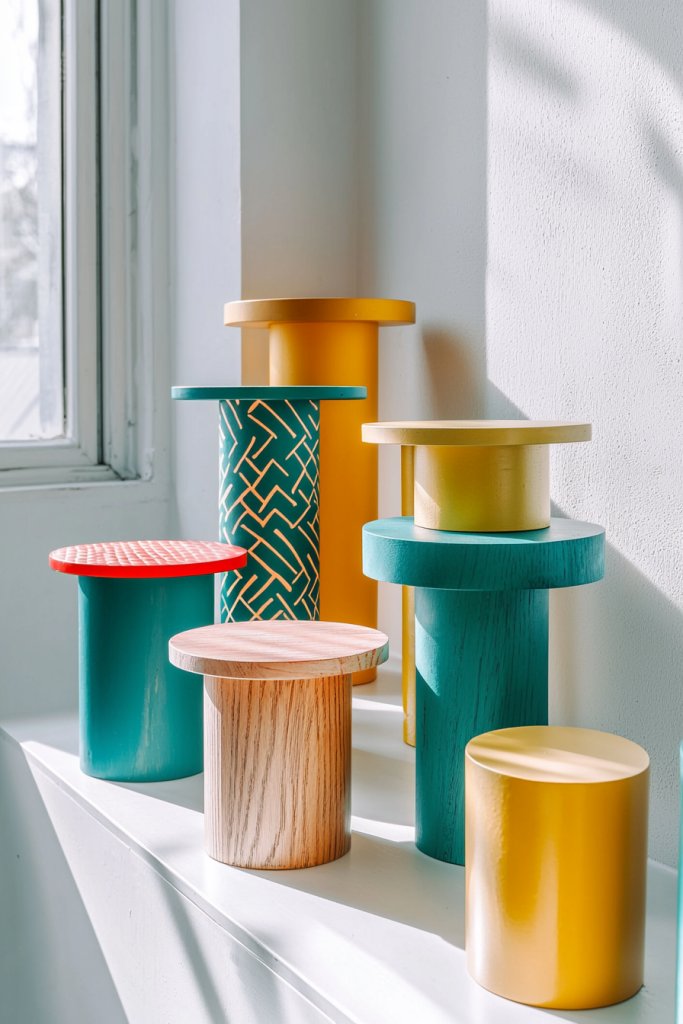
Custom painted plant stands and holders are a fantastic way to add color and personality to your decor, without the need for actual plants. They provide a stylish platform for showcasing decorative objects or faux greenery, offering a versatile and artistic touch to any space.
Recommended Products to replicate this idea
| # | Preview | Product | |
|---|---|---|---|
| 1 |

|
Bamworld Tall Plant Stand Indoor Outdoor, Corner Metal Flower Pot Stands for Multiple Plants, 4 Tier... | Check Latest Price |
| # | Preview | Product | |
|---|---|---|---|
| 1 |

|
Rnined Adjustable Plant Stand Indoor,Bamboo Mid Century Modern Plants Stands, Stable Plant... | Check Latest Price |
Picture a sleek, minimalist metal or wooden stand painted in vibrant shades like turquoise, blush pink, or matte black. The stand might feature geometric shapes or elegant curves, with a smooth or textured finish.
You can also decorate the surface with hand-painted patterns, gold leaf accents, or abstract designs to match your room’s aesthetic. These stands can be placed on side tables, shelves, or directly on the floor, creating a layered look that adds visual interest.
When paired with decorative objects such as ceramic sculptures, vintage vases, or faux plants, they enhance the overall style while keeping the space lively and fresh. To make your own, choose a small wooden or metal plant stand or a simple tray as your base.
Sand and clean the surface thoroughly, then prime it with a suitable base coat if needed. Use acrylic paints, spray paint, or stencils to add your preferred colors and patterns.
For added flair, apply gold or silver leaf accents or seal the paint with a clear protective coat. Once dry, place it on your chosen spot and style with your favorite decorative objects. This DIY project is straightforward, budget-friendly, and allows for endless customization to suit your decor style.
16. Decorative Wall Hooks with Artistic Mason Jars or Bottles
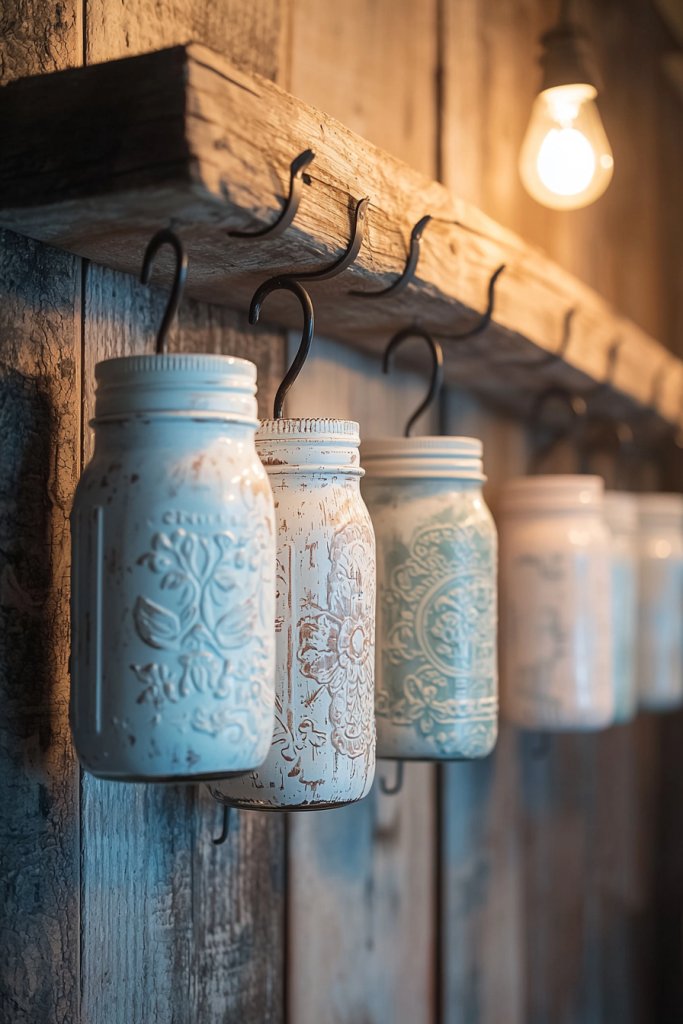
Transforming ordinary mason jars or bottles into decorative wall hooks creates a charming and functional accent that adds rustic or vintage flair to your home. These DIY hooks are perfect for hanging keys, jewelry, or lightweight decorative elements.
Recommended Products to replicate this idea
| # | Preview | Product | |
|---|---|---|---|
| 1 |

|
WEAXIO Stainless Steel Mason Jar Hangers (15 Pack) - Tool-Free Installation, Rustproof Wire Hooks... | Check Latest Price |
| # | Preview | Product | |
|---|---|---|---|
| 1 |

|
Goovilla Shelf Bracket, Heavy Duty Floating Shelf Brackets 6 inch Long, 6 Pack Brackets for Shelves,... | Check Latest Price |
Visualize a wall-mounted wooden board or metal backing, with mason jars or bottles secured upside down or hanging from custom brackets. The jars can be painted in soft pastel shades, metallic finishes, or left clear to showcase decorative fillers like fairy lights, dried flowers, or faux greenery.
The open mouths of the jars serve as hooks, or you can attach sturdy hooks or ribbons to the necks for hanging. When mounted on a wall, they create a whimsical display that combines practicality with aesthetic appeal.
The overall look is cozy, eclectic, and perfect for kitchens, entryways, or bedrooms. To craft your own, gather mason jars or bottles, along with wooden or metal backing panels.
Secure the jars using metal rings, wire, or custom brackets—these can be painted or left raw for a rustic look. Attach the backing to your wall with appropriate anchors and screws, ensuring stability.
Decorate the jars with ribbons, twine, or paint, and add your preferred fillers or hanging items. This project is simple, budget-conscious, and results in a personalized decor piece that combines vintage charm with creative flair.
17. DIY Wreaths Using Fabric, Ribbons, or Recycled Materials
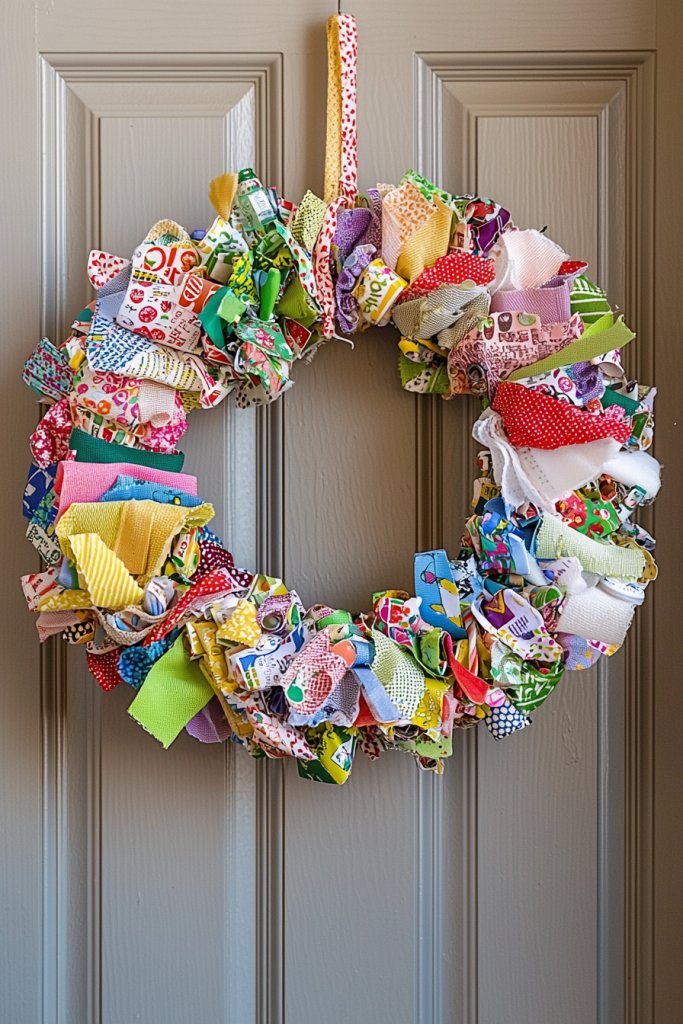
Creating your own wreath offers a wonderful opportunity to infuse your home with seasonal cheer or everyday charm, using sustainable materials and your personal style. These handcrafted wreaths serve as festive door decor or wall accents with a cozy, inviting vibe.
Recommended Products to replicate this idea
| # | Preview | Product | |
|---|---|---|---|
| 1 |

|
Upstout 2-Pack 14 Inch Wire Wreath Frame – Round Metal Wreath Form with Ring Design for DIY... | Check Latest Price |
| # | Preview | Product | |
|---|---|---|---|
| 1 |

|
Ribbons for Crafts - 30 Yd Pack Pastel Ribbon for Hair Ribbons for Girls Spring Ribbon Craft Fabric... | Check Latest Price |
Envision a circular base made from wire, foam, or grapevine, wrapped with fabric strips, ribbons, or recycled materials like old t-shirts, scarves, or paper. For a textured, layered look, choose fabrics in coordinating colors or patterns—think soft pastels, bold florals, or rustic plaids.
Embellish the wreath with buttons, dried flowers, burlap bows, or even small ornaments to enhance its visual appeal. The finished piece can be hung on a door, above a fireplace, or on a wall, bringing warmth and personality to your space.
Start by cutting your chosen materials into strips or shapes, then tie or glue them onto your wreath base, layering for fullness. Add decorative accents as desired, securing them with hot glue or wire.
For a more personalized touch, incorporate meaningful symbols or color themes that match your decor. Hanging your wreath with a simple ribbon or hook completes the project. This craft is accessible for all skill levels, eco-friendly, and allows endless customization to suit any season or style.
18. Handmade Poufs and Ottomans with Unique Covers
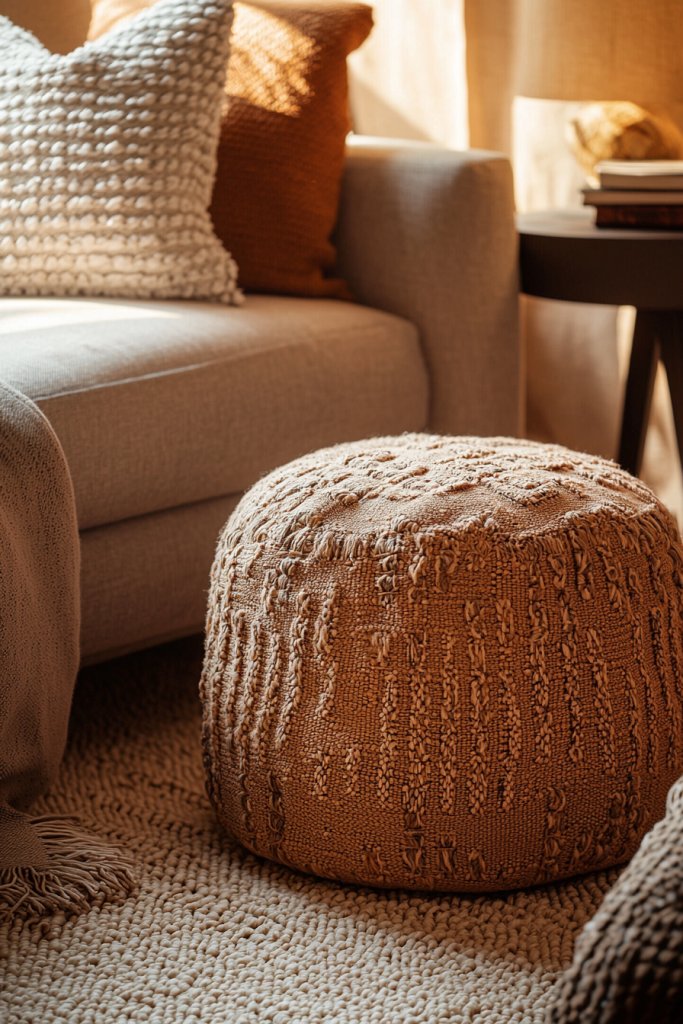
A handmade pouf or ottoman with a custom cover offers a versatile, cozy addition to any living space, perfect for extra seating, footrests, or accent pieces. Creating your own allows for personalization in color, texture, and fabric choice.
Recommended Products to replicate this idea
| # | Preview | Product | |
|---|---|---|---|
| 1 |

|
Sexysamba Square Corduroy Pouf Cover Only, 20"x 16" Unstuffed Decorative Ottoman Foot Stool Rest,... | Check Latest Price |
| # | Preview | Product | |
|---|---|---|---|
| 1 |

|
Welacer Shredded Memory Foam Filling 10lbs for Bean Bag Filler, Pillow Stuffing Cushion Arts Crafts... | Check Latest Price |
Visualize a soft, round or square cushion filled with lightweight foam or stuffing, wrapped in a bold patterned fabric, plush velvet, or chunky knit textile. The cover might feature embroidery, tassels, or piping details for added flair.
Imagine this piece nestled in a corner, inviting you to kick up your feet, or serving as a stylish seat in a reading nook. The textures can range from smooth and silky to tactile and chunky, with vibrant colors or neutral tones to match your decor.
The overall look is inviting, trendy, and handmade charm radiates from its craftsmanship. To make one, select your preferred fabric, foam, and stuffing.
Sew the fabric into a removable cover with a zipper or drawstring closure for easy cleaning. For a simple project, use a large round cushion insert and cover it with your chosen textile, sewing or gluing the edges for a snug fit.
Customize further with decorative trims or appliqué patches. Place your pouf on the floor or next to a sofa, and enjoy a cozy, personalized piece that elevates your room’s style effortlessly.
19. Artistic Tape and Paint Wall Borders or Patterns
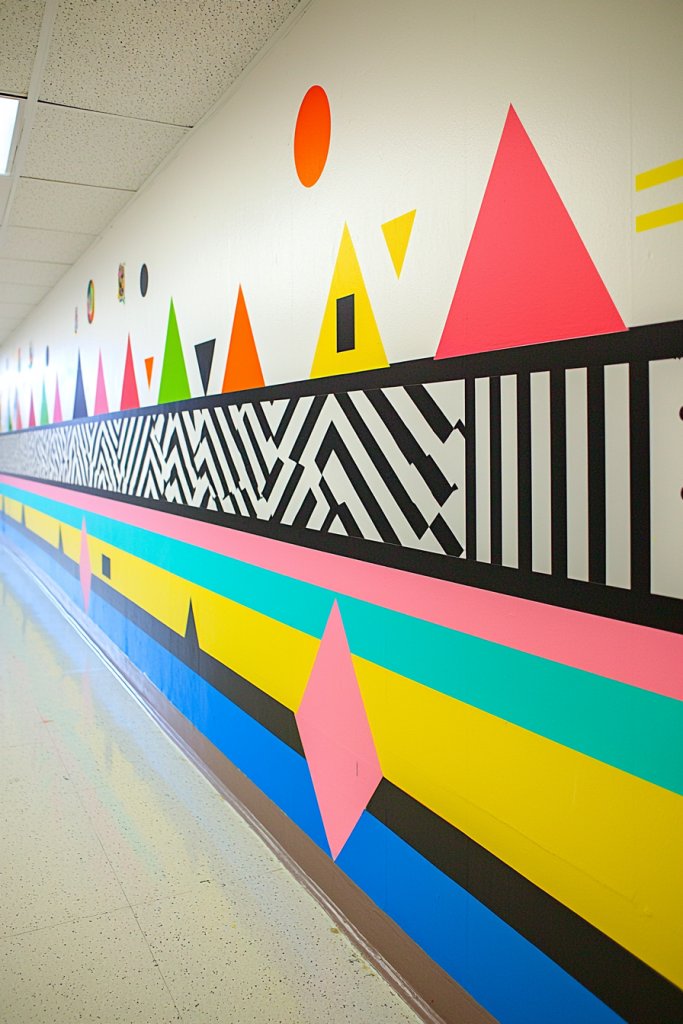
Transforming plain walls into stunning focal points is easier than ever with creative tape and paint techniques. This idea breathes new life into your space, adding personality and visual interest without the need for extensive renovations.
It’s perfect for anyone looking to make a bold statement or subtly define different areas in a room. Imagine a clean, crisp geometric pattern traced with painter’s tape in contrasting colors like navy and white, creating a modern, layered look.
Or picture delicate, hand-painted borders with metallic gold or soft pastel shades that frame your walls beautifully. The textures of the tape, combined with the matte or glossy paint finishes, add depth and dimension, while the design can be tailored to match your style—whether minimalist, boho, or eclectic.
The result is a dynamic, personalized backdrop that elevates your entire room aesthetic with a fresh, artistic vibe. Getting started is simple and budget-friendly.
First, choose your design—stripes, chevrons, or abstract shapes—and gather painter’s tape, painter’s brushes, and your preferred paint colors. Use a level and pencil to lightly sketch your pattern, then carefully apply the tape to create clean, sharp lines.
Paint over the taped areas with your chosen color, let it dry, and remove the tape to reveal your custom border or pattern. For a more intricate look, practice your design on paper beforehand, and always tape in small sections to ensure precision. This project is perfect for beginners and offers endless opportunities for creativity.
20. Creative Use of Washi Tape on Furniture and Walls
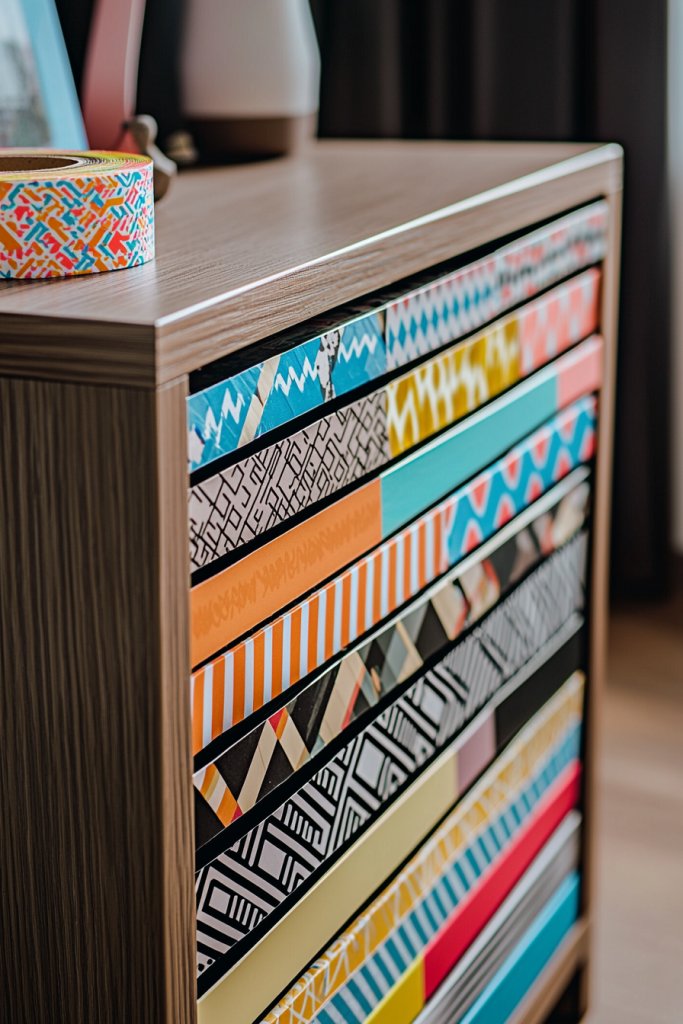
Washi tape is a versatile, decorative tape that opens up endless possibilities for personalizing your home decor. Its colorful, patterned designs can instantly elevate furniture and wall surfaces, making your space unique and lively.
Recommended Products to replicate this idea
| # | Preview | Product | |
|---|---|---|---|
| 1 |

|
Washi Tape Set 30 Rolls, Decorative Tape, Colored Tape, Scrapbook Tape, Craft Tape for Scrapbook... | Check Latest Price |
| # | Preview | Product | |
|---|---|---|---|
| 1 |
|
Mod Podge Spray Acrylic Sealer that is Specifically Formulated to Seal Craft Projects, Dries Crystal... | Check Latest Price |
It’s especially popular among Pinterest enthusiasts for its easy application and removal, allowing you to experiment without permanence. Visualize a sleek dresser or bookshelf adorned with bold, geometric stripes or delicate floral motifs created with washi tape in shades like blush pink, emerald green, and gold.
On walls, it transforms plain surfaces into artful displays—think borders, frames, or abstract patterns that add a pop of color and texture. The tape’s slightly translucent quality means it layers beautifully over painted or wallpapered surfaces, creating a rich, textured look.
When applied, it feels like a playful, curated gallery of vibrant designs that instantly refresh any room, from bedrooms to living areas. To achieve this look, start by gathering various washi tapes in your chosen colors and patterns.
Decide on your design—stripes, chevron, or random blocks—and use a ruler or painter’s level to keep lines straight. Carefully press the tape onto furniture or walls, smoothing out any bubbles or wrinkles.
For furniture, you can create accent stripes or borders, then seal with a clear acrylic spray for durability. For walls, consider framing sections or creating a feature wall with layered patterns. This craft requires minimal tools and skill, making it perfect for quick, impactful updates that are easily reversible.
21. DIY String Art to Create Inspirational or Abstract Wall Decor
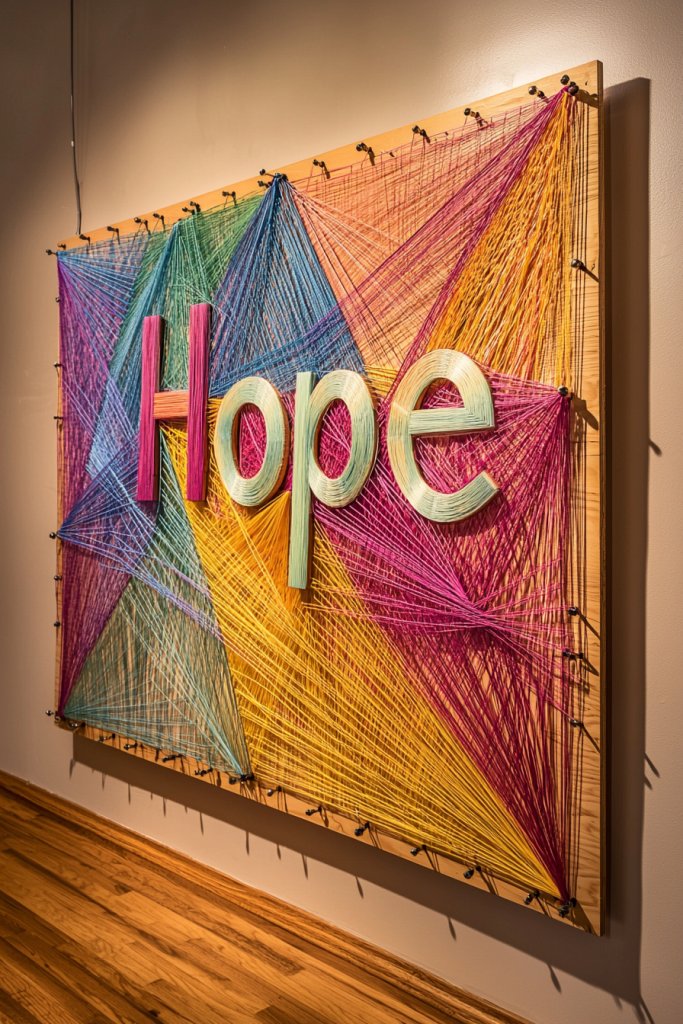
String art is a captivating craft that transforms simple geometric shapes or inspiring words into stunning wall art. With just a few materials, it’s a highly customizable way to add texture and personality to your space, making your walls more engaging and meaningful.
Recommended Products to replicate this idea
| # | Preview | Product | |
|---|---|---|---|
| 1 |

|
Ampersand Art Supply Hardboard Wood Painting Panel: Museum Series Hardbord, 12" x 16", 1/8 Inch Flat... | Check Latest Price |
| # | Preview | Product | |
|---|---|---|---|
| 1 |
|
Friendship Bracelet String 50 Skeins Rainbow Color Embroidery Floss Cross Stitch Embroidery Thread... | Check Latest Price |
Picture a large, wooden board with a heartfelt quote like “Dream Big” or an abstract, flowing design composed of colorful threads in shades of teal, coral, and gold. The textured strings crisscross across the frame, creating intricate patterns that catch the light and invite closer inspection.
The combination of smooth wood, vibrant thread, and precise nails creates a tactile and visual conversation piece. Whether minimalist or elaborate, this art form lends a handcrafted, artistic touch that feels both personal and stylish, perfect for living rooms, bedrooms, or home offices.
To make your own, start with a sturdy wooden board and a set of nails or pins. Sketch your design lightly with a pencil, then hammer the nails into the board along your lines.
Choose colorful embroidery threads or thick craft strings, and tie them onto the nails, weaving back and forth to fill in your pattern. Experiment with different colors and weaving techniques—tight, loose, layered—to achieve your desired look.
For added inspiration, incorporate metallic threads or incorporate small decorative beads. This project is accessible for beginners and offers endless opportunities for creative expression, turning simple materials into a stunning focal point.
Conclusion
With a diverse range of room decor crafts—from boho macramé hangings and upcycled banners to personalized wall art and functional DIY accessories—there are endless ways to infuse your home with creativity and style. These ideas empower you to transform your space into a reflection of your personality, all while enjoying the satisfying process of crafting.
Dive in and experiment with these projects to make your home uniquely yours. Get started today, and watch your space come alive with your personal touch!