I have been, or can be if you click on a link and make a purchase, compensated via a cash payment, gift, or something else of value for writing this post. As an Amazon Associate, I earn from qualifying purchases. Please read my full Affiliate Disclosure for more information.
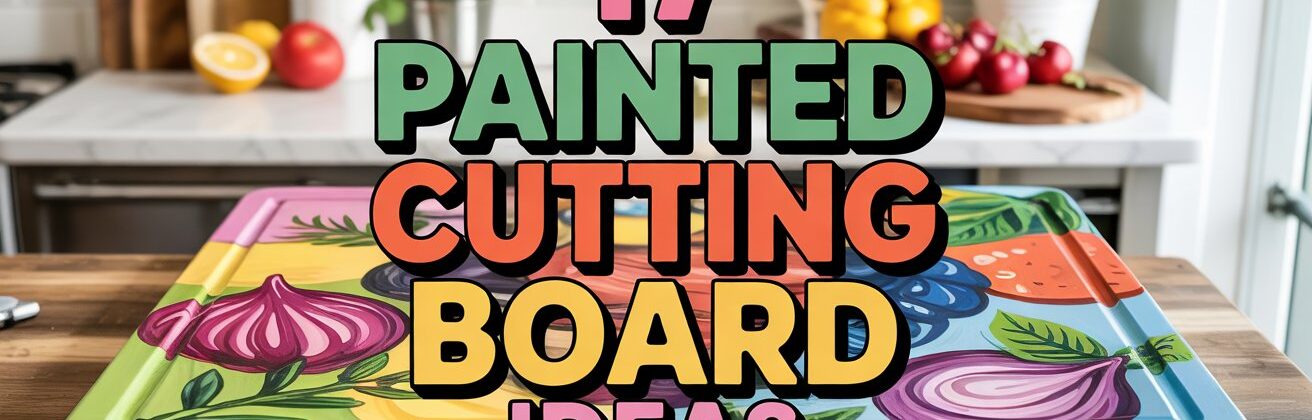
Imagine turning an everyday kitchen essential into a canvas of creativity and style — painted cutting boards have become a must-have for home decor enthusiasts! Their popularity skyrockets because they combine practicality with personal expression, adding a pop of color or artistic flair to your culinary space.
In this article, you’ll explore a variety of inspiring painted cutting board ideas that will elevate both your kitchen’s look and your cooking experience. From bold geometric patterns to delicate floral designs, there’s something here to suit every taste and skill level, making your kitchen uniquely yours.
1. Geometric Patterns in Bold Colors for Modern Flair
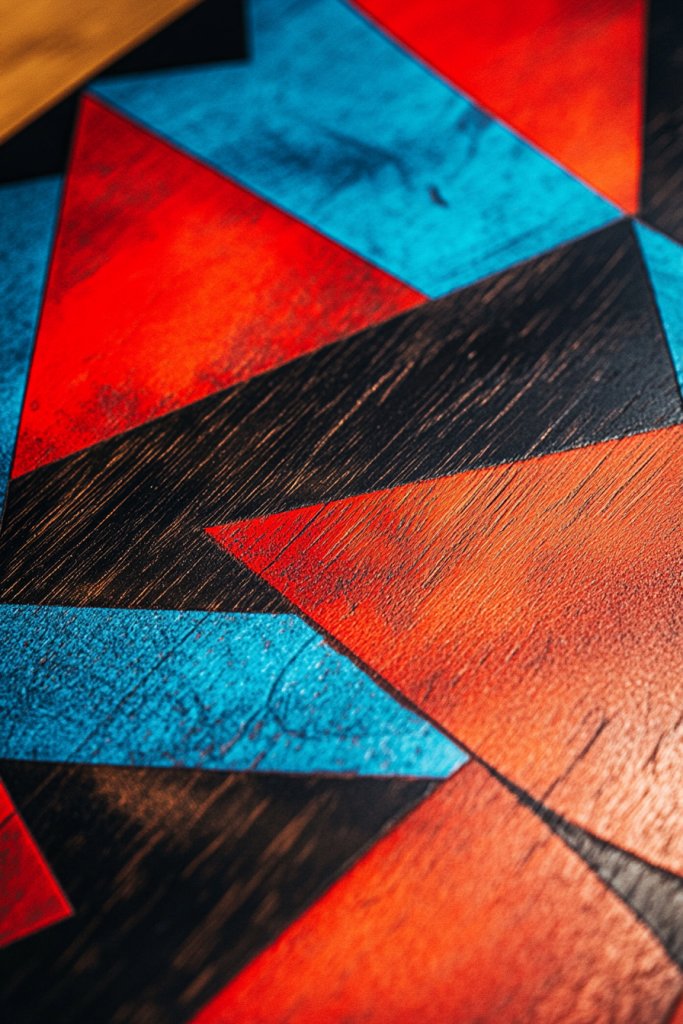
Ever get tired of the same old plain cutting boards that blend into the background? Want something that adds a punch of personality to your kitchen without sacrificing style? Geometric patterns in bold colors are the perfect way to turn a simple tool into a statement piece. They bring energy and modern flair that can elevate your entire culinary space. Plus, they make prep work a lot more fun.
Imagine a sleek wooden board with sharp, contrasting triangles in vibrant reds, blues, and yellows. The geometric shapes create a dynamic, eye-catching pattern that draws attention immediately. The clean lines and vivid colors pop against the natural wood grain, turning your boring chopping station into a mini gallery. The textured paint adds depth, making the design almost tactile. It’s like having a piece of contemporary art right on your countertop.
You can go bold with primary colors for a playful vibe or use metallic shades for a more sophisticated look. Smaller geometric motifs work well for compact boards, while larger designs suit bigger surfaces. Matching the color scheme to your kitchen palette creates a cohesive look, but contrasting hues can also make the pattern stand out. Seasonal updates—like red and green for holidays—are easy with this approach. The key is balancing the pattern with your overall decor.
Start by choosing a sturdy wooden or bamboo board as your canvas. Use painter’s tape to outline your geometric shapes precisely—triangles, hexagons, or diamonds—depending on your style. Select highly pigmented, water-based acrylic paints in your chosen colors, and apply with small brushes for sharp edges. Seal the design with a food-safe clear topcoat for durability. Patience is key; wait for each layer to dry before adding details or second coats. Finishing with a food-safe sealant preserves the vivid colors and protects from wear.
Add a personal touch by incorporating initials or subtle patterns within the geometric shapes. Experiment with metallic accents on the edges or in the center for a touch of glam. You can also customize the pattern size based on your preferred aesthetic—larger shapes for boldness, smaller for a more intricate look. Using stencils or painter’s tape ensures precision, but freehand designs can lend an organic feel. The goal is making the design uniquely yours.
Bold geometric patterns are a fantastic way to express your creativity and make your kitchen really pop. They prove that functional items can also be fun and artistic. With a little patience and some simple tools, you can craft a piece that’s both practical and a conversation starter. Ready to turn your cutting board into a modern masterpiece?
2. Rustic Chalkboard-Style Cutting Boards for Meal Planning
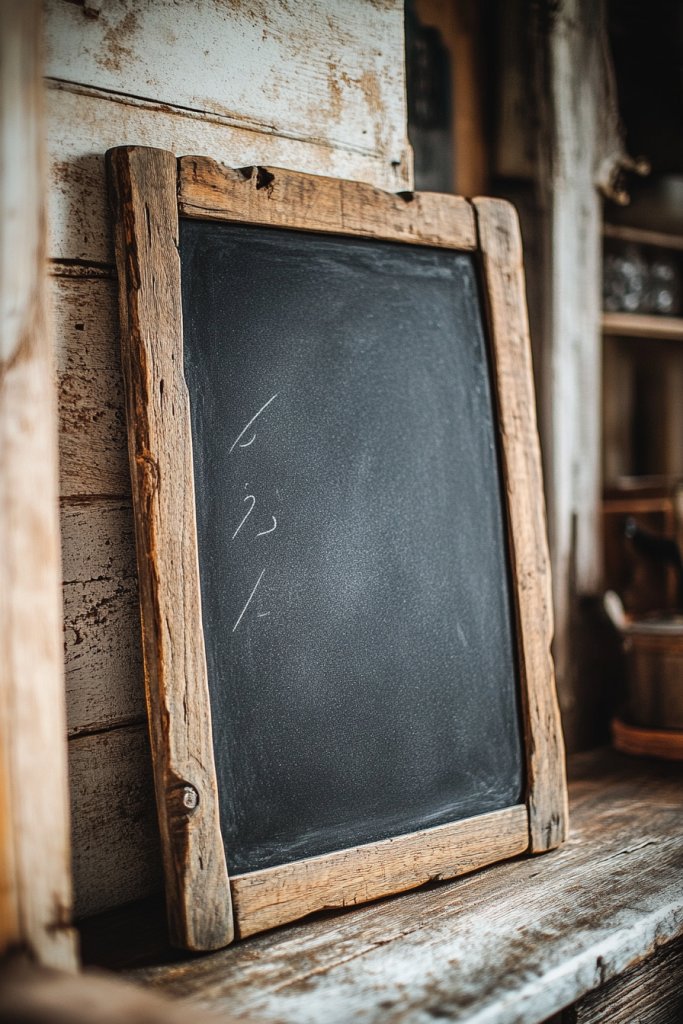
Ever struggle to keep track of grocery lists or meal plans while cooking? Traditional whiteboards or sticky notes often get lost or clutter your counter. A rustic chalkboard-style cutting board offers a charming solution that combines functionality with rustic appeal. It transforms your prep station into a handy, decorative organizer. Plus, it’s a fun way to stay on top of your menu without adding clutter.
Picture a wooden cutting board with a dark, matte chalkboard surface. The frame is made of distressed wood, giving it a farmhouse vibe. You can write your weekly menu or shopping list with chalk, then easily erase and update as needed. The surface is smooth enough for writing yet durable enough to withstand regular kitchen use. The contrast between the matte black and the rustic wood creates a warm, inviting aesthetic. It’s like having a mini, portable blackboard right on your countertop.
Choose different woods or finishes to match your decor—whitewashed, stained, or natural. Add decorative elements like a small chalk holder or hooks for hanging utensils nearby. Seasonally, you can switch from neutral tones to more colorful frames or accents that match holiday themes. For small kitchens, a compact version with a built-in marker holder works best. Larger boards can serve dual purposes as both a prep surface and an organizational tool.
Start with a clean, smooth wooden cutting board that’s large enough for writing. Apply a chalkboard paint designed for food-safe surfaces—many are available specifically for kitchen use. Use painter’s tape to create borders or decorative accents before painting. Once dry, lightly sand the surface to ensure smooth writing. Write your menu or lists with chalk or chalk markers, which provide vibrant, smudge-free lines. Seal the surface with a food-safe clear sealant if recommended by the paint manufacturer. Regularly erase and update your notes for ongoing organization.
Personalize your chalkboard board by adding stenciled borders or decorative corner designs. Use different chalk colors for categories—green for produce, red for meats, etc. Attach small magnetic clips or hooks to hold receipts or small notes. Consider adding a small chalkboard label for the day or week to keep everything visually organized. This way, the board becomes a lively, functional piece that truly reflects your style.
A chalkboard-style cutting board makes meal planning feel less like a chore and more like a creative activity. It encourages regular updates and lets you get playful with handwriting and doodles. Plus, it adds a rustic charm that suits farmhouse, vintage, or shabby chic kitchens. With minimal effort, you create an organized, inviting space that simplifies your cooking routines.
3. Botanical Florals for a Fresh, Natural Look
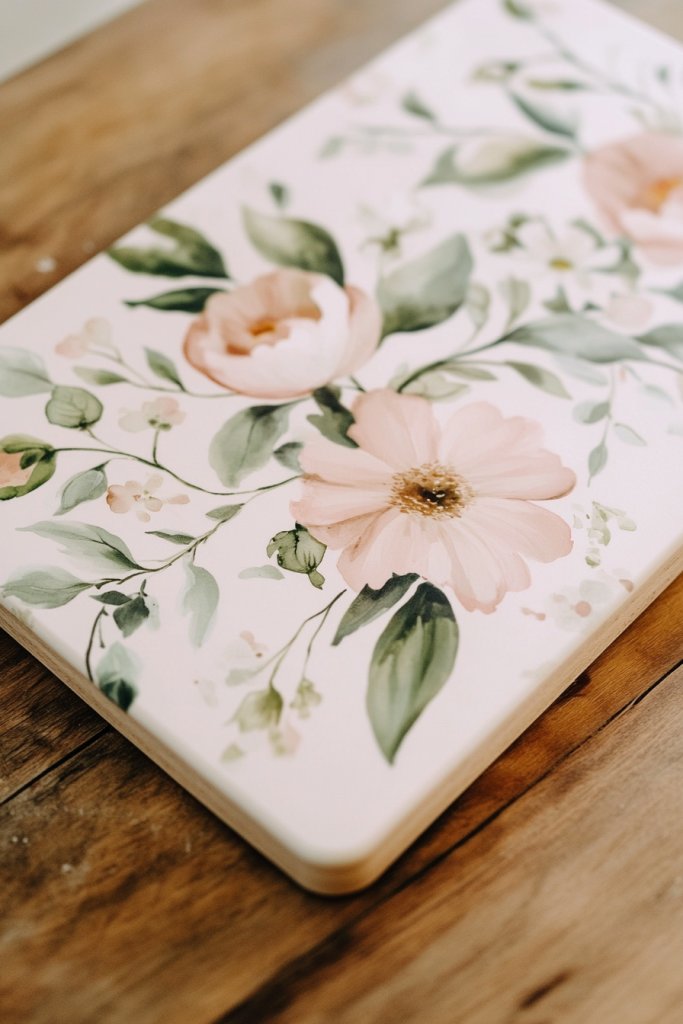
Do your kitchen surfaces feel a little uninspired? Looking for a way to bring a touch of nature inside without the hassle of real plants? Botanical floral patterns on your cutting boards can add a fresh, natural vibe that brightens up any space. It’s like a mini garden that you can enjoy every day, no watering required. Plus, floral designs never go out of style.
Imagine a smooth wooden board decorated with delicate hand-painted roses, peonies, or leafy vines. Soft pastel colors or vibrant blooms can create a lively contrast against natural wood tones. The detailed floral motifs evoke a sense of tranquility and organic beauty. The textures of the paint mimic the softness of petals, adding depth. It’s like having a tiny floral painting that doubles as a functional kitchen tool.
Opt for a monochromatic floral palette for a subtle, elegant look, or go bold with bright, contrasting colors. You can paint large, statement blooms or tiny, intricate bouquets depending on your style. Seasonal floral themes—like lavender for summer or poinsettias for winter—can be swapped out or incorporated into one design. Combining floral patterns with geometric accents creates a modern botanical fusion. Use matte or gloss finishes to match your decor’s mood.
Start with a clean, smooth wooden surface suitable for painting. Use fine brushes and high-quality, food-safe acrylic paints to ensure durability. Sketch your floral design lightly with pencil before painting, or use stencils for precision. Layer the colors, starting with light base coats and building up details gradually. Seal the finished design with a clear, food-safe topcoat to protect from food stains and wear. Regularly clean the surface with a damp cloth—avoid harsh chemicals to preserve the artwork.
Add your favorite flowers or create a personalized bouquet by including initials or meaningful symbols within the design. Play with different color schemes to match your kitchen palette or seasonal decor. Embellish the design with subtle metallic accents or textured paint for depth. Alternatively, incorporate tiny painted insects or butterflies for a whimsical touch. These details make each piece uniquely yours.
Botanical floral designs blend the beauty of nature with everyday practicality, turning a simple cutting board into an artful accent. They remind you to enjoy the small joys of life and bring a fresh perspective to your cooking space. With a little patience and some steady hands, you can create a charming piece that feels both calming and inspiring. Ready to add a touch of nature to your kitchen?
4. Monochrome Minimalist Lines for Sleek Sophistication
Feeling overwhelmed by busy patterns and cluttered decor? Want a design that’s simple yet stylish enough to elevate your kitchen’s look? Monochrome minimalist lines offer a sleek, modern aesthetic that’s both calming and sophisticated. They bring a sense of order and elegance without overwhelming the senses. Sometimes, less really is more.
Picture a clean, light-colored wood board with crisp black or white straight lines running parallel or crossing in geometric patterns. The contrast creates a bold yet understated visual impact, emphasizing simplicity. The thin lines add structure and rhythm without cluttering the space. The overall effect is a polished, contemporary vibe that pairs well with any decor style. It’s like a piece of minimalist art you can use every day.
Choose a monochrome palette—black and white for classic sophistication, or shades of gray for a softer look. Play with line thickness or add subtle dots or dashes for variation. For a more dynamic effect, create asymmetrical or grid-like patterns. Seasonal adaptations could include metallic accents or textured paints to add depth. These designs look great on both small and large boards and can be customized for personal taste.
Begin with a smooth, sealed wooden or bamboo surface. Use painter’s tape to mark your lines precisely, ensuring straight edges. Apply high-quality acrylic or enamel paint with fine brushes or a steady hand for crisp lines. Remove the tape carefully before the paint dries to avoid smudging. Seal the finished design with a food-safe clear coat for durability. For a more refined look, you can also use a stencil or masking fluid for perfect edges. Regular cleaning keeps the lines sharp and intact.
Personalize by adding a small monogram or a date in a corner, subtly integrated into the lines. Play with color inversions—white lines on a dark background or vice versa—for a striking impact. Incorporate textured paints or metallic accents along some of the lines for a touch of luxury. Keep the design minimal but meaningful by choosing subtle details that resonate with your style.
Monochrome minimalist lines prove that simplicity can be stunning. They create a timeless look that complements modern, industrial, or Scandinavian aesthetics. With just a steady hand and some painter’s tape, you can craft a refined piece that elevates your kitchen’s style effortlessly. Ready to embrace sleek sophistication?
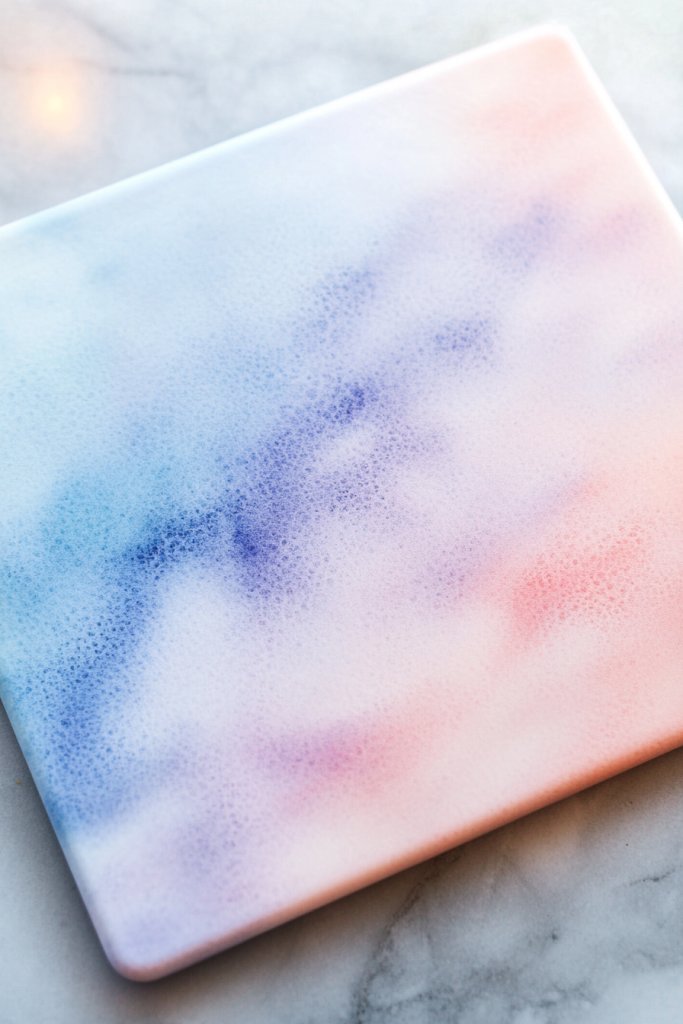
5. Watercolor Washes for Soft, Artistic Vibes
Craving a touch of artistry on your kitchen tools? Tired of rigid, perfect patterns that lack personality? Watercolor washes bring a soft, dreamy aesthetic that makes your cutting board feel like a piece of art. They evoke calmness and creativity, perfect for those who love a relaxed, boho vibe. Plus, they’re surprisingly easy to achieve with a little patience.
Envision a wooden board with gentle, blended color gradients—like a sky at dawn or a watercolor landscape. The colors bleed softly into each other, creating a fluid, organic look. The muted tones and subtle transitions add a calming effect that invites slow, mindful cooking. The textured paint mimics the natural flow of watercolor, making each piece unique. It’s like a soft painting that adds personality without overpowering your space.
Choose pastel shades for a delicate, feminine feel or richer hues for more vibrancy. Layer multiple washes, allowing each to dry before adding the next, to build depth. Incorporate metallic or glitter accents sparingly for a touch of glamour. Seasonal versions could include warm autumn tones or icy winter blues. These washes work well on various shapes and sizes, adapting easily to your decor mood.
Start with a clean, sealed wooden surface. Dilute acrylic paints with water to create transparent, watercolor-like effects. Use wide, soft brushes for blending, and work quickly to achieve smooth transitions. Layer light washes, letting each dry thoroughly before adding more. Seal the finished design with a clear, food-safe varnish to preserve the delicate look. Experiment with different color combinations and techniques to create your signature style. Be patient; blending takes time but results in a stunning, artistic piece.
Add subtle details like tiny white highlights or metallic flecks to mimic the shimmer of watercolor paper. Customize by painting abstract shapes or gentle florals within the wash. Incorporate initials or symbols in a contrasting hue for a personal touch. Variations in color intensity and blending make each piece one-of-a-kind. These artistic touches turn a simple board into a personal masterpiece.
Watercolor washes turn everyday kitchen tools into calming, artistic expressions. They encourage experimentation and help develop your painting skills. The end result is a soft, inviting piece that feels both functional and inspiring. Ready to add a splash of creativity to your cooking space?
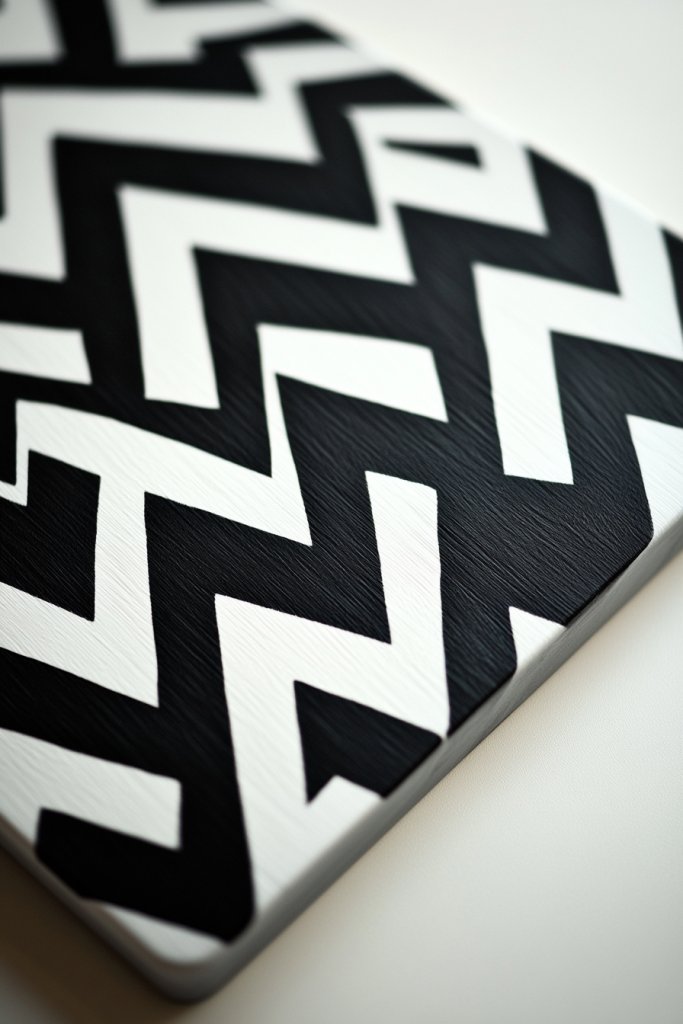
6. Chevron or Herringbone Patterns for Dynamic Texture
Bored with flat, boring surfaces? Want to add a sense of movement and texture to your kitchen tools? Chevron and herringbone patterns create a dynamic visual that energizes any space. They’re perfect for those who love geometric designs with a bit of flair. Plus, they add depth and interest without overwhelming the overall aesthetic. Ready to make your cutting board stand out?
Imagine a wooden board adorned with zigzag chevron stripes in contrasting colors or natural wood tones. The repeating V-shapes draw the eye and add a rhythmic flow to the surface. The textured pattern creates an illusion of movement, making your prep area feel lively. The crisp, clean lines give a modern edge, while the natural wood background keeps it warm and inviting. It’s like a piece of graphic art you can chop on.
Use bold, high-contrast colors for a striking statement or subtle shades for a more understated look. The pattern can be painted in large blocks or narrow lines depending on your preference. For a softer approach, combine the pattern with gentle curves or rounded edges. Seasonal adaptations include metallic accents or color updates to match your decor mood. Different sizes and orientations can also change the impact—vertical, horizontal, or diagonal.
Start with a smooth, sealed wooden surface. Use painter’s tape or stencils to outline the chevron or herringbone pattern precisely. Apply high-quality acrylic paints in your chosen colors, working from the center outward. Carefully remove the tape after painting to reveal sharp, clean lines. Seal the finished design with a food-safe topcoat to protect from stains and scratches. For a more textured look, consider using a sponge or stippling brush in some areas. Patience and precision will reward you with a professional-looking result.
Add metallic or glitter accents along the chevron lines for extra sparkle. Incorporate your favorite colors or motifs into the pattern for a personalized touch. Paint a subtle border or frame around the pattern to enhance its presence. Mixing different pattern sizes or orientations creates a layered, more complex visual. The key is balancing boldness with simplicity to keep it stylish and functional.
Chevron and herringbone patterns bring energy and sophistication to your kitchen essentials. They demonstrate that geometric designs can be both modern and timeless. With some careful masking and painting, you’ll craft a piece that’s both eye-catching and practical. Ready to zigzag your way to a more stylish cooking space?
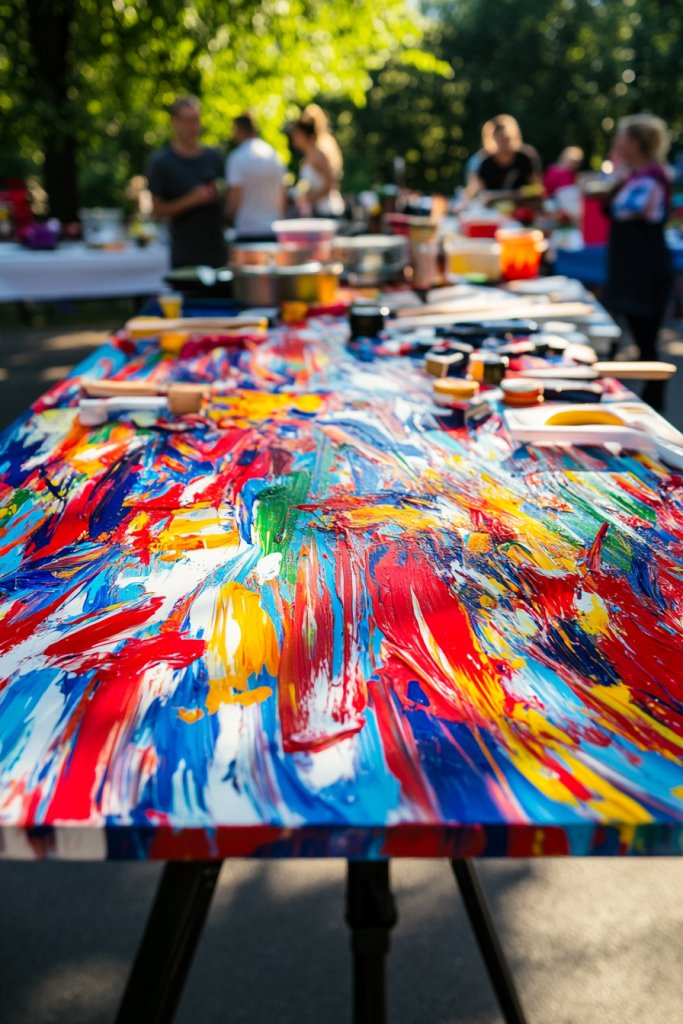
7. Bright Abstract Art for a Colorful Statement Piece
Feeling like your kitchen needs a splash of personality? Want an artful touch that’s bold and lively? Bright abstract designs turn a boring cutting board into a vibrant focal point. They let you express your creative side and add a pop of color to your space. Plus, they’re surprisingly easy to customize and change whenever you feel inspired.
Visualize a canvas of swirling, splattered, and bold brushstrokes bursting with color. Think electric blues, fiery reds, and sunny yellows blending in energetic patterns. The abstract shapes evoke movement and emotion, making the board look like a piece of contemporary art. The unpredictable strokes and splashes create a lively, playful scene. It’s a visual feast that sparks joy every time you see it.
Use a limited color palette for a more cohesive look or go full-spectrum for maximum impact. Incorporate different textures—matte, gloss, or metallic—to add depth. Abstract designs can be large, sweeping gestures or tiny, detailed splatters, depending on your style. Seasonal themes could include warm, fiery colors in fall or cool, icy hues in winter. Mixing different abstract techniques—like drip painting or sponge effects—keeps it fresh.
Begin with a clean, sealed surface. Use high-quality acrylic paints and large brushes or sponges. Embrace spontaneity—apply broad strokes, splatters, drips, and layers at random for a natural feel. Let each layer dry before adding new details to prevent muddiness. Seal it with a food-safe, durable topcoat to lock in the vibrancy. Feel free to experiment with different tools and techniques to find your signature style.
Add metallic accents or glitter to highlight certain areas for extra sparkle. Incorporate personal symbols or initials subtly into the design. Use contrasting colors or textures to create focal points. You can also frame the abstract art with a simple border for a finished look. The goal is to keep it lively but balanced.
Bright abstract art proves that your kitchen tools can double as expressions of your personality. They boost your creative confidence and make everyday cooking more inspiring. With bold strokes and splashes, you create a lively centerpiece that sparks conversation. Ready to unleash your inner artist?
8. Vintage-Inspired Stenciled Designs for Timeless Charm
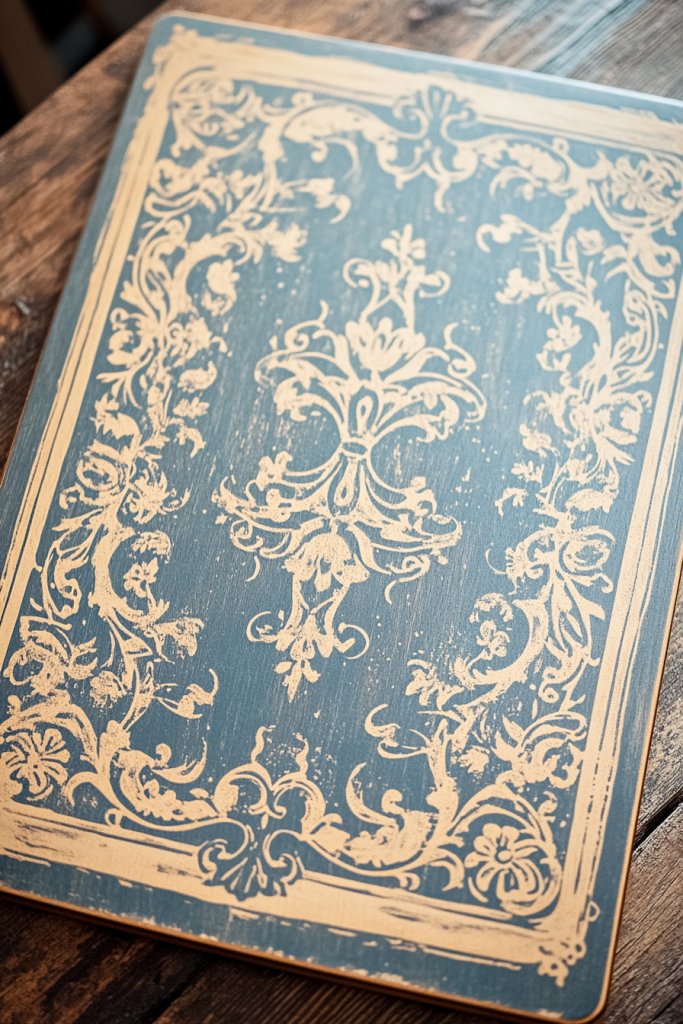
Looking for a way to add timeless charm to your kitchen? Tired of overly modern or generic designs that lack personality? Vintage-inspired stenciled patterns give your cutting board a classic, elegant touch. They evoke nostalgia and sophistication, making your kitchen feel warm and inviting. Plus, they’re easy to customize to your personal style.
Picture a wooden board decorated with intricate floral motifs, ornate borders, or traditional motifs like scrolls and medallions. The stencil creates crisp, uniform patterns that evoke the craftsmanship of bygone eras. Soft muted colors like pastel blues, creams, or antique whites enhance the vintage vibe. The detailed designs lend a sense of history and elegance, transforming a simple piece into a heirloom-quality item. It’s like holding a piece of the past in your hands.
Choose stencil patterns inspired by Victorian, Art Deco, or rustic farmhouse styles for different moods. Pair with distressed or antiqued finishes for an aged look. Incorporate subtle metallic or glimmering accents for added luxury. Seasonal updates could include holiday motifs or floral patterns in seasonal hues. Combining multiple stencil layers or borders adds complexity and richness to the design.
Start with a smooth, sealed wood surface. Use a stencil and high-quality, food-safe ink or paint—preferably water-based for easy cleanup. Secure the stencil with painter’s tape to prevent shifting. Apply paint with a sponge or stencil brush, dabbing gently for crisp edges. Remove the stencil carefully, and touch up any imperfections with a fine brush. Seal the design with a food-safe topcoat to protect it from scratches and stains. Consider distressing the edges for a truly vintage look.
Customize by adding initials or dates within the design for a personal touch. Incorporate subtle metallic or glitter accents to highlight certain details. Mix and match stencil motifs for a layered, eclectic effect. For a more authentic aged appearance, lightly sand the surface after sealing to create a distressed finish. These touches make each piece uniquely yours and full of character.
Vintage-inspired stenciled designs connect you to history and craftsmanship. They add a sense of timeless elegance that elevates your kitchen’s ambiance. With patience and a steady hand, you can create a charming piece that looks like it’s from a different era. Ready to bring a piece of the past into your modern kitchen?
9. Metallic Accents for a Touch of Glam
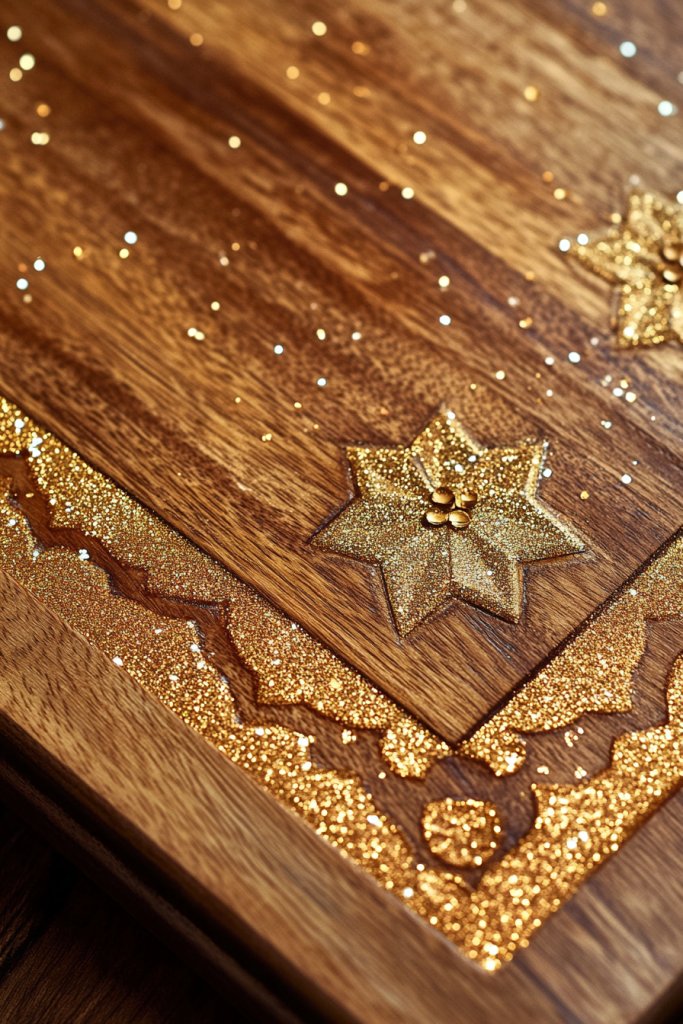
Want to add a little sparkle and luxury to your kitchen tools? Metallic accents on your painted cutting board can instantly elevate its style. Whether it’s gold, silver, or copper, metallic details catch the light and bring a chic, glamorous vibe. They’re perfect for modern, industrial, or even vintage decor styles that crave a little extra flair.
Picture a wooden board with a sleek matte background accented by shimmering metallic lines or borders along the edges. Tiny metallic dots or geometric shapes can add depth and dimension. The reflective surfaces create a stunning contrast against matte or textured paint, making the design pop. The metallic highlights transform a simple cutting board into a luxurious decor piece. It’s like jewelry for your kitchen, subtle yet eye-catching.
Choose metallics in gold for warmth, silver for cool elegance, or copper for a rustic touch. Apply metallic paint with small brushes or foam tips for precise detailing. Use sparingly along borders, handles, or as accent dots to avoid overwhelming the design. Seasonal updates might include metallic gold or silver in holiday themes. Combining metallics with matte or gloss finishes can create interesting visual effects.
Start with a sealed, smooth surface. Use painter’s tape or stencils to outline where the metallic accents will go. Apply high-quality metallic paint with fine brushes, working carefully to avoid smudges. For sharp lines, use tape or masking fluid to create clean edges. Once dry, seal the entire surface with a food-safe clear coat that preserves the metallic finish. Be cautious with handling and cleaning to keep the metallic shine intact.
Highlight edges or handles with metallic paints to draw attention or add a luxurious touch. Combine metallic accents with other design elements—geometric patterns, florals, or abstract art—for a layered effect. Personalize with initials or symbols in metallic tones for a bespoke feel. Experiment with different metallic shades for a unique, personalized look that matches your kitchen’s style.
Metallic accents bring a touch of glam that makes your kitchen tools feel special. They reflect light beautifully and add sophistication to everyday items. With a steady hand and some patience, you can create a high-end look that rivals boutique decor. Ready to make your cutting board shine?
10. Whimsical Doodles and Playful Icons for Fun Appeal
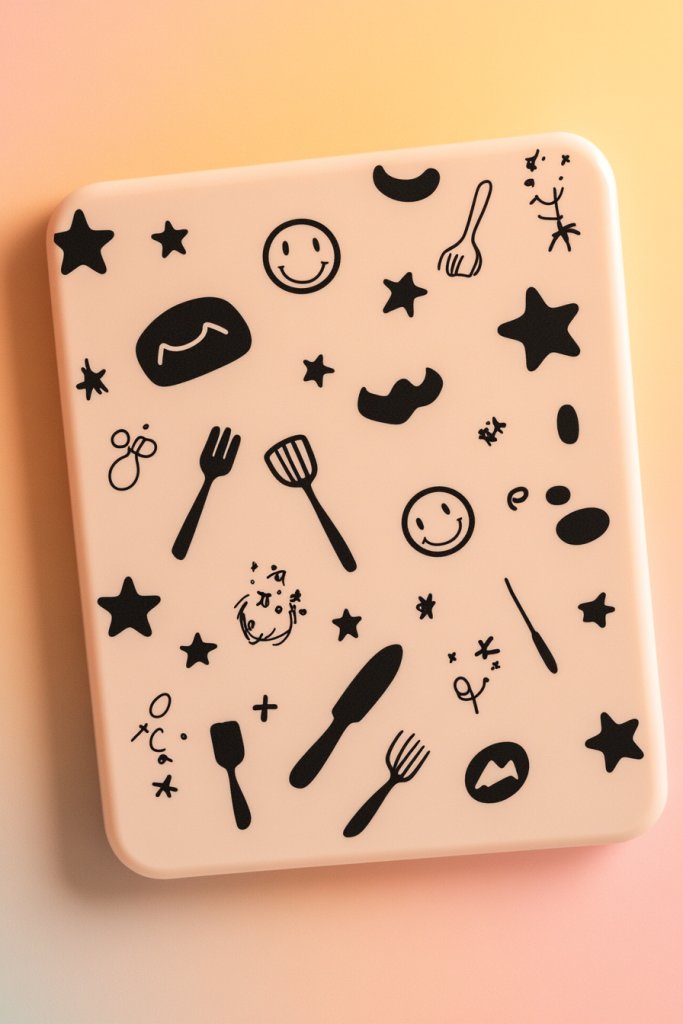
Is your kitchen feeling a little too serious? Want to add some personality and humor to your culinary space? Whimsical doodles and playful icons can turn a plain cutting board into a fun, lighthearted piece. They inspire smiles and make food prep more enjoyable. Plus, they’re a fantastic way to showcase your personality or artistic side.
Imagine a wooden board decorated with cheerful fruits, utensils, and quirky patterns like swirls or smiley faces. Bright colors and exaggerated shapes give it a cartoonish, playful vibe. The doodles can be simple line art or filled with colorful details. They evoke a sense of joy and whimsy, transforming your kitchen into a lively, inviting space. Think of it as a mini-illustration that sparks creativity every time you cook.
Choose a theme—fruit, vegetables, kitchen tools, or funny quotes—and stick with it for consistency. Use bold, vibrant colors or stick to a monochrome palette for a more subdued look. Incorporate doodles into borders or corner accents to frame the main design. Seasonal themes like pumpkins or snowflakes add versatility. Mixing detailed icons with simple line art creates visual interest.
Start with a clean, sealed surface. Sketch your doodles lightly with a pencil or use stencils for precision. Use waterproof, food-safe markers or acrylic paints to fill in the designs. For a more textured look, experiment with different brush sizes and techniques. Seal the finished artwork with a clear, food-safe varnish to protect it from food stains and scratches. Don’t be afraid to add your personal touch—quirky faces, funny sayings, or cute animals.
Create a signature style by developing a mascot or recurring icon that appears on all your kitchen tools. Use bright colors and playful fonts for labels or quotes. Add small embellishments like stars, hearts, or swirls around your icons for extra fun. Personalize by including family jokes, nicknames, or inside references in your doodles. These details make your board uniquely yours and full of personality.
Whimsical doodles turn everyday kitchen routines into joyful moments. They showcase your creativity and make your space inviting for family and guests. With a little practice, you’ll be surprised how much personality you can pack into a small design. Ready to doodle your way to a happier kitchen?
11. Ombre Gradients for Smooth Color Transitions
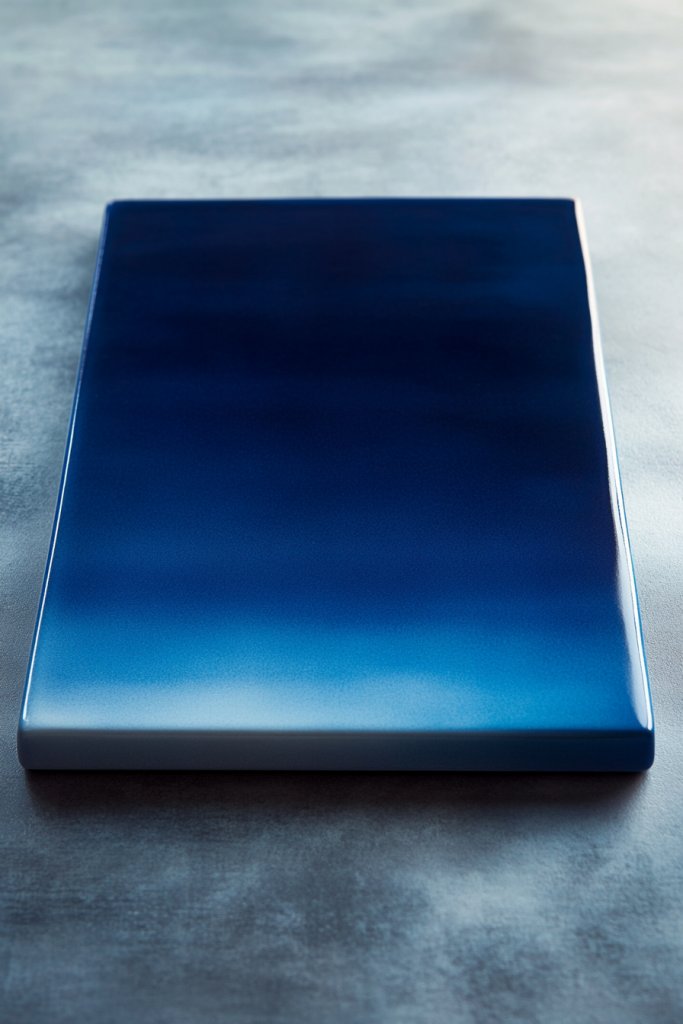
Craving a subtle yet sophisticated look for your kitchen tools? Ombre gradients offer a seamless transition between colors that’s both calming and stylish. They add depth and elegance without overwhelming the senses. Perfect for those who love gentle color shifts and modern aesthetics. It’s a simple way to upgrade your cutting board’s visual appeal.
Picture a wooden surface fading from a soft pastel pink at the top to a deep coral at the bottom. The smooth blend creates a soothing, almost hypnotic effect that invites you to run your fingers along the gradient. The color transition enhances the natural grain of the wood, adding richness and dimension. The overall vibe is tranquil yet chic, perfect for a contemporary or coastal decor theme. It’s like a watercolor sunset captured on your cutting board.
Use two or three shades within the same color family for a subtle ombre, or go bold with contrasting hues like navy fading into white. Vertical, horizontal, or diagonal gradients can change the visual flow. Apply multiple thin layers, blending carefully with a sponge or brush to achieve a smooth transition. Seasonal variations might include warm autumn tones or icy winter shades. Play with different finishes—matte, gloss, or satin—to match your kitchen’s vibe.
Start with a sealed, smooth surface. Use a sponge, foam brush, or soft cloth to apply the base color evenly. Gradually blend in the second color by dabbing and feathering the edges, working quickly before the paint dries. Continue layering until the transition is seamless. Use a clean sponge or brush to soften any harsh lines. Finish with a food-safe sealant to preserve the gradient and protect from stains. Practice on scrap wood if needed to perfect your technique.
Customize by adding subtle metallic or glitter highlights along the gradient line for a touch of shimmer. Incorporate initials or small symbols within the blend for a personal touch. Change the gradient direction or color palette to match seasonal decor. Combine ombre with other techniques—like geometric overlays or floral accents—for a layered look. The key is balancing color depth with simplicity.
Ombre gradients turn a basic cutting board into a piece of modern art. They demonstrate that you can create sophistication with simple tools and patience. The soft transitions add a peaceful, elegant touch that complements many decor styles. With practice, you’ll master smooth blending techniques that elevate your entire kitchen aesthetic. Ready to fade into fabulous?
12. Folk Art or Ethnic Patterns for Cultural Flair
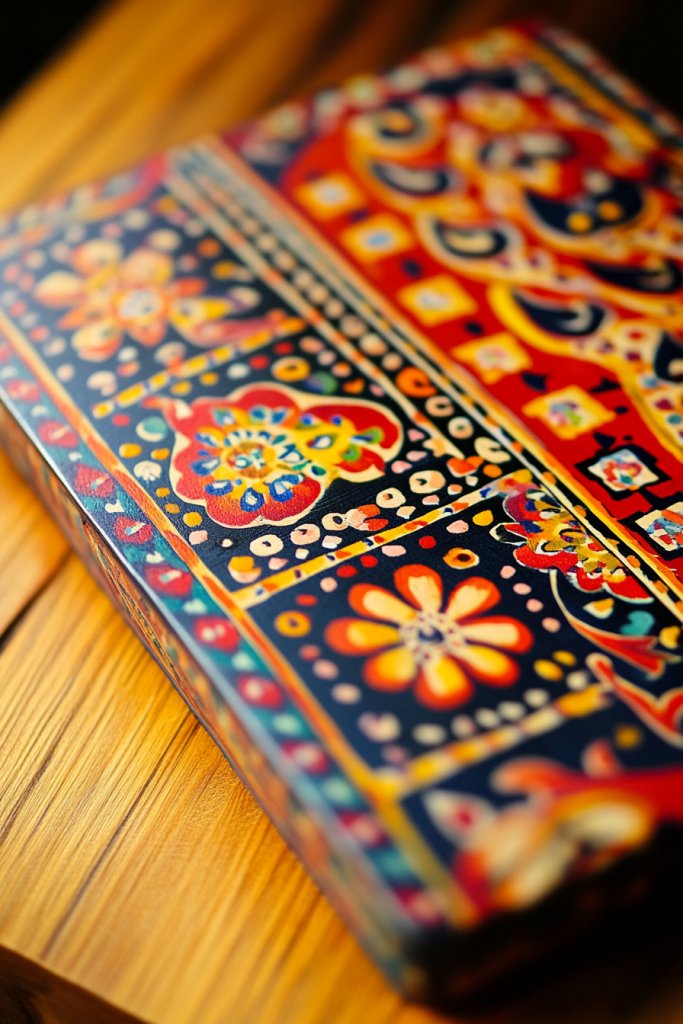
Looking to add a unique, worldly touch to your kitchen? Folk art and ethnic patterns celebrate cultural diversity and bring rich history into your home. They add visual interest and a sense of storytelling that’s both beautiful and meaningful. Perfect for those who love vibrant colors and intricate designs that tell a story.
Imagine a wooden board painted with traditional motifs—like Mexican Talavera, African tribal patterns, or Scandinavian geometric designs. Bright, bold colors and repetitive patterns evoke a sense of heritage and craftsmanship. The detailed motifs can be painted freehand or stenciled for precision. These designs create a lively, cultural tapestry that makes your kitchen feel vibrant and full of life. It’s like carrying a piece of the world in your hands.
Select a pattern that reflects your heritage or favorite culture. Use vivid, contrasting colors or stick to a more subdued, earthy palette. Combine different motifs for an eclectic, bohemian look or keep it uniform for a more traditional feel. Seasonal updates could include holiday symbols or festive colors. Layering patterns—like borders or centers—adds richness and depth.
Begin with a clean, sealed surface. Use fine brushes and high-quality, food-safe paints to replicate traditional motifs. Sketch lightly with pencil or use stencils for complex patterns. Apply paints carefully, paying attention to symmetry and detail. Seal with a food-safe topcoat to protect the design from food stains and scratches. For authenticity, consider distressing the edges or adding textured details to mimic aged, handcrafted art.
Incorporate personal symbols or initials into the design subtly within the folk motifs. Use contrasting colors or metallic paints to highlight specific details. Mix patterns from different cultures for a global fusion look. Add decorative borders or small accents that resonate with your personal story. Each piece becomes a unique cultural statement.
Folk art and ethnic patterns connect you to global traditions and celebrate craftsmanship. They transform simple kitchen essentials into cultural artifacts that tell a story. With patience and attention to detail, you can craft a vibrant, meaningful piece that sparks curiosity and admiration. Ready to bring the world to your kitchen?
13. Pastel Palette for Soft, Cozy Vibes
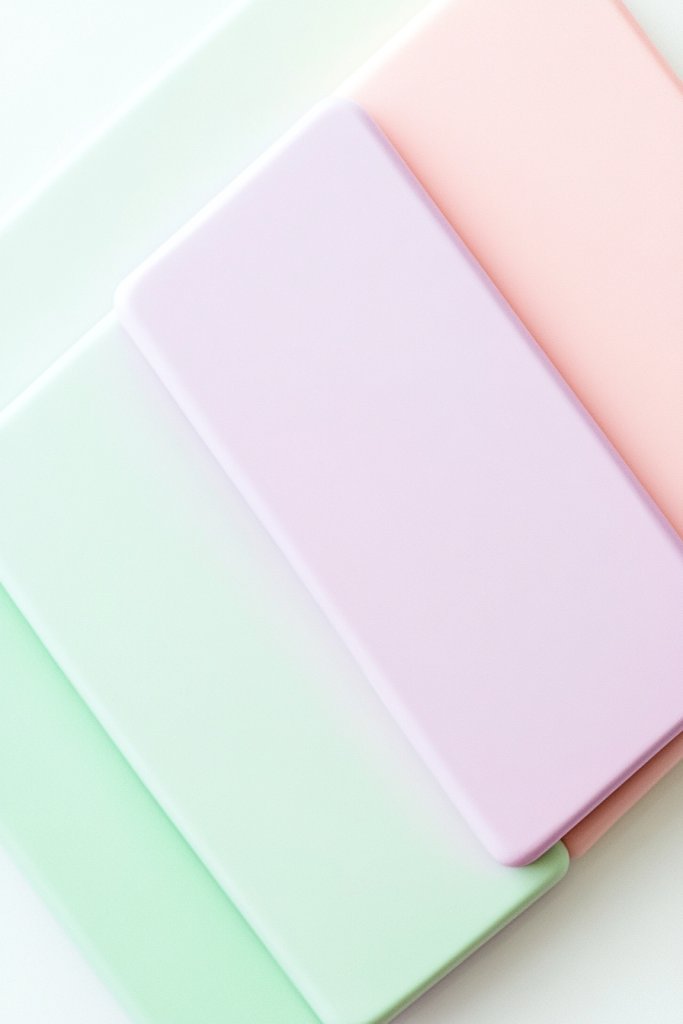
Looking to create a warm, welcoming atmosphere in your kitchen? Pastel shades offer a soft, cozy aesthetic that’s perfect for farmhouse, shabby chic, or cottage styles. They bring a gentle touch of color that feels relaxing and inviting. Plus, pastel palettes are versatile enough to blend with a variety of decor themes. Ready to soften your space?
Imagine a wooden board painted in a muted mint green, blush pink, or soft lavender. The subtle hues create a calming backdrop that complements natural textures like linen, rattan, or distressed wood. The colors evoke a sense of comfort and tranquility, making your kitchen feel like a cozy retreat. The matte finish prevents glare, enhancing the gentle, soothing vibe. It’s like a soft, warm hug in kitchen form.
Combine different pastel shades for a layered, harmonious look—think a mint green border with a pink center. Use monochromatic schemes for a minimalist vibe or mix with other soft hues for a more eclectic feel. Seasonal updates can include pastel yellows for spring or icy blues for winter. Pair with textured fabrics or ceramics in similar shades to enhance the cozy aesthetic. These colors work well on various shapes and sizes.
Start with a sealed, smooth wooden surface. Use soft brushes or sponges to apply pastel-colored paints, blending gently for a seamless look. Build up layers gradually, allowing each to dry before adding more. For crisp edges, use painter’s tape. Seal with a food-safe matte or satin topcoat to preserve the gentle finish and protect from stains. Light sanding between coats can help achieve a smooth, even surface. Practice blending on scrap wood if needed.
Customize with subtle hand-painted details like tiny flowers, polka dots, or personalized initials in matching pastel tones. Mix textures—glossy accents or matte finishes—to add depth. Incorporate decorative trims or fabric accents in matching hues for a layered look. Seasonal touches, like tiny snowflakes or sun motifs, can make it festive. These personal touches turn a simple piece into a charming, cozy corner.
Pastel palettes create a peaceful, inviting atmosphere that makes your kitchen more relaxing. They show that subtle color can have a big impact on mood and style. With a bit of patience, you can craft a beautiful, soothing piece that enhances your decor. Ready to add a soft touch of warmth?
14. Playful Polka Dots or Stripes for a Cheerful Touch
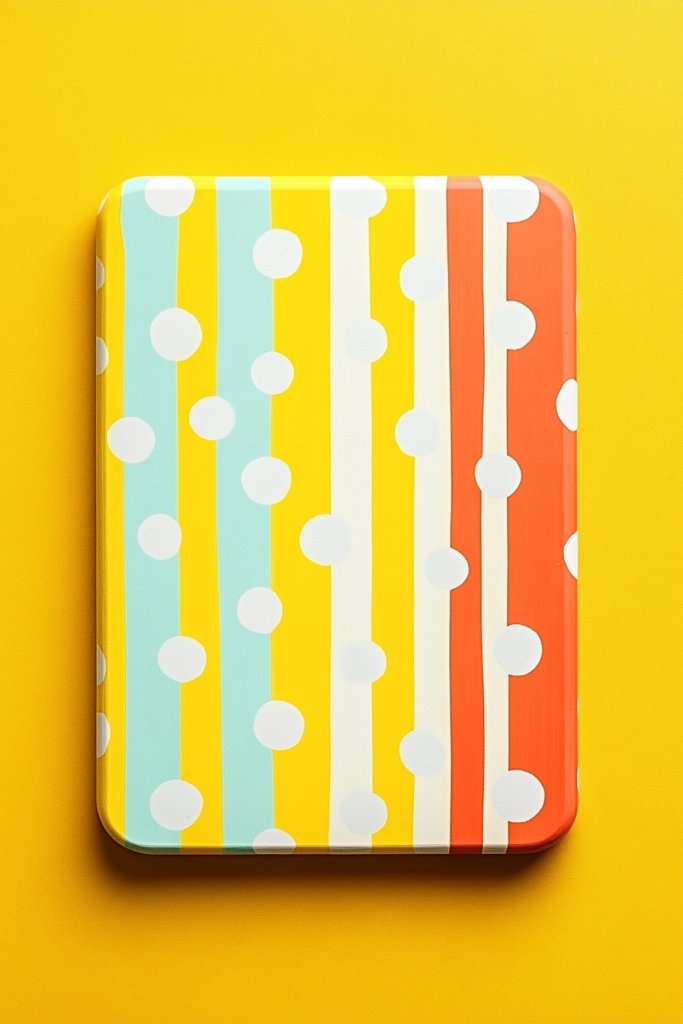
Want to inject some fun and energy into your kitchen? Polka dots and stripes are classic patterns that instantly lift the mood and add a cheerful vibe. They’re perfect for making your cutting board feel playful rather than plain. Plus, they’re easy to adapt to any color scheme or decor style, making your kitchen more lively and inviting.
Picture a wooden board covered in bright, evenly spaced polka dots or bold stripes in your favorite colors. The pattern creates a sense of movement and joy, transforming a utilitarian item into a focal point. The playful design pairs well with casual or eclectic decor, adding a burst of personality. The textured paint or stenciled shapes bring a tactile element that invites touch. It’s like a cheerful pattern that makes you smile every time you prep.
Opt for classic black and white for a timeless look, or go full-color for maximum impact. Use different sizes of polka dots or varying stripe widths to create visual interest. Combine both patterns on one piece for eclectic charm, or keep it to one for simplicity. Seasonal updates could include holiday-themed colors—red and green for Christmas or pastels for spring. Mixing patterns with neutral backgrounds ensures a balanced, fun design.
Start with a smooth, sealed surface. Use painter’s tape to mark straight lines or stencil circles for polka dots. Apply bright, highly pigmented acrylic paints with small brushes, working carefully to keep shapes uniform. For stripes, use a ruler or masking tape for clean edges. Remove tape before the paint dries to avoid smudging, then seal with a food-safe topcoat. Practice on scrap wood to perfect your technique if needed.
Create a signature look by varying dot sizes or stripe colors across different boards. Add tiny hand-drawn accents like stars or hearts for extra cuteness. Incorporate initials or small symbols within the pattern for a personalized touch. Use metallic or glitter paints on some elements to add sparkle. These playful touches make the board uniquely yours and full of personality.
Polka dots and stripes are timeless patterns that bring joy and energy to your kitchen. They demonstrate that simple shapes can have a big visual impact. With minimal tools and some patience, you’ll craft a cheerful piece that brightens daily routines. Ready to add some fun to your culinary space?
15. Nautical Themes with Blues and Anchors
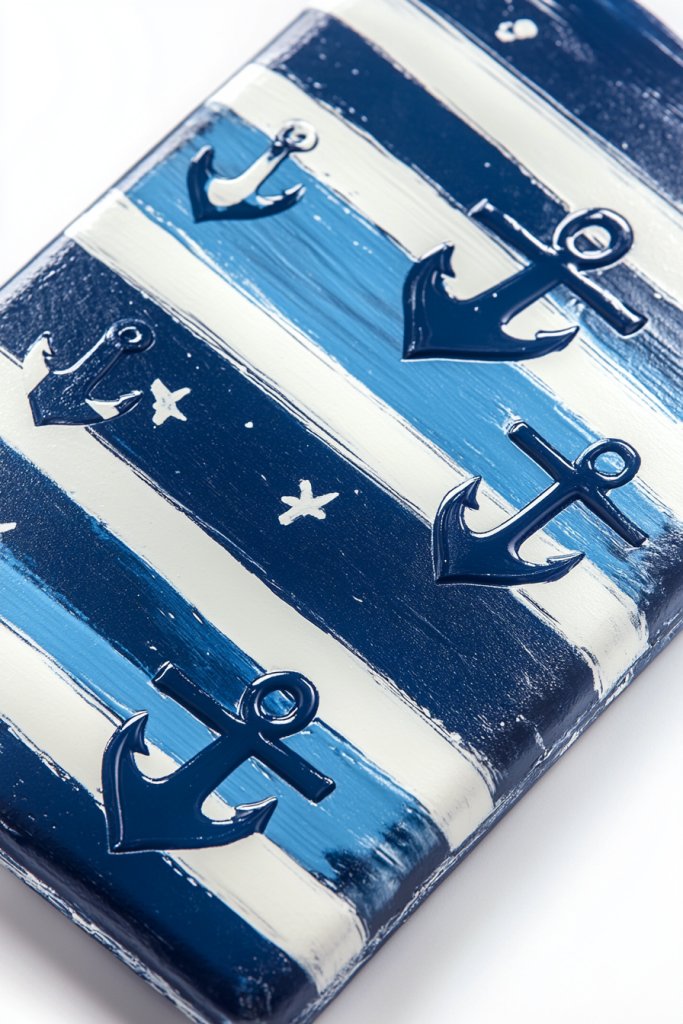
Dreaming of a coastal escape every time you cook? Nautical themes bring a fresh, breezy vibe to your kitchen that’s perfect for creating a seaside retreat feel. Using shades of blue, white, and nautical motifs like anchors, ropes, and waves instantly evokes calmness and adventure. It’s a fun way to add a touch of the ocean without leaving home.
Imagine a wooden board painted in navy or sky blue, decorated with white anchors and rope patterns. The motifs can be stenciled or freehanded, giving a handcrafted, authentic vibe. The textured paint mimics the roughness of weathered boats or driftwood, adding depth. The overall look is crisp, clean, and refreshing—like a coastal breeze captured in design. It creates a relaxed, inviting atmosphere reminiscent of beach days.
Use different shades of blue—turquoise, navy, or powder blue—for diversity. Incorporate other nautical symbols like shells, lighthouses, or waves for variety. Pair with striped or chevron backgrounds for extra visual interest. Seasonal updates could include starfish or holiday-themed motifs like Christmas anchors. Keep the overall design minimal to maintain a breezy, uncluttered feel.
Start with a sealed wooden surface. Use painter’s tape to outline your motifs—anchors, ropes, or waves—and paint with high-quality acrylics. For detailed work, use fine brushes or stencils for precision. Add texture by layering different shades of blue or distressing the surface for a weathered look. Seal the design with a food-safe topcoat to protect from food stains and scratches. Regular touch-ups keep it looking fresh.
Personalize with initials or family names integrated into the nautical motifs. Add small metallic or glitter accents to simulate the shine of ships or water. Incorporate small additional symbols like starfish or seashells for variety. Use a contrasting color for borders or outlines to make motifs stand out. These details turn a simple design into a charming coastal treasure.
Nautical themes bring a fresh, relaxed vibe that can transform your kitchen into a seaside escape. They show that decorating with thematic motifs can be fun and easy. With some patience, you’ll craft a piece that’s both functional and full of personality. Ready to sail into a more stylish kitchen?
16. Personalized Monograms or Initials for Custom Charm
Want to add a special, personal touch to your kitchen accessories? Monograms or initials turn a simple cutting board into a meaningful keepsake or a thoughtful gift. They create a sense of ownership and pride, making your space uniquely yours. It’s a small detail that makes a big impact and elevates everyday tools into cherished items.
Imagine a clean wooden board with a beautifully hand-painted or stenciled monogram in elegant script or bold block letters. The initials can be accented with flourishes, borders, or decorative motifs like hearts or stars. The design is simple yet sophisticated, drawing attention to the personalized detail. The contrast between the painted initials and the natural wood creates a striking focal point. It’s like a signature piece that proudly proclaims your style.
Choose classic fonts for timeless appeal or modern styles for a contemporary look. Incorporate decorative elements like scrolls, floral accents, or geometric shapes around the initials. Use colors that match or contrast with your decor—metallics, pastels, or bold hues. You can stencil or freehand the monogram for more personalized charm. Seasonal or holiday-themed initials can also add a festive touch.
Start with a smooth, sealed surface. Sketch your initials lightly with pencil or use a stencil for accuracy. Apply paint with fine brushes, choosing colors that complement your decor. For a more refined look, use metallic or gloss paints. Seal the design with a food-safe topcoat, and consider sealing the entire board to protect the artwork. For an extra touch, lightly distress the edges for a vintage effect. The key is neatness and precision.
Combine initials with decorative borders or motifs for extra charm. Use metallic or glitter paints for a luxe effect. Add additional personalized touches like a date or a short phrase. Incorporate textured paint or embossing for a tactile element. Each piece becomes a personalized statement, perfect as a gift or a keepsake.
Personalized monograms make your kitchen feel special and one-of-a-kind. They show off your style and attention to detail. With a steady hand and simple tools, you can create a professional-looking, custom piece. Ready to stamp your style on your culinary tools?
17. Color-Blocked Sections for Practical Zoning
Ever wish you could organize your food prep zones more effectively? Color-blocking your cutting board allows you to designate specific areas for different ingredients or tasks. It makes food prep more efficient and helps prevent cross-contamination. Plus, it adds a vibrant, organized look that’s both functional and attractive.
Imagine a large wooden board divided into sections, each painted in a bold, contrasting color—red for meats, green for vegetables, yellow for fruits, and so on. Clear boundaries and bright colors create an instant visual cue for different food groups. The color zones keep your workspace neat and hygienic, and the vibrant palette energizes your kitchen. It’s like a mini culinary traffic control system, right on your countertop.
Use different shades to match your kitchen’s color scheme or go for high-contrast combinations to visually separate zones. Incorporate labels or symbols within each section for added clarity. For a softer look, pastel block sections work well, especially in cozy or vintage kitchens. Seasonal updates might include holiday colors or themed zones—like pumpkin orange for fall. The key is clarity and ease of use.
Start with a sealed, smooth surface. Use painter’s tape to outline your zones precisely. Apply high-quality, food-safe acrylic paints in each section, allowing each to dry thoroughly. Remove tape carefully to ensure crisp edges. Seal with a food-safe topcoat to protect from stains and scratches. You can also add labels or icons with stencils for extra clarity. This method keeps your kitchen organized and visually appealing.
Customize by choosing colors that match your decor or mood. Add small icons or symbols within each zone—like a fish for seafood, a leaf for vegetables. Incorporate textured or metallic paints for a layered effect. You can also add a decorative border or frame to tie everything together. This approach makes your workspace both practical and personalized.
Color-blocked zones turn a simple cutting board into a smart, organized tool that simplifies food prep. They boost your kitchen’s efficiency and add a lively splash of color. With a bit of tape and paint, you can create a design that’s both functional and beautiful. Ready to zone in on a more organized kitchen?
Conclusion
With a diverse range of painted cutting board ideas showcased, you now have plenty of inspiration to customize your kitchen decor. Whether you opt for vibrant colors, intricate patterns, or minimalist designs, these projects are perfect for adding a personal touch to your space. Get creative, have fun, and transform your everyday tools into stunning works of art that bring joy to your cooking and hosting adventures!
Leave a Reply