
25 Inspiring New Ceiling Designs for Stunning Living Rooms
I have been, or can be if you click on a link and make a purchase, compensated via a cash payment, gift, or something else of value for writing this post. As an Amazon Associate, I earn from qualifying purchases. Please read my full Affiliate Disclosure for more information.
Ever wondered how a simple ceiling upgrade can completely transform the vibe of a living room? In recent years, innovative ceiling designs have taken center stage in interior decor, offering homeowners a fantastic way to add personality, style, and a touch of luxury to their spaces. These fresh, creative ideas are not only visually stunning but also functional, making rooms feel more spacious, cozy, or modern—whatever your mood or aesthetic preference may be.
It’s no wonder that intriguing ceiling treatments are becoming a go-to trend for those looking to elevate their home’s ambiance. In this article, you’ll discover a treasure trove of inspiring new ceiling designs that can turn your living room into a showstopper.
From timeless classics to bold contemporary statements, each idea is crafted to spark your creativity and help you envision the perfect ceiling for your space. Whether you want subtle texture, dramatic lighting, or artistic accents, we’ve got you covered with a variety of styles to suit every taste and budget. Get ready to reimagine your ceiling and create a living room that truly reflects your unique style!
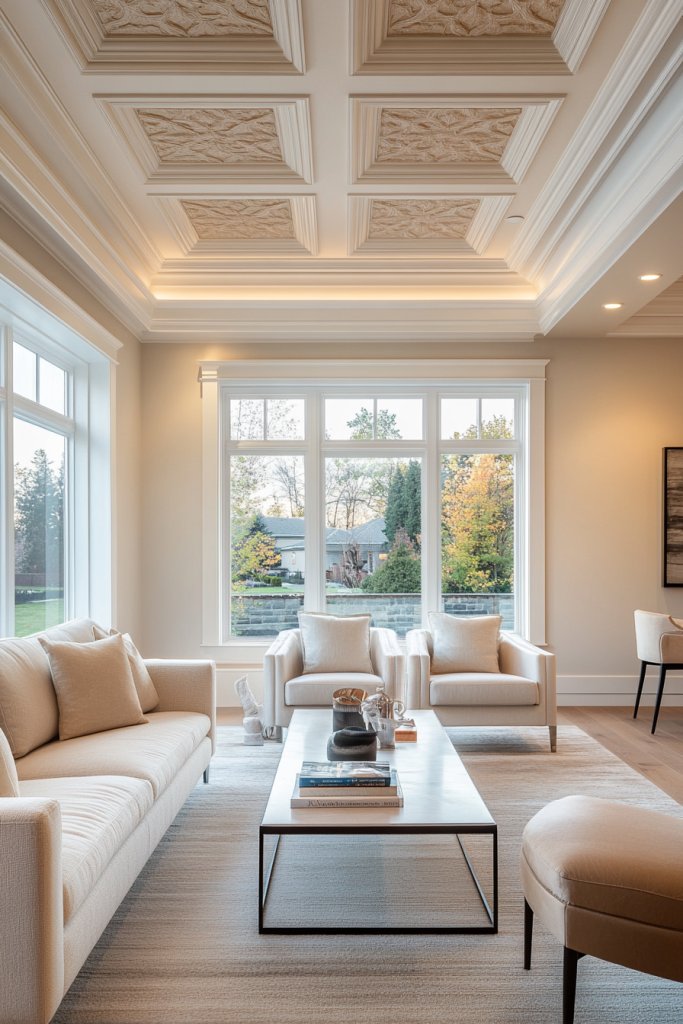
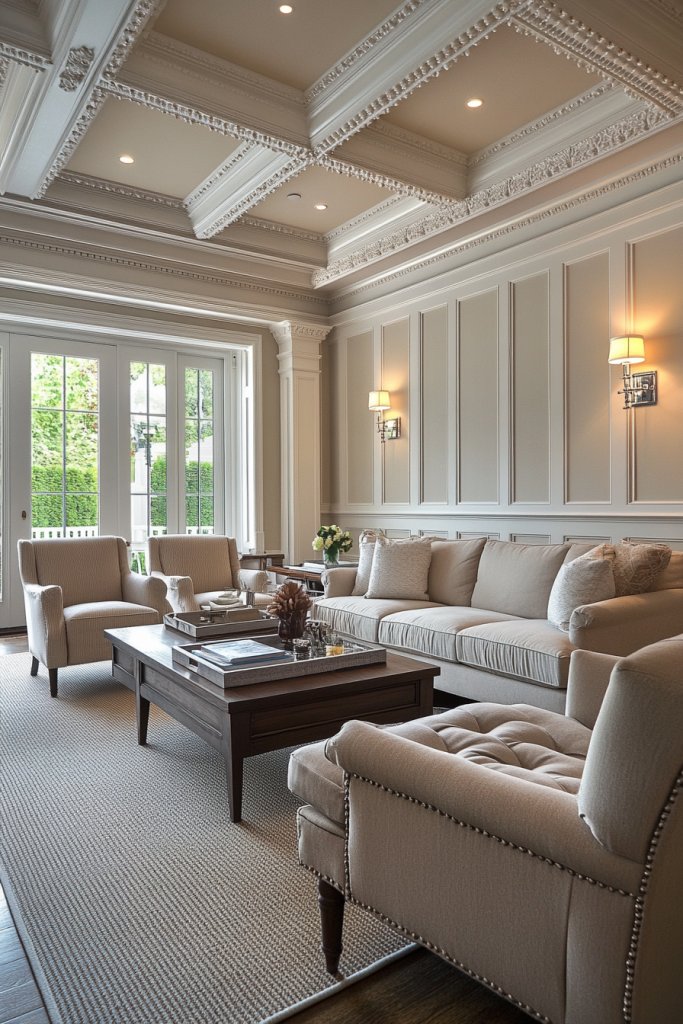
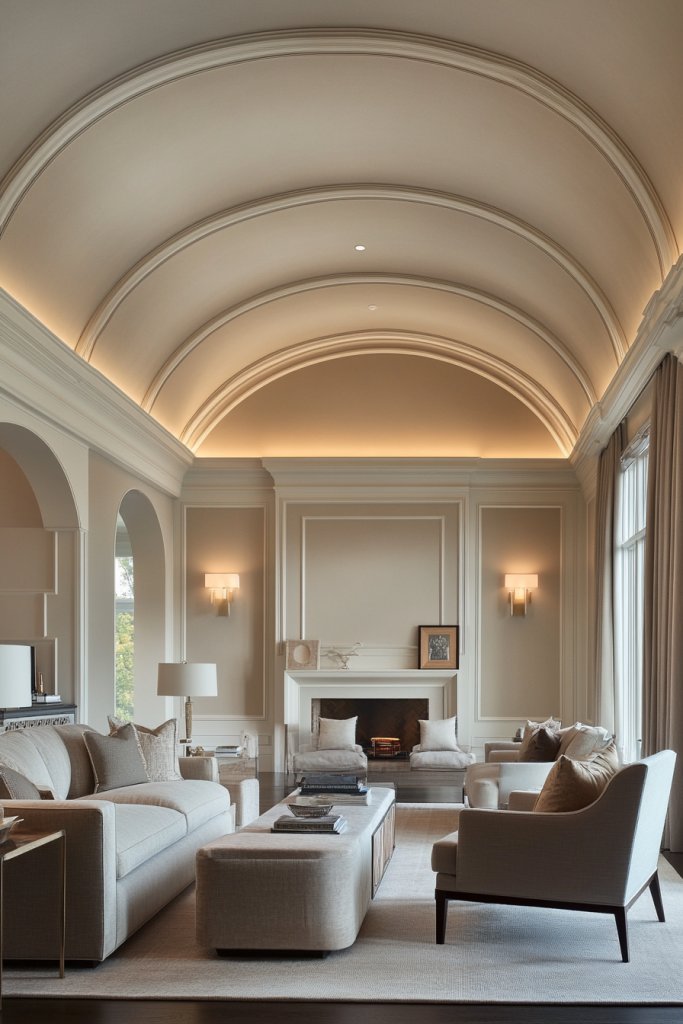
1. Coffered Ceilings with Elegant Molding for a Classic Touch
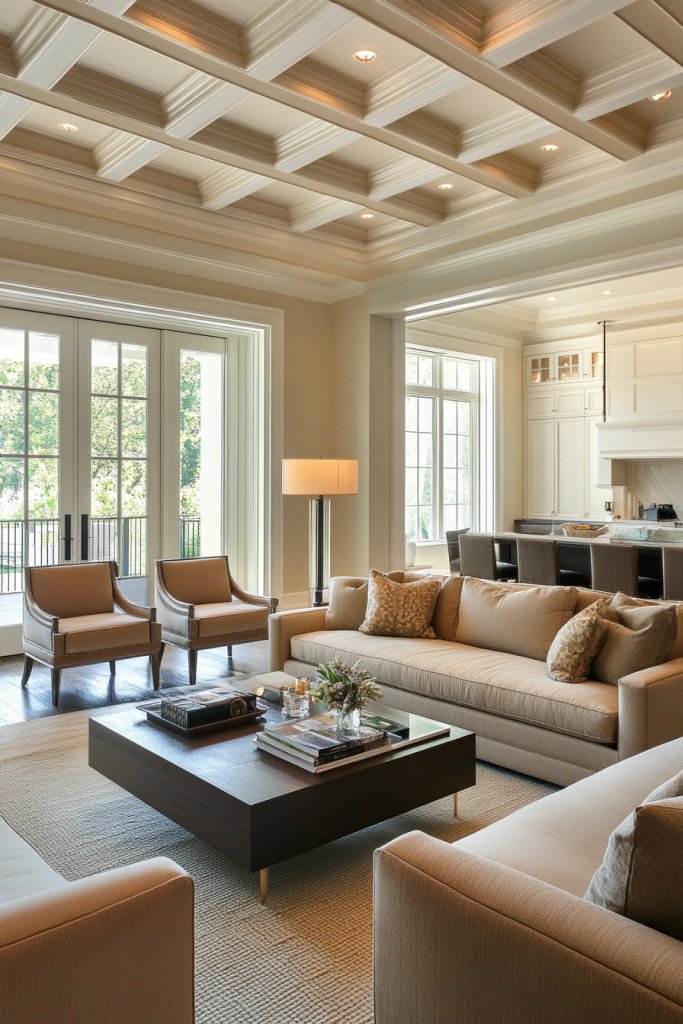
A coffered ceiling instantly elevates a living room with its timeless elegance and architectural charm, making it a favorite for those seeking a sophisticated interior. This design adds depth and a sense of grandeur, transforming an ordinary ceiling into a striking focal point.
Recommended Products to replicate this idea
| # | Preview | Product | |
|---|---|---|---|
| 1 |

|
Art3d 12-Pack Square Drop Ceiling Tile 2ft x 2ft in White, PVC Ceiling Panel 24 x 24in. - Compatible... | Check Latest Price |
| # | Preview | Product | |
|---|---|---|---|
| 1 |

|
Endurathane Universal Inside Corner for Moulding Profiles, 3 1/8"P x 3 1/8"W x 7 3/4"H (Less than 3... | Check Latest Price |
Imagine a ceiling divided into a grid of recessed panels framed by delicate, ornate molding. The panels are painted a soft, matte white or a subtle neutral shade, contrasting beautifully with the darker, intricate moldings—perhaps in rich wood tones or a glossy lacquer finish.
The coffered grid creates a sense of rhythm and order, while the moldings bring a handcrafted, luxurious feel. When lit with ambient lighting, the shadows cast by the moldings lend a warm glow, emphasizing the craftsmanship and depth of the design.
The overall effect is both classical and inviting, perfect for traditional or transitional decor styles. To recreate this look, start by measuring and marking your ceiling to create an even grid pattern.
Use wooden or polyurethane moldings—easy to cut with a miter saw—to frame each panel. Secure the moldings with adhesive and nails, then fill and sand any gaps for a seamless finish.
Paint the entire ceiling in your chosen color, and add recessed LED lights within the panels for soft, indirect illumination. For an easier option, consider pre-made coffered ceiling tiles or panels that can be installed directly onto your existing ceiling, making this project accessible even for DIY beginners.
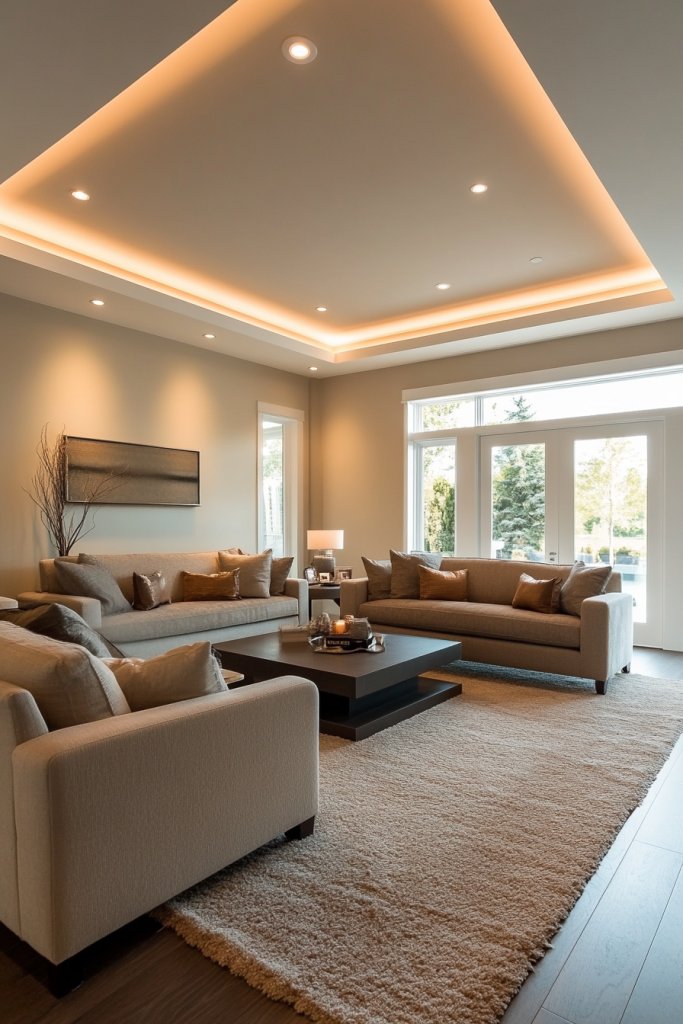
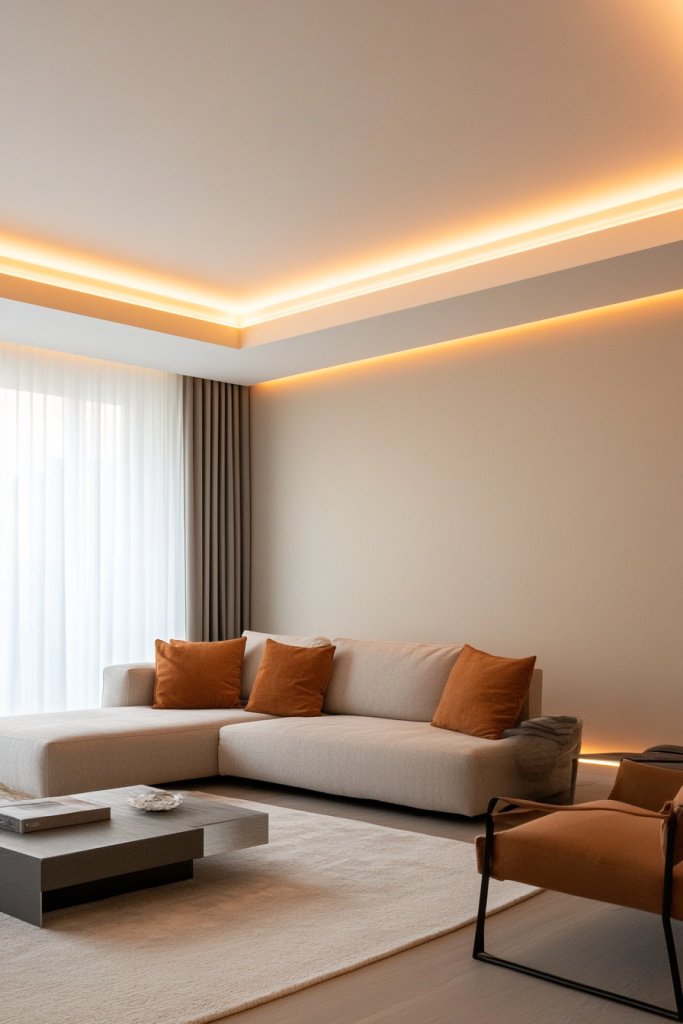
2. Tray Ceilings with LED Backlighting for Modern Ambiance
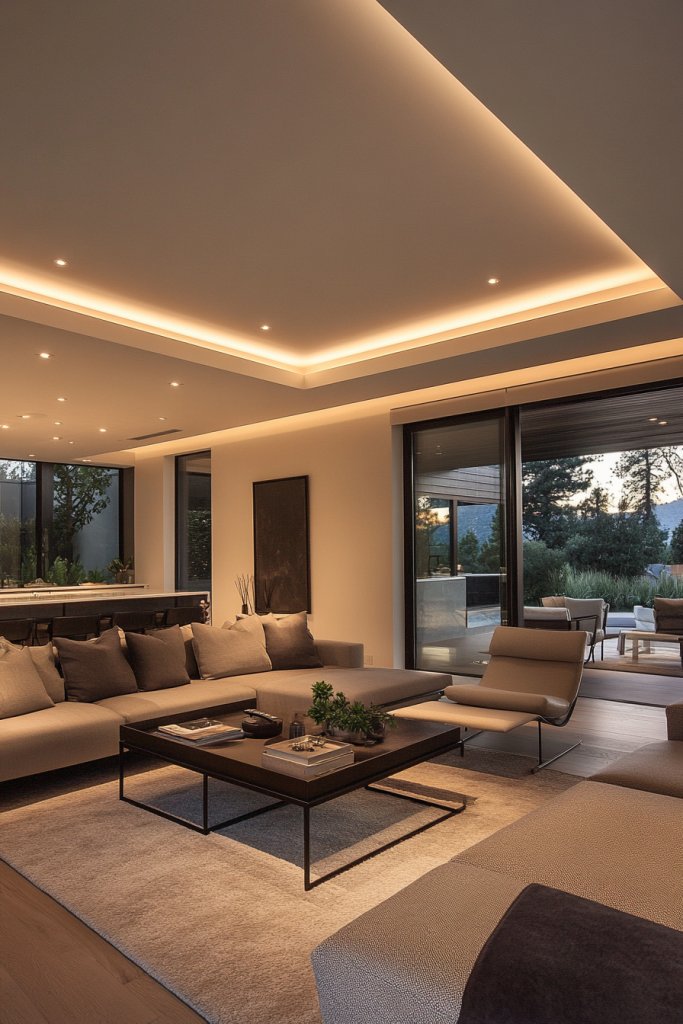
Tray ceilings offer a sleek, upscale look that instantly modernizes a living room, especially when paired with subtle LED backlighting. This design creates a layered, dimensional effect that enhances the room’s sense of height and openness while adding a soft, customizable glow.
Recommended Products to replicate this idea
| # | Preview | Product | |
|---|---|---|---|
| 1 |

|
KSIPZE 100ft Led Strip Lights RGB Music Sync Color Changing Led Lights with Smart App Control Remote... | Check Latest Price |
| # | Preview | Product | |
|---|---|---|---|
| 1 |

|
LZC 20Pcs Claw Drywall Picture Hanger: Wall Hooks for Hanging Picture Mirror Photo Poster Kit - No... | Check Latest Price |
Picture a ceiling with a central section that is recessed downward, framed by a wider border that arches or straight lines. The inner tray is painted a crisp, neutral tone—white, beige, or soft gray—while the border can be a contrasting darker hue or a coordinating color.
Hidden LED strip lights are installed along the perimeter of the tray, casting a gentle, indirect light that radiates upward, softening the space and creating a calming atmosphere. When dimmed, the backlighting mimics a twilight glow; when brighter, it energizes the room.
The overall effect is clean, contemporary, and highly customizable, perfect for minimalist or modern interiors. To achieve this look, start by framing the recessed section with wooden or drywall strips, then secure the structure with screws or nails.
Install LED strip lights along the inner perimeter, hiding the wiring behind the molding or crown. Paint the tray and border in your preferred colors—using painter’s tape for sharp edges—and ensure the electrical components are safely concealed.
Finish by installing a smooth, flat ceiling surface around it, and add dimmable switches to control the lighting for different moods. This project offers a high-impact upgrade with moderate effort, especially with the help of a professional electrician for wiring.
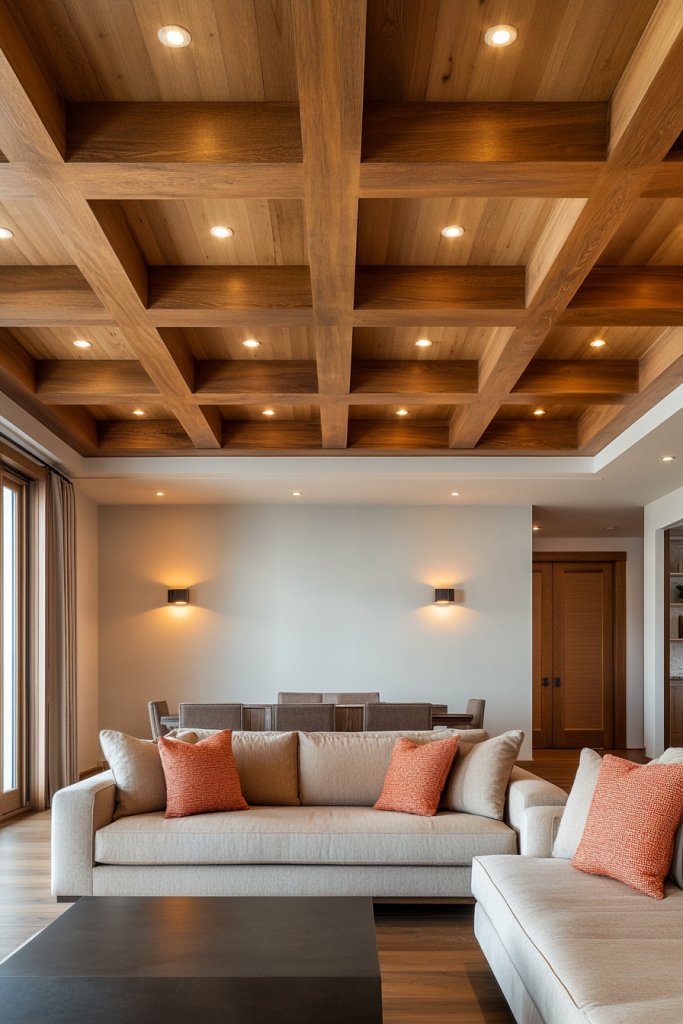
3. Exposed Wooden Beams for Rustic Charm and Warmth
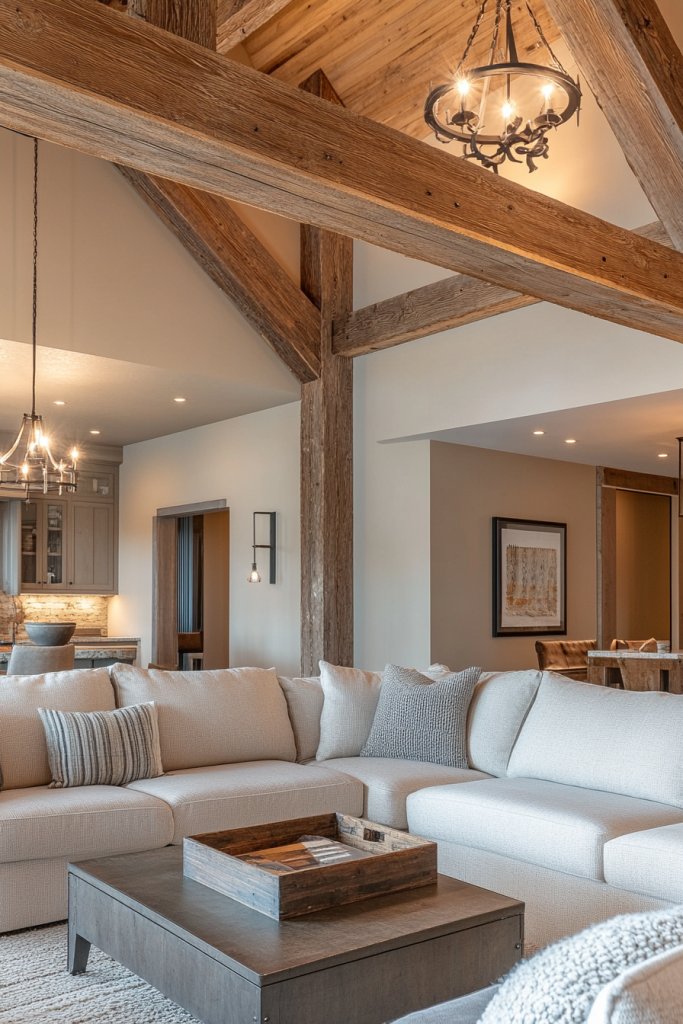
Exposed wooden beams introduce a cozy, rustic charm that instantly adds warmth and character to a living room, blending natural textures with architectural interest. This design celebrates craftsmanship and brings an inviting, farmhouse-inspired vibe.
Recommended Products to replicate this idea
| # | Preview | Product | |
|---|---|---|---|
| 1 |

|
Heritage Timber Salvaged Timber Faux Wood Beam, 3-Sided (U-Beam), 5 1/2"W x 5 1/2"H x 72"L, Kona... | Check Latest Price |
| # | Preview | Product | |
|---|---|---|---|
| 1 |

|
sprookber 304 Stainless Steel Pad Eye Snap Hooks, M5 Heavy Duty Ceiling Hooks, 500 lb Capacity... | Check Latest Price |
Visualize thick, dark-stained wooden beams spanning across the ceiling, their rough-hewn texture contrasting beautifully with smoother, painted ceiling surfaces. The beams are arranged in parallel or crossing patterns, depending on the room’s layout, and can be left natural or stained in warm amber or deep espresso tones.
When paired with soft lighting—such as vintage filament bulbs or wall sconces—these beams create a tactile, welcoming atmosphere filled with subtle scent notes of aged wood and perhaps a hint of pine or cedar. The beams frame the ceiling space, making the room feel grounded and intimate, perfect for traditional, country, or eclectic decor styles.
Getting this look starts with selecting solid or faux wood beams—faux options are lightweight and easier to install. Attach the beams securely to the ceiling joists using heavy-duty brackets or screws.
For authenticity, choose reclaimed wood or wood-look panels for a budget-friendly approach. Finish with warm stain or sealant to enhance the wood’s natural grain, then incorporate warm, ambient lighting fixtures to highlight the texture. This project is accessible for DIYers with basic carpentry skills and offers a striking transformation that combines rustic charm with everyday comfort.
4. Metallic Ceiling Panels for a Sleek, Contemporary Look
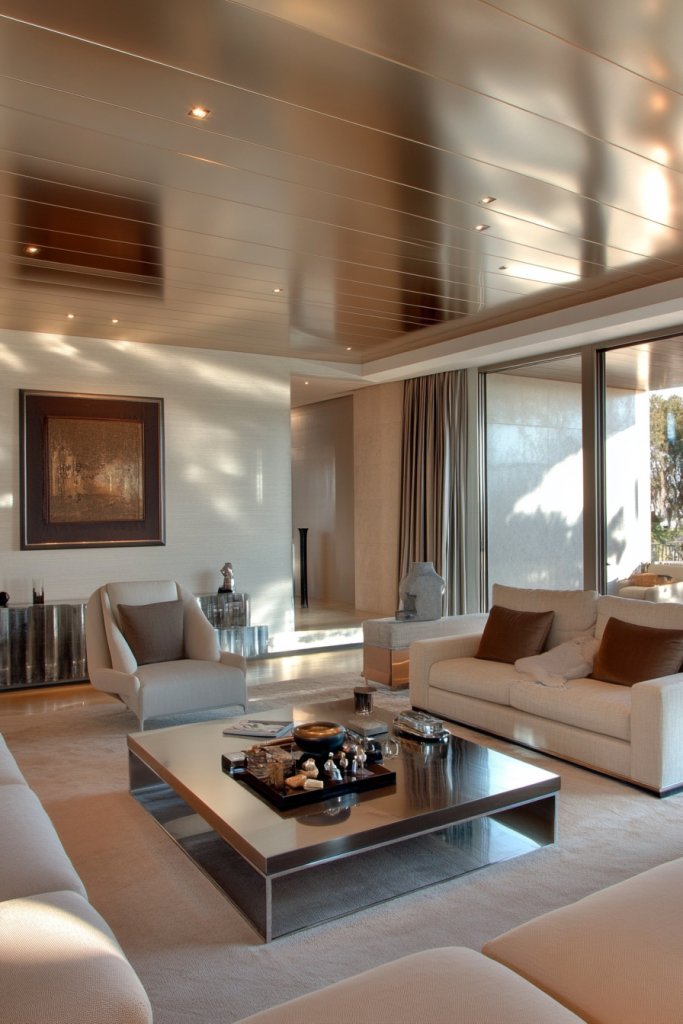
Metallic ceiling panels lend a modern, sophisticated edge to a living room, reflecting light and adding a high-gloss, futuristic appeal. This design works particularly well in contemporary or industrial-inspired interiors, creating a space that feels both chic and cutting-edge.
Envision a ceiling covered with large, sleek metallic panels—brushed aluminum, copper, or matte black metal—arranged seamlessly in a grid or linear pattern. The reflective surfaces bounce ambient light around the room, making the space appear larger and more luminous.
The cool, smooth textures contrast with softer furnishings, adding a bold statement that’s both stylish and functional. When illuminated with strategic lighting—such as spotlights or LED strips—the panels shimmer and create a dynamic visual effect that changes with the room’s lighting conditions, giving the living room a high-end, gallery-like atmosphere.
To implement this design, start with metallic wall panels or ceiling tiles available at home improvement stores or specialty suppliers. Secure them onto a sturdy metal or drywall framework, ensuring proper spacing and alignment.
For a seamless look, consider interlocking panels or custom-cut pieces to fit your ceiling dimensions. Finish with recessed lighting or track lights to enhance the reflective qualities. While installing metallic panels requires precise measurements and some familiarity with tools, many modern options are lightweight and DIY-friendly, making this a striking yet achievable upgrade.
5. Wallpapered Ceilings with Bold Patterns to Add Visual Interest
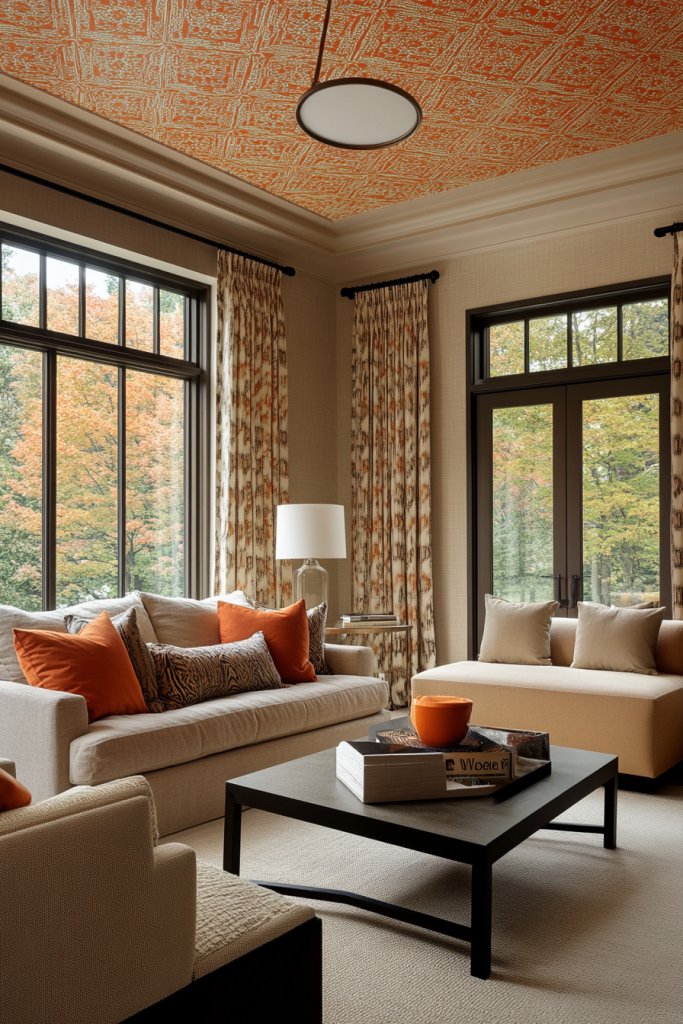
Wallpapered ceilings turn the often-neglected overhead space into a canvas for bold, eye-catching patterns, instantly infusing personality and depth into a living room. This trend appeals to those eager to experiment with color and design, creating a memorable focal point.
Recommended Products to replicate this idea
| # | Preview | Product | |
|---|---|---|---|
| 1 |

|
Ceiling Tiles, 3D Wall Panels Foam Peel and Stick, 16 Pcs Waterproof Ceiling Tiles Foam, Covered 21... | Check Latest Price |
| # | Preview | Product | |
|---|---|---|---|
| 1 |

|
Loctite Power Grab Express Heavy Duty Construction Adhesive, 9 fl oz Cartridge, 1 Pack - Versatile... | Check Latest Price |
Imagine a ceiling adorned with dramatic, large-scale wallpapers featuring geometric shapes, floral motifs, or abstract designs in vibrant hues—deep navy with gold accents, emerald green with metallic details, or blush pink with white patterns. The wallpaper adds a layer of visual interest, drawing the eye upward and balancing the room’s proportions.
Textured wallpapers or those with metallic or matte finishes can further enhance the tactile experience, making the space feel luxurious and curated. When paired with neutral walls and carefully chosen furnishings, a wallpapered ceiling becomes a sophisticated statement piece that elevates the entire living room aesthetic.
To create this look, choose a wallpaper suitable for ceilings—thick, durable, and washable options are ideal. Prepare the ceiling surface by cleaning and smoothing it, then apply primer if needed.
Use a high-quality adhesive designed for ceilings, and carefully align the pattern to avoid mismatches. For DIY installation, a stepladder, a smoothing tool, and patience are essential.
For those less confident in their skills, hiring a professional ensures a flawless finish. This bold update transforms a simple ceiling into an artistic feature that captures attention and sparks conversation.
6. Drop Ceilings with Recessed Lighting for a Clean, Functional Style
A drop ceiling with recessed lighting offers a sleek, streamlined look that seamlessly blends form and function, making it a popular choice for modern living rooms. This design not only conceals wiring and structural elements but also creates a tidy, minimalist aesthetic that enhances any space.
Recommended Products to replicate this idea
| # | Preview | Product | |
|---|---|---|---|
| 1 |

|
IMXPW Premium PVC Smooth Drop Ceiling Tiles 2ft x 4ft - Waterproof, Fire-Rated, Washable, Drop in... | Check Latest Price |
| # | Preview | Product | |
|---|---|---|---|
| 1 |

|
Amico 12 Pack 6 Inch 5CCT Ultra-Thin LED Recessed Ceiling Light with Junction Box, 1050LM... | Check Latest Price |
Imagine a ceiling layered with a smooth, matte white surface, subtly lowered from the main ceiling to add depth. Embedded within are slim, circular LED lights that emit a warm, soft glow, illuminating the room evenly without cluttering visual space.
The clean lines and simple design foster a sense of calm and order, perfect for contemporary interiors. Textures are minimal, focusing on the crispness of the ceiling and the glow of the lighting, which can be dimmed for ambiance or brightened for activities.
The overall effect is a versatile, functional ceiling that feels modern and unobtrusive. To recreate this look, start by measuring your ceiling to determine the desired drop height.
Install a grid framework or use pre-made drop ceiling panels in a neutral color like white or light gray for ease. Incorporate recessed LED lights—either dimmable or fixed—placing them evenly across the ceiling for balanced illumination.
Use simple materials like metal grid systems or drywall for the drop, and consider adding dimmer switches to control lighting intensity. This project is straightforward for DIY enthusiasts, provided basic tools like a drill, level, and ladder are available, making it an achievable upgrade for a fresh, modern vibe.
7. Artistic Faux Coffers with Intricate Paintwork for a Luxurious Feel
Faux coffered ceilings with artistic paintwork elevate a living room into a space of understated elegance and creative flair. By mimicking the classic grid pattern of traditional coffers combined with detailed hand-painted or stenciled accents, you can add a sense of grandeur without the hefty price tag or structural complexity.
Visualize a ceiling divided into a series of square or rectangular panels, each framed with painted or wallpapered borders in metallic gold, deep charcoal, or soft pastel hues. Within each “coffer,” intricate patterns—such as floral motifs, geometric designs, or subtle textures—bring visual interest and sophistication.
The surface has a slight sheen, reflecting ambient light and highlighting the painted details. The overall effect is a luxurious, textured ceiling that commands attention, subtly blending classic charm with artistic modernity.
The textured paintwork invites touch and adds depth, making the space feel more layered and curated. To achieve this, start with a flat ceiling surface and outline your coffer pattern with painter’s tape or stencils.
Use high-quality ceiling paints in your chosen color palette—metallics or matte finishes work well—and consider adding faux finish techniques like sponging or glazing for extra depth. For the detailed artwork, either hire a mural artist or use stencils and fine brushes for a DIY approach.
Finish with a clear sealant if needed to protect your artwork. This project is perfect for DIYers with some painting experience seeking to craft a bespoke, luxurious ceiling that reflects their personal style.
8. Textured Plaster Ceilings for Subtle Depth and Dimension
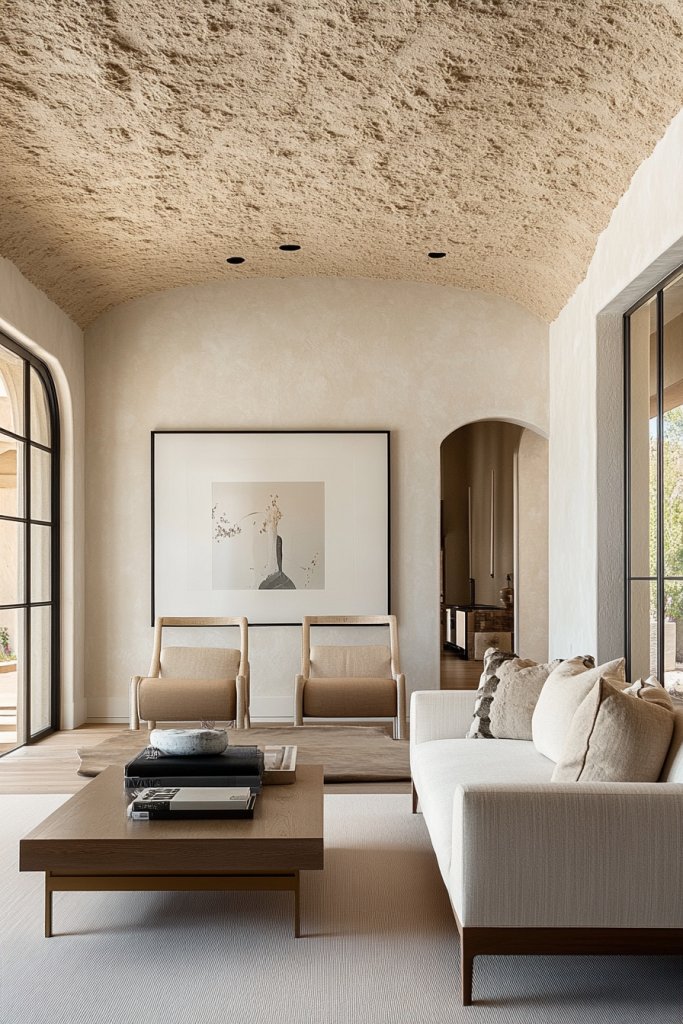
A textured plaster ceiling brings a sophisticated touch of tactile richness to your living room, adding subtle depth and visual interest without overwhelming the space. This timeless technique offers a refined aesthetic that pairs beautifully with both modern and traditional decor.
Picture a ceiling with a soft, matte plaster finish featuring gentle swirls, stucco, or a troweled pattern that catches light differently across its surface. The texture can range from fine, almost velvety finishes to more pronounced, rough surfaces that evoke rustic charm.
The muted tones—think warm beige, cool gray, or soft white—enhance the tactile quality while keeping the overall look understated. This textured surface creates an inviting, cozy atmosphere, especially when highlighted by carefully positioned lighting that accentuates the surface’s nuances.
The result is a ceiling that feels both grounded and artistically interesting, elevating the entire room’s aesthetic. To implement this look, start by preparing a smooth drywall surface.
Apply a specialty plaster or joint compound with a trowel or sponge to create your desired texture—techniques like swirling, stippling, or dragging work well. Use neutral-colored plaster or paint over the texture once dry, with a matte or eggshell finish.
For best results, work in small sections, and consider hiring a professional if you want a more intricate or consistent texture. This approach offers a durable, low-maintenance finish that adds depth and a handcrafted feel to your living space.
9. Skylights and Glass Ceilings to Maximize Natural Light

Incorporating skylights or glass ceilings transforms a living room into a bright, airy sanctuary filled with natural light, making the space feel larger and more inviting. This design option emphasizes openness and creates a seamless connection between indoors and outdoors.
Recommended Products to replicate this idea
| # | Preview | Product | |
|---|---|---|---|
| 1 |

|
OXBZKMY Skylight Window for House Roof, Tempered Glass Roof Hatch, Sloped Flat Roof Window for Attic... | Check Latest Price |
| # | Preview | Product | |
|---|---|---|---|
| 1 |

|
Lilly Double Door Ceramic Glass Panel – 6" x 6" | Check Latest Price |
Visualize a ceiling with expansive glass panels or strategically placed skylights, allowing sunlight to flood the room during the day. The glass surfaces are framed with sleek, minimalistic trim—think matte black or brushed aluminum—that complements modern aesthetics.
The natural light filters through, casting soft shadows and highlighting textures and colors within the room. During sunset or overcast days, the space takes on a gentle glow, while at night, it offers a view of the stars or cityscape through transparent panels.
The effect is an effortlessly luminous environment that feels expansive and fresh, perfect for living rooms designed to maximize daylight and scenic views. To incorporate skylights or glass ceilings, start with a structural assessment—consult a professional if needed—to ensure your roof can support the installation.
Choose energy-efficient, double-glazed glass panels to regulate temperature and reduce noise. For skylights, opt for models with automatic blinds or shades to control light levels.
Framing materials like aluminum or composite provide durability and a sleek look. Installation involves sealing, electrical wiring for optional lighting, and finishing touches like trim and insulation. While it may require professional help, this investment dramatically enhances your living room’s brightness and ambiance, creating a stunning, light-filled retreat.
10. Beaded or Wainscoting Ceilings for a Touch of Vintage Elegance
Adding beaded or wainscoting details to your ceiling introduces a charming vintage element that elevates your living room with texture and architectural interest. This style blends traditional craftsmanship with contemporary appeal for a timeless effect.
Recommended Products to replicate this idea
| # | Preview | Product | |
|---|---|---|---|
| 1 |

|
from Plain to Beautiful in Hours 126-P-BEAD-4X8-3P Beadboard Faux Tin Glue Up Wainscoting Panels 4... | Check Latest Price |
| # | Preview | Product | |
|---|---|---|---|
| 1 |

|
WAPANE 90" x 3.1" Peel Stick Foam Molding Trim Self Adhesive, Crown Molding Wallpaper Border... | Check Latest Price |
Imagine a ceiling with narrow, vertical wood beads or panels arranged in a repeating pattern, painted in crisp white, soft pastels, or rich, dark hues for contrast. The beaded design creates a rhythmic, textured surface that catches light and adds subtle shadow play, making the ceiling appear more dynamic.
When paired with wainscoting on the walls, it creates a cohesive, classic look reminiscent of vintage or farmhouse interiors. The tactile quality of the beads or panels evokes a sense of craftsmanship and history, while the clean finish keeps the space feeling fresh and sophisticated.
To implement, start by installing wooden beadboard panels or molding strips on the ceiling, ensuring they are securely affixed and evenly spaced. Paint or stain the panels in your preferred color—white for a crisp, airy feel or darker shades for a cozy vibe.
For a DIY approach, use pre-cut kits or tongue-and-groove panels to simplify installation. Finish with a protective clear coat if desired. This design is accessible for DIYers with basic carpentry skills and offers a charming, vintage-inspired update that adds texture and character to your living room ceiling.
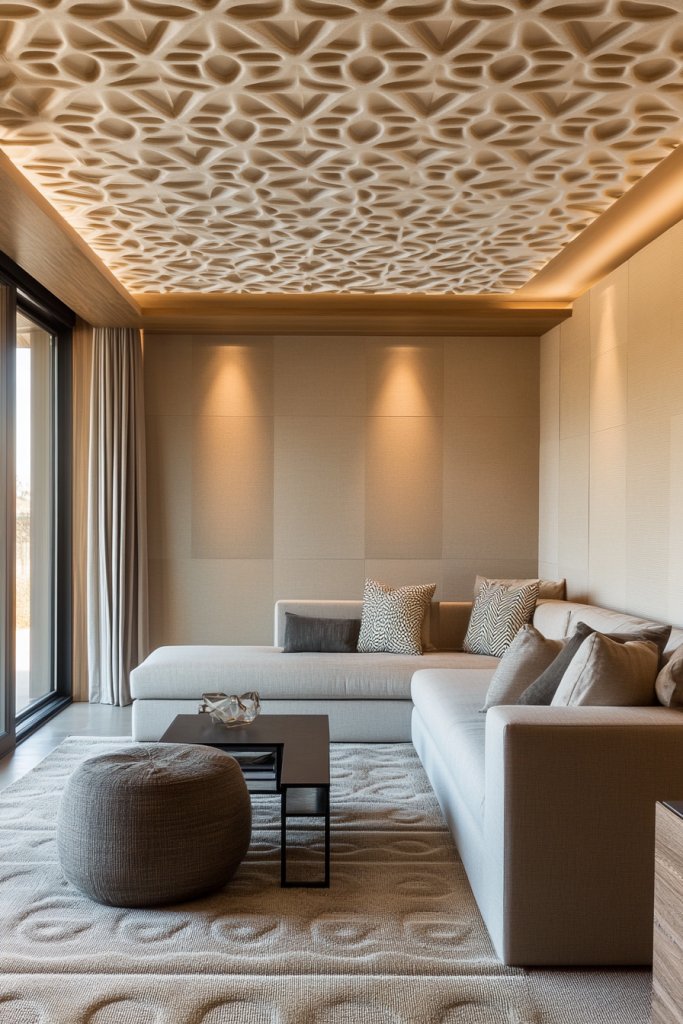
11. Geometric Ceiling Designs with 3D Panels for a Modern Edge

A geometric ceiling with 3D panels is an innovative way to add depth and architectural interest to your living room, transforming a plain surface into a captivating focal point. This trend combines modern artistry with subtle sophistication, making your space feel both trendy and thoughtfully designed.
Recommended Products to replicate this idea
| # | Preview | Product | |
|---|---|---|---|
| 1 |
|
Art3dwallpanels 33 Pack 3D Wall Panel Diamond for Interior Wall Décor, PVC Flower Textured Wall... | Check Latest Price |
| # | Preview | Product | |
|---|---|---|---|
| 1 |
|
Amico 4 Pack 6 Inch 5CCT Ultra-Thin LED Recessed Ceiling Light with Junction Box,... | Check Latest Price |
Imagine walking into a room where the ceiling features a series of interconnected hexagonal or trapezoidal panels, each with textured, raised surfaces in matte or gloss finishes. The panels are crafted from materials like lightweight MDF, PVC, or acoustic foam, painted in monochrome shades such as crisp white, charcoal gray, or muted beige, creating a sleek, contemporary vibe.
When illuminated with strategically placed recessed lighting or LED strips, the geometric shapes cast soft shadows that emphasize their three-dimensionality, adding visual intrigue and a dynamic sense of movement. The overall effect is both minimalist and bold, perfect for modern living spaces craving a bit of artistic flair.
To recreate this look, start by measuring your ceiling space and sketching out a geometric pattern that fits your room’s proportions. Purchase 3D wall panels or develop a custom design using foam or MDF cutouts, then paint them in your preferred color palette.
Adhere the panels securely using strong adhesive or mounting hardware, ensuring they are level and flush. Finish by installing subtle, hidden lighting around the perimeter or within the panels to highlight their shapes at night. This project is best suited for those with some DIY experience but can be simplified with pre-made panels or professional help for a seamless, polished finish.
12. Suspended Ceiling Clouds for a Soft, Acoustic Enhancement
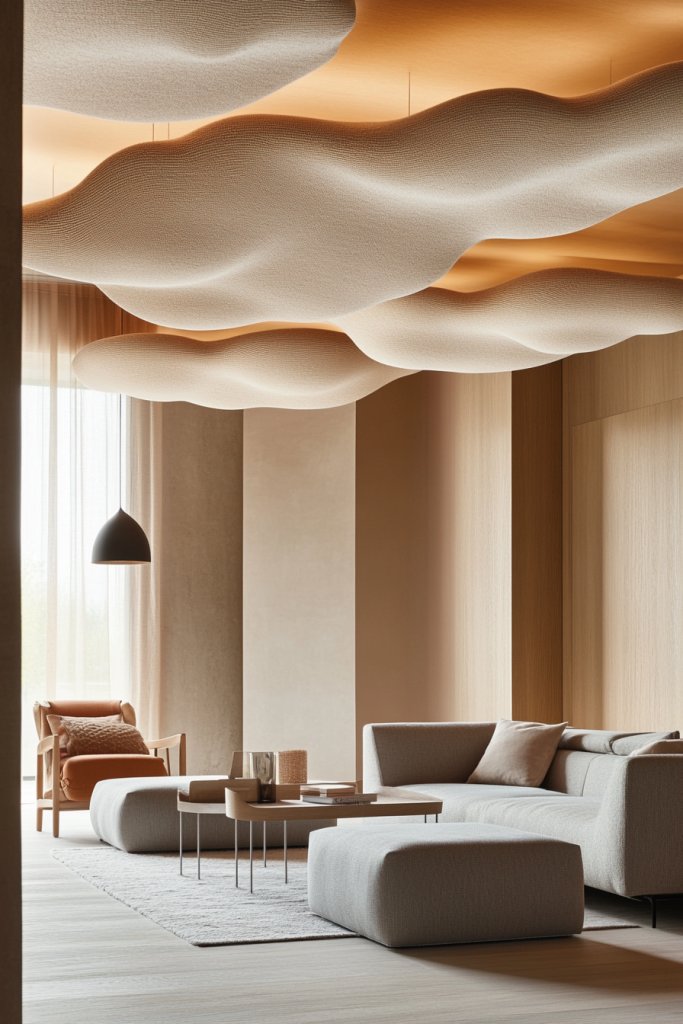
Suspended ceiling clouds introduce a dreamy, sculptural element that softens the lines of your living room while improving sound quality, creating a cozy yet stylish environment. This design combines aesthetic elegance with practical acoustic benefits, perfect for making your space more inviting and serene.
Recommended Products to replicate this idea
| # | Preview | Product | |
|---|---|---|---|
| 1 |

|
8 Pack Large Acoustic Panels Sound Absorbing with Self-Adhesive, 47.2”*23.6”*0.36” High... | Check Latest Price |
| # | Preview | Product | |
|---|---|---|---|
| 1 |
|
KSIPZE 100ft Led Strip Lights RGB Music Sync Color Changing Led Lights with Smart App Control Remote... | Check Latest Price |
Picture large, plush fabric or acoustic panel “clouds” hanging at varying heights from the ceiling, resembling soft, floating shapes. These can be covered in materials like linen, velvet, or woven textiles in calming neutral shades—think soft cream, blush pink, or muted gray.
Their rounded, organic forms contrast beautifully with straight architectural lines, adding a sense of movement and softness. The clouds may be framed with thin metallic or wood accents, and integrated lighting within or around the shapes can cast warm, diffuse glow, heightening their plush appearance and creating a soothing ambiance.
The overall effect is both calming and visually captivating, perfect for a relaxed, modern living room. To implement this idea, start by choosing the size and placement of your ceiling clouds—consider hanging them in clusters or as standalone pieces.
Use lightweight, sound-absorbing materials like acoustic foam or fabric-covered panels, suspended from the ceiling with sturdy cables or wires. Securely attach the mounting hardware, ensuring the clouds are stable and at different heights for visual interest.
Incorporate LED strip lighting or hidden spotlights to enhance the shapes and add warmth. This project is accessible for DIY enthusiasts with basic tools, and templates or pre-made cloud shapes can streamline the process.
13. Colorful Painted Ceilings to Brighten and Personalize the Space
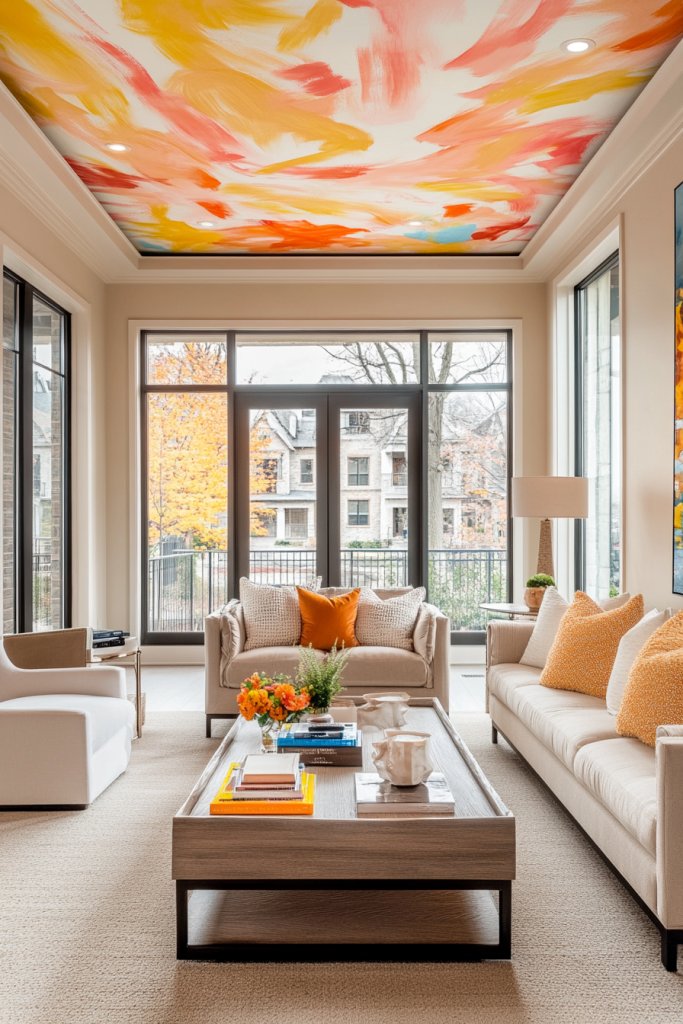
A colorful painted ceiling can instantly uplift your living room, infusing it with personality and vibrancy. This trend allows you to express your style boldly, turning an often-overlooked surface into a stunning visual feature that energizes the entire space.
Recommended Products to replicate this idea
| # | Preview | Product | |
|---|---|---|---|
| 1 |

|
Zinnser 03688 Covers Up Stain Sealing Ceiling Paint, White | Check Latest Price |
Visualize a ceiling painted in a vibrant hue like deep teal, sunny yellow, or blush pink, covering the entire surface or just a defined section for a playful accent. The paint has a smooth, matte or eggshell finish that enhances the color’s richness, making the ceiling feel like an extension of your decor palette.
To add extra dimension, consider incorporating subtle patterns, gradients, or geometric shapes using painter’s tape or stencils. Complement the ceiling with neutral or matching wall colors to balance the boldness, and layer in soft lighting—like warm LED bulbs or pendant fixtures—to emphasize the color’s depth and vibrancy.
The result is a lively, personalized space that radiates warmth and creativity. Getting started involves selecting your favorite color and preparing the ceiling surface by cleaning and priming it thoroughly.
Use high-quality ceiling paint—preferably with low VOCs for a healthier environment—and apply it with a roller or brush for a smooth finish. For patterns or accents, use painter’s tape to create clean lines or stencils for more intricate designs.
Allow ample drying time between coats, and finish with a clear sealant if desired for extra durability. This project is beginner-friendly and offers a fun way to make your living room truly your own.
14. Stenciled Ceiling Art for Creative, Custom Patterns
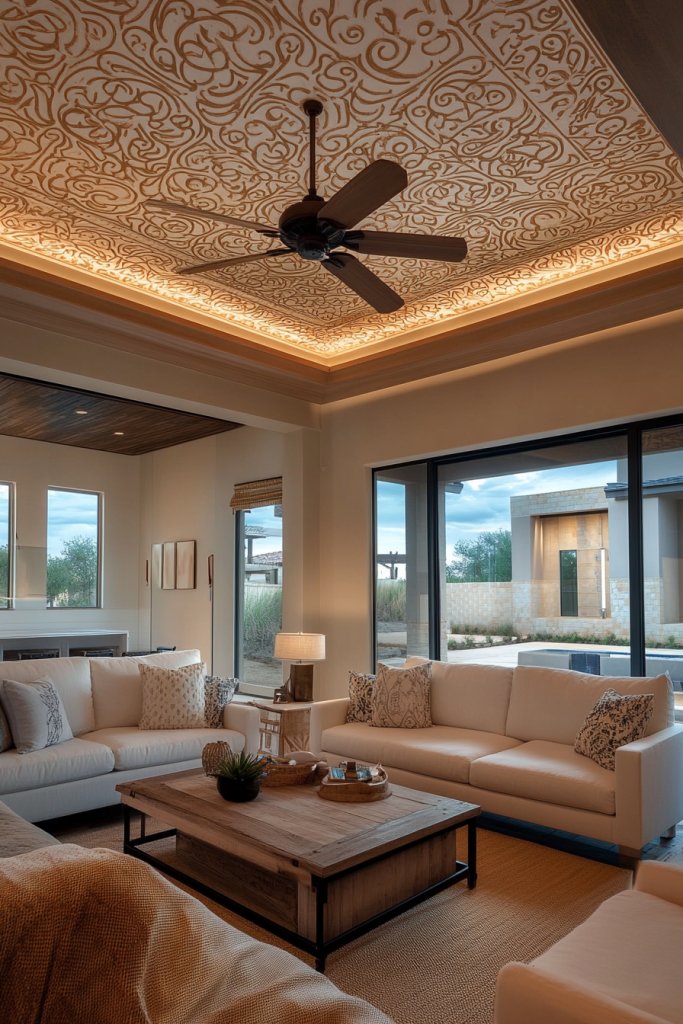
Stenciled ceiling art brings a touch of whimsy and personality to your living room, allowing for endless customization with creative patterns that reflect your style. This approach transforms a plain surface into a gallery of intricate designs, adding visual interest and a bespoke feel.
Recommended Products to replicate this idea
| # | Preview | Product | |
|---|---|---|---|
| 1 |
|
Zonon 4 Pieces Reusable Tile Stencil Floor 12 x 12 Inches Wall Templates Tile Pattern Stencil... | Check Latest Price |
| # | Preview | Product | |
|---|---|---|---|
| 1 |
|
Zinnser 03688 Covers Up Stain Sealing Ceiling Paint, White | Check Latest Price |
Picture a ceiling covered in delicate, repeating motifs like floral patterns, geometric shapes, or abstract swirls, all created with stencils and paint. Choose colors that contrast or complement your wall palette—perhaps a soft white pattern on a muted background or bold black designs for dramatic impact.
The textures are smooth, with crisp, clean lines that showcase craftsmanship, and the designs can be scaled to fit the room’s proportions—small and subtle or large and bold. When paired with subtle lighting, the patterns cast interesting shadows that enhance their complexity, making the ceiling a captivating focal point.
This technique adds a layer of artistic sophistication and invites admiration from guests. To create your own stenciled ceiling, start by selecting or designing your pattern, then tape it securely in place on your ceiling.
Use high-quality, flat, matte or satin paint and a stencil brush or roller to apply the paint evenly, avoiding drips or smudges. Work systematically in sections to ensure a cohesive look, and consider sealing the finished design with a clear matte finish for longevity. For beginners, pre-cut stencils and painter’s tape simplify the process, making it a manageable DIY project that yields stunning results.
15. Mirrored Ceilings to Create a Sense of Space and Openness
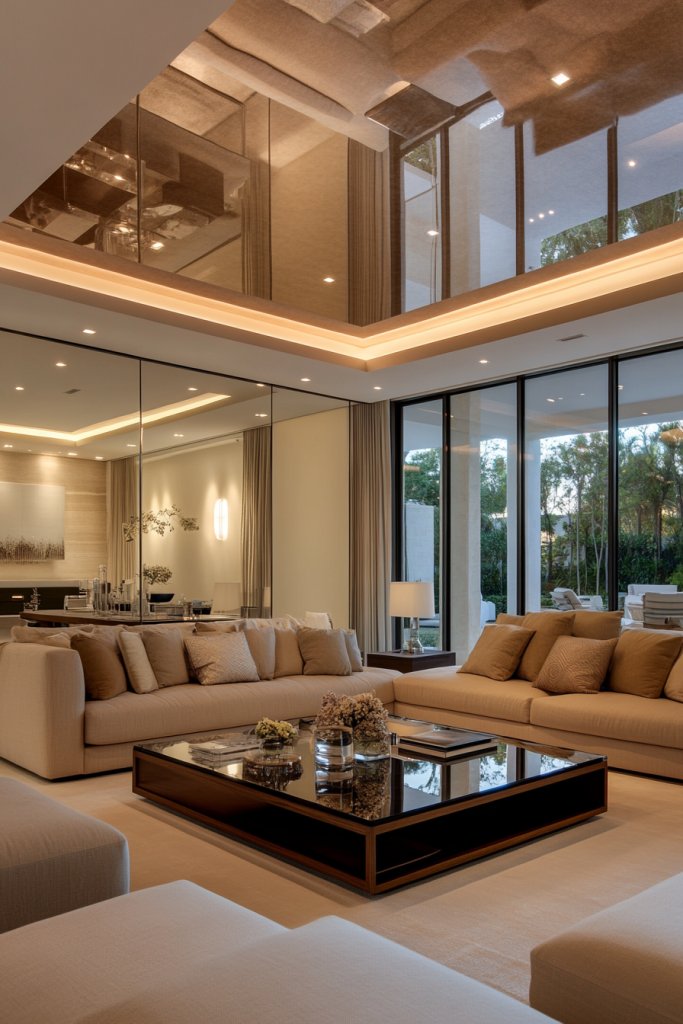
Mirrored ceilings are an eye-catching feature that can dramatically expand a room’s perceived size while adding a luxe, contemporary vibe. By reflecting light and surrounding decor, they create an airy, open atmosphere that feels both glamorous and inviting.
Recommended Products to replicate this idea
| # | Preview | Product | |
|---|---|---|---|
| 1 |

|
Shiftshade 12PCS Acrylic Mirror Tiles,12x12 Inch Flexible Mirror Sheet,Self Adhesive Self Cuttable... | Check Latest Price |
| # | Preview | Product | |
|---|---|---|---|
| 1 |
|
KSIPZE 100ft Led Strip Lights RGB Music Sync Color Changing Led Lights with Smart App Control Remote... | Check Latest Price |
Visualize a sleek, glossy mirror panel or a series of smaller mirrored tiles carefully installed across the entire ceiling or in a large section. The reflective surface captures and bounces light from your fixtures and windows, making the room appear larger and more luminous.
When paired with minimalist furnishings and neutral tones, the mirror adds a sophisticated, high-end touch. For added drama, incorporate LED strip lighting along the edges or behind fixtures to produce a soft glow that enhances the reflective quality.
The mirrored ceiling also creates interesting visual illusions, often doubling the visual space and adding a modern, upscale aesthetic to your living room. To install a mirrored ceiling, begin by measuring your ceiling and selecting high-quality, shatterproof mirror panels or tiles designed for ceiling use.
Use strong adhesive or mounting hardware suitable for your surface, ensuring the panels are perfectly aligned and securely attached. Finish with LED lighting or spotlights to highlight the reflective surface and create a striking visual effect.
While professional installation is recommended for a seamless look, DIY enthusiasts can achieve impressive results with patience and careful attention to detail. This feature truly elevates your living room into a chic, spacious retreat.
16. Fabric Drape Ceilings for a Soft, Luxurious Atmosphere
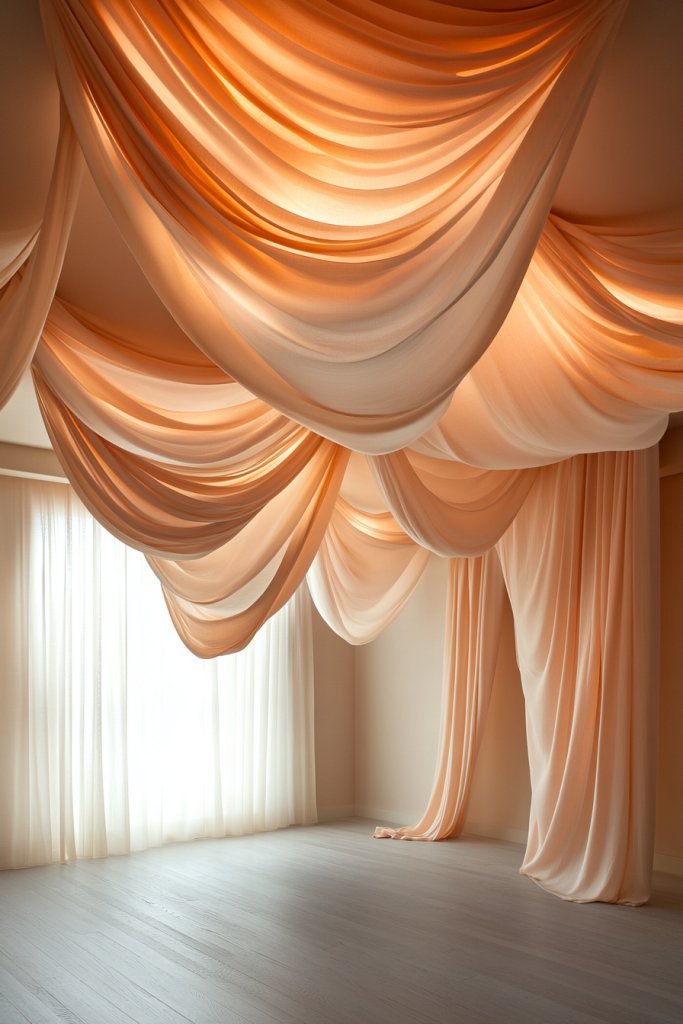
Transforming your living room ceiling with flowing fabric drapes can instantly add a sense of softness and elegance that turns any space into a cozy retreat. This design creates a dreamy, luxurious ambiance by enveloping the ceiling with billowing textiles that catch the light beautifully, producing gentle shadows and a warm glow.
Imagine a ceiling layered with sheer, flowing fabrics like silk or chiffon in neutral tones such as ivory, blush, or soft gray. The fabric is gently gathered along the edges or hung in gentle waves from a central point or perimeter, creating an undulating, cloud-like effect.
The textures are soft to the touch, and the movement of the fabric adds a dynamic, almost ethereal quality to the room. When paired with warm LED lighting or candles, the space feels inviting and serene, perfect for relaxing evenings or intimate gatherings.
To recreate this look, start by choosing lightweight fabrics such as silk, chiffon, or linen—alternatives include polyester or cotton blends for easier maintenance. Attach a sturdy ceiling-mounted rod or tension wire along the perimeter of the room, then drape the fabric in loose, flowing layers, securing it with clips or hooks as needed.
For a simple DIY option, use spring-loaded tension rods at the corners and attach the fabric with push pins or velcro strips. Keep the installation light and flexible so you can easily change or wash the fabric, and consider adding LED strip lights hidden behind the drapes for a soft, luminous effect.
17. Wooden Slat Ceilings for a Warm, Scandinavian-Inspired Style
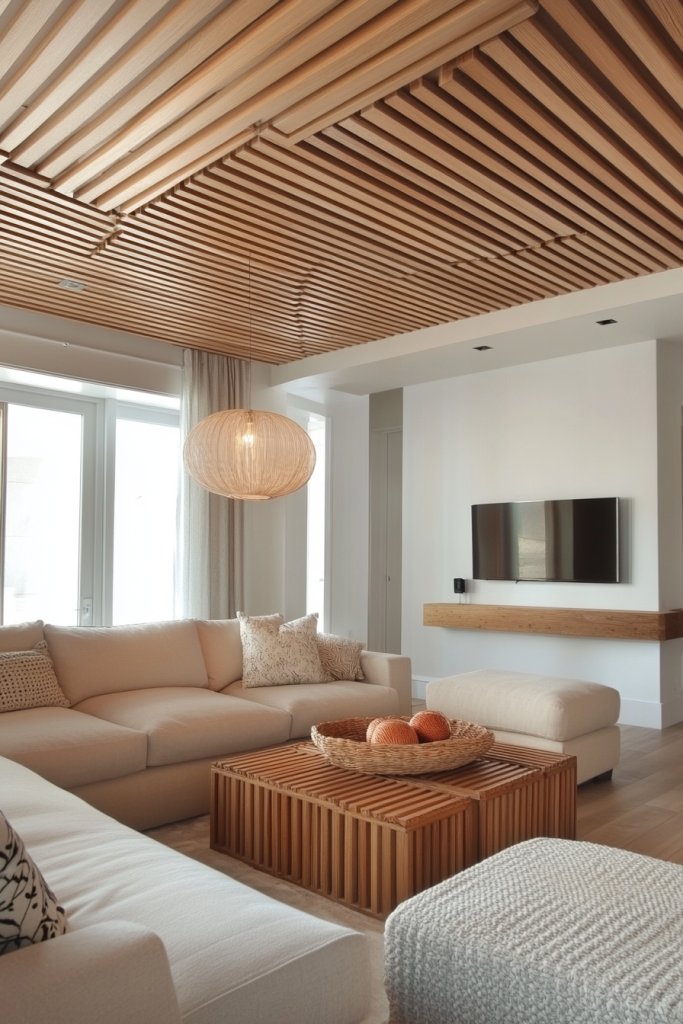
A wooden slat ceiling brings warmth, texture, and a modern Scandinavian vibe to your living room, creating a cozy yet sleek environment that feels inviting and sophisticated. The linear arrangement of narrow wood panels adds visual interest while emphasizing clean, minimalist lines that are highly Pinterest-worthy.
Recommended Products to replicate this idea
| # | Preview | Product | |
|---|---|---|---|
| 1 |

|
Art3d 4-Piece Wood Slat Acoustic Panels for Stylish Decor and Noise Reduction, 3D Textured Panel for... | Check Latest Price |
| # | Preview | Product | |
|---|---|---|---|
| 1 |
|
KSIPZE 100ft Led Strip Lights RGB Music Sync Color Changing Led Lights with Smart App Control Remote... | Check Latest Price |
Picture a ceiling covered with evenly spaced, natural wood slats in light oak, ash, or pine. The slats run parallel across the ceiling, leaving small gaps that allow for discreet LED strip lighting, casting a gentle, diffuse glow.
The wood’s grain and matte finish add tactile richness, while the neutral tones complement a variety of color palettes—from soft pastels to bold contrasts. This design creates an atmosphere that’s both calming and stylish, with the natural scent of wood enhancing the sensory experience.
To implement this look, gather wooden slats or planks, which can be purchased pre-finished or DIY-cut from pine, cedar, or oak. For a beginner-friendly version, consider using PVC or composite wood panels that mimic real wood but are easier to install.
Attach the slats to a substructure of metal or wooden battens secured directly to the ceiling, ensuring even spacing and alignment. Finish with a clear matte sealant or natural oil to preserve the wood’s beauty. You can also incorporate hidden LED lights within the gaps for a subtle, modern glow that highlights the linear pattern at night.
18. Circular or Oval Ceiling Features as Focal Points

Creating a circular or oval ceiling feature instantly draws the eye upward and establishes a striking focal point in your living room. These shapes add an element of architectural interest and can make the space feel more dynamic and layered, perfect for a contemporary or luxe aesthetic.
Recommended Products to replicate this idea
| # | Preview | Product | |
|---|---|---|---|
| 1 |

|
2Packs Molded Nylon Ceiling Medallion for Light Fixtures and Ceiling Fans, 9.8"OD x 4"ID x 0.94"P... | Check Latest Price |
| # | Preview | Product | |
|---|---|---|---|
| 1 |
|
Amico 4 Pack 6 Inch 5CCT Ultra-Thin LED Recessed Ceiling Light with Junction Box,... | Check Latest Price |
Visualize a smooth, rounded ceiling medallion or a recessed oval area painted in a contrasting color or textured with decorative plaster. The centerpiece could be framed with trim molding or accent lighting, such as a statement chandelier hanging in the center or soft cove lighting that emphasizes the curved shape.
The design feels both elegant and playful, breaking away from traditional flat ceilings and adding a sculptural dimension that enhances the room’s overall style. To create this feature, start by marking the desired shape directly on the ceiling with a pencil and using a level or template for accuracy.
Use plaster, drywall, or wood panels to form the shape, then finish with paint, wallpaper, or textured plaster for added depth. For a simpler approach, install a pre-made circular or oval ceiling medallion from a home improvement store and add decorative molding or trim.
Incorporate lighting—such as a pendant or spotlight—directly in the center or along the perimeter to highlight the shape and add ambiance. This focal point becomes a conversation starter while elevating the entire living room aesthetic.
19. Multi-Tiered Ceilings with Layered Lighting Effects
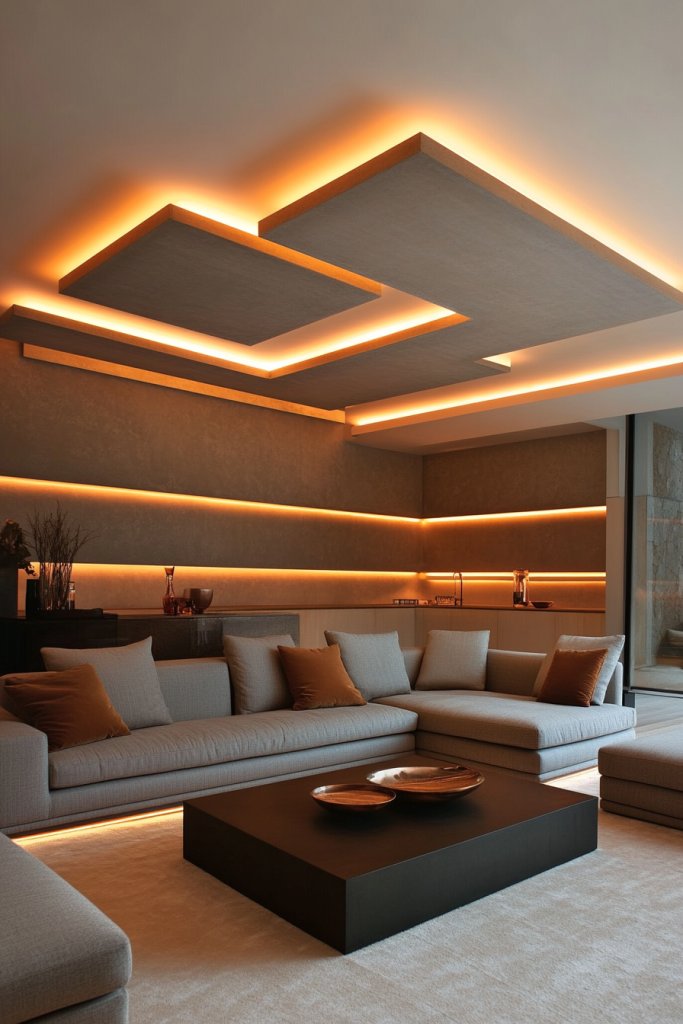
A multi-tiered ceiling design adds architectural complexity and depth to your living room, creating a layered, luxurious look that plays with light and shadow. Combined with layered lighting, this approach transforms a plain ceiling into a stunning visual feature that enhances the room’s ambiance and perceived space.
Recommended Products to replicate this idea
| # | Preview | Product | |
|---|---|---|---|
| 1 |
|
Amico 12 Pack 6 Inch 5CCT Ultra-Thin LED Recessed Ceiling Light with Junction Box, 1050LM... | Check Latest Price |
| # | Preview | Product | |
|---|---|---|---|
| 1 |
|
IMXPW Premium PVC Smooth Drop Ceiling Tiles 2ft x 4ft - Waterproof, Fire-Rated, Washable, Drop in... | Check Latest Price |
Envision a ceiling composed of several recessed levels, each with its own trim or molding, arranged in a step-like fashion. The highest tier might be the central focal point, with softer, indirect LED cove lighting installed in each layer’s recess to produce a glow that emphasizes the depth.
The layered structure adds volume and height, making the room feel more expansive and dramatic, especially when accented with a statement chandelier or pendant in the center. To achieve this, begin by designing a ceiling framework with gypsum board or drop ceiling panels in multiple levels.
Use LED strip lights or hidden cove lighting at each level’s edge for subtle illumination. The materials needed include gypsum drywall, wooden framing, LED lighting strips, and molding, which can be sourced from local hardware stores or specialty suppliers.
For ease, hire a professional for precise measurements and installation, or follow detailed DIY tutorials for step-by-step guidance. Finish with paint or wallpaper on the surfaces for a polished look. This layered approach not only adds visual interest but also improves lighting versatility for various moods and occasions.
20. Industrial Concrete Ceilings with Exposed Ductwork
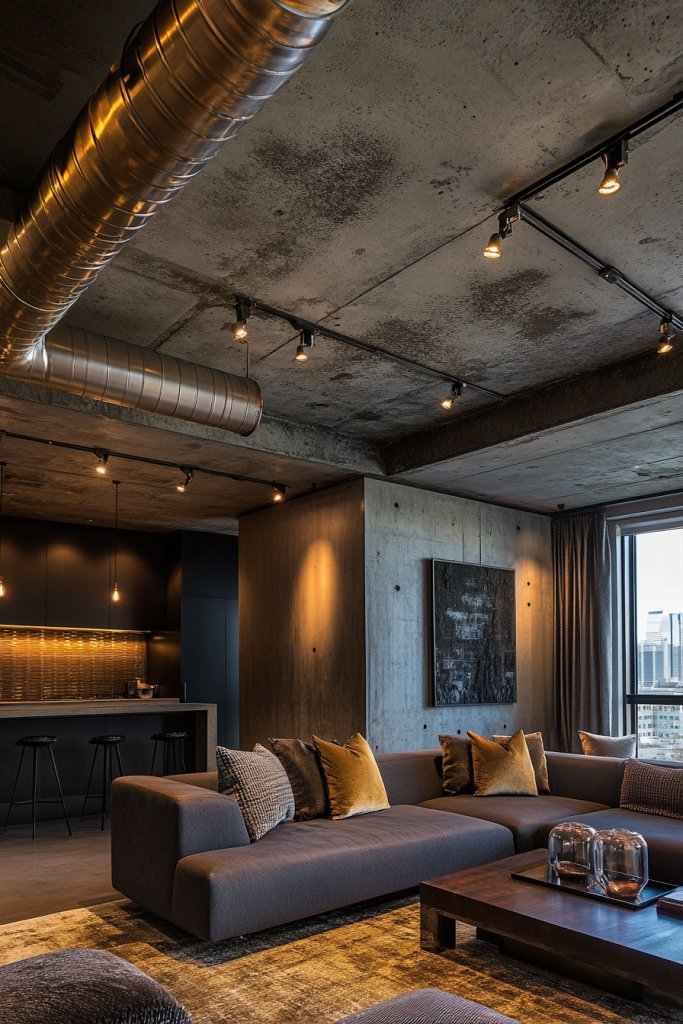
For a bold, modern aesthetic, an industrial concrete ceiling with exposed ductwork offers a raw, edgy vibe that pairs beautifully with minimalist, vintage, or loft-inspired living rooms. This look emphasizes texture and structural honesty, creating a space that feels authentic and effortlessly stylish.
Recommended Products to replicate this idea
| # | Preview | Product | |
|---|---|---|---|
| 1 |
|
Sunnyglade 12-Pack Drop Ceiling Tile 2ft x 2ft, Smooth White PVC Ceiling Panel 24 x 24in, 4mm... | Check Latest Price |
| # | Preview | Product | |
|---|---|---|---|
| 1 |

|
Imperial Gv0605 Duct Angle Boot, 3-1/4" X 10" X 4" | Check Latest Price |
Imagine a ceiling finished with polished or matte gray concrete, with visible ductwork, pipes, and electrical conduits painted black or left metallic to enhance the industrial feel. The rough texture of the concrete contrasts with sleek, modern furniture and soft textiles, balancing ruggedness with comfort.
The open ceiling design also enhances acoustic qualities, creating a lively, vibrant atmosphere with a touch of urban grit. To implement this style, consider options like concrete panels or overlays if you’re remodeling, or expose the existing concrete slab if your home has a raw ceiling structure.
Keep ductwork and piping intentionally visible, or add metallic pipe fittings and fixtures for a cohesive look. Use industrial-style lighting fixtures like vintage Edison bulbs or cage pendants to complete the aesthetic.
For DIY enthusiasts, applying concrete paint or overlay kits is an accessible way to mimic real concrete without the heavy labor. Regular maintenance involves cleaning dust and inspecting for cracks, but the visual impact of this design makes it a striking centerpiece that requires minimal embellishment.
21. Beamed Ceilings with Recessed Spotlights for a Cozy, Traditional Look
A beamed ceiling instantly adds warmth and character to a living room, evoking a cozy, traditional atmosphere that feels both inviting and timeless. When complemented with recessed spotlights, this design seamlessly combines rustic charm with modern functionality, creating a space that’s both stylish and practical.
Recommended Products to replicate this idea
| # | Preview | Product | |
|---|---|---|---|
| 1 |
|
Heritage Timber Salvaged Timber Faux Wood Beam, 3-Sided (U-Beam), 5 1/2"W x 5 1/2"H x 72"L, Kona... | Check Latest Price |
| # | Preview | Product | |
|---|---|---|---|
| 1 |

|
POPANU Canless Recessed Gimbal Downlight Rotatable-Spotlight 5 CCT 3 Inch Eyeball Ceilling Potlight,... | Check Latest Price |
Imagine exposed wooden beams running across the ceiling in rich, warm tones—perhaps oak or walnut—highlighted by soft, whitewashed finishes for a lighter, airy feel. Nestled between these beams are discreet, adjustable recessed spotlights that cast a gentle glow, accentuating the natural wood grain and creating a layered lighting effect.
The combination of textured wood and subtle lighting adds depth and warmth, making the room feel intimate yet spacious. This design works well with neutral or earth-tone color palettes, enhancing the overall cozy vibe.
To recreate this look, start by installing sturdy wooden beams—either real or faux, depending on your budget and DIY skills. Securely fasten the beams to the ceiling, ensuring they are evenly spaced for visual balance.
Then, embed recessed spotlights between the beams, focusing the light downward to highlight the ceiling’s architectural features. Use LED bulbs for energy efficiency and adjustability.
For an easier alternative, opt for faux beams made from lightweight materials like foam or fiberboard, which can be painted or stained to match your decor. Finish by adding warm-toned bulbs to create an inviting glow that transforms your living room into a cozy retreat.
22. Stained Glass Ceiling Inserts for Artistic Color Accents
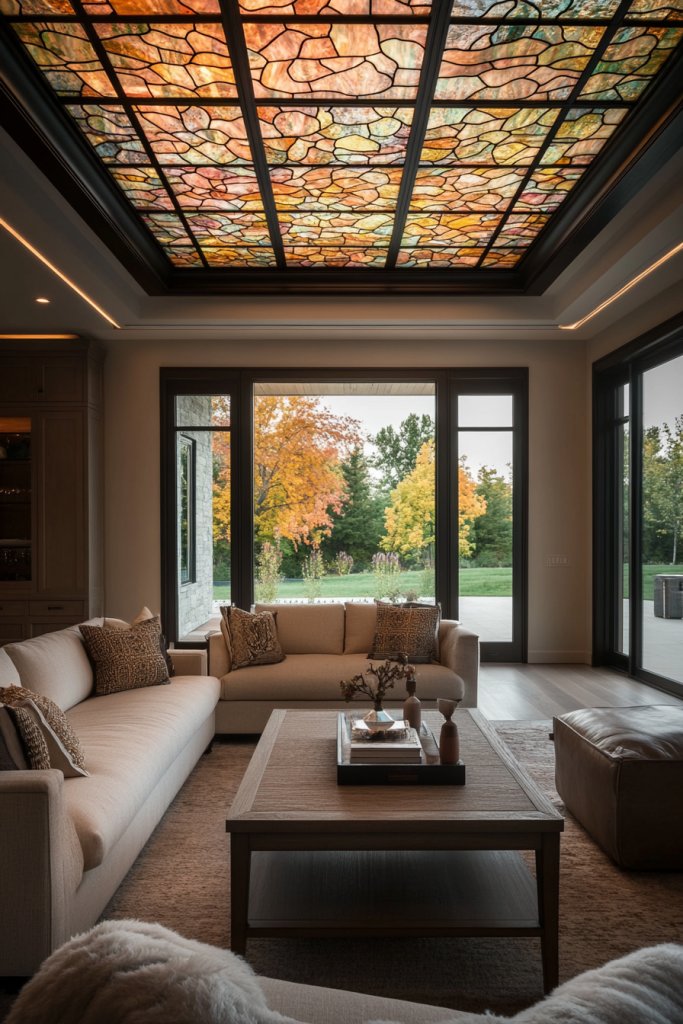
Stained glass ceiling inserts transform a plain ceiling into a stunning piece of art, adding vibrant color and intricate design that elevates your living room’s style with a touch of elegance and personality. This feature brings a unique, artistic focal point that captures attention and sparks conversation.
Recommended Products to replicate this idea
| # | Preview | Product | |
|---|---|---|---|
| 1 |

|
2 Pcs Stained Glass Fluorescent Light Cover for Classroom - Magnetic Fluorescent Light Covers for... | Check Latest Price |
| # | Preview | Product | |
|---|---|---|---|
| 1 |

|
VocgoUU 6 Pack 2x4 Surface Mount Kit for 2x4 LED Flat Panel Light - Aluminum 2'x4' ft Ceiling Frame... | Check Latest Price |
Visualize a beautifully crafted stained glass panel set into the ceiling, featuring a delicate floral motif or geometric pattern in jewel tones like sapphire blue, emerald green, or ruby red. When sunlight filters through, it casts a kaleidoscope of colors onto the walls and furniture, creating a dynamic, ever-changing atmosphere.
The glass’s textured surface adds a subtle shimmer, and the frame—made from brass, bronze, or painted wood—complements the overall aesthetic. The effect is both luxurious and whimsical, perfect for a living room that embraces artistic expression and individuality.
To install a stained glass ceiling insert, first measure your ceiling opening and select a design that complements your decor. You can commission custom panels from artisans or purchase ready-made options.
The insert is typically framed with a sturdy border that secures into your ceiling structure—either directly into a recessed opening or as a decorative overlay. Ensure the frame is sealed properly to prevent drafts or damage.
For a straightforward DIY project, consider attaching a pre-made stained glass panel into a lightweight metal or wooden frame, then mounting it securely. Pair with soft, warm lighting behind or around the panel to enhance the vibrant colors and create a captivating visual centerpiece.
23. Patterned Acoustic Tiles for Style and Sound Control
Patterned acoustic tiles are a clever, stylish solution to improve both the look and acoustics of your living room, combining decorative appeal with noise reduction. They offer an eye-catching way to add texture and pattern to your ceiling while making the space more comfortable and functional.
Recommended Products to replicate this idea
| # | Preview | Product | |
|---|---|---|---|
| 1 |

|
Focusound 52 Pack Acoustic Foam Panels 1" x 12" x 12" Sound Proof Foam Panles Soundproofing Noise... | Check Latest Price |
| # | Preview | Product | |
|---|---|---|---|
| 1 |

|
Armstrong Ceiling Tiles; 2x4 Ceiling Tiles - 10 pc White; Acoustic Ceilings for Suspended Grid;... | Check Latest Price |
Imagine a ceiling covered with geometric or organic-patterned tiles in shades of gray, white, or bold colors like navy and mustard. The tiles feature intricate cutouts, embossed designs, or abstract patterns that create visual interest and add depth to the room’s overhead space.
Their textured surfaces also help absorb sound, reducing echoes and making conversations more intimate. When paired with modern or eclectic decor, they become an integral part of the aesthetic, providing both form and function in one stylish package.
To implement these tiles, start by choosing a pattern and size that suits your ceiling dimensions. Adhesive-backed tiles are straightforward to install—simply peel and stick—making them suitable for DIY projects.
For larger areas, consider using a grid system or installing tiles with a lightweight suspended frame for easier handling. Ensure the surface beneath is smooth and clean before application for optimal adhesion.
As an alternative, fabric-covered or cork acoustic tiles can offer similar soundproofing with a softer look. Finish by adding lighting fixtures that complement the pattern—like spotlights or LED strips—to highlight the textures and create a cozy, inviting atmosphere.
24. Faux Vaulted Ceilings with Architectural Detailing
Faux vaulted ceilings create the illusion of spaciousness and grandeur without the extensive construction work of true vaulted roofs. This architectural detail adds a dramatic, elegant touch, especially when paired with detailed moldings or decorative beams, elevating your living room’s visual appeal.
Recommended Products to replicate this idea
| # | Preview | Product | |
|---|---|---|---|
| 1 |

|
Art3d Ceiling Crown Molding Trim 10-Pack 47Ft, High Impact Polystyrene Decorative Ceiling Moulding -... | Check Latest Price |
| # | Preview | Product | |
|---|---|---|---|
| 1 |
|
Amico 12 Pack 6 Inch 5CCT Ultra-Thin LED Recessed Ceiling Light with Junction Box, 1050LM... | Check Latest Price |
Picture a ceiling that mimics the gentle arch of a cathedral vault, finished with painted plaster or textured materials for realism. The arch is subtly integrated into the existing ceiling plane, often with decorative moldings or paneling that emphasize the curvature and add a touch of classical sophistication.
This design not only makes the room feel larger but also introduces a sense of architectural depth and craftsmanship. Complemented by ornate crown molding, recessed lighting, or gentle uplights, the faux vaulted ceiling becomes an impressive statement piece that enhances the overall ambiance.
To achieve this look, start by assessing your ceiling’s current height and structure. Use lightweight foam or fiberboard panels shaped into a gentle arch to create the illusion of a vaulted ceiling.
Attach these panels securely to the existing ceiling with adhesive or screws, then finish with drywall compound and paint in a color that matches or contrasts your walls. Adding decorative moldings along the edges can further enhance the architectural illusion.
For a simpler option, use wallpaper or textured paint to simulate the look of a vaulted ceiling. Finish with subtle lighting—like hidden cove lights—to accentuate the curves and create a sense of spaciousness and elegance.
25. Minimalist Flat Ceilings with Hidden Cove Lighting for a Sleek Finish
A sleek, flat ceiling with hidden cove lighting offers a modern, minimalist aesthetic that emphasizes clean lines and uncluttered space. This design creates a sophisticated backdrop, making your living room appear larger, brighter, and more streamlined.
Recommended Products to replicate this idea
| # | Preview | Product | |
|---|---|---|---|
| 1 |
|
KSIPZE 100ft Led Strip Lights RGB Music Sync Color Changing Led Lights with Smart App Control Remote... | Check Latest Price |
| # | Preview | Product | |
|---|---|---|---|
| 1 |
|
Amico 12 Pack 6 Inch 5CCT Ultra-Thin LED Recessed Ceiling Light with Junction Box, 1050LM... | Check Latest Price |
Visualize a smooth, white ceiling with no visible fixtures or moldings, where soft, indirect light emanates from concealed LED strips hidden within a narrow ledge or cavity along the perimeter. The gentle glow highlights the ceiling’s edges, adding depth and dimension without interrupting the minimalist vibe.
The overall effect is serene and uncluttered, perfect for contemporary or Scandinavian-inspired interiors. The subtle lighting accentuates the ceiling’s flatness and draws attention to the room’s architecture and decor, creating a calm, refined atmosphere.
To implement this design, start by ensuring your ceiling is level and smooth. Install a narrow ledge or recess around the perimeter, then run flexible LED strip lights inside the cavity, securing them with clips or adhesive.
Cover the strips with a diffusing cover to soften the light and prevent glare. Connect the lighting to a dimmer switch for adjustable ambiance.
For best results, choose neutral, matte paint for the ceiling to enhance the clean look. As an alternative, some prefabricated ceiling panels come pre-installed with hidden lighting options, making installation even easier while maintaining a sleek, modern finish.
Conclusion
With so many innovative ceiling design ideas—from classic coffered and tray ceilings to modern geometric panels, skylights, and textured finishes—there’s endless potential to transform your living room into a stunning space. Whether you prefer warm wooden beams, bold painted patterns, or sleek metallic accents, these designs invite creativity and personalization.
Don’t hesitate to experiment and bring your vision to life—your perfect living room awaits above. Elevate your home’s style and ambiance by reimagining your ceiling today!