
I have been, or can be if you click on a link and make a purchase, compensated via a cash payment, gift, or something else of value for writing this post. As an Amazon Associate, I earn from qualifying purchases. Please read my full Affiliate Disclosure for more information.
Imagine transforming a tiny corner of your yard into a tidy, efficient haven for your gardening tools—sounds like a dream, right? Small-space garden tool storage ideas are more popular than ever, helping urban gardeners and homeowners maximize limited space while keeping their outdoor areas organized and attractive.
This article is packed with creative and practical solutions that will inspire you to reimagine your garden storage. From clever wall-mounted racks to stylish storage benches, you’ll find a variety of ideas suited for every small space, ensuring your yard stays clutter-free and inviting.
1. Vertical Wall-Mounted Pegboards for Easy Access and Customization
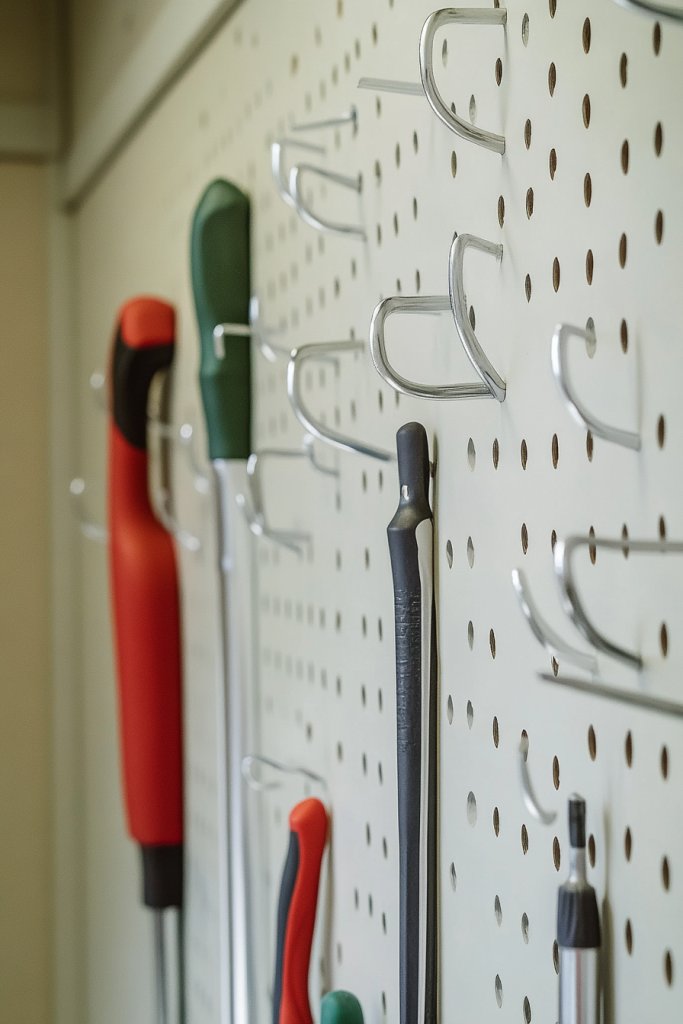
Ever struggled to keep your garden tools organized without clutter taking over every available surface? Finding a simple, efficient way to access your tools quickly can feel like a challenge, especially in small spaces. No one wants to hunt through piles or dig through boxes every time you need a trowel or pruning shears. The desire for a neat, accessible system is real, and luckily, there’s a straightforward solution.
Imagine a sturdy pegboard mounted on a compact wall, painted in a cheerful color that matches your garden vibe. Hooks hold various tools—rakes, hoes, gloves—all within arm’s reach. The textured surface allows for customization: add labels, small shelves, or baskets for extra bits. The entire setup looks tidy yet inviting, turning a blank wall into a functional art piece that sparks gardening enthusiasm.
Choose a sleek metal pegboard for a modern look or rustic wood slats for a cozy feel. Small modular baskets can be swapped out seasonally, and hooks can be repositioned to fit your specific tools. For tiny yards, mount the pegboard vertically to save space or combine multiple for larger tool collections. Colors can be bold or neutral, depending on your style preference. Flexibility makes this idea adaptable to any garden setup.
Start by selecting a durable, weather-resistant pegboard suited for outdoor use. Measure your wall space and plan your layout, grouping similar tools together. Install sturdy hooks and attach small shelves if needed. Organize your tools by size or frequency of use, and label sections for quick identification. Secure the pegboard high enough to avoid accidental knocks but within easy reach. Regularly clean and reorganize to keep it functional and fresh.
Add decorative touches with painted frames or stenciled patterns around the pegboard for personality. Include small pots or containers for hand tools or seed packets—hidden but accessible. Use colorful or patterned hooks to add a pop of fun. Personalize with engraved labels or tags to keep everything looking neat and professional. The goal is a space that truly reflects your gardening personality.
Transforming a blank wall into a tool haven boosts your confidence and makes gardening more enjoyable. Plus, an organized space can inspire you to try new projects. With just a few hooks and some paint, you’re well on your way to a tidy, efficient yard. It’s a small change that makes a big difference—why not start today?
2. Repurposed Shoe Organizers as Compact Garden Tool Holders
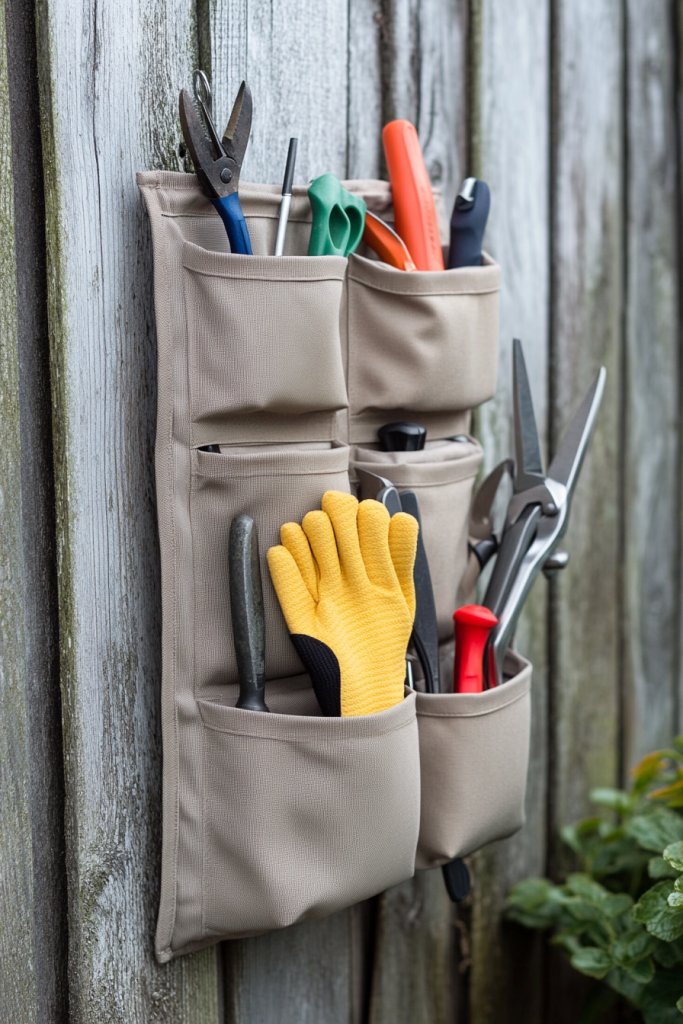
Ever find yourself tripping over garden tools scattered across the yard or shoved into random corners? Keeping things tidy in a small space can feel like an impossible puzzle. You want quick access to your tools without creating clutter or sacrificing precious space. The solution? Repurpose something you already have—your shoe organizer.
Visualize a hanging shoe organizer attached to a shed wall or fence, each pocket filled with small hand tools, gloves, or plant markers. Brightly colored pockets contrast nicely against a weathered wooden shed, adding a playful touch. Everything is visible at a glance, with no digging or searching needed. It’s like a mini closet designed specifically for your gardening needs, all in one compact, vertical space.
Choose clear or fabric pockets based on your aesthetic—see-through for quick visual checks or solid for a cleaner look. Hang it inside a shed door, on a fence, or near your planting area. For winter or off-season storage, swap out with a smaller or collapsible version. Use different colors or labels to categorize tools or supplies, making organization even easier. This flexible approach adapts well to any yard size.
Start by selecting a sturdy, washable shoe organizer—preferably waterproof if exposed to rain. Mount it at eye level or within reach, using strong hooks or nails. Fill each pocket with the essentials: small pruners, seed packets, gloves, or hand rakes. Label pockets with waterproof tags for quick identification. Keep frequently used tools at the top for convenience and store seasonal items lower down. Check regularly to restock or reorganize.
Add decorative fabric or paint the organizer for a custom look. Use waterproof labels or tags with fun fonts for personalization. Incorporate small hooks inside pockets for hanging delicate tools or accessories. For a more polished vibe, coordinate colors with your shed or fence paint. This DIY project turns clutter into charm with minimal effort.
Repurposing a shoe organizer is a budget-friendly, easy fix that instantly declutters your gardening space. It encourages you to keep tools organized and ready to go, making gardening less stressful. Plus, it’s a great conversation starter—your friends might want to copy your genius idea. With a little creativity, you’ll enjoy a tidier, more efficient yard that sparks joy every time you step outside.
3. Slim Over-the-Fence Storage Bins to Maximize Underutilized Spaces
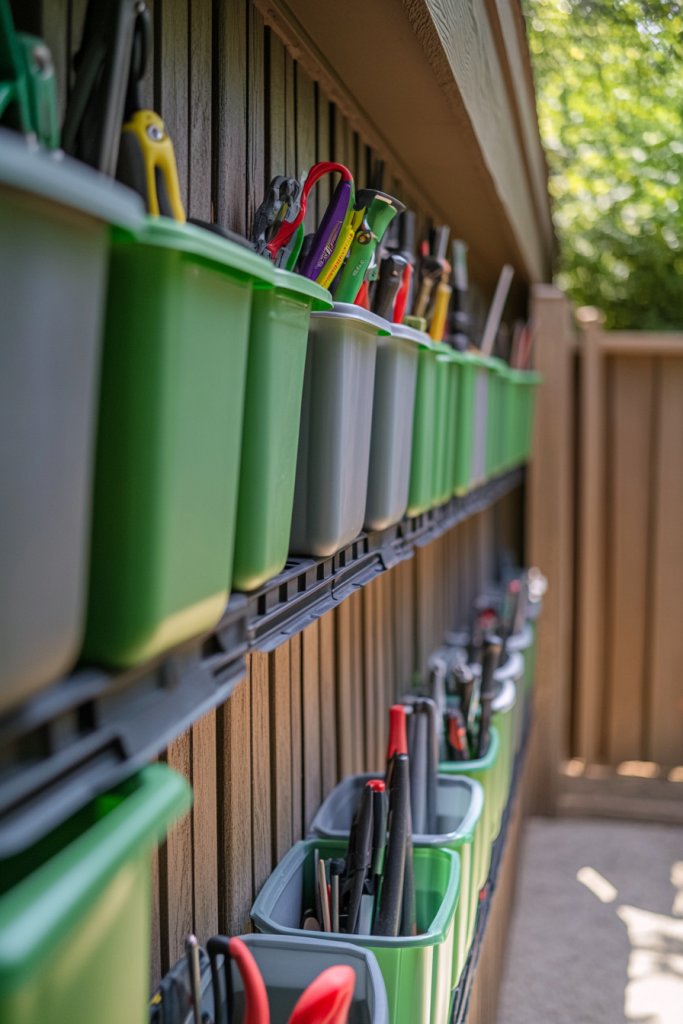
Feeling cramped in your tiny yard and struggling to find space for your gardening gear? Underutilized areas like fence gaps often go ignored, wasting prime real estate. You want a clever way to store tools without sacrificing precious ground space. Over-the-fence storage bins could be just what you need to reclaim that wasted space.
Picture slim, weatherproof plastic bins hanging neatly on a fence panel, secured with hooks or brackets. The bins are transparent or labeled, showing their contents—small shovels, watering cans, or garden gloves—at a glance. They follow the fence’s contour, blending into the yard’s aesthetic while freeing up ground space. This setup looks tidy, accessible, and surprisingly stylish for such a simple idea.
Choose durable, UV-resistant containers in colors that complement your yard. Mount them at different heights depending on your tools’ size or accessibility needs. For narrow spaces, slim bins are perfect; for wider fences, opt for larger or multiple units. You can also add hooks or small shelves above for extra organization. Seasonal adjustments include swapping out the contents or changing the placement for better access.
Start by measuring your fence gaps and selecting storage bins that fit snugly without crowding. Install sturdy hooks or brackets designed for outdoor use, ensuring they can bear the weight of full bins. Label each container for quick identification, and organize tools by frequency of use. Secure the bins with weatherproof fasteners, and consider adding a small lock for valuable tools. Regularly check for wear and reposition as needed for optimal access.
Personalize your bins with custom paint, decals, or fabric covers for style and weather protection. Attach small hooks or clips inside or outside for additional tools or accessories. Use color coding to identify contents easily—green for pruning, blue for watering supplies, etc. Incorporate decorative elements like plant-themed stickers to enhance visual appeal. This setup combines practicality with a dash of personality.
Maximizing vertical space with fence bins transforms overlooked areas into handy storage zones. It’s a smart, space-efficient solution that keeps your tools within reach while maintaining a tidy yard. Once set up, you’ll wonder how you ever managed without it. Small changes like this boost your confidence and inspire more outdoor projects. Your yard will look organized and inviting in no time.
4. Clever Hidden Storage Beneath Garden Benches for Discreet Tool Keeping
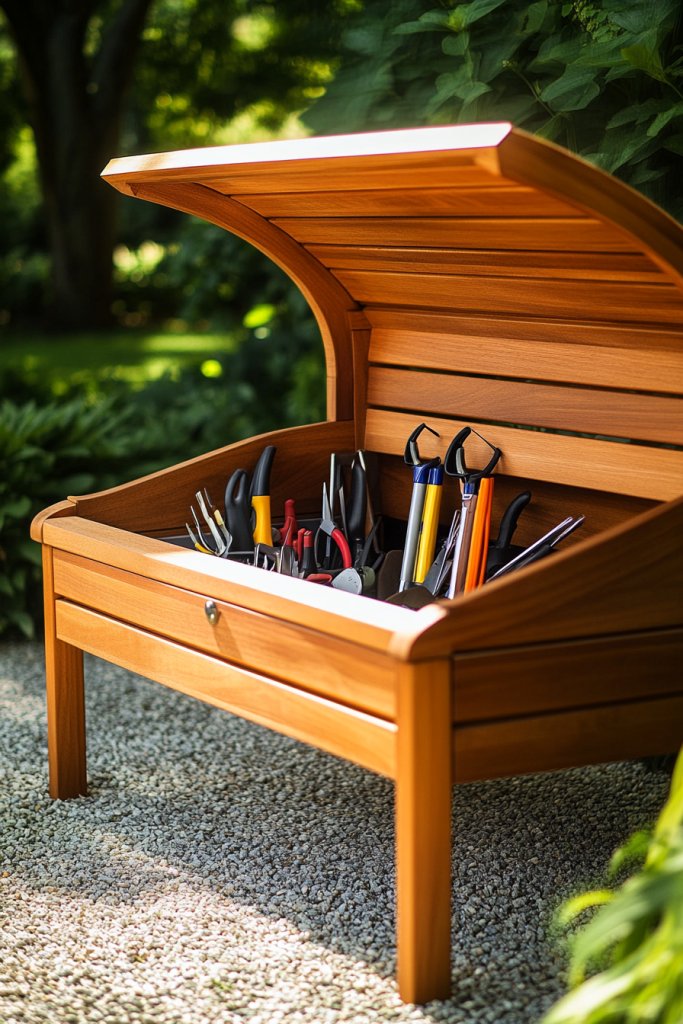
Tired of your garden tools cluttering up your patio or taking up valuable shed space? Sometimes, the best storage solution is hiding in plain sight—beneath a garden bench. Concealed storage offers the perfect way to keep tools out of sight but still accessible, especially in small yards where every inch counts.
Imagine a sturdy wooden bench with a hinged or removable seat, revealing a hidden compartment beneath. Inside, neatly organized tools rest in designated slots or bins, protected from the elements. The bench’s exterior looks like a charming piece of outdoor furniture—no clutter, no mess, just a seamless blend of style and function. It’s like having a secret stash that keeps your yard looking tidy and inviting.
Opt for rustic, modern, or vintage styles depending on your yard decor. Use weatherproof materials like treated wood or composite for longevity. The compartment can be designed with built-in dividers, small shelves, or removable trays for easy access. For smaller spaces, choose a narrow or compact bench; for larger yards, go for a spacious design with extra storage features. This idea adapts to various aesthetic preferences and sizes.
Begin by selecting a durable outdoor bench with a lid or hinged seat. Reinforce the internal space with moisture-resistant lining or paint to prevent rot. Organize tools with custom dividers or small containers to maximize space. Install the bench on a level surface, ensuring stability. Regularly clean out and reorganize to keep the hidden storage functional and free of debris. Consider adding a lock or latch for security if needed.
Paint or stain the bench in your favorite color to match your outdoor decor. Decorate the exterior with decorative hardware or cushions for extra comfort. Use labels or color-coded trays inside for quick gear identification. You could also add a small built-in watering can holder or tool rack on the outside for added flair. Personal touches make this storage both practical and charming.
Hidden storage under a garden bench combines style with practicality, making your yard look organized without sacrificing aesthetics. It’s an elegant solution that keeps clutter out of sight and within reach. Once you see how easy it is to keep tools tucked away, you’ll be motivated to tidy other outdoor spaces. Small upgrades like this turn your yard into a peaceful retreat that’s both functional and beautiful.
5. Hanging Baskets and Pockets on Fences for Lightweight Tool Storage
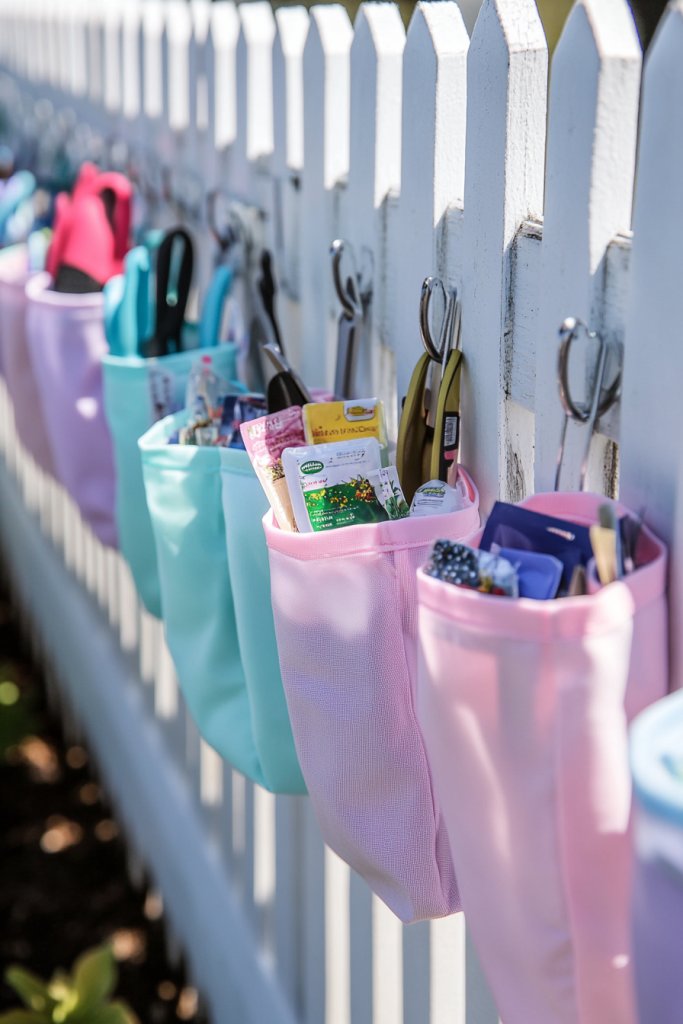
Struggling to find space for your lightweight gardening tools without cluttering your shed or garage? Small yards often lack dedicated storage, making every inch precious. You want a simple, accessible way to keep your tools handy without sacrificing style or space. Hanging baskets and pockets on fences could be just what you need.
Imagine colorful fabric or plastic pockets hanging neatly along a fence line, each holding a trowel, pruning shears, or seed packets. The baskets sway gently in the breeze, adding a cheerful splash of color. The fence becomes an organized, functional art piece that keeps your essentials within easy reach. It’s a simple, charming setup that transforms a plain boundary into a practical storage zone.
Select weatherproof fabrics, plastic, or wire baskets to match your yard’s aesthetic. Hang them at different heights based on your tools’ size or your comfort. For a uniform look, use matching colors or labels; for a fun vibe, mix patterns and shades. Seasonal swaps include replacing worn fabrics or reordering baskets for better access. This adaptable idea works well in any small outdoor space.
Start by attaching sturdy hooks or brackets to your fence, spaced appropriately for your baskets. Secure baskets with weather-resistant ties or clips, ensuring they won’t blow away. Organize tools by size or type, and label each pocket if desired. Keep frequently used items at waist level or within easy reach. Regularly check for wear or damage, and reorganize as needed to maintain order. Easy to install and maintain, it’s an instant upgrade.
Decorate baskets with paint or fabric covers matching your garden theme. Add tags, labels, or small charms for a personalized touch. Incorporate small hooks inside the baskets for hanging delicate or small tools. Use bright colors or patterns to inject personality into your fencing. This approach makes tool storage a fun part of your yard’s decor.
Harnessing fence space with hanging baskets turns a boring boundary into a functional feature. It encourages ongoing organization and easy access, making gardening more enjoyable. Once set up, you’ll wonder how you ever managed without it. Small, smart solutions like this boost your confidence and inspire regular outdoor projects, transforming your yard into a lively, well-organized space.
6. Compact Wall Shelves with Bins for Organized Small Tool Collection
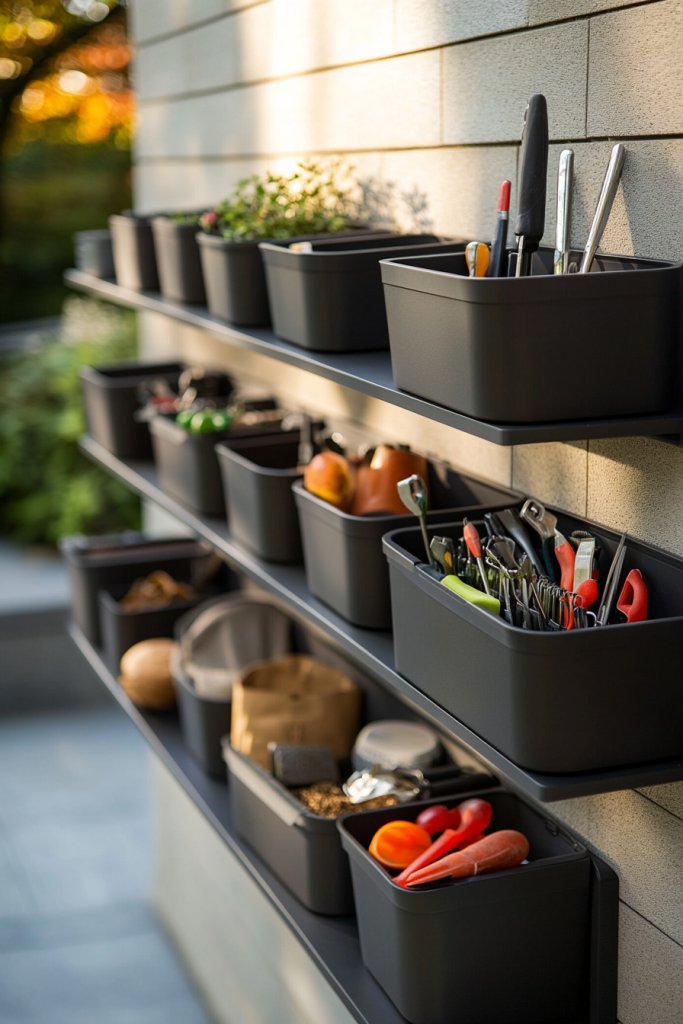
Ever felt overwhelmed by a jumble of small garden tools scattered across your yard? Keeping everything orderly, especially in tight spaces, can seem impossible. You want a way to display and access your tools easily without cluttering your limited area. Compact wall shelves with bins offer a simple, effective fix.
Picture a sturdy wall-mounted shelf system, with small bins arranged neatly in a row. Each bin holds a specific type of tool—hand trowels, gloves, or plant labels—organized for quick grab-and-go moments. The shelves are made from weatherproof wood or metal, blending seamlessly with your garden decor. It’s a practical, tidy setup that turns chaos into convenience.
Choose open or enclosed shelves depending on your aesthetic preference. Use colorful bins or label them clearly for quick identification. Mount the shelves at different heights to suit your tools’ size and your reach. For seasonal needs, swap out bins or add extra shelves for larger tools or supplies. This adaptable system fits well into small yards or narrow spaces.
Install sturdy wall brackets or mounts suitable for outdoor use. Arrange bins on the shelves, organizing tools by type or frequency of use. Label each container with waterproof tags for easy recognition. Keep frequently used tools at eye level for efficiency, and store less-used items higher or lower. Regularly clean and reorganize to keep everything accessible and tidy. This system offers both form and function.
Personalize your shelves with paint, stencils, or decorative hardware. Use different colored bins to categorize tools or supplies, adding visual interest. Incorporate small hooks or clips inside the bins for hanging delicate or small items. Experiment with shelf arrangements—vertical stacks or staggered layouts—to suit your style. Custom touches make the setup uniquely yours.
A well-organized wall shelf system simplifies gardening routines and saves time. It encourages regular tidying and helps you maintain a clutter-free yard. Seeing everything neatly displayed boosts your confidence in managing your space. With just a few basic materials, you can create a stylish, practical storage solution that lasts for years.
7. Reclaimed Pallet Wall for Rustic and Efficient Tool Display
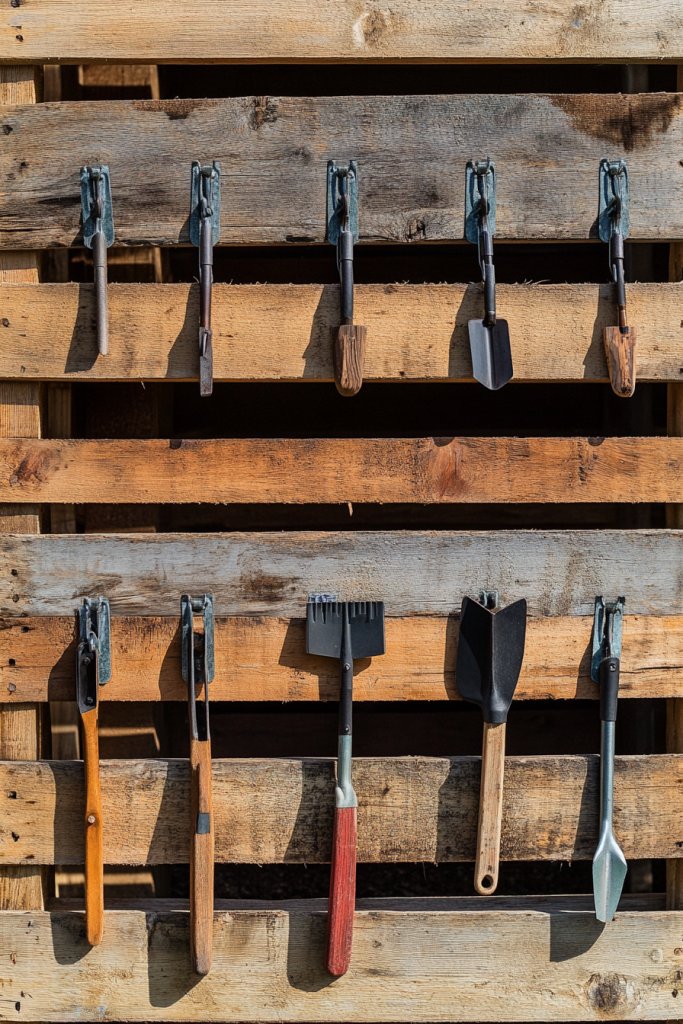
Wishing you could add some rustic charm to your garden while keeping tools accessible? Using reclaimed pallets is a charming, eco-friendly way to build a functional display wall. It’s perfect for small spaces where every bit of visual interest counts. Plus, it’s a budget-friendly project that adds personality to your yard.
Envision a weathered wooden pallet mounted on a garden wall, with hooks or nails holding tools like pruning shears, small shovels, or gloves. The rough texture and imperfect finish give it a vintage vibe, blending seamlessly with natural surroundings. A few painted or stenciled accents add a pop of color, making it a focal point rather than just storage. The entire display exudes a relaxed, farmhouse feel that’s both practical and pretty.
Sand, paint, or seal the pallet to match your yard’s aesthetic—going for a distressed look or a polished finish. Attach multiple pallets in a staggered or linear fashion depending on space and style preference. Incorporate additional elements like small shelves, baskets, or plant hooks (avoiding restricted items) to expand functionality. For seasonal flair, add fairy lights or decorative signs. The versatile pallet wall adapts easily to different garden themes.
Source reclaimed pallets from local stores, farms, or online marketplaces—make sure they’re clean and free of chemicals. Mount the pallet securely on a sturdy wall or fence using heavy-duty brackets or screws. Install hooks or nails at strategic points for hanging tools. Organize tools by type or size, and add labels for quick identification. Reinforce with weatherproof coatings to prolong life. Regularly check for loose boards or rusted hardware.
Decorate the pallet with paint, stencil designs, or personalized signs for extra charm. Use colorful or vintage-style hooks to enhance visual appeal. Incorporate small baskets or tins for storage of smaller items—seed packets, twine, or plant ties. Add fairy lights or decorative elements to make the display a focal point. Personal touches turn a simple pallet into a customized outdoor feature.
A reclaimed pallet wall combines sustainability with style, transforming clutter into a charming focal point. It’s easy to create, budget-friendly, and endlessly customizable, inspiring you to take on more DIY projects. Once finished, you’ll love how it elevates your yard’s look and organization. Small upgrades like this encourage ongoing care and pride in your outdoor space.
8. Over-the-Door Storage Racks for Garden Tools in Small Sheds
Does your tiny shed turn into a chaotic maze of garden tools? Small spaces need smart solutions to stay functional without feeling cramped. Over-the-door storage racks are a game-changer, turning unused door space into a handy tool station. They help keep your tools organized and easily accessible, saving you time and frustration.
Imagine a sturdy rack hanging over the door of your shed, with hooks and compartments holding gloves, small tools, and accessories. The rack’s sleek metal or plastic finish contrasts with the shed’s rustic walls, creating a tidy, organized look. When you open the door, everything you need is right there, ready to grab. It’s like having an extra storage closet right on your shed door, transforming chaos into order.
Select a rack with adjustable hooks, multiple compartments, or pockets depending on your needs. Use labels or color coding for quick identification. Mount the rack at a height that suits your reach, avoiding obstruction of the door’s closure. For seasonal changes, swap out tools or accessories on the hooks. For very narrow sheds, choose slim, space-efficient designs that maximize vertical storage.
Choose a durable, weather-resistant over-the-door rack suitable for outdoor use. Install the rack securely over the shed door, making sure it doesn’t interfere with opening or closing. Organize tools by type or size, hanging frequently used items at eye level. Use labels or color-coded tags to maintain clarity. Regularly inspect for rust or loose hooks, and reorganize as your collection grows or shrinks.
Decorate the rack with paint or decals to match your garden theme. Add small containers or clips inside the compartments for tiny items like plant tags or twine. Use decorative hooks or personalized labels for a custom look. Incorporate a small magnetic strip for metal tools or accessories, increasing efficiency. Personal touches make your storage both practical and charming.
Over-the-door racks efficiently utilize vertical space, turning a small shed into a well-organized workshop. It’s a quick, affordable upgrade that keeps your tools tidy and ready. Once you experience the convenience, you’ll be motivated to organize other outdoor areas. Simple solutions like this turn clutter into calm, inspiring more outdoor projects.
9. Multi-Functional Garden Carts with Built-in Storage Compartments
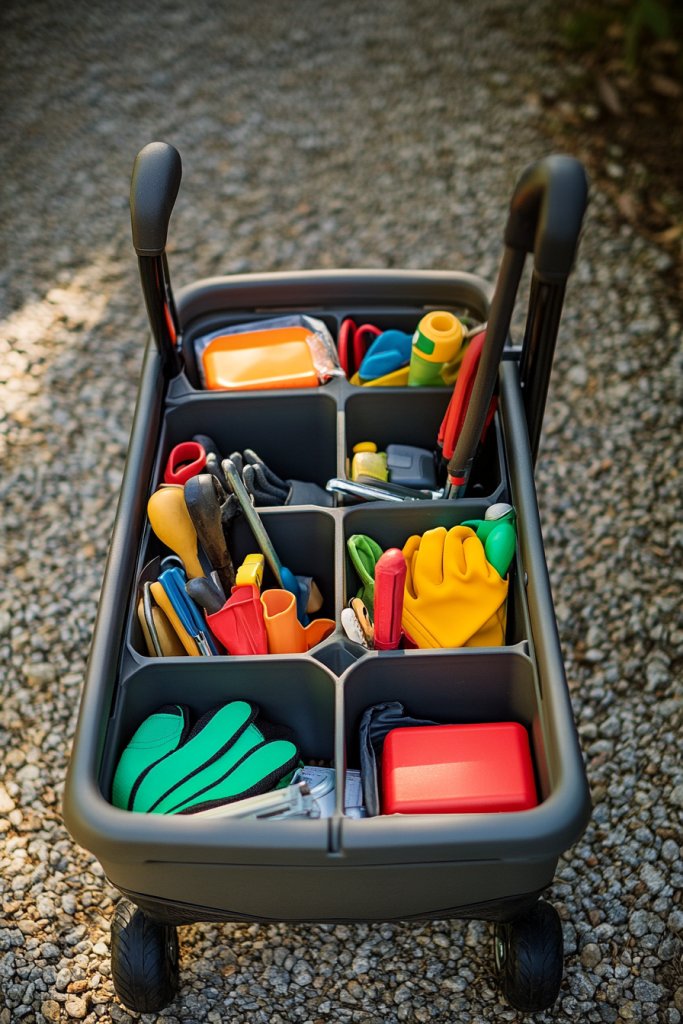
Need a versatile solution to transport and store your garden tools without multiple trips? A garden cart with built-in storage combines mobility and organization in one compact package. It’s perfect for small yards where space is tight but efficiency is essential. Plus, it adds a touch of convenience to your gardening routine.
Picture a sturdy, wheeled cart with multiple compartments and trays—filled with your favorite tools, gloves, and seed packets. Its rugged wheels roll smoothly across uneven terrain, and the compartments keep everything separated and easy to find. The cart’s design blends function with style, featuring weatherproof materials and a compact footprint. It’s like having a portable toolbox that moves with you, making gardening less of a chore.
Choose a model with adjustable or removable compartments to customize storage. Use different sections for large tools, small hand tools, and accessories. Opt for lightweight but durable materials like plastic or aluminum for easy maneuvering. For different seasons, add or remove trays, or swap out compartments for larger or smaller items. This adaptable cart fits a range of yard sizes and gardening styles.
Select a garden cart with ample storage capacity and sturdy wheels suited for your terrain. Fill compartments with tools based on usage frequency, keeping the most-used items at the top or front. Secure loose items with straps or clips to prevent shifting during movement. Regularly clean the cart and reorganize tools to match your gardening projects. Invest in a model with weather-resistant features for longevity.
Add custom labels or color-coded sections for quick identification. Decorate with stickers or paint for a personalized touch. Use small baskets or containers inside compartments for tiny items like plant tags or twine. Attach a fold-out work surface or extra hooks for added functionality. Personalization turns a practical tool into a reflection of your gardening personality.
A multi-functional cart streamlines your gardening process, making it easier and more enjoyable. It encourages you to stay organized and prepared, boosting confidence for bigger projects. Once you see how much easier gardening becomes, you’ll be motivated to tackle new challenges. This simple upgrade transforms your yard into a well-oiled outdoor workspace.
10. Magnetic Strips on Garden Walls for Metal Tool Storage
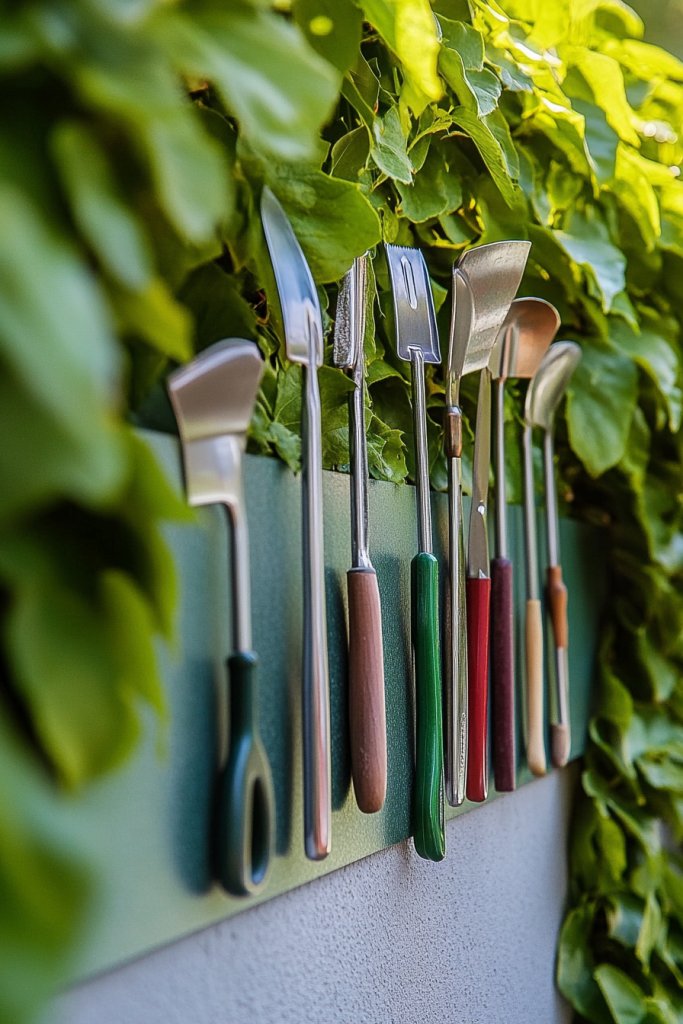
Ever lost track of your favorite metal tools or spent ages rummaging through clutter? Small space gardeners need quick, efficient storage solutions that keep essentials within reach. Magnetic strips provide a sleek, space-saving way to organize and display your metal tools—no more digging around in boxes or drawers.
Visualize a sturdy strip mounted on a wall or shed interior, with shiny metal tools like pruners, trowels, and weeders easily magnetized and held in place. The strips are discreet but highly functional, creating a clean, organized look. The tools hang neatly, ready for action, and the entire setup adds a modern, streamlined vibe to your yard or shed. It’s practical, minimalist, and effective.
Choose from metal, magnetic rubber, or silicone strips depending on your aesthetic preference. Mount them at different heights to suit your tool sizes and your comfort. Combine with hooks or small bins for non-metal items, creating a hybrid storage system. For seasonal adjustments, move or replace strips to optimize space. This method adapts well to any small yard or shed.
Securely attach the magnetic strip to a wall using appropriate fasteners, ensuring it can support the weight of your tools. Organize your metal tools by size or type, placing the most used items at eye level. Keep a few spare magnets or strips handy for future expansion. Regularly wipe down tools and check the strip’s attachment points for stability. It’s a quick, low-cost fix for a cluttered space.
Decorate the strip with paint or decals matching your garden theme. Add small labels or tags to keep track of tool types or maintenance schedules. Use brightly colored or patterned magnets for a fun touch. Combine with other storage ideas like bins or hooks for non-metal tools to create a comprehensive system. Personal touches make organization both functional and stylish.
Magnetic strips turn chaotic tool collections into sleek displays, making your yard feel more organized and professional. It’s a simple upgrade that encourages regular tidying and easy access. Once you experience how much easier gardening becomes, you’ll be motivated to keep everything in order. A small change that delivers big results—what’s stopping you?
11. Stackable Plastic Crates for Modular and Flexible Tool Organization
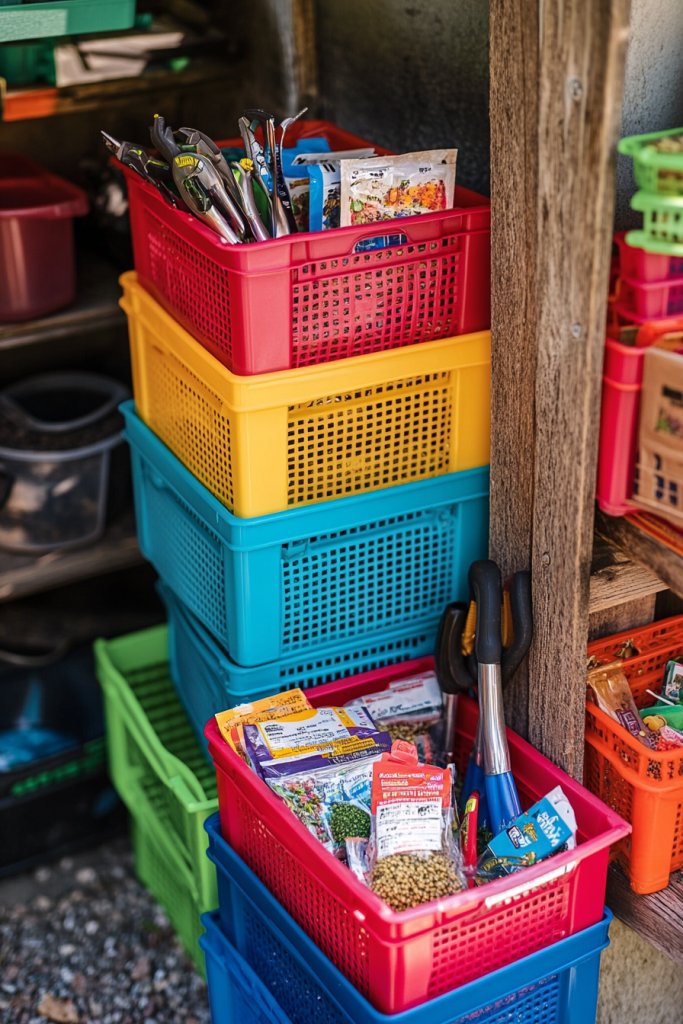
Tired of cluttered, unorganized tool piles that make gardening more stressful? Small spaces demand adaptable storage that grows with your collection. Stackable plastic crates offer a simple, modular solution that can be customized to fit your needs and space. They’re affordable, durable, and perfect for flexible organization.
Picture a series of colorful crates stacked neatly in a corner of your shed or garage, each labeled for specific tools or supplies. The crates are see-through or clearly labeled, making it easy to find what you need. When not in use, they can be stacked high or separated for different projects. This versatile system keeps your tools accessible and your yard looking tidy, with a cheerful splash of color.
Choose crates in various sizes and colors based on your storage needs and aesthetic preferences. Use labels, tags, or even chalkboard paint to identify contents easily. Stack them vertically or spread them out on shelves or the ground, depending on your available space. For seasonal storage, swap or reorganize crates to match your gardening cycle. The modular nature makes this idea adaptable to any yard size.
Select heavy-duty, weatherproof crates that stack securely and are easy to clean. Label each crate with waterproof tags or labels for quick access. Organize tools by type or project, and place the most used items in the top crates. Stack them in a corner or on a shelf, leaving space for future additions. Regularly check for cracks or wear, replacing or reorganizing as needed. This system simplifies tidying and makes expansion effortless.
Decorate crates with colorful paint, stickers, or labels that reflect your personality or garden theme. Use different colors for different tool categories—think green for pruning, yellow for digging, etc. Add small handles or wheels to some crates for easier movement. Incorporate small dividers or containers inside for tiny items like seed packets or plant ties. Personal touches turn simple crates into a fun, organized display.
Stackable crates make a huge difference in small yard organization, offering flexibility and easy expansion. They encourage regular cleaning and help keep everything in sight and within reach. Seeing your tools neatly stored boosts confidence in your gardening skills. It’s a straightforward upgrade with a big impact—why not start stacking today?
12. Corner Wall Racks to Maximize Narrow or Odd-Shaped Spaces
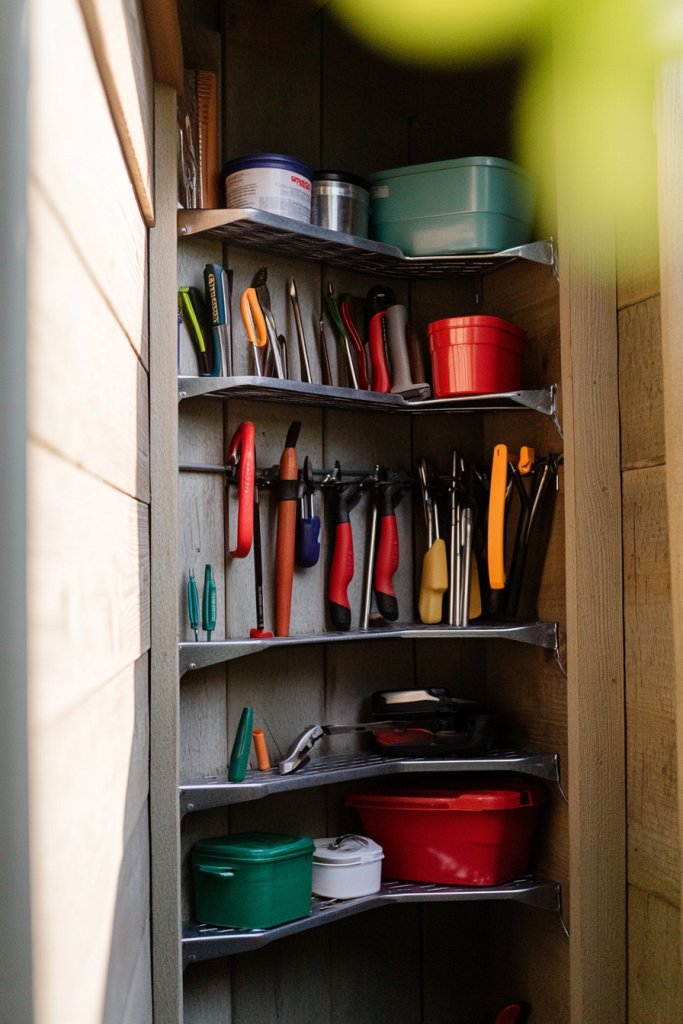
Do you have a tiny, awkward corner in your yard or shed that’s just begging for a makeover? Small or irregular spaces often go unused, wasting valuable storage real estate. Corner wall racks make the most of these overlooked areas, turning them into practical, organized zones. It’s a smart way to maximize every inch of your yard.
Imagine a triangular or L-shaped rack snugly fitted into a corner, with hooks and shelves holding tools, gloves, or small containers. The design emphasizes vertical use, freeing up floor space. The racks can be made from wood, metal, or plastic, painted or stained to match your decor. The result is a tidy, efficient setup that makes the corner look intentional and stylish.
Choose a sleek, minimalist metal rack for a modern vibe or a rustic wooden one for a country feel. Mount multiple levels for different tool sizes or add small baskets for accessories. For seasonal changes, swap out tools or reorganize contents to suit your needs. In tight spaces, opt for ultra-slim, wall-mounted designs that don’t protrude. This idea adapts beautifully to odd or narrow spaces.
Measure your corner carefully and select a wall rack that fits precisely. Install with sturdy anchors, ensuring it can support the weight of your tools. Organize items by frequency of use, placing the most needed at the top or front. Use labels or color coding for quick identification. Regularly inspect mounting points and clean or reorganize to keep the space functional. This setup turns neglected corners into valuable storage spots.
Paint or stain the rack to match your yard’s theme or add decorative hardware for a personalized touch. Incorporate small decorative elements like vintage signs or themed labels. Use colorful baskets or containers inside the rack for tiny items—twine, plant ties, or seed packets. Personalization makes this corner both practical and visually appealing.
Maximizing corner space with wall racks turns overlooked areas into efficient storage zones. It’s a simple, space-saving hack that boosts organization and accessibility. Once you see how much more functional your yard becomes, you’ll be motivated to find other hidden spots to optimize. Small changes like this can dramatically improve your gardening experience.
13. Hanging Tool Loops on Fence Posts for Simple, No-Fuss Storage
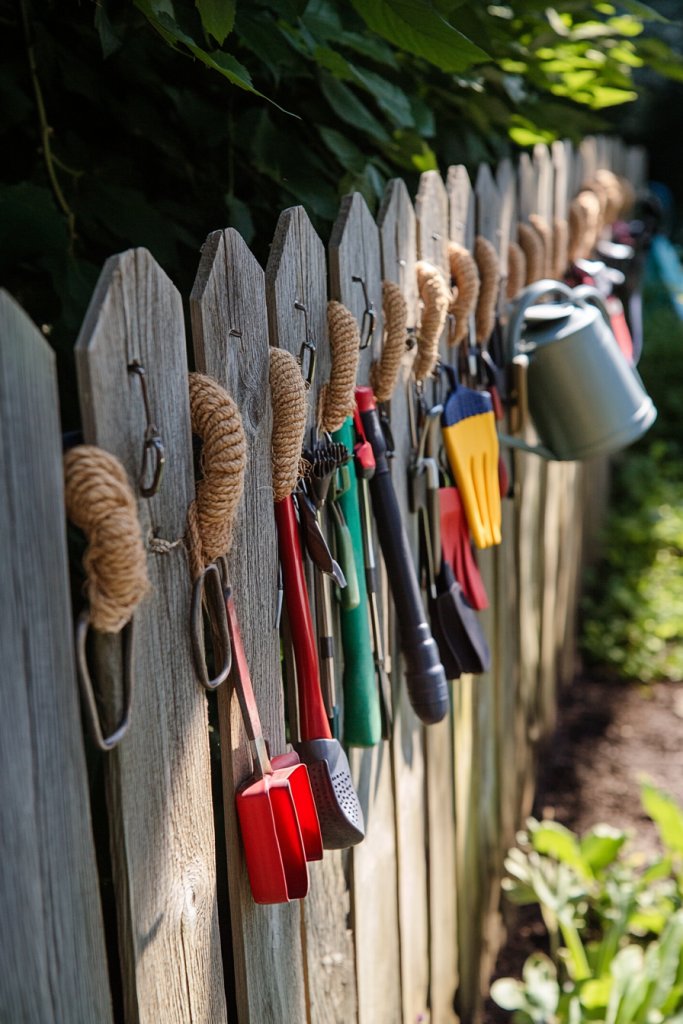
Feeling overwhelmed by scattered tools and the lack of simple storage options? Small gardens need quick, easy solutions that don’t require extra furniture or hardware. Hanging tool loops on fence posts offer a no-fuss way to keep your essentials within reach. It’s a minimalist approach that saves space and time.
Picture sturdy loops or hooks attached directly to fence posts, with garden tools hanging neatly—shovels, hoes, or watering cans. The setup is straightforward, with items hanging freely but securely, ready for use. The fence becomes a functional display, blending utility with a rustic charm. The simplicity of the design makes it a favorite among minimalists and DIYers alike.
Opt for heavy-duty metal hooks or fabric loops, depending on your style preference. Mount them at different heights based on your tool sizes and your reach. For a decorative touch, paint or decorate the fence posts to match your yard theme. Seasonal reorganization involves simply swapping or repositioning loops and tools. This adaptable method fits any small yard or garden space.
Securely attach hooks or loops to fence posts using weatherproof fasteners, ensuring they can support the weight of your tools. Organize tools based on size or purpose, hanging frequently used ones at eye level. Keep a few extra hooks or loops handy for future additions or seasonal changes. Regularly check attachments for stability and rust, replacing or repositioning as needed. It’s an effortless, low-cost solution.
Customize your loops with paint or decorative elements to match your garden style. Add tags or labels for quick tool identification. Incorporate small accessories like clips or hooks inside the loops for delicate or tiny tools. Personal touches make this simple idea uniquely yours and more functional over time.
A few well-placed fence loops create an instant, effective tool storage zone that’s easy to maintain. It encourages ongoing organization and quick access, making gardening more enjoyable. Once you see how simple and effective this is, you’ll be motivated to find other ways to declutter your yard. Small ideas like this pave the way for a more organized outdoor space.
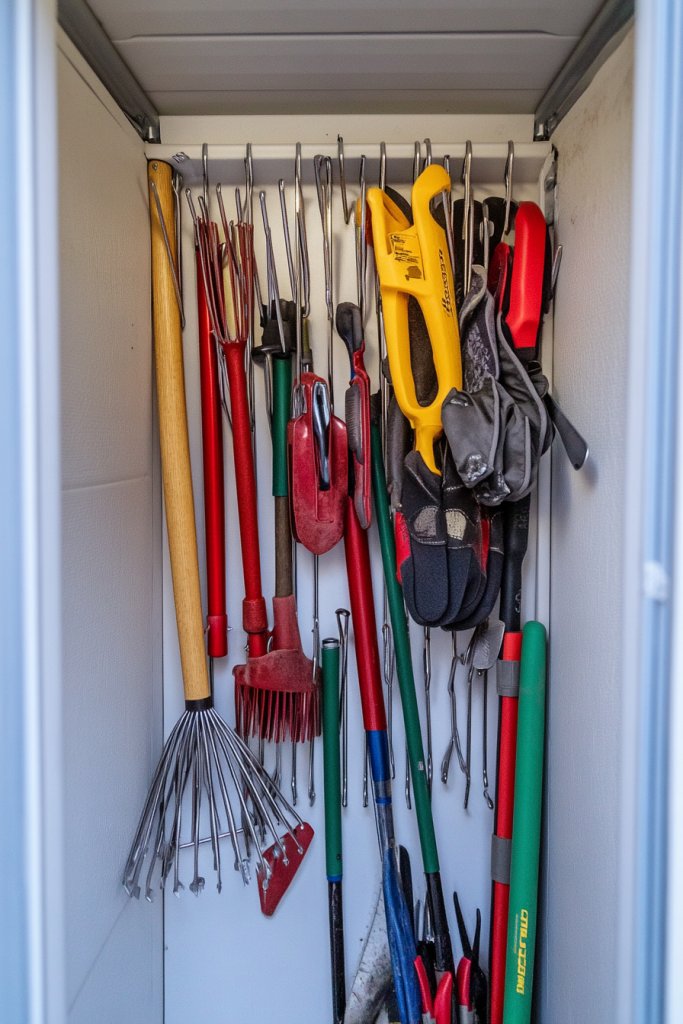
14. Compact Tool Cabinets with Fold-Out Drawers for Small Gardens
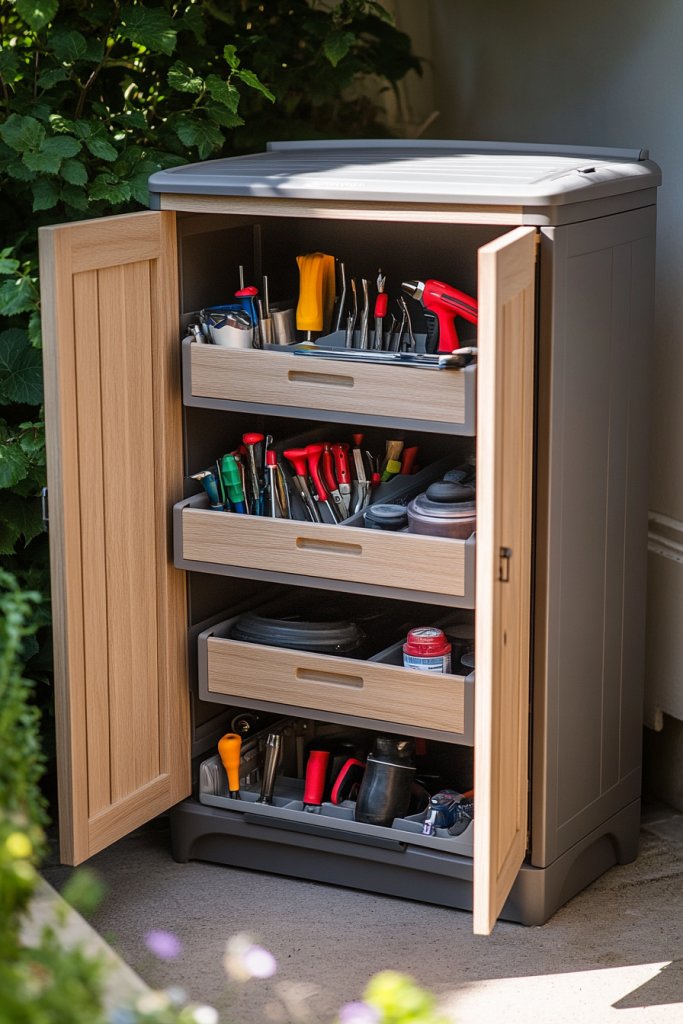
Are your garden tools taking over your tiny shed or cluttering your patio? A compact tool cabinet with fold-out drawers offers a sleek, space-efficient way to keep everything organized and accessible. It’s perfect for small yards where every inch counts and a clutter-free zone makes gardening more enjoyable.
Imagine a small, sturdy cabinet tucked into a corner, with drawers that fold out to reveal neatly organized compartments. The exterior is sleek, perhaps painted in a bright color or natural wood finish. Inside, small tools, gloves, and accessories are stored in labeled dividers, ready to grab. The cabinet’s compact size maximizes storage without crowding your yard or shed. It’s a tidy, stylish centerpiece for your gardening space.
Choose from wood, metal, or plastic finishes based on your aesthetic and durability needs. Incorporate fold-out or pull-out drawers with adjustable dividers for customization. Mount the cabinet at an ergonomic height for easy access or place it on a sturdy stand. For seasonal storage, swap out contents or add extra shelves inside. Its modular design adapts comfortably to any small garden or yard.
Securely mount the cabinet on a wall or place it on a stable base. Organize tools using labeled compartments or small containers inside the drawers. Keep frequently used tools at the top or in the most accessible drawers. Regularly clean and reorganize to maintain order. Seal or treat the materials to withstand weather if placed outdoors. This cabinet transforms chaos into order quickly and efficiently.
Paint or stain the cabinet to match your outdoor decor. Add custom labels or decals for quick identification. Incorporate small decorative hardware or handles for a personalized touch. Use drawer organizers or small bins inside for tiny items like seeds or plant ties. Personal touches make your storage both functional and visually appealing.
A compact tool cabinet boosts your confidence by making organization effortless. It encourages regular tidying and helps maintain a clutter-free environment. Seeing everything neatly stored inspires you to take on bigger gardening projects. Small, smart storage solutions like this turn your yard into a well-organized haven, making gardening less stressful and more fun.
15. Stylish Wall-Mounted Baskets for Daily Gardening Essentials
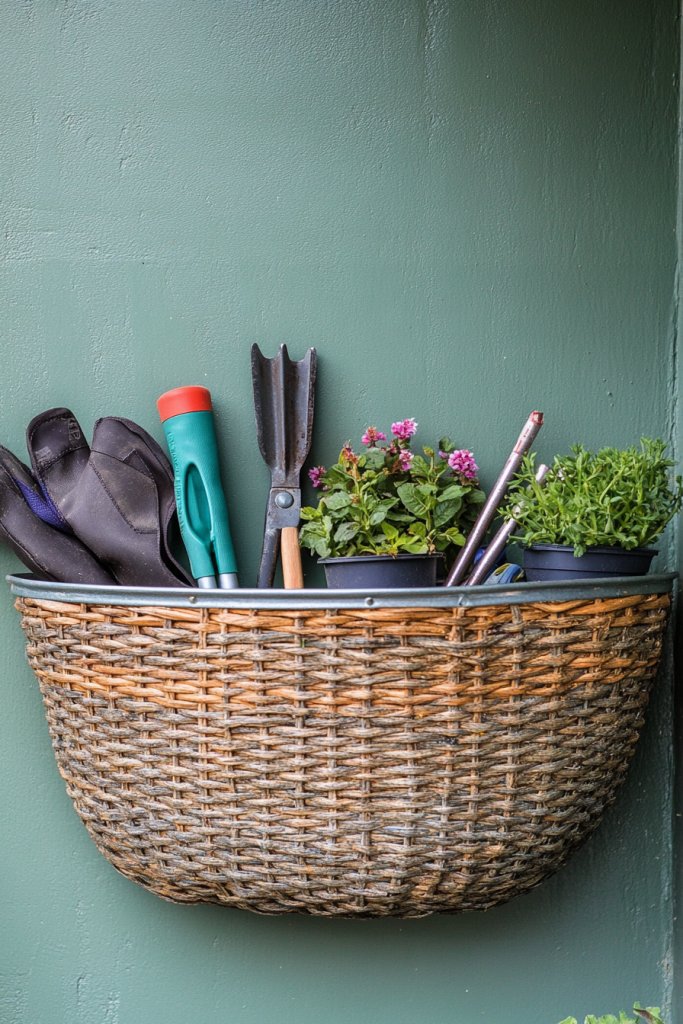
Tired of constantly digging through cluttered storage to find your everyday gardening tools? Small yards benefit from stylish, accessible solutions that keep essentials within arm’s reach. Wall-mounted baskets combine functionality with aesthetic appeal, transforming ordinary storage into a decorative feature.
Imagine a row of woven or metal baskets hung along a garden wall, each filled with gloves, small tools, or seed packets. The baskets add texture and visual interest, complementing your yard’s natural or modern style. When you step outside, everything you need is right there—organized, attractive, and easy to grab. It’s a simple upgrade that makes your garden feel more inviting.
Choose materials like wicker, metal, or painted wood to match your aesthetic. Mount baskets at different heights for visual interest and ergonomic access. Use labels or tags to identify contents or categorize by task. Seasonal updates include swapping out or reorganizing baskets to keep things fresh and functional. This versatile idea can be customized to any style or space.
Securely attach heavy-duty hooks or brackets to your wall, ensuring they can support the weight of the baskets. Fill each with your daily essentials, such as hand tools, gloves, or plant clips. Label or color-code baskets for quick recognition. Keep frequently used items at eye level for maximum convenience. Regularly clean and reorganize to maintain a tidy, functional display. It’s a simple, effective way to keep your yard organized.
Decorate baskets with paint, fabric liners, or personalized tags for a unique look. Incorporate small decorative elements like charms or labels that reflect your personality. Use colorful or patterned baskets to add vibrancy. Personal touches make your storage both practical and a reflection of your style, encouraging ongoing organization.
Stylish baskets on a wall make daily gardening routines smoother and more enjoyable. They inspire a habit of organization and make your yard feel more curated. Once you see how easy it is to keep essentials handy, you’ll be motivated to keep everything neat. Small upgrades like this foster a sense of pride in your outdoor space, turning chaos into calm.
16. Under-Deck Storage Solutions for Hidden, Out-of-Sight Tool Storage
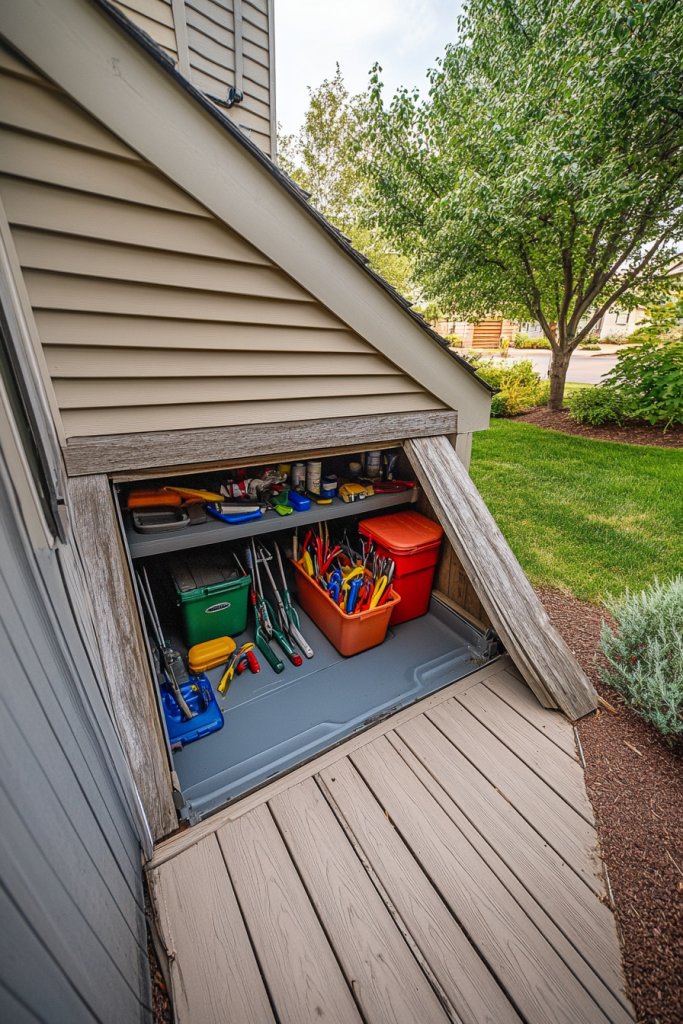
Struggling to find storage space in your small yard? Under-deck areas often go unused but can be perfect for hidden storage. An under-deck storage solution keeps your tools out of sight but within easy reach, helping you maintain a clutter-free yard. It’s a clever way to maximize every inch of your outdoor space.
Envision a sturdy, weatherproof box or cabinet tucked beneath your deck, hidden from view. Accessible via a hatch or removable panel, it holds larger tools, watering cans, or seasonal gear. When closed, the space looks clean and uncluttered, blending seamlessly with your yard’s natural aesthetic. Opening the hatch reveals a well-organized storage area that keeps your tools protected from the elements and out of sight.
Select a weather-resistant cabinet made from plastic, metal, or treated wood. For larger yards, opt for a custom-built enclosure; for smaller spaces, a compact, fold-down unit works well. Add shelves or hooks inside to optimize organization. Seasonal adjustments include swapping out stored items or reorganizing for current projects. This hidden storage adapts to various yard sizes and needs.
Install the storage unit securely underneath your deck, ensuring it’s level and stable. Use weatherproof fasteners and seal any gaps to prevent water ingress. Organize tools by size or type, using bins or hooks inside the enclosure. Regularly inspect for leaks or damage, and keep the interior clean. This hidden compartment keeps your yard tidy while protecting your tools from weather and theft.
Paint or stain the enclosure to match your deck or yard theme. Add labels or small tags for quick identification. Incorporate small shelves or baskets for easy access to seasonal items. Consider installing a small lock for security if you store valuable tools. Personal touches make hidden storage both functional and aesthetically pleasing.
Hidden under-deck storage turns neglected space into a practical, discreet tool area. It encourages ongoing organization and protects your gear. Once set up, you’ll feel more confident about your yard’s tidiness. Small upgrades like this lead to a more enjoyable, stress-free gardening experience, inspiring you to keep everything in order.
17. Creative Use of Recycled Watering Cans and Buckets as Decorative Storage Units
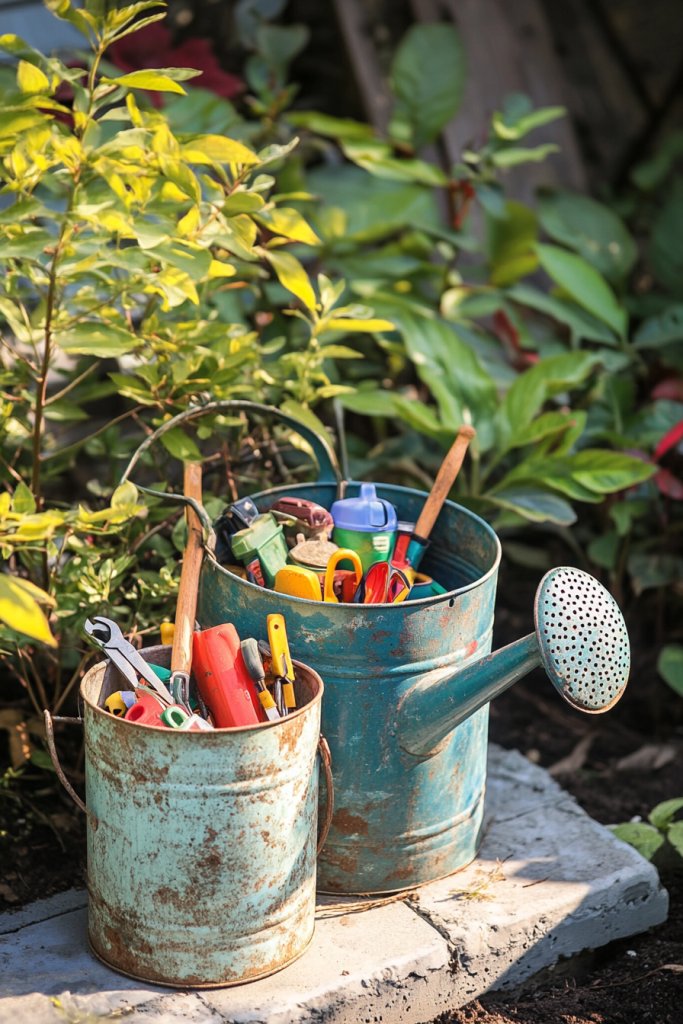
Looking for a fun, eco-friendly way to add character to your garden while storing tools? Recycled watering cans and buckets serve as charming, decorative storage units that double as art pieces. They’re perfect for small spaces where every detail counts. Plus, they help reduce waste and add a personal touch to your outdoor sanctuary.
Imagine vintage watering cans with handles and spouts repurposed as planters or tool holders, placed on shelves or hung on walls. Brightly painted or weathered, these containers bring a rustic charm and a splash of color. Small buckets can hold garden gloves, seed packets, or hand tools, arranged whimsically around your yard. Their quirky, nostalgic appeal makes your space inviting and unique.
Decorate cans and buckets with paint, stencils, or decals that match your garden theme. Use different sizes and colors for variety, or group similar items for visual cohesion. Hang them with sturdy hooks or attach them to walls or fences for easy access. Seasonal swaps include changing the contents or decor to reflect holidays or themes. This approach suits any style, from shabby chic to modern minimalism.
Clean and seal the containers to withstand weather exposure. Attach hooks or brackets to walls, fences, or posts to hang or display the cans. Organize contents based on frequency of use and assign each container a specific role—watering, planting, or tool storage. Keep tools or supplies inside or nearby for quick access. Regularly clean and decorate to keep the display lively and functional. It’s a creative, budget-friendly project that adds personality.
Add decorative touches such as flowers, ribbons, or custom labels to enhance visual appeal. Use the cans as part of a themed display—vintage, rustic, or colorful. Incorporate small plantings in the cans for a living display, blending storage with garden decor. Personalization helps your yard feel special and inspiring, encouraging ongoing care.
Using recycled containers as decor and storage is a fun, sustainable way to personalize your yard. It sparks creativity and makes organization feel less like a chore. Once you see how charming and practical these pieces are, you’ll be motivated to repurpose more items. Small, imaginative updates like this turn your yard into a lively, eco-conscious retreat that’s uniquely yours.
Conclusion
With a mix of innovative wall organizers, compact furniture, and multi-purpose containers, these garden tool storage ideas offer versatile solutions for small spaces. Don’t hesitate to try out these clever tips in your own yard—small changes can make a big difference! Turn your outdoor area into an organized oasis and enjoy gardening with ease and style.
Leave a Reply