I have been, or can be if you click on a link and make a purchase, compensated via a cash payment, gift, or something else of value for writing this post. As an Amazon Associate, I earn from qualifying purchases. Please read my full Affiliate Disclosure for more information.
Ever wondered how a simple mirror can transform the entire vibe of a room? DIY mirror wall decor has become an incredibly popular trend because it combines functionality with creativity, allowing you to personalize your space while making it feel brighter and more inviting. These projects are not only budget-friendly but also offer a fun way to showcase your style, whether you prefer sleek modern designs or rustic charm.
In this article, you’ll find a treasure trove of inspiring ideas and practical tips to help you craft stunning mirror wall decor that brightens your home. From geometric arrangements and vintage frames to playful shapes and textured mosaics, there’s something for every taste and skill level. Get ready to elevate your decor game with creative, easy-to-make mirror ideas that will add light, personality, and a touch of artistry to any room!
1. Geometric Mirror Wall Art for a Modern Touch
A stunning way to elevate your space with a contemporary flair, geometric mirror wall art instantly adds a sleek, modern vibe that’s both eye-catching and functional. This design transforms plain walls into focal points, reflecting light and creating a sense of openness that brightens any room.
Recommended Products to replicate this idea
| # | Preview | Product | |
|---|---|---|---|
| 1 |

|
Weysat Wall Mount Home Mirror, 2 Pieces Silver Square Decorative Mirror for Bedroom, Living Room,... | Check Latest Price |
| # | Preview | Product | |
|---|---|---|---|
| 1 |

|
KURUI Drywall Anchors and Screws Assortment Kit 270PCS, 135 Plastic Dry Wall Expansion Anchors and... | Check Latest Price |
Imagine a large, multi-faceted mirror composed of various geometric shapes—triangles, hexagons, and diamonds—assembled into a cohesive piece. The mirrors are framed in thin, black or metallic borders, emphasizing clean lines and sharp angles.
The reflective surfaces catch ambient light, bouncing it around the room, while the geometric arrangement adds visual interest without clutter. This art piece can be hung alone or as part of a gallery wall, making your space feel fresh, structured, and modern.
To recreate this look, start by choosing a large, geometric mirror or assembling smaller mirrors into your desired pattern. Materials like metallic or black-painted frames can be found at craft stores or online, or you can opt for pre-made geometric mirrors.
Use wall anchors and a level to ensure precise placement. For a DIY twist, you can glue small mirrors onto a sturdy backing like plywood and frame the edges with painter’s tape for sharp lines. This project is accessible for beginners and offers a striking upgrade to your decor.
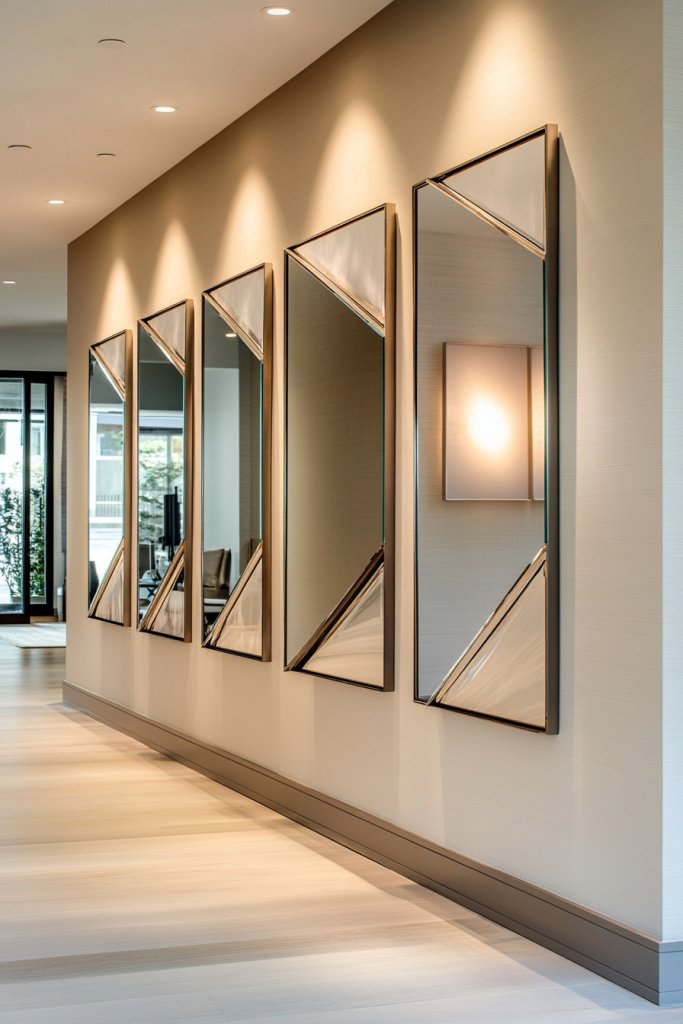
2. Framed Vintage Mirrors for Elegant Charm
Adding vintage mirrors with ornate frames introduces a timeless elegance that instantly elevates your interior decor. These mirrors evoke a sense of history and craftsmanship, bringing warm charm and sophistication to any space.
Recommended Products to replicate this idea
| # | Preview | Product | |
|---|---|---|---|
| 1 |

|
OIGUMR Oval Smallest Wall Mirror Resin Frame Size:12 x 8.3 inch Mirror Vintage Hanging Mirrors for... | Check Latest Price |
| # | Preview | Product | |
|---|---|---|---|
| 1 |

|
184 Pieces Picture Hanging Kit, 20lb, 30lb, and 50lb Picture Hangers, Metal Picture Hanging Hooks... | Check Latest Price |
Visualize a collection of antique-style mirrors, each framed in intricately carved wood or ornate metal with finishes like gold leaf, distressed silver, or patina. The mirrors vary in shape—oval, rectangular, or oval—and are arranged in a harmonious cluster on your wall.
The reflective surfaces subtly distort the room’s light, adding a soft glow, while the decorative frames lend a sense of opulence and character. Whether in a cozy bedroom corner or an elegant hallway, these vintage pieces create an inviting, refined atmosphere.
To create this look, source vintage or vintage-inspired mirrors from thrift stores, flea markets, or online marketplaces. If needed, recondition or clean the frames to restore their charm.
Mount them using sturdy hooks, ensuring the weight is supported, especially for heavier frames. For a DIY approach, you can paint or distress new wood or metal frames to mimic antique finishes, then attach the mirrors with strong adhesive or clips. This approach blends history with personal style, making your space feel both curated and warm.
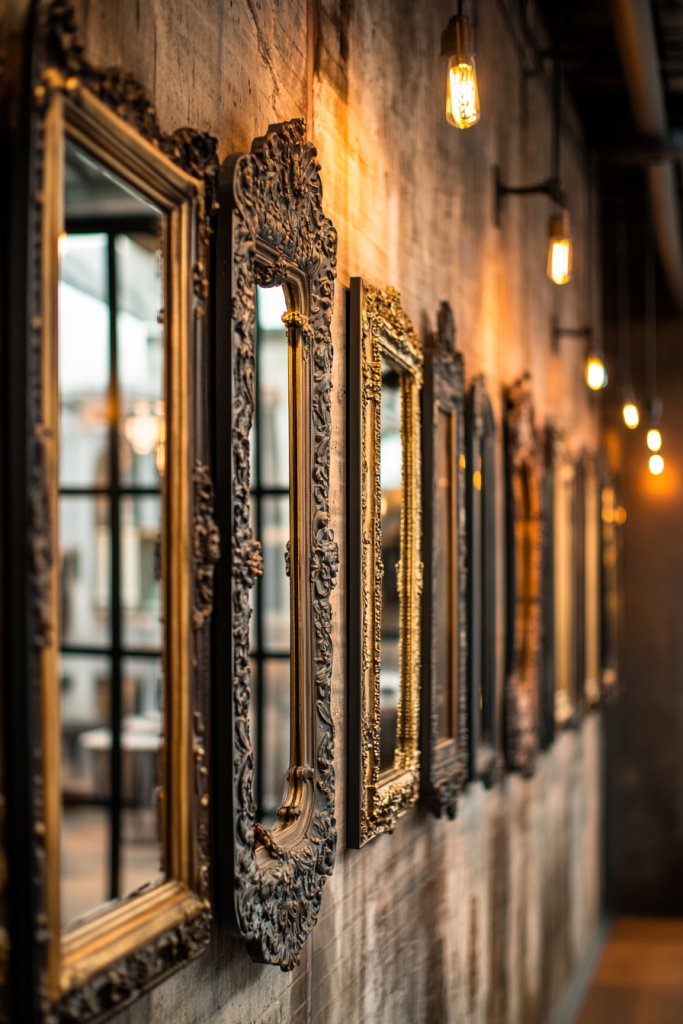
3. Cluster of Small Mirrors in Different Shapes and Sizes
Arranging a cluster of small mirrors in various shapes and sizes creates a playful, dynamic focal point that adds depth and brightness to your walls. This eclectic display captures the eye and reflects light from multiple angles, making your room feel larger and more lively.
Recommended Products to replicate this idea
| # | Preview | Product | |
|---|---|---|---|
| 1 |

|
Vandlciad 4 Pack Acrylic Mirrors for Wall,8 x 8 Inch Self Adhesive Frameless Small Mirror Tiles,... | Check Latest Price |
| # | Preview | Product | |
|---|---|---|---|
| 1 |
|
10Pcs Heavy Duty Picture Hangers with Nails, Kinxuanda Professional Picture Hanging Hooks Support up... | Check Latest Price |
Picture a wall decorated with an array of small mirrors—round, square, hexagonal, and irregular shapes—organized in a seemingly spontaneous yet balanced layout. The frames are minimalistic, in finishes like matte black, brass, or clear acrylic, allowing the mirrors themselves to shine.
The reflective surfaces bounce natural and artificial light throughout the room, creating a lively sparkle. This arrangement invites exploration and personal expression, perfect for a boho, modern, or eclectic aesthetic.
To assemble this, gather an assortment of small mirrors from craft stores or online, choosing shapes and sizes that appeal to your style. Use removable hooks or adhesive strips for easy mounting and adjustments.
Lay the mirrors out on the floor beforehand to plan your composition, then transfer the arrangement to the wall. For added visual interest, intersperse decorative elements like small wall stickers or decals around the mirrors. This DIY project is beginner-friendly and allows for endless customization.
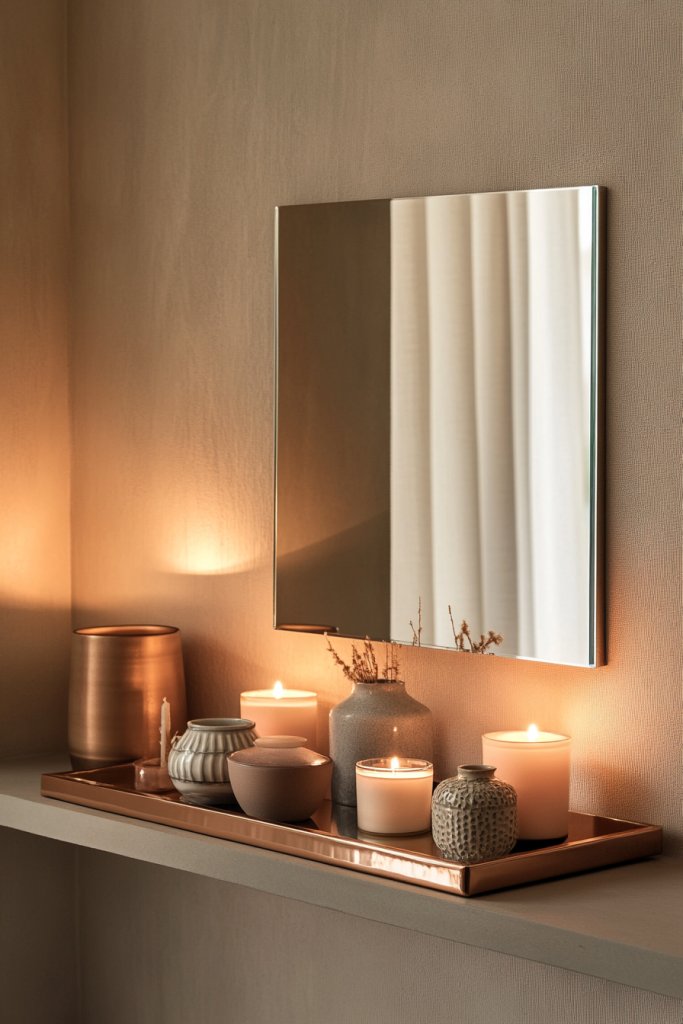
4. Mirror Tray Wall Display with Decorative Items
Transform a simple tray into a chic wall display by mounting a decorative mirror tray and arranging charming accents on or around it. This approach combines functionality with style, turning everyday objects into artful decor.
Envision a large, ornate mirror tray—perhaps with a vintage brass or silver finish—mounted horizontally or vertically on your wall. Surround it with small decorative items like candles, tiny potted plants, or elegant figurines placed atop the tray or arranged around it.
The mirror surface reflects light and surrounding decor, amplifying brightness and adding a layer of sophistication. This setup is especially effective in entryways, living rooms, or bedrooms, where it acts as a visual anchor and conversation piece.
Begin by selecting a sturdy, decorative tray with a mirror surface—these can be found at craft stores or repurposed from thrifted items. Secure it to the wall using appropriate hardware, ensuring it’s level and well-supported.
Decorate around the tray with small, lightweight objects that complement your style, such as glass jars, vases, or candles. To enhance the overall aesthetic, consider adding a few decorative wall hooks or mounting brackets behind the tray for extra stability. This DIY wall feature is quick to assemble, budget-friendly, and offers endless possibilities for personalization.
5. Mirrored Mosaic Panels for a Bold Statement
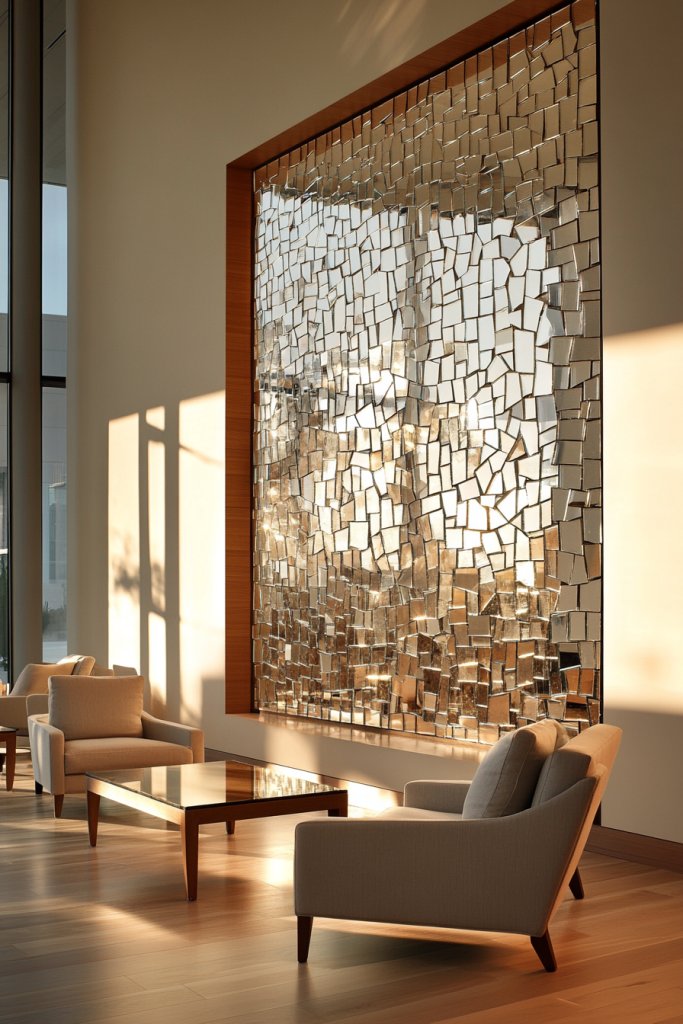
Creating a mirrored mosaic panel offers a dramatic, eye-catching focal point that transforms a plain wall into a stunning piece of art. The reflective mosaic adds depth, texture, and a contemporary edge to your decor.
Visualize a large wall covered with tiny, irregularly shaped mirror tiles arranged in an abstract or geometric pattern. The reflective surfaces catch and scatter light in multiple directions, creating a shimmering, almost kaleidoscopic effect.
The edges of the mosaic are finished with sleek grout lines—black, white, or metallic—highlighting the intricate pattern and adding visual contrast. The overall effect is bold and sophisticated, perfect for a modern living room or statement wall.
To make this, purchase small mirror tiles or broken mirror pieces from craft suppliers or salvage stores. Prepare a sturdy backing such as plywood or MDF board.
Arrange the tiles in your desired pattern, then adhere them with strong tile adhesive or epoxy. Once the adhesive sets, fill the gaps with grout, wiping away excess for a smooth finish.
For a less labor-intensive alternative, pre-made mirrored tile sheets can be cut to size and mounted directly. This project is suitable for intermediate DIYers and results in a striking, personalized feature wall.
6. Upcycled Mirror Frame with Rope or Twine Accents
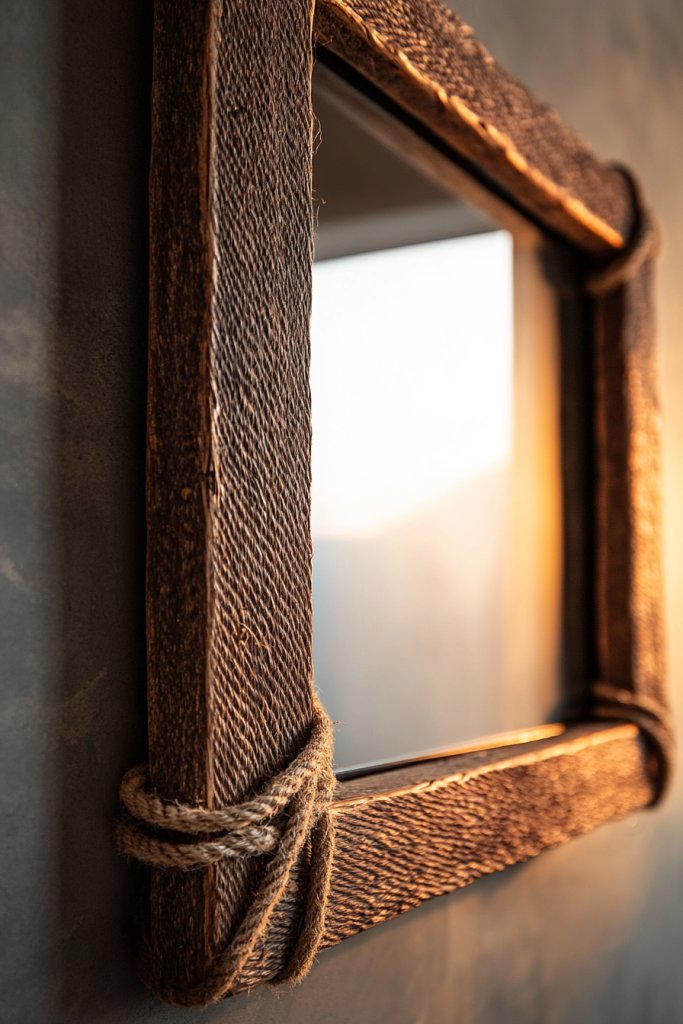
Transforming an old mirror frame into a charming, textured piece is a creative way to add personality to your wall decor. This idea leverages recycled materials to create a rustic, boho vibe that feels both eco-friendly and stylish.
Recommended Products to replicate this idea
| # | Preview | Product | |
|---|---|---|---|
| 1 |

|
DESOMINOR 32FT Black Border Peel &Stick Black Wood Grain Wallpaper Border Removable Waterproof... | Check Latest Price |
| # | Preview | Product | |
|---|---|---|---|
| 1 |

|
Achart Macrame Wall Hanging Large- Boho Wall Decor- large wall art- Wall Decor Living Room- Macrame... | Check Latest Price |
The focus is on enhancing the frame with tactile elements, turning a simple mirror into a statement piece that catches the eye. Imagine a vintage wooden mirror frame wrapped in thick, natural jute or hemp rope, creating a layered, textured border.
Twine or braided cords can be artfully wound around corners or along the edges, adding visual interest and a handcrafted feel. The natural fibers bring warmth and a cozy, seaside atmosphere—perfect for relaxed living rooms or bedrooms.
The overall look is charming, slightly rustic, and full of tactile appeal, making it a versatile decor piece that complements both modern and farmhouse interiors. To recreate this look, start with an existing mirror or purchase a plain, inexpensive one.
Gather natural jute or hemp rope, twine, or burlap ribbon—available at craft stores or online. Wrap the rope around the frame, securing it with hot glue at the back for a clean finish.
For added detail, you can braid smaller cords or tie decorative knots along the edges. Finish by attaching the mirror to your wall with sturdy hooks or adhesive strips—simple, sustainable, and full of personality.
7. Sunburst Mirror Arrangements for a Retro Vibe
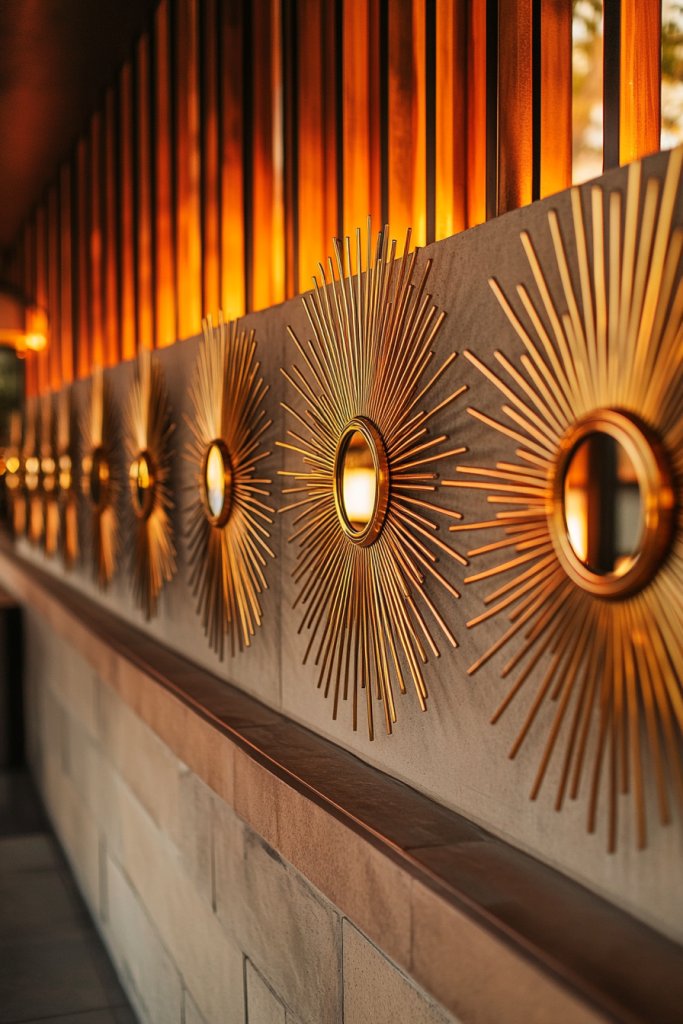
Sunburst mirrors are iconic for their radiant, starburst shape that instantly adds a vintage flair to any space. Arranging multiple smaller sunburst mirrors creates a dynamic, eye-catching focal point that reflects light beautifully and infuses your decor with a nostalgic, 70s-inspired charm.
Recommended Products to replicate this idea
| # | Preview | Product | |
|---|---|---|---|
| 1 |

|
Creative Co-Op Gold Sunburst Mirror | Check Latest Price |
| # | Preview | Product | |
|---|---|---|---|
| 1 |

|
Mirror, Mirror (4 Disc Collection Set) | Check Latest Price |
This idea is perfect for creating a bold statement wall that brightens and energizes the room. Visualize a cluster of metallic sunburst mirrors in gold, brass, or antique finishes, radiating outward with pointed or rounded rays of varying lengths.
The mirrors are arranged in an overlapping or grid pattern, filling a large wall space with a burst of light and texture. Their reflective surfaces catch and bounce natural sunlight, making the room feel more open and lively.
The combination of different sizes and finishes adds depth and movement, resulting in a lively, retro-inspired gallery that feels both curated and effortless. To assemble this look, select 3-7 small sunburst mirrors of different sizes and finishes—these can be purchased online, at thrift stores, or made DIY with craft wire, mirror discs, and decorative rays.
Use painter’s tape or a paper template to plan your layout on the wall before hanging, ensuring symmetry or a freeform arrangement as desired. Secure each piece with appropriate hooks or adhesive strips. This arrangement transforms a plain wall into a dazzling centerpiece with minimal effort and maximum impact.
8. Mirrored Wall Borders to Enlarge and Illuminate Rooms
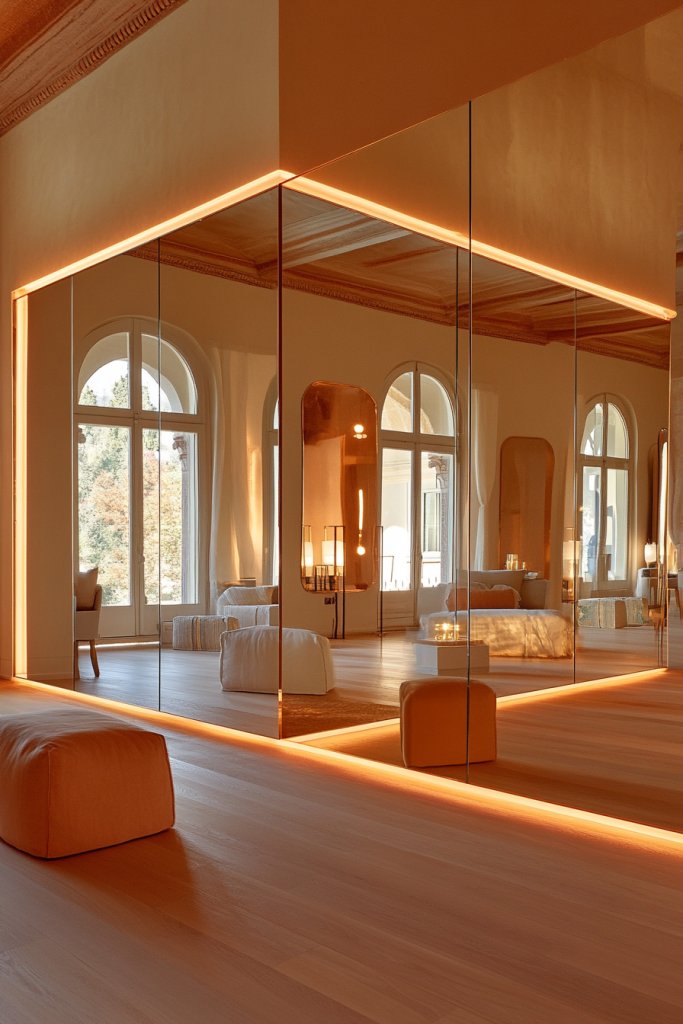
Adding a mirrored border around a room’s perimeter creates an illusion of greater space and enhances natural light, making small or dim rooms feel much larger and brighter. This idea is especially effective in hallways, bathrooms, or bedrooms, where maximizing light and space is a priority.
Recommended Products to replicate this idea
| # | Preview | Product | |
|---|---|---|---|
| 1 |
|
Flexible Mirror Sheets Self Adhesive Non Glass Mirror Tiles Stickers for Home Wall Decor(10 Pieces,6... | Check Latest Price |
| # | Preview | Product | |
|---|---|---|---|
| 1 |

|
25Pcs Mirror Hangers for The Wall, Mirror Holder Clips, Clear Plastic Mirror Mounting Clips, Glass... | Check Latest Price |
It’s a simple yet impactful way to give your room a polished, sophisticated look. Imagine a sleek, continuous band of mirrored panels framing your wall, reflecting everything within the space.
The border can be installed with narrow, beveled mirrors or large, seamless sheets that run along the top, bottom, or sides of the wall. When positioned correctly, these mirrors bounce sunlight and artificial light throughout the room, creating a luminous atmosphere.
The effect is both functional and stylish—adding a touch of glamour while visually expanding the space. To achieve this, purchase pre-cut mirror strips or sheets from hardware stores or online.
Use industrial adhesive or mirror clips for secure mounting, following manufacturer instructions carefully. For a seamless look, consider hiring a professional for precise installation, or if you’re confident, use a strong, double-sided mirror tape for DIY projects. This approach transforms your room into a brighter, more open environment with a sleek, modern edge.
9. DIY Mirror Wall Hangings with Decorative Chains or Beads
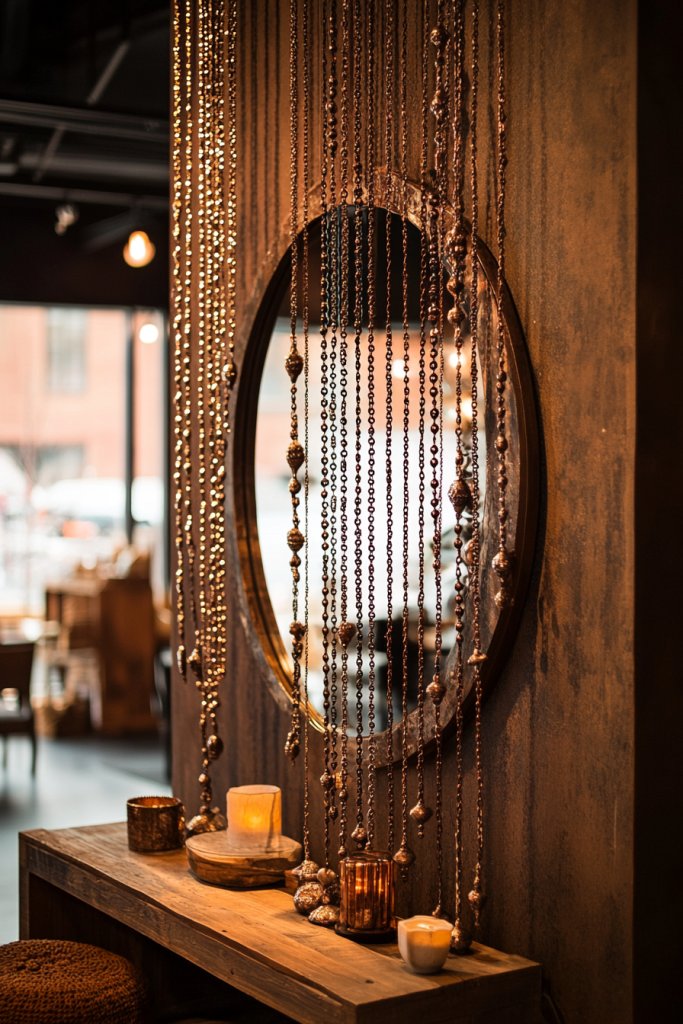
Creating a custom mirror wall hanging with decorative chains or beads adds texture, movement, and a touch of boho-chic to your decor. This idea combines a central mirror with hanging embellishments that cascade below or around it, giving the space a layered, dynamic appearance.
It’s perfect for adding visual interest without overwhelming the wall. Picture a medium-sized mirror with a simple frame, from which hang metal chains, beaded strands, or tassels in materials like brass, wood, or colorful glass.
The chains and beads can be arranged in a symmetrical or asymmetrical pattern, with longer strands draping down for a dramatic effect. The tactile elements sway gently when touched or when air moves through the room, adding a subtle sensory dimension.
The overall look is eclectic, artistic, and perfect for creating a focal point with personality. To make this, start with a mirror and gather decorative chains, beaded strings, or tassels—these can be purchased from craft stores or made at home with wire, string, and beads.
Attach the chains or beads to the top or sides of the mirror with small hooks, eyelets, or strong glue. Adjust the length and positioning for balance and visual interest. Hang the finished piece on your wall with sturdy hooks or wall anchors, and enjoy a custom, textured decor element that’s easy to personalize.
10. Mirrored Tiles with Patterned Grout for Textured Walls
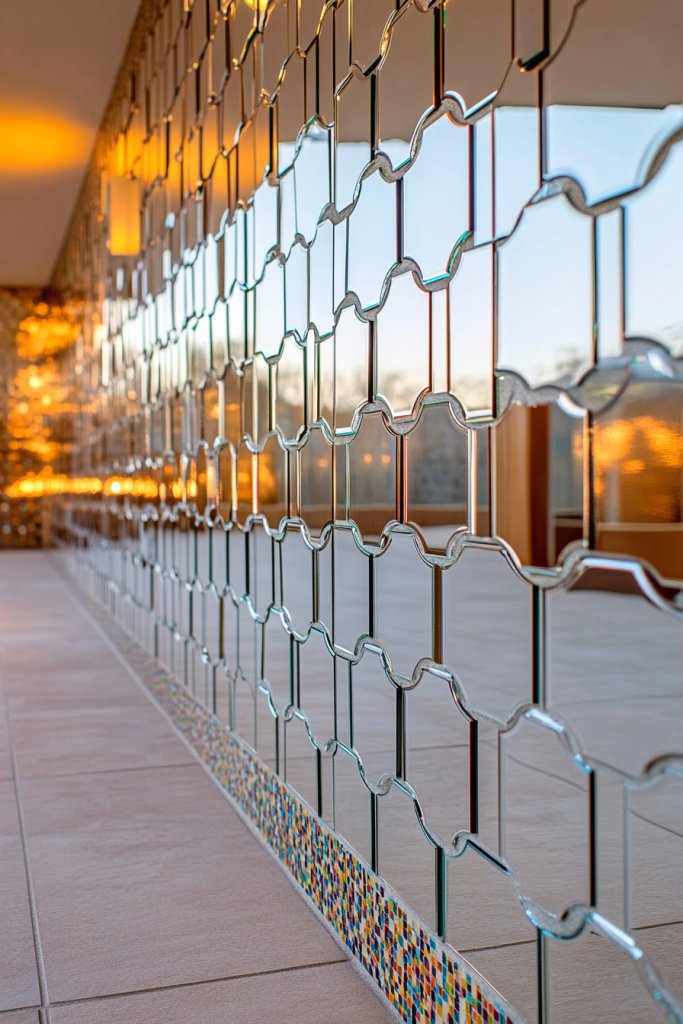
Using mirrored tiles arranged in patterns creates a striking, textured wall that reflects light and adds depth to your space. Grouting the tiles with a patterned or colored grout accentuates the design, making the surface a focal point.
Recommended Products to replicate this idea
| # | Preview | Product | |
|---|---|---|---|
| 1 |

|
Ruomeng Home Gym Mirrors 12 Inch x 12Pcs Wall Mounted Mirror Glass Frameless Full Length Mirror... | Check Latest Price |
| # | Preview | Product | |
|---|---|---|---|
| 1 |
|
Miracle Sealants GRT SLR, Grout Sealer, 6 oz. | Check Latest Price |
This idea lends a contemporary, luxe feel to bathrooms, kitchens, or feature walls in living areas. Visualize a wall covered with small, square or hexagonal mirrored tiles arranged in a geometric pattern—such as herringbone, chevron, or honeycomb.
The reflective surfaces shimmer with movement, catching light from different angles. To add visual interest, the grout can be tinted in shades like charcoal, metallic, or contrasting colors, creating a textured, layered effect.
The combination of mirror and pattern adds sophistication and brightness, transforming the wall into a captivating, textured mosaic. To DIY this, purchase mirror tiles and grout suitable for glass or ceramic surfaces.
Lay out your pattern on a flat surface or directly on the wall, using spacers for even gaps. Apply the tiles with strong adhesive or thinset mortar, pressing firmly into place.
Once set, fill the gaps with your chosen grout, wiping excess away for a clean look. Finish by sealing the grout if necessary. This project offers a high-impact, customizable feature wall that brightens and elevates your space with minimal fuss.
11. Rustic Wooden Frame Mirrors for Cozy Spaces
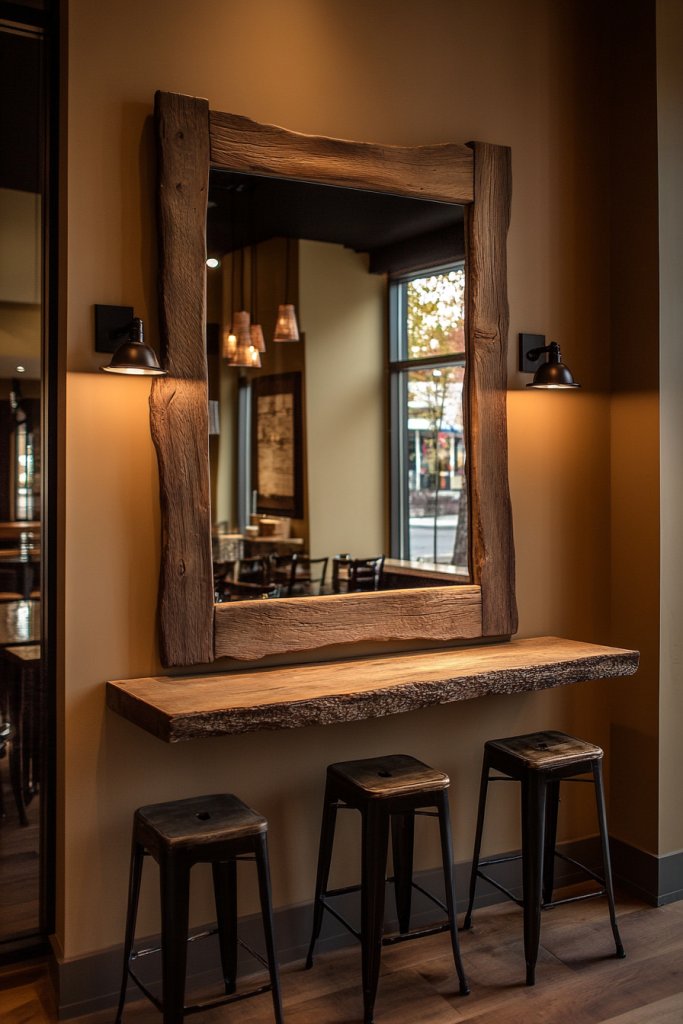
Adding a rustic wooden frame to your mirror instantly creates a warm, inviting atmosphere perfect for cozy spaces like bedrooms or living rooms. The natural wood tones—think warm honey, deep mahogany, or weathered gray—bring a touch of nature indoors, evoking feelings of comfort and relaxation.
Recommended Products to replicate this idea
| # | Preview | Product | |
|---|---|---|---|
| 1 |
|
AAZZKANG Wall Mirror with Wood Framed Rustic Mirrors for Wall Rectangle Decorative for Bedroom... | Check Latest Price |
| # | Preview | Product | |
|---|---|---|---|
| 1 |
|
Amazon Basics Wall Mount Round Vanity Magnifying Bathroom Mirror, 1X/5X Magnification, 12.8"L x... | Check Latest Price |
The frames often feature textured, distressed finishes or smooth, polished surfaces, giving each piece a unique character. When paired with soft lighting and plush textiles, these mirrors enhance the sense of hominess while reflecting light to brighten the room.
Imagine a mirror with a chunky, reclaimed wood frame, its knots and imperfections adding visual interest and authenticity. The mirror itself is clear and bright, set within a frame that feels substantial yet charmingly imperfect.
The surrounding décor might include a cozy throw blanket, a stack of vintage books, or a ceramic vase with dried flowers—elements that deepen the rustic aesthetic. The overall effect is a space that feels both stylish and lived-in, perfect for creating a welcoming retreat.
To recreate this look, start by sourcing reclaimed or distressed wood—either from a craft store or by repurposing old furniture. Measure your desired frame size and cut the wood accordingly.
Sand down rough edges to avoid splinters, then assemble the frame using wood glue and nails or a staple gun. Attach the mirror to the back using strong adhesive or mirror clips.
Finish by adding a protective sealant if desired. This project is beginner-friendly and offers a charming way to personalize your space.
12. Mirrored Pegboard Wall for Functional and Stylish Decor
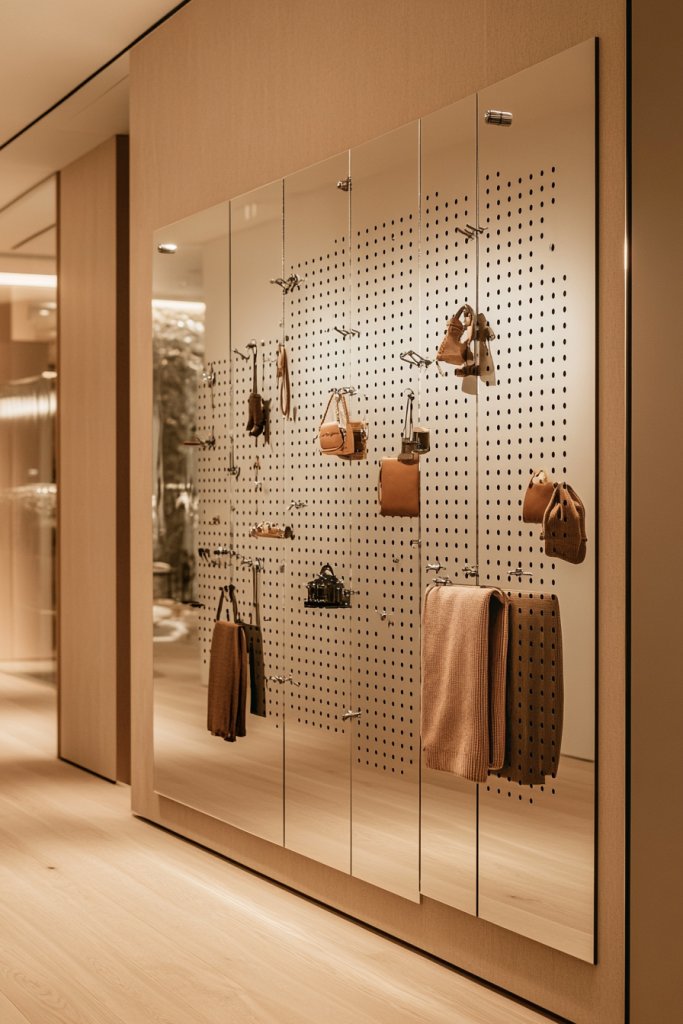
A mirrored pegboard wall combines practicality with modern style, transforming an everyday organizational tool into a sleek decorative feature. The reflective surface amplifies light and creates the illusion of more space, making it ideal for small apartments or home offices.
Recommended Products to replicate this idea
| # | Preview | Product | |
|---|---|---|---|
| 1 |

|
Pegboard Smith Metal Pegboard Panels, 16" x 12" Heavy-Duty Wall Peg Boards for Garage Tool Storage,... | Check Latest Price |
| # | Preview | Product | |
|---|---|---|---|
| 1 |
|
KURUI Drywall Anchors and Screws Assortment Kit 270PCS, 135 Plastic Dry Wall Expansion Anchors and... | Check Latest Price |
The pegs allow you to hang everything from jewelry and keys to small baskets and decorative accents, keeping your space tidy while adding visual interest. Visualize a large square or rectangle of mirror mounted flush against the wall, with evenly spaced holes for pegs.
You might hang a few decorative baskets filled with makeup brushes or keys, or display jewelry on elegant hooks. The mirror’s clean lines and shiny surface catch and reflect ambient light, brightening the room.
You could also paint the wall behind the pegboard in a bold hue or keep it neutral for a more minimalist look—either way, it’s both functional and stylish. To implement this idea, purchase a large mirrored pegboard or create your own by attaching a mirror sheet to a sturdy pegboard frame.
Use a drill to make holes and insert metal or plastic pegs—these can be swapped out for decorative hooks or small shelves. Secure the pegboard to the wall with appropriate anchors and screws, ensuring it’s level. Finish by customizing with your favorite hanging items—like small planters, photos, or accessories—making the space uniquely yours.
13. Mirror-Embedded Wall Shelves for Display and Light Reflection

Mirror-embedded wall shelves are a clever way to combine storage with reflective decor, making your space appear larger and brighter. These shelves typically feature a mirror backing or surface, which bounces light around the room, while the shelves themselves hold decorative objects like candles, ceramics, or small plants.
This dual purpose enhances both functionality and aesthetic appeal in living rooms, bathrooms, or entryways. Picture sleek, rectangular shelves with a mirrored front or back panel, mounted securely to the wall.
The reflective surface adds depth and elegance, while the open design invites you to display meaningful or beautiful objects—such as a cluster of candles, vintage vases, or framed photos. The combination of glass and storage creates a modern, airy feel, especially when paired with soft lighting or neutral tones that highlight the reflective qualities.
Start by choosing mirror-backed shelves from home improvement stores or custom-building your own using mirror sheets and wooden or metal shelving brackets. Secure the shelves to the wall with appropriate anchors, ensuring they can support your intended objects.
Decorate with a few carefully selected pieces—think textured ceramics or metallic accents—to complete the look. This DIY project is straightforward and instantly elevates your decor while adding practical display space.
14. Asymmetrical Mirror Wall Art for a Contemporary Look
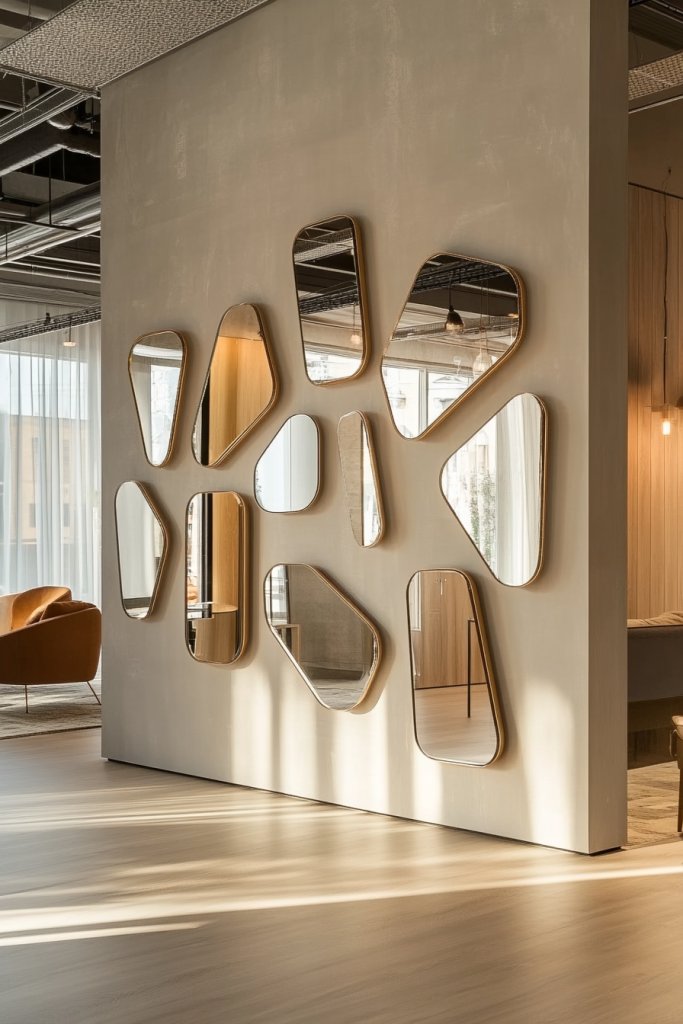
Asymmetrical mirror arrangements create a bold, modern statement that adds visual interest and a sense of movement to any wall. Instead of uniformity, this design features mirrors of varying shapes and sizes placed in an intentionally irregular pattern, which enhances a contemporary aesthetic.
Recommended Products to replicate this idea
| # | Preview | Product | |
|---|---|---|---|
| 1 |
|
184 Pieces Picture Hanging Kit, 20lb, 30lb, and 50lb Picture Hangers, Metal Picture Hanging Hooks... | Check Latest Price |
| # | Preview | Product | |
|---|---|---|---|
| 1 |

|
Monsensiy 52 Pcs Double Sided Adhesive Pads, Two Sided AdhesiveTape,Double Sided Mounting Tape Heavy... | Check Latest Price |
The irregular layout draws the eye and creates a dynamic focal point that feels fresh and artistic. Imagine a collection of mirrors—some rectangular, others round or irregularly shaped—hung at different heights and angles, forming an abstract composition.
The mix of frame finishes, such as matte black, brushed gold, or natural wood, enhances the eclectic vibe. The reflective surfaces catch and bounce light across the space, making it feel more open and lively.
This arrangement pairs well with minimalist furniture or bold accent colors for maximum impact. To achieve this look, start by selecting a variety of mirrors in different shapes and sizes from thrift stores or online marketplaces.
Lay them out on the floor first to plan a pleasing composition. Use painter’s tape to mark the placement on the wall before hanging.
Secure the mirrors with appropriate hooks or wall anchors, making sure they’re level and stable. This project encourages creativity and allows you to craft a one-of-a-kind art installation that enhances your space’s modern appeal.
15. Mirror Wall Decals with Geometric or Botanical Designs
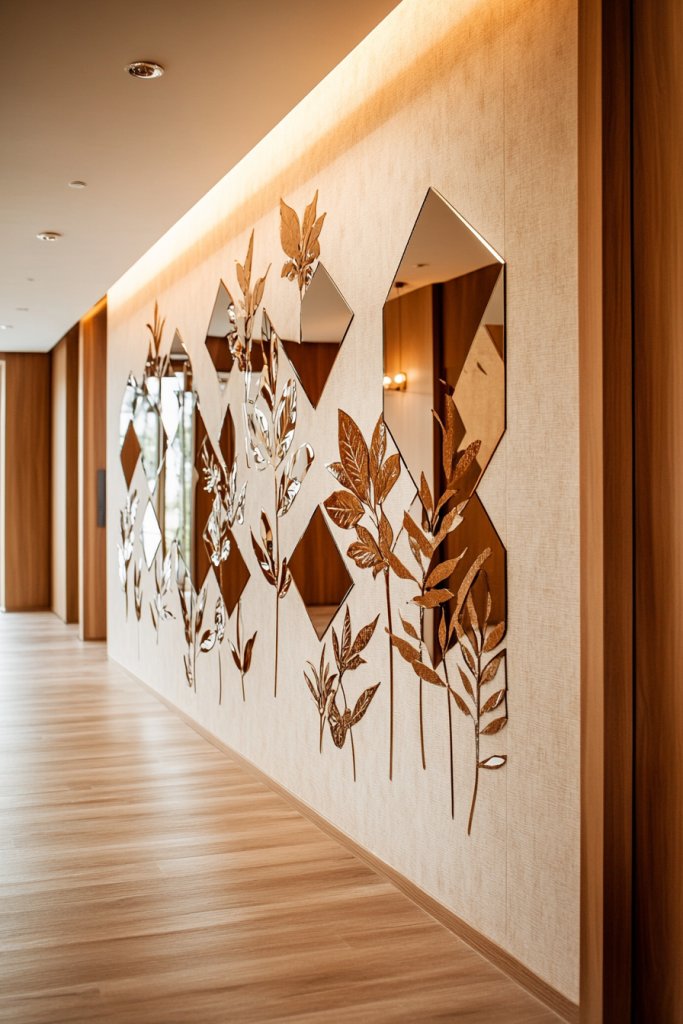
Mirror wall decals offer a versatile way to add decorative flair without the need for frames or complex installations. Available in geometric shapes or botanical-inspired patterns, these decals instantly elevate your wall with a reflective, shimmering element.
They’re perfect for adding a touch of elegance or whimsy to any room—think living rooms, bedrooms, or even bathrooms. Visualize a wall adorned with a series of mirrored hexagons arranged in a honeycomb pattern or delicate botanical shapes like leaves and flowers.
The decals catch light beautifully, creating a sense of movement and depth. The reflective surfaces contrast beautifully with matte walls and colorful décor, adding brightness and sophistication.
These decals can be placed in a symmetrical pattern or scattered randomly for a more organic feel, allowing customization to suit your style. To implement this idea, purchase mirror wall decals in your preferred shapes and sizes from craft stores or online.
Clean the wall surface thoroughly and peel the backing from each decal. Carefully stick them onto the wall, starting from the center or edges, smoothing out air bubbles with a credit card or smoothing tool. Arrange the decals in a pattern that complements your space, and enjoy an easy, mess-free way to add reflective, decorative detail that’s both stylish and temporary if desired.
16. Framed Mirror Collage for a Personalized Gallery Wall
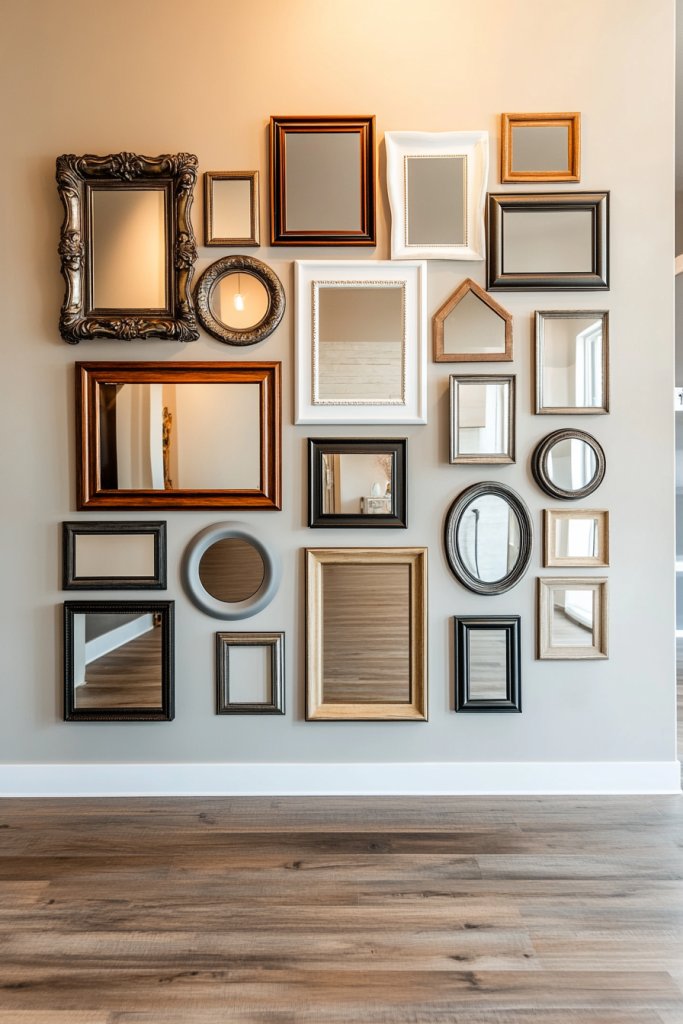
Creating a framed mirror collage transforms a plain wall into a stunning focal point that reflects your personal style. This idea is perfect for adding a unique, eclectic touch to any room, blending functionality with artistic flair.
Recommended Products to replicate this idea
| # | Preview | Product | |
|---|---|---|---|
| 1 |
|
USHOWER 2-Pack Black Bathroom Mirrors for Over Sink 24 x 36 Inch, Metal Frame Rectangle Wall Mirror,... | Check Latest Price |
| # | Preview | Product | |
|---|---|---|---|
| 1 |

|
upsimples 10 Pack Picture Frames Collage Wall Decor for Mounting or Tabletop Display, Photo Gallery... | Check Latest Price |
It’s an easy way to showcase your personality while making your space look brighter and more spacious. Imagine a collection of mirrors in various shapes—round, rectangular, oval—each set within different stylish frames like gold, black, or rustic wood.
The mirrors are arranged in an organic, asymmetrical pattern, filling a large wall with visual interest. Some frames might have intricate carvings, while others are minimalist.
The reflective surfaces bounce light across the room, creating a lively, dynamic atmosphere. The varied sizes and styles keep the display engaging, while the overall composition feels curated and personal.
The space feels vibrant, airy, and full of character, perfect for a living room, hallway, or bedroom. To create your own mirror collage, start by gathering different mirrors and frames—thrift stores and online marketplaces are perfect sources for budget-friendly options.
Lay them out on the floor to experiment with arrangements before hanging. Use a measuring tape and painter’s tape to mark where each piece will go on the wall.
Secure the mirrors with appropriate wall hooks or adhesive strips, ensuring the heavier ones are well-supported. For a polished look, keep the spacing consistent or intentionally varied for an artful effect. This project is beginner-friendly and offers endless opportunities for personalization, making your wall a true reflection of your style.
17. Mirrored Heart or Star Shapes for Playful Decor
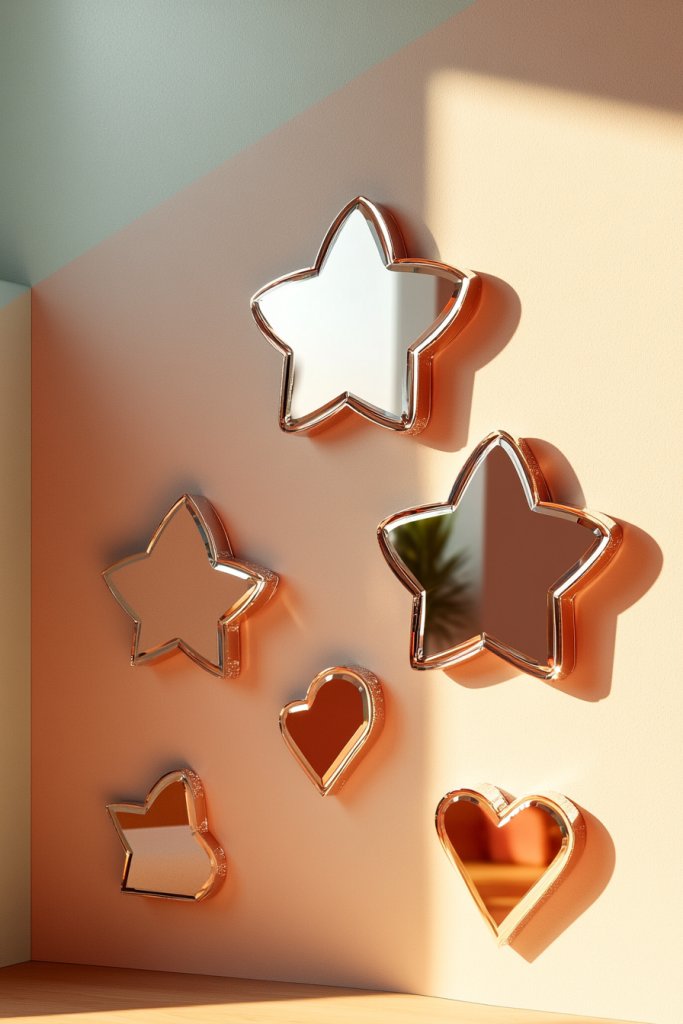
Adding mirrored heart or star shapes introduces a fun, whimsical element to your decor, perfect for brightening up children’s rooms, playful entryways, or modern boho spaces. These shapes inject personality and lighthearted charm, making your wall feel lively and inviting.
Visualize a wall where shimmering hearts and stars—each crafted from small, polished mirror pieces—are arranged in a scattered or symmetrical pattern. The shapes come in various sizes, with smooth, rounded edges for hearts and sharp, crisp points for stars.
The reflective surfaces catch the light from windows or lamps, creating tiny flashes of brightness that dance across the room. The mirrors’ glossy finish contrasts beautifully with surrounding wall textures, such as painted brick or textured wallpaper.
The overall effect is cheerful and dynamic, adding a playful touch that catches the eye and sparks joy in everyday living. To make your own mirrored shapes, start with pre-cut mirror sheets or adhesive-backed mirror stickers available at craft stores or online.
Use a stencil or printable template of hearts and stars to trace your shapes onto the mirror material. Carefully cut out each shape with a glass cutter or strong scissors designed for acrylic mirrors.
Mount them on the wall with strong adhesive strips or small hooks, arranging them in a pattern that feels spontaneous or organized. For added fun, mix metallic or colorful frames around the shapes. This DIY project is simple, inexpensive, and perfect for bringing a cheerful, playful vibe to any space.
Conclusion
With so many creative DIY mirror wall decor ideas—from modern geometric designs and vintage frames to playful shapes and textured mosaics—there’s endless potential to brighten and personalize your space. Whether you prefer sleek arrangements or cozy rustic touches, these projects invite you to transform your walls into stunning focal points.
Don’t hesitate to try multiple styles or mix and match to reflect your unique personality. Start crafting today and watch your home come to life with radiant, one-of-a-kind mirror decor!
Leave a Reply