I have been, or can be if you click on a link and make a purchase, compensated via a cash payment, gift, or something else of value for writing this post. As an Amazon Associate, I earn from qualifying purchases. Please read my full Affiliate Disclosure for more information.
Ever wish you could give your home a fresh, stylish update without breaking the bank? DIY home decor on a budget has become a popular way to transform spaces with creativity and personal flair, all while saving money. It’s incredibly satisfying to craft unique pieces that reflect your personality, and it’s a fantastic way to add charm and character to your living environment without relying on expensive store-bought decor.
Whether you’re a seasoned DIY enthusiast or just starting out, affordable projects make decorating accessible and fun for everyone. In this article, you’ll discover a treasure trove of inspiring ideas that will help you elevate your home’s style without overspending.
From simple upcycling tricks to clever craft projects, these budget-friendly DIY decor ideas are perfect for adding warmth, personality, and a touch of chic to any space. Get ready to explore practical, creative, and easy-to-implement ideas that will make your home feel both stylish and uniquely yours!
1. Upcycled Mason Jar Candle Holders for Cozy Ambiance
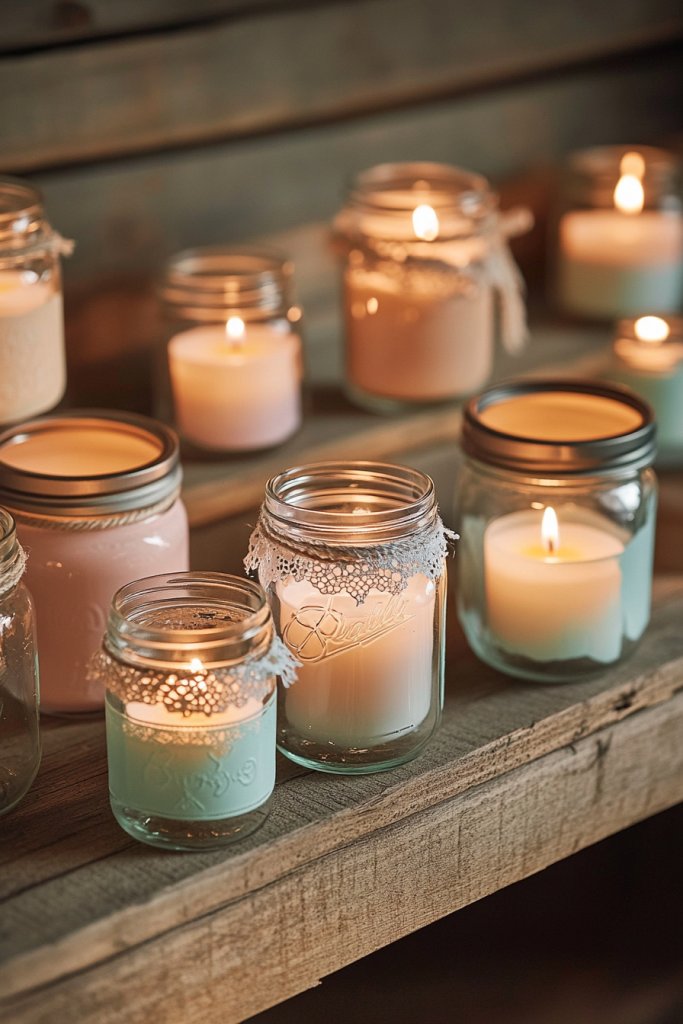
Transforming ordinary mason jars into charming candle holders is a simple yet effective way to add warm, inviting light to any space without breaking the bank. This DIY project combines rustic charm with personalized creativity, making your home feel cozy and stylish.
Recommended Products to replicate this idea
| # | Preview | Product | |
|---|---|---|---|
| 1 |

|
Zonon 2 Pcs Mason Jar Candle Holder Farmhouse Hook Taper Candle Holder Insert Iron Vintage Rustic... | Check Latest Price |
| # | Preview | Product | |
|---|---|---|---|
| 1 |
|
Stonebriar Unscented Long Burning White Tealight Candles, Bulk Pack, 6-7 Hour Burn Time, Smokeless... | Check Latest Price |
Imagine a collection of clear glass jars, each filled with a flickering tea light or small pillar candle. The jars might be decorated with twine, lace, or even painted with soft pastel hues to match your decor.
The glow of the candles creates a gentle ambiance, casting dancing shadows that evoke a sense of comfort. You can arrange these on shelves, mantels, or even hang them with wire for a whimsical touch.
The textures of the glass, combined with the rustic metal lids or painted accents, make the space feel warm and inviting, perfect for relaxing evenings or intimate gatherings. To recreate this look, start with clean mason jars—any size works! You can embellish the rims with jute twine or paint the outside with chalk paint for a matte finish.
Fill them with small candles, like tealights or LED alternatives for safety. For added charm, tie a small piece of burlap or ribbon around the neck.
Arrange your jars on a tray or in clusters on a shelf, and light the candles for instant ambiance. These holders are versatile, affordable, and customizable to suit any style, from farmhouse to modern chic.
2. Fabric-Covered Throw Pillow Makeovers on a Budget
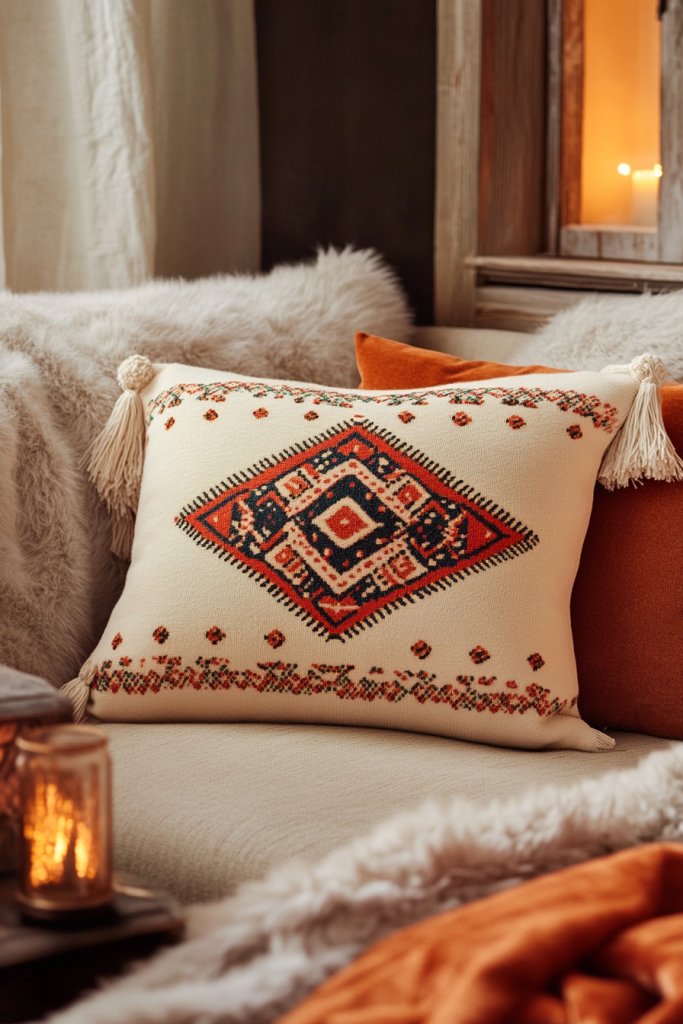
Revamping plain throw pillows with fabric covers is an easy way to inject new life into your living space without spending a fortune. It allows for endless customization, whether you prefer bold patterns, cozy textures, or subtle neutrals, all while maintaining a budget.
Recommended Products to replicate this idea
| # | Preview | Product | |
|---|---|---|---|
| 1 |

|
Utopia Bedding Throw Pillows Insert (Pack of 2, White) - 18 x 18 Inches Bed and Couch Pillows -... | Check Latest Price |
| # | Preview | Product | |
|---|---|---|---|
| 1 |

|
Ultra Soft Pillow Protectors with Zipper Standard Size - Set of 4 Breathable Pillow Covers - 100%... | Check Latest Price |
Visualize a soft, neutral-colored pillow with a vibrant, geometric fabric cover wrapping around it. The fabric might be a lightweight cotton with a cheerful floral pattern or a plush velvet in jewel tones.
You could choose a simple, clean edge or add decorative trims like pom-poms or tassels for extra flair. The cover fits snugly over the pillow insert, transforming a basic piece into a statement accessory.
When you run your hand over it, you’ll notice the tactile contrast—smooth cotton, fluffy faux fur, or textured chenille—adding depth and personality to your sofa or bed. To make your own, measure your pillow and cut a piece of fabric slightly larger than the pillow dimensions, allowing for seam allowance.
Sew the edges with a simple straight stitch, adding decorative details if desired. You can use an existing pillow insert or repurpose one you already own.
Slip the fabric cover over the pillow and close it with a hidden zipper, buttons, or even a simple envelope closure. With a few dollars worth of fabric from a thrift store or discount shop, you can craft a chic, personalized pillow that elevates your decor effortlessly.
3. Stylish Wall Hooks Using Repurposed Wooden Clothespins
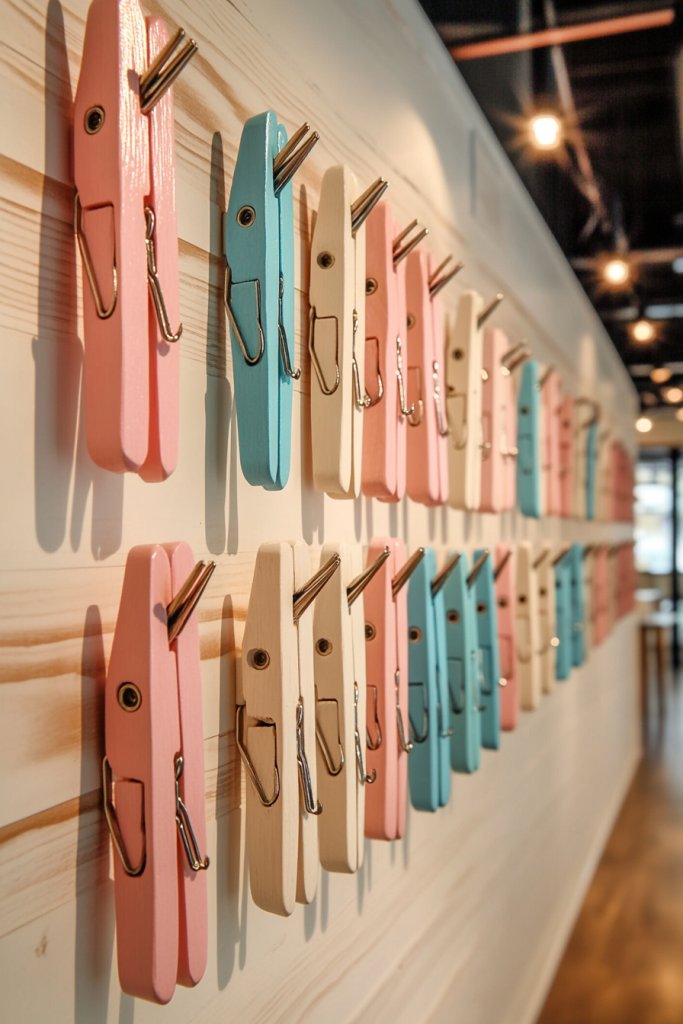
Transforming wooden clothespins into decorative wall hooks is a playful and budget-friendly way to add functional style to your home. These DIY hooks are perfect for hanging hats, keys, jewelry, or lightweight bags, while giving your space a quirky, personalized touch.
Recommended Products to replicate this idea
| # | Preview | Product | |
|---|---|---|---|
| 1 |

|
(Pack of 50) Wooden Clothespins About 2-7/8" Long | Check Latest Price |
| # | Preview | Product | |
|---|---|---|---|
| 1 |

|
Mr. Pen- Nail Assortment Kit, 600 Pcs, 4 Sizes, Silver, Small Nails for Hanging Pictures, Finishing... | Check Latest Price |
Picture a wall adorned with a series of large, painted clothespins mounted with small nails or adhesive strips. Each clothespin is dipped in bright colors—think pastel pinks, bold blues, or neutral whites—and sealed with a clear topcoat for durability.
They are spaced evenly along the wall, creating a pattern that’s both modern and whimsical. When used as hooks, the open grip of the clothespin holds your items securely, and the natural wood grain or painted finish adds visual interest.
These hooks blend function and fun, making your space feel lively and inviting without being cluttered. To create your own, gather a handful of large wooden clothespins.
Paint them in your preferred colors and let dry completely. Attach small nails or command hooks to the wall in your chosen pattern, then secure each clothespin with a nail or strong adhesive.
For extra durability, you might reinforce the back with hot glue. These hooks are easy to make, cost-effective, and customizable to match your decor, making everyday organization both stylish and fun.
4. DIY Macrame Plant Hangers for a Boho Touch (without plants)
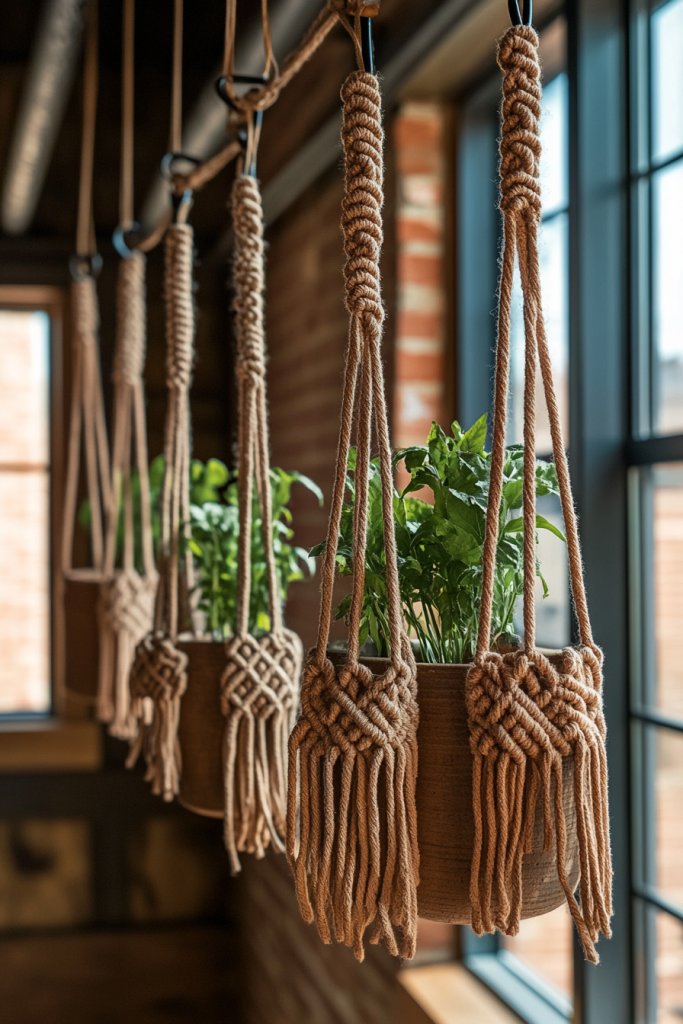
Adding DIY macrame plant hangers is a popular way to introduce a relaxed, boho vibe to your home—without the need for actual plants if you prefer. These intricate-looking hangers are surprisingly simple to make and instantly elevate your decor.
Recommended Products to replicate this idea
| # | Preview | Product | |
|---|---|---|---|
| 1 |

|
100 Ft Heavy Duty Braided Cotton Rope Clothesline Approximately #6 1/4" 6 mm Multi Purpose Home Boat... | Check Latest Price |
| # | Preview | Product | |
|---|---|---|---|
| 1 |

|
10 Inch Metal Plant Hooks (2-Pack) - Decorative Wall Hangers with Bird Design for Indoor & Outdoor... | Check Latest Price |
Imagine soft, knotted cords made from natural cotton or jute, hanging in symmetrical patterns from a ceiling hook or wall bracket. The hangers are composed of a series of knots—square knots, half-hitches, or spirals—that form a decorative webbing.
The cords can be left long for a dramatic effect or trimmed to a shorter length for a subtler look. The visual appeal lies in the texture and craftsmanship, with the intricate knots creating a sense of artistry and calm.
You could hang empty, decorative baskets or simply enjoy the aesthetic of the knotted cords themselves, adding a tactile, textured element to your space. To make one, gather about 10-15 feet of cotton cord or jute, depending on the desired length.
Cut the cord into four equal strands, then tie a loop at the top for hanging. Use simple knots to create a pattern—there are plenty of beginner tutorials online.
Attach a small metal ring or wooden dowel at the bottom for added stability if needed. The beauty of this project is that it’s affordable, customizable, and quick to assemble, making it a perfect weekend DIY for stylish, budget-friendly decor.
5. Creating a Personalized Gallery Wall with Printed Photos and Frames
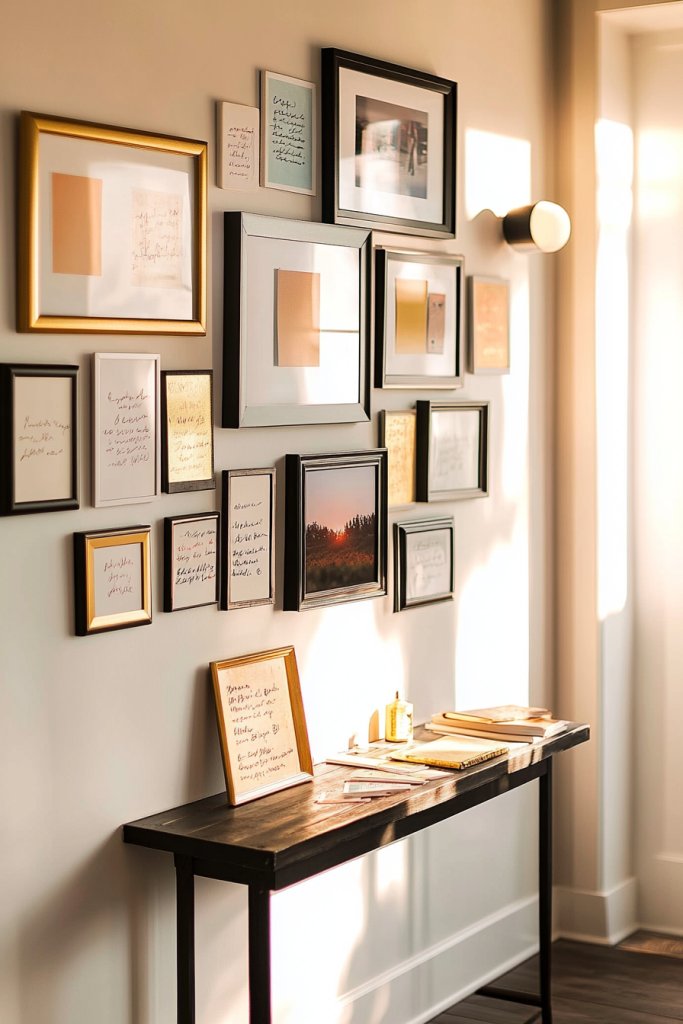
A gallery wall filled with printed photos and frames is an inspiring way to showcase your memories and personalize your living space. This DIY project allows you to craft a visually striking focal point that reflects your personality without spending a lot.
Recommended Products to replicate this idea
| # | Preview | Product | |
|---|---|---|---|
| 1 |

|
Personalized Custom Canvas Prints: Photo On Canvas (Framed 8X10) Transform Your Photos into Stunning... | Check Latest Price |
| # | Preview | Product | |
|---|---|---|---|
| 1 |

|
upsimples 11x14 Picture Frame, Display Pictures 8x10 with Mat or 11x14 Without Mat, Wall Hanging... | Check Latest Price |
Picture a blank wall transformed into a curated display of framed photographs—family moments, travel snapshots, or art prints—arranged in a dynamic, yet balanced layout. The frames can be thrifted or bought cheaply in bulk, and painted in your favorite colors like matte black, white, or metallic gold for a chic look.
Use a mix of sizes and styles to add visual interest, and include some mementos like postcards or handwritten notes for a personal touch. The photos, printed on standard paper or photo paper, are mounted with adhesive putty or framed for a polished appearance.
The result is a colorful, meaningful collage that invites conversation and adds warmth to your home. To assemble your gallery wall, select your favorite photos and choose or create matching frames.
Lay out the arrangement on the floor first, experimenting with spacing and positioning until you’re satisfied. Mark the wall with painter’s tape or a pencil to guide placement.
Hang the frames securely using nails or command strips, then step back to enjoy your personalized, budget-friendly art display. This project not only enhances your decor but also creates a heartfelt atmosphere in any room.
6. Painted Wooden Crate Shelves for Rustic Storage
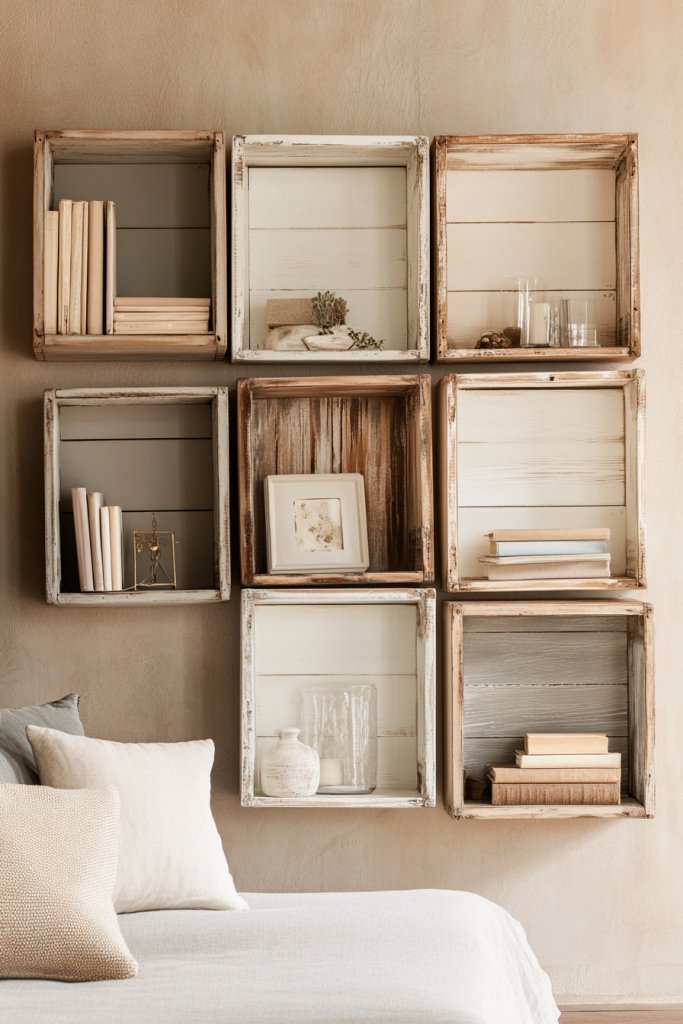
If you’re craving a cozy, farmhouse-inspired home, painted wooden crate shelves are an easy way to add charm and functionality without breaking the bank. They turn simple storage into a decorative focal point that mixes practicality with rustic appeal.
Recommended Products to replicate this idea
| # | Preview | Product | |
|---|---|---|---|
| 1 |

|
ZENFUN 3 Pack Wooden Nesting Crates with Handles, Decorative Hand Crafted Wood Box Nesting Crate... | Check Latest Price |
| # | Preview | Product | |
|---|---|---|---|
| 1 |

|
4 Pairs Interlocking Flush Mount Bracket Picture Hanging Hooks Stainless Steel Heavy Duty Photo... | Check Latest Price |
Imagine stacking vintage-style wooden crates painted in soft neutral shades like creamy white, muted gray, or warm taupe. The crates have a slightly distressed finish, showcasing their natural wood grain, adding texture and character.
When mounted on the wall, they create open shelving perfect for displaying books, small plants, or decorative accessories. The overall look feels warm, inviting, and effortlessly stylish, with a tactile mix of smooth painted surfaces and rougher wood edges that evoke a cozy, lived-in vibe.
To make your own, start by sourcing inexpensive wooden crates from thrift stores or craft suppliers. Lightly sand them to smooth out rough edges and apply a primer if necessary.
Paint each crate in your chosen color, using chalk paint or acrylic for an affordable finish. Once dry, arrange and secure the crates on the wall using sturdy brackets or wall anchors.
For added durability, seal the paint with a clear matte or satin topcoat. This project is beginner-friendly and takes only a few hours, transforming basic storage into a rustic statement piece.
7. Decorate Plain Vases with Washi Tape for a Colorful Accent
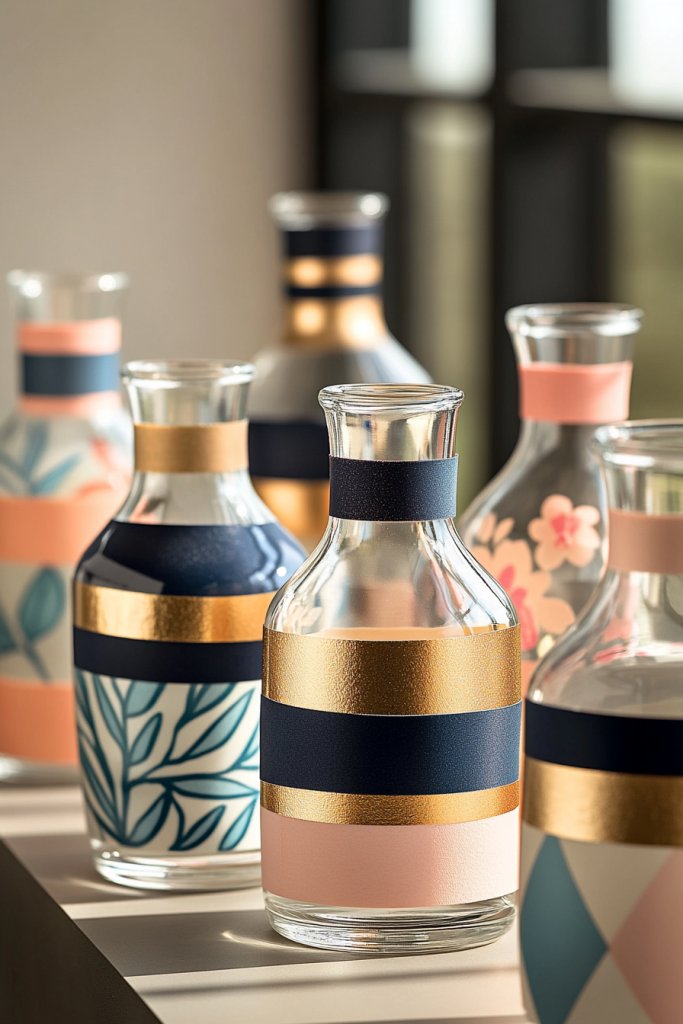
Transforming simple vases into eye-catching decor pieces with washi tape is a quick, budget-friendly way to add color and personality to your space. This DIY project is perfect for refreshing your existing decor or creating personalized gift ideas.
Picture a collection of clear glass or ceramic vases wrapped in strips of vibrant or patterned washi tape. The tape could feature geometric designs, florals, or bold stripes in shades like blush pink, navy blue, or gold accents.
The tapes adhere smoothly, creating crisp lines and a clean, modern look. When placed on shelves or tabletops, these vases become focal points, adding a playful touch to your decor.
The tactile contrast between the glossy glass and the matte tape creates visual interest, making even plain containers stand out. To create your own, gather inexpensive washi tapes in various patterns and colors from craft stores or dollar shops.
Choose plain vases—glass, ceramic, or even repurposed jars. Clean the surface thoroughly before applying the tape to ensure it sticks well.
Wrap the tape around the vase in your desired pattern, overlapping or creating stripes for a layered look. For a more polished finish, use a craft knife to trim excess tape at the edges. These decorated vases are perfect for holding flowers or as standalone decorative objects, and the whole process takes less than an hour.
8. Transform Old T-Shirts into Unique Wall Art or Textile Decor
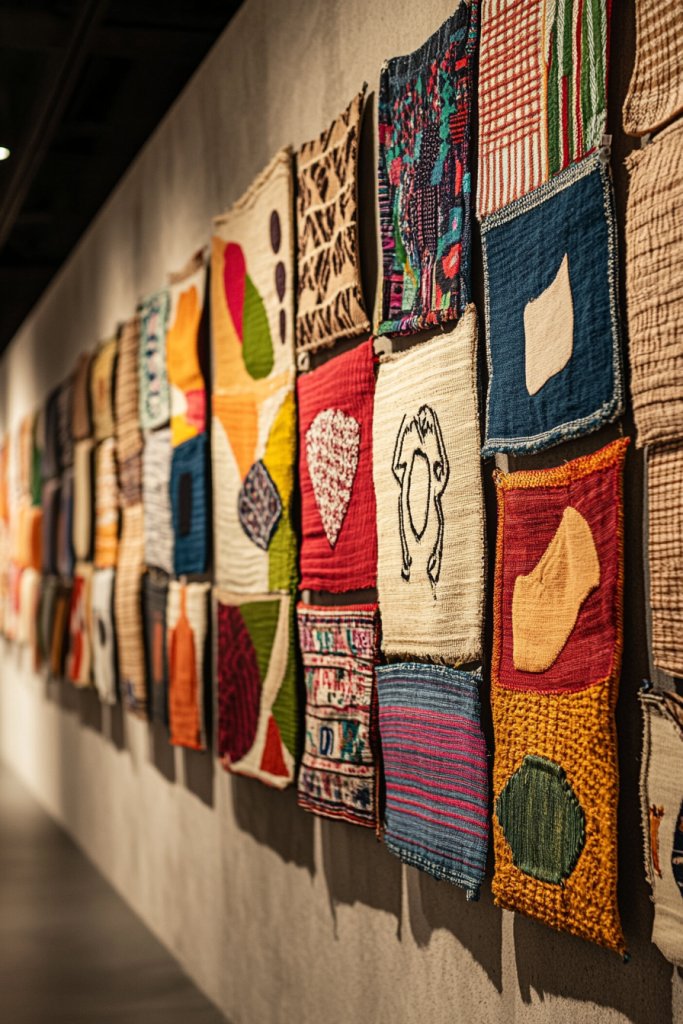
Repurposing old T-shirts into wall art or textile decor is a creative way to recycle clothing and add a personal touch to your home. This project turns worn-out shirts into colorful, textured accents that brighten any room.
Recommended Products to replicate this idea
| # | Preview | Product | |
|---|---|---|---|
| 1 |

|
72 Pcs Botanical Stencils Set, Reusable Butterfly & Flower Painting Templates - Leaf, Dragonfly,... | Check Latest Price |
| # | Preview | Product | |
|---|---|---|---|
| 1 |

|
Roslynity Framed Canvas Wall Art Vintage Print Paintings Neutral Tapestry Textile Antique Peonies... | Check Latest Price |
Visualize a wall adorned with vibrant fabric patches or woven art made from T-shirt material. You can create a collage of cut-out shapes, or sew strips together for a patchwork tapestry.
The soft cotton fabric, in shades and patterns from your old shirts, adds a cozy, nostalgic vibe. When hung on the wall, these pieces bring a pop of color and tactile interest, transforming everyday clothing into a meaningful decor element.
The textures and playful patterns evoke a relaxed, boho aesthetic perfect for casual living spaces. Getting started is simple: gather old T-shirts in various colors and patterns.
Cut the shirts into desired shapes—strips, squares, or abstract forms. Sew or glue the pieces together into a fabric collage, or stretch them over a canvas frame for a more finished look.
Use a staple gun or fabric glue for quick assembly. Hang your textile art with nails or hooks, and enjoy a one-of-a-kind decor piece that’s both eco-friendly and budget-conscious. This project is ideal for beginners and takes just a few hours to complete.
9. Handmade Decorative Trays Using Cardboard and Decorative Paper
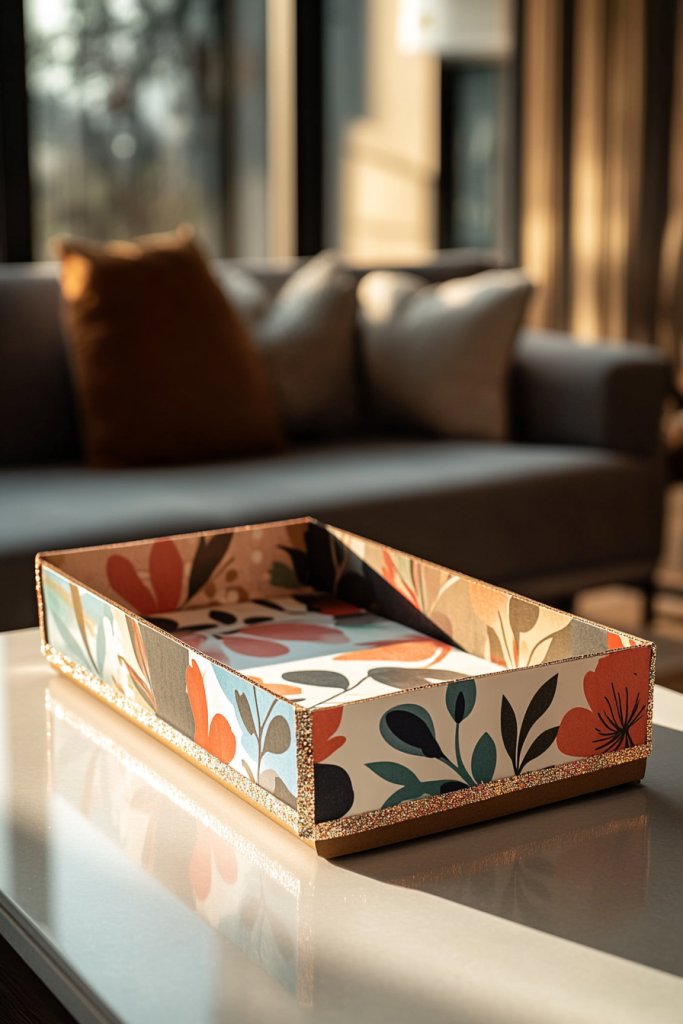
Creating decorative trays from cardboard and decorative paper is an affordable way to add style and organization to your home. These trays serve as catch-alls or display pieces, elevating everyday essentials with a bespoke touch.
Recommended Products to replicate this idea
| # | Preview | Product | |
|---|---|---|---|
| 1 |

|
Captain Decor 8 Crepe Paper Streamers Rolls, 656ft Pack of Unique 8 Rainbow Streamers Party... | Check Latest Price |
| # | Preview | Product | |
|---|---|---|---|
| 1 |
|
Aleene's 26412 Spray Gloss Finish, 6 Oz Acrylic Sealer, Original Version | Check Latest Price |
Imagine a sleek, rectangular tray with a sturdy cardboard base wrapped in vibrant, patterned decorative paper. The edges are reinforced with painted or washi-tape borders, giving it a polished look.
The surface features colorful designs—florals, geometric prints, or metallic accents—that inject personality into a plain space. Whether used on coffee tables, dressers, or entryways, these trays keep clutter contained while adding an eye-catching element to your decor.
The combination of tactile textures and bold patterns creates a lively, personalized vibe. To make your own, cut a piece of cardboard to your desired tray size.
Cover the top with decorative paper or contact paper, smoothing out air bubbles and creases. Reinforce the edges with washi tape or painted borders for durability.
For handles, cut out small holes and insert looped ribbon or fabric strips. Finish by sealing the surface with a clear acrylic spray for added protection. This project is straightforward, requires minimal materials, and allows for endless customization with different patterns and colors.
10. Repurposed Ladder as a Chic Bookshelf or Storage Unit
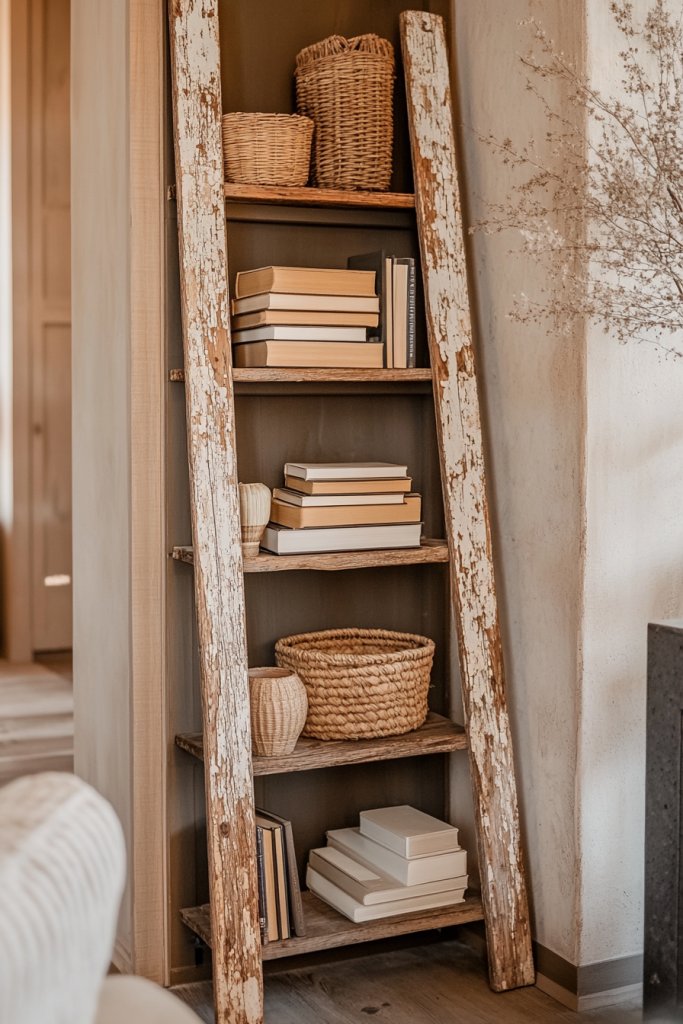
A vintage ladder transformed into a stylish bookshelf or storage solution is a creative, low-cost way to add rustic charm to any room. It’s perfect for displaying books, plants, or decorative objects while serving as a statement piece.
Recommended Products to replicate this idea
| # | Preview | Product | |
|---|---|---|---|
| 1 |

|
Maydear Bamboo Ladder Shelf Bookcase, 5-Tier Leaning Bookshelf Free Standing Organizer Storage... | Check Latest Price |
| # | Preview | Product | |
|---|---|---|---|
| 1 |

|
Goovilla Shelf Bracket, Heavy Duty Floating Shelf Brackets 6 inch Long, 6 Pack Brackets for Shelves,... | Check Latest Price |
Picture an old wooden ladder with peeling paint or weathered texture, leaning against a wall or freestanding. The rungs serve as shelves, holding stacks of books, baskets, or small decor items like candles or vases.
The natural imperfections add character, making it an eye-catching focal point that combines function with vintage flair. This setup works well in living rooms, bedrooms, or even bathrooms, creating a layered, relaxed aesthetic rooted in repurposed charm.
To create your own, find a sturdy wooden or metal ladder from thrift stores or clearance sales. Clean and sand the surface if needed, then paint or distress it to match your decor style.
Securely lean or anchor the ladder in place, and arrange your favorite items on the rungs. For added stability, attach the ladder to the wall with brackets or hooks, especially if placed freestanding. This project is simple, cost-effective, and offers endless possibilities for personalization and practical use.
11. DIY Fabric Banners and Garlands to Liven Up Living Spaces
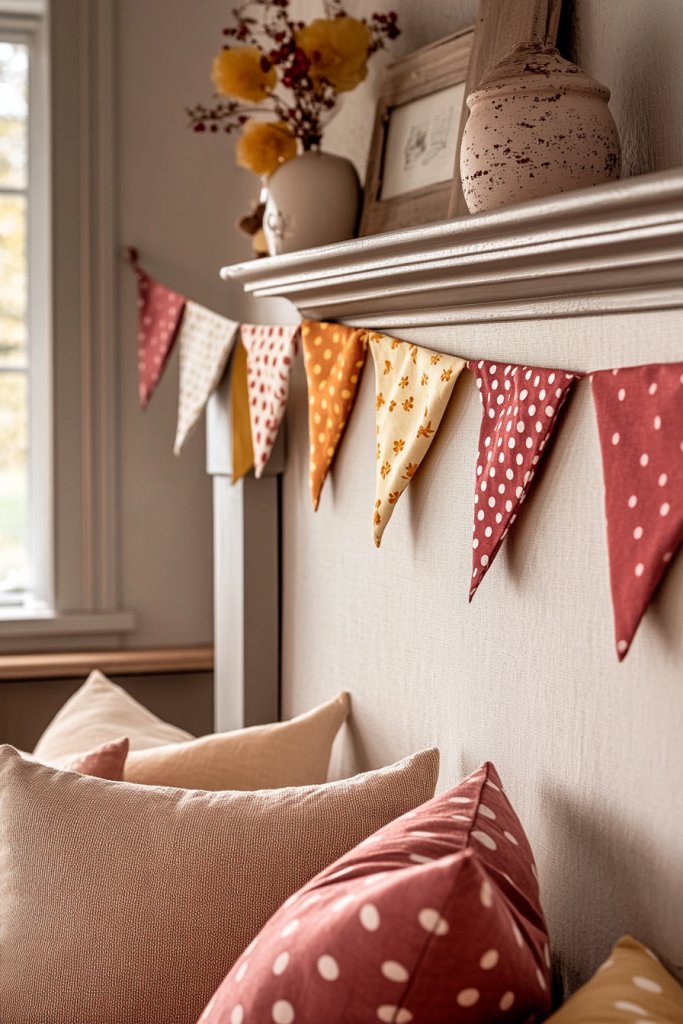
Transforming your space with colorful fabric banners or garlands is an easy and affordable way to add personality and charm to any room. These decorative elements create a lively, welcoming atmosphere and are perfect for celebrations or everyday decor.
Recommended Products to replicate this idea
| # | Preview | Product | |
|---|---|---|---|
| 1 |

|
10M/32Ft Triangle Bunting Banner, 36 Pcs Cotton Fabric Flags Pennant Garlands for Birthday Party,... | Check Latest Price |
| # | Preview | Product | |
|---|---|---|---|
| 1 |
|
12 Pack Fake Vines for Room Decor Artificial Ivy Garland with Clip Green Flowers Hanging Plants Faux... | Check Latest Price |
Imagine a string of vibrant fabric triangles or circles hanging across a mantel or along a wall. The fabrics come in soft textures like cotton or linen, featuring cheerful patterns such as polka dots, florals, or solid colors.
They sway gently with air movement, adding a dynamic feel, while their cheerful hues—bright reds, sunny yellows, or pastel pinks—brighten up neutral backgrounds. The overall effect is playful, inviting, and customizable to match your style.
Getting started is simple: cut fabric strips or shapes from scraps or affordable bolts of fabric. Use a needle and matching thread or a hot glue gun to attach each piece to a length of twine, jute, or ribbon.
For a more polished look, you can fold and sew the edges or add embellishments like tassels or pom-poms. Hang your banner on a wall, across a window frame, or above a doorway for an instant mood boost—all with minimal effort and cost.
12. Custom Painted Mason Jars for Pen Holders or Kitchen Storage
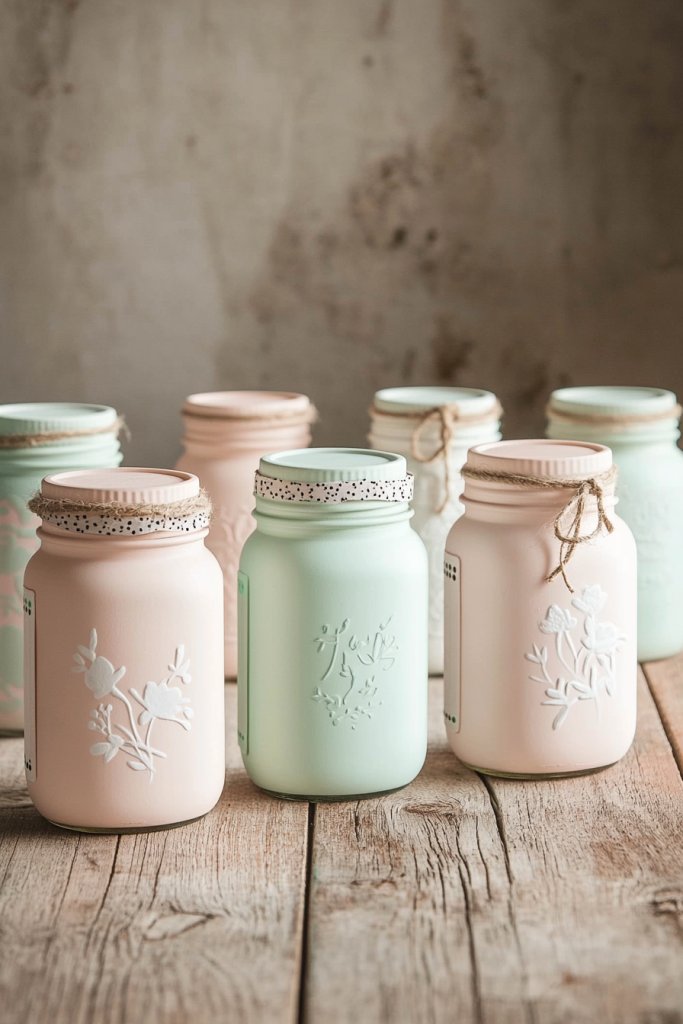
Personalized painted mason jars are a charming and budget-friendly way to organize your home while adding a splash of color. These versatile containers can serve as pen holders, utensil caddies, or small storage for craft supplies, instantly elevating your space.
Recommended Products to replicate this idea
| # | Preview | Product | |
|---|---|---|---|
| 1 |

|
Blushtier 66 Pieces Paint Your Own Mason Jar Kit 16oz DIY Glass Mason Jars with Lids Painting Favor... | Check Latest Price |
| # | Preview | Product | |
|---|---|---|---|
| 1 |

|
DGBDPACK 400 Dissolvable Canning Labels for Mason Jars, Small Pantry Labels 1 x 2⅛ inch,... | Check Latest Price |
Picture a set of jars painted in soft pastel shades—mint green, blush pink, or creamy white—each featuring simple patterns like stripes, polka dots, or delicate floral accents. The paint creates a matte or semi-gloss finish that contrasts beautifully with the transparent glass, giving a handcrafted, cozy vibe.
You might also add labels or decorative touches like twine or washi tape around the lid for extra flair. The overall look is both functional and decorative, fitting seamlessly into a rustic, shabby chic, or modern aesthetic.
To create your own, start by cleaning and drying your mason jars thoroughly. Use painter’s tape to section off areas if you want clean lines or patterns.
Apply acrylic or chalk paint with a foam brush or sponge for an even coat—multiple thin layers work best. Once dry, you can seal the paint with a clear matte spray to increase durability. Finish by adding labels or embellishments, then fill and display these jars on your kitchen counter, desk, or open shelves for a personalized touch that’s both practical and pretty.
13. Create a Statement Wall with Washable Chalkboard Paint
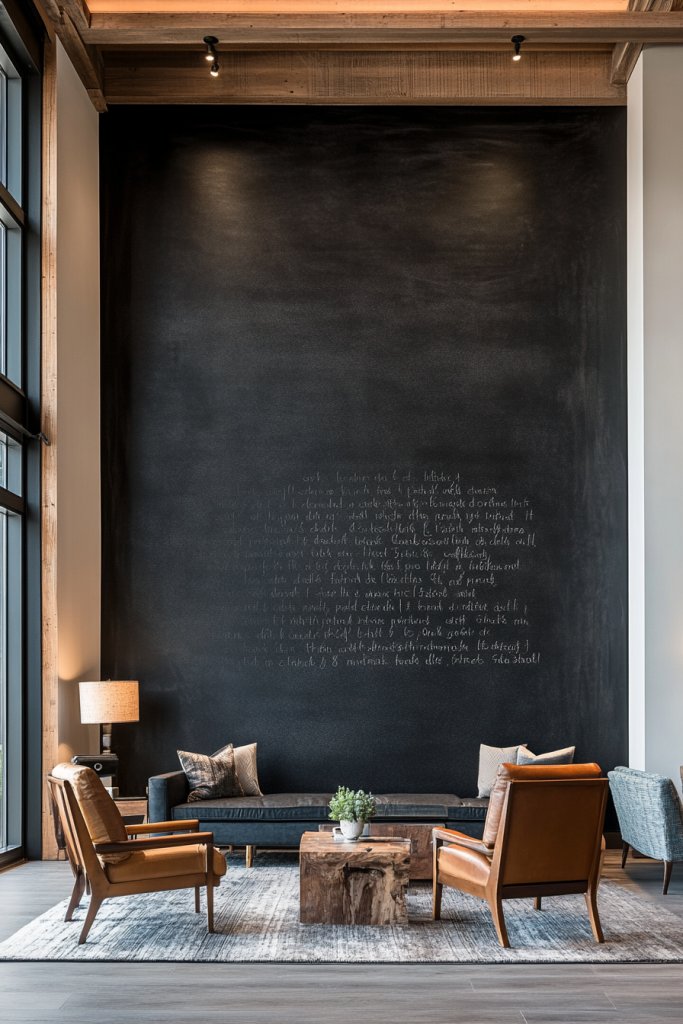
A chalkboard wall makes a bold, interactive focal point in any room, perfect for notes, doodles, or seasonal messages. Using budget-friendly washable chalkboard paint, you can transform an ordinary wall into a versatile masterpiece with minimal cost and effort.
Recommended Products to replicate this idea
| # | Preview | Product | |
|---|---|---|---|
| 1 |

|
QT BLK Chalkboard Paint | Check Latest Price |
Visualize a large wall painted in deep black or charcoal gray, with a matte finish that absorbs light beautifully. This surface invites creativity—write inspiring quotes, menus, or daily reminders, all easily erasable with a damp cloth.
The wall’s crisp, smooth look contrasts with surrounding decor, adding depth and functionality. You might also decorate the edges with washi tape or framed sections of the chalkboard for a polished, personalized appearance.
Start by selecting the wall you want to convert—preferably a smooth, clean surface. Use painter’s tape to create clean edges or sections.
Apply a primer if needed, then evenly coat with washable chalkboard paint using a roller or brush, following the manufacturer’s instructions. Allow sufficient drying time, then season the surface by rubbing a piece of chalk all over and erasing it. Now, you’re ready to jot down daily to-do lists or fun doodles, making your space more dynamic and interactive without breaking the bank.
14. Decorate Plain Lampshades with Ribbon, Fabric, or Paint
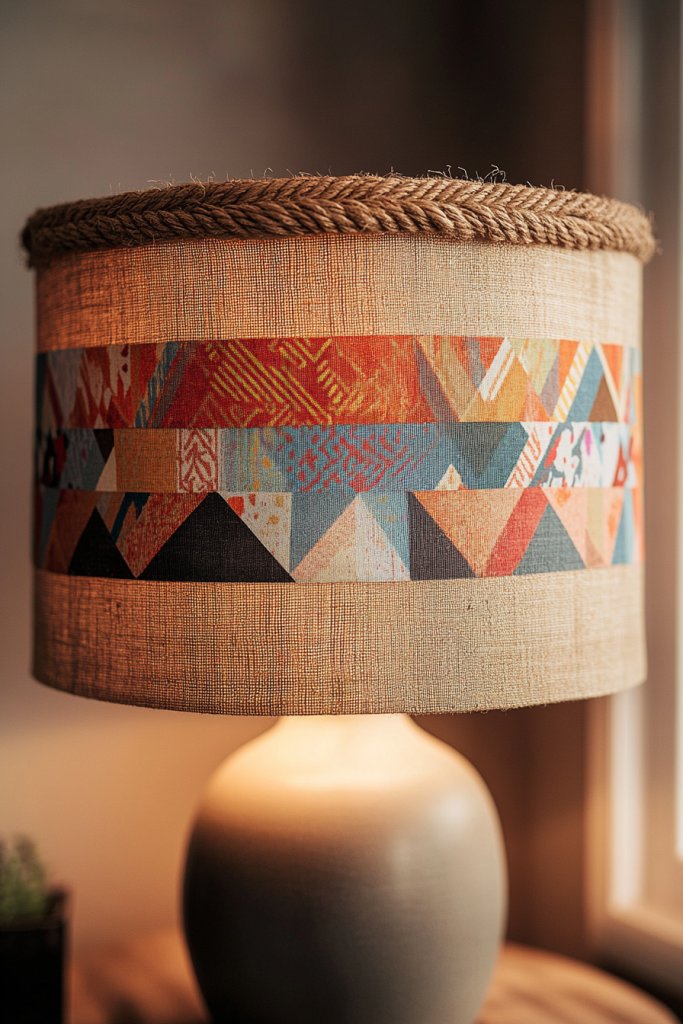
Revamping a plain lampshade is a quick, cost-effective way to refresh your room’s ambiance and add a personalized touch. With simple materials like ribbons, fabric strips, or paint, you can turn an ordinary lampshade into a stylish statement piece.
Recommended Products to replicate this idea
| # | Preview | Product | |
|---|---|---|---|
| 1 |
|
Halloween Decor Lamp Shades, Lampshades Table Cover Decorations, 20 X 60 Inch Large Spider Web Lamp... | Check Latest Price |
| # | Preview | Product | |
|---|---|---|---|
| 1 |

|
FITTDYHE Fabric Glue Permanent, 60 ML Washable Clear Clothing Glue, Super Fabric Adhesive for... | Check Latest Price |
Picture a neutral-colored drum shade transformed with a band of woven jute ribbon wrapping around the top or bottom edge, or adorned with a splash of bold fabric in a geometric print. Alternatively, use fabric glue or double-sided tape to attach strips of colorful fabric or washi tape in fun patterns.
For a more artistic approach, paint abstract designs or delicate patterns directly onto the shade’s surface with acrylic or fabric paint. The result is a customized lampshade that complements your decor, whether cozy, modern, or eclectic.
To do this yourself, remove the lampshade and clean it thoroughly. Decide on your design—ribbons, fabric strips, or painted patterns—and gather your materials.
For fabric or ribbon, cut to size and attach with fabric glue or double-sided tape, smoothing out any bubbles. For painted designs, use painter’s tape to create clean lines or stencils for intricate patterns, then carefully paint and let dry. Once complete, reassemble and position your new lampshade—your room will glow with a fresh, personalized charm.
15. Make Your Own Decorative Mirrors Using Recycled Frames
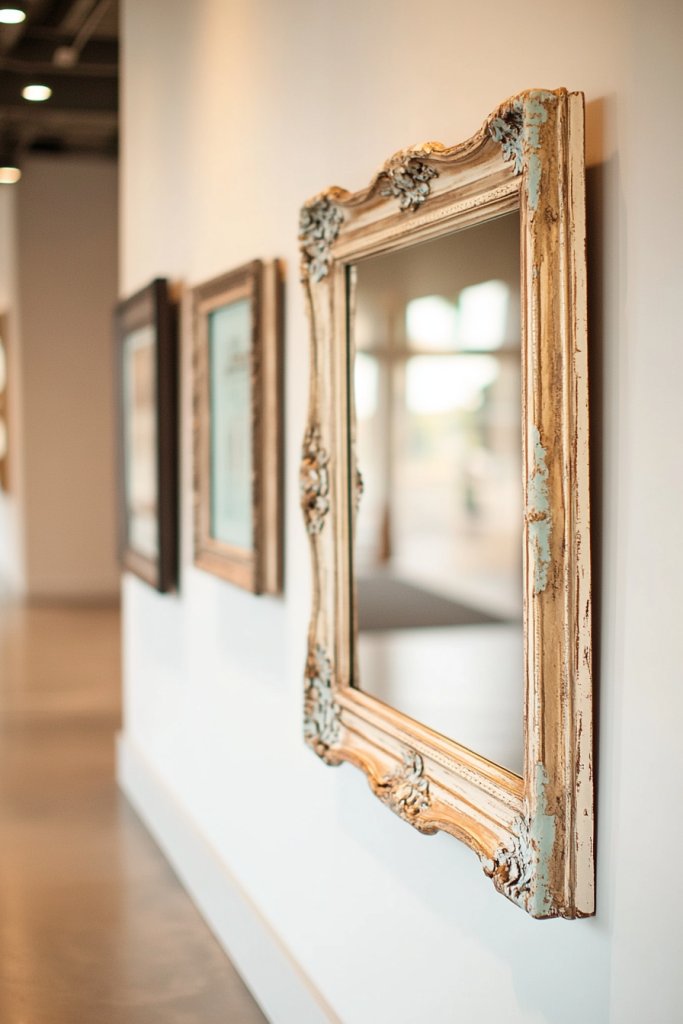
Creating decorative mirrors from recycled frames is an eco-friendly, budget-conscious project that adds elegance and visual interest to your home. By repurposing old frames and adding a mirror insert, you can craft unique focal points that reflect your style.
Imagine a vintage picture frame painted in a metallic gold or matte black, with a mirror cut to fit snugly inside. The frame’s ornate details or distressed finish lend a touch of sophistication or rustic charm, depending on your preference.
These mirrors can be hung in entryways, bedrooms, or living areas, instantly enlarging and brightening the space through reflected light and personality. Begin by sourcing old frames from thrift stores, flea markets, or your own attic.
Remove any backing and glass if present—measure the opening carefully to buy a mirror cut to size from a hardware store or mirror supplier. If desired, paint or decorate the frame with spray paint, washi tape, or decorative accents.
Fit the mirror into the frame, secure it with adhesive if needed, and hang using appropriate hardware. These DIY mirrors are a perfect blend of sustainability and style, transforming simple frames into eye-catching decor pieces that cost only a fraction of retail prices.
16. Craft a Stylish Key and Jewelry Organizer from Wooden Spoons
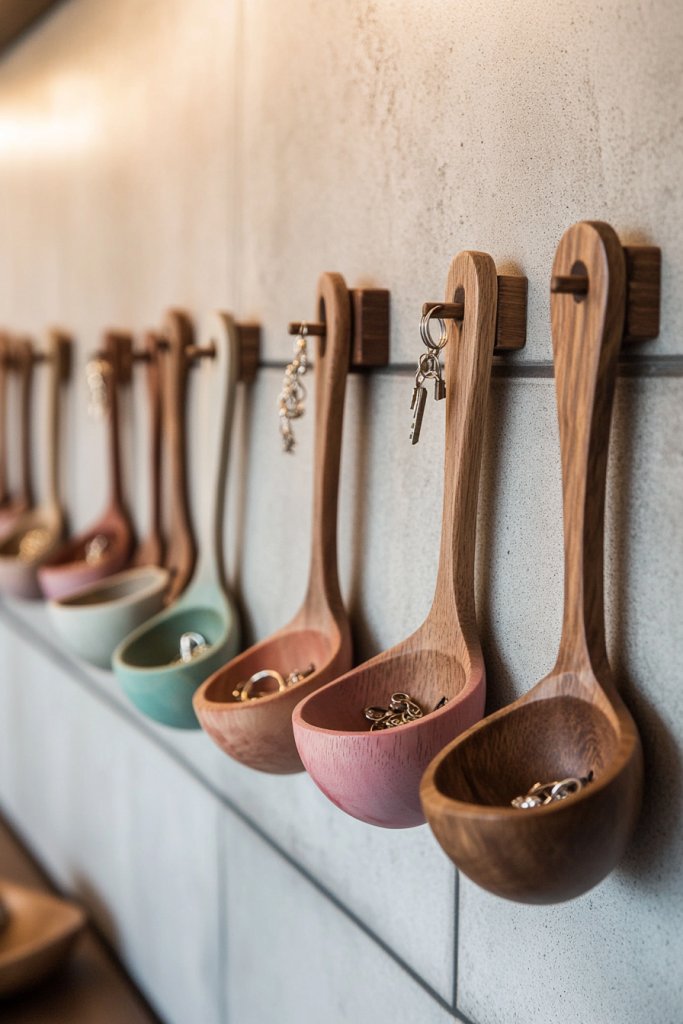
Imagine turning everyday kitchen items into a chic, functional decor piece that keeps your keys and jewelry organized while adding a rustic charm to your entryway. This project transforms a set of wooden spoons into an eye-catching organizer that’s both practical and decorative, perfect for small spaces or minimalist interiors.
Recommended Products to replicate this idea
| # | Preview | Product | |
|---|---|---|---|
| 1 |

|
Zulay Kitchen 6-Piece Wooden Cooking Spoons Set – Heat-Resistant, Smooth Teak Utensils with... | Check Latest Price |
| # | Preview | Product | |
|---|---|---|---|
| 1 |

|
Command 5 lb Large Utility Hooks, 7 Wall Hooks and 12 Command Strips, Damage-Free Hanging with... | Check Latest Price |
Visualize hanging a row of painted or stained wooden spoons on the wall, each one serving as a tiny hook or holder. The spoons are arranged with their handles downward, creating a natural holder for rings, bracelets, or keys nestled in the bowl.
You might choose pastel hues for a soft vibe or bold colors for a lively statement. The textured wood adds warmth and a handcrafted feel, making your space inviting.
The overall look is playful yet stylish, blending functional design with a touch of whimsy, and it can be easily customized to match your existing decor. To create your own, start by gathering 8-12 wooden spoons—you can find these at craft stores or repurpose old ones.
Paint or stain them in your preferred shades and let dry. Attach small hooks or nails to a wooden plank or directly on the wall, then hang the spoons by their handles, securing them with glue or screws for extra stability.
For a more polished finish, you can seal the paint with a clear coat. This simple DIY takes less than an hour and turns a common household item into a charming, functional display.
17. DIY Tile Coasters Using Cork or Ceramic Pieces
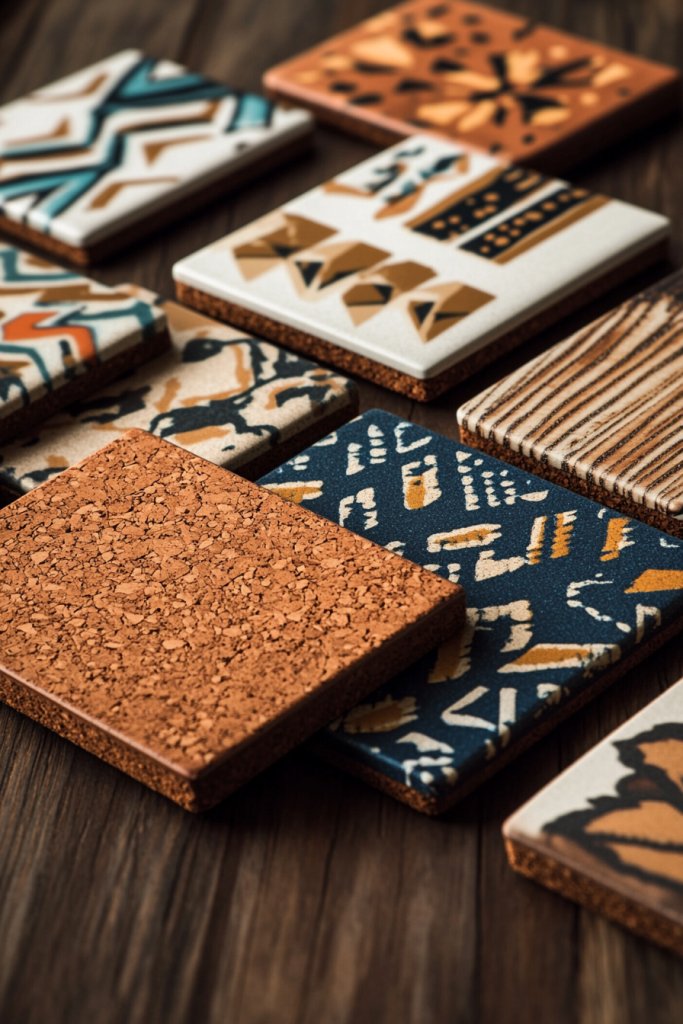
Protect your tabletops in style with handmade coasters that add personality and color to your living space. Using affordable materials like cork or broken ceramic tiles, you can craft unique, eye-catching coasters that are both functional and decorative, perfect for entertaining or everyday use.
Recommended Products to replicate this idea
| # | Preview | Product | |
|---|---|---|---|
| 1 |

|
12 Pcs Cork Coaster for Drink, Absorbent Heat Resistant Reusable Tea or Coffee Coaster, Blank... | Check Latest Price |
| # | Preview | Product | |
|---|---|---|---|
| 1 |

|
Colovis 12 Pack Ceramic Tile for Crafts Coasters, 4 Inches Square Unglazed Blank Ceramic Costers... | Check Latest Price |
Picture a set of coasters featuring vibrant patterns, metallic accents, or minimalist monochrome designs. Cork coasters have a soft, matte finish, providing a natural look that pairs well with rustic or boho decor.
Ceramic tiles can be customized with stencils, decoupage, or even painted designs, creating a personalized set that complements your home’s color palette. The textures vary from smooth ceramic surfaces to the slightly cushioned feel of cork, giving each piece its own character.
When in use, they feel sturdy and add a touch of handmade charm to your coffee table or kitchen counter. To make these, gather cork sheets or ceramic tiles (1-2 inches square).
Cut cork into circles or squares using scissors or a utility knife, or select pre-cut tiles from a hardware store. Decorate the surface with acrylic paint, stencils, or adhesive paper for a custom look.
Seal the finished design with a clear waterproof sealant or mod podge. Attach felt pads to the bottom to prevent scratches on furniture. These coasters are quick to assemble—usually under 30 minutes—and can be made in multiples for a cohesive set, offering a budget-friendly way to elevate your tabletop decor.
18. Transform Old Suitcases into Vintage-Style Side Tables
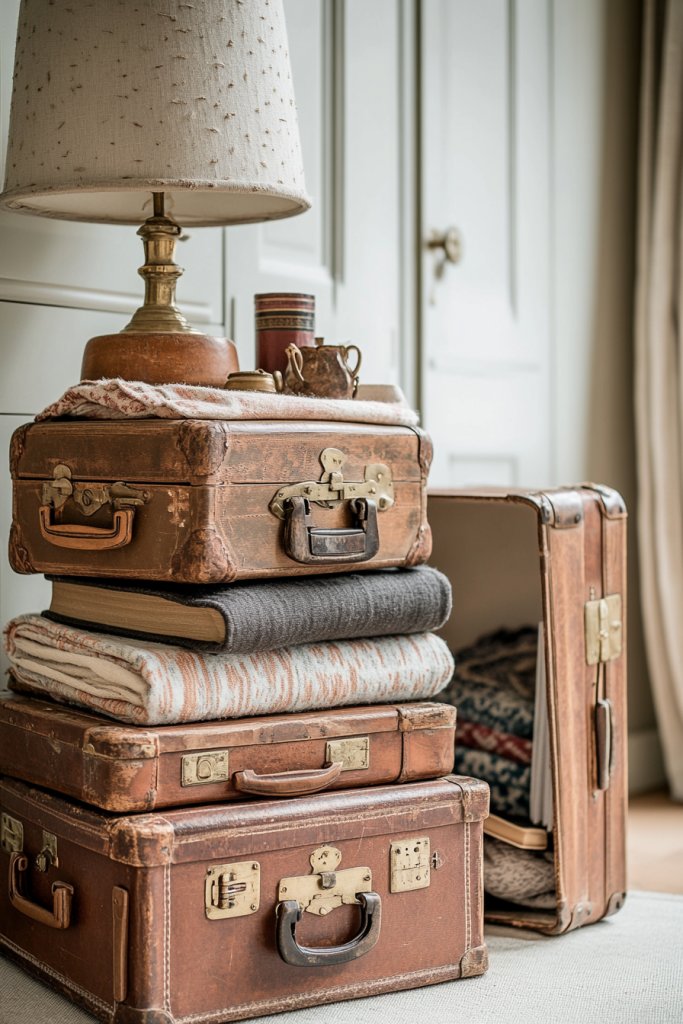
Give your living space a nostalgic, vintage vibe by repurposing old suitcases into charming side tables. This creative project combines storage and style, turning discarded luggage into eye-catching accents that evoke a sense of wanderlust and history.
Recommended Products to replicate this idea
| # | Preview | Product | |
|---|---|---|---|
| 1 |

|
Eazy2hD Paperboard Suitcases, Set of 3 Decorative Storage Boxes Gift Boxes With Lids for Photo... | Check Latest Price |
| # | Preview | Product | |
|---|---|---|---|
| 1 |

|
Yes4All 4-Inch Square Wooden Furniture Legs Set of 4, Brown Mid-Century Modern Feet for Sofa,... | Check Latest Price |
Envision a stack of weathered suitcases with their worn leather, brass hardware, and faded patterns, topped with a cozy lamp or decorative objects. You can leave the suitcases open to store books, blankets, or accessories, making them both decorative and functional.
The mix of textured fabrics and aged materials creates an inviting, eclectic look that fits well with shabby chic or bohemian interiors. The visual impact is nostalgic yet fresh, transforming an ordinary piece into a statement that sparks curiosity and nostalgia.
To create your own, start with vintage suitcases—thrift stores, flea markets, or online marketplaces are great sources. Reinforce the structure if needed with wooden planks inside for stability.
Stack or stand a single suitcase on a small stand or legs (which can be DIY made from wooden blocks or metal). Secure the suitcase to the stand with screws or brackets for safety.
For a more refined look, you can clean or lightly sand the exterior and add new hardware or decorative straps. This project typically takes a couple of hours but results in a distinctive, budget-friendly side table with personality and storage.
19. Decorate Plain Curtains with DIY Tiebacks or Embellishments
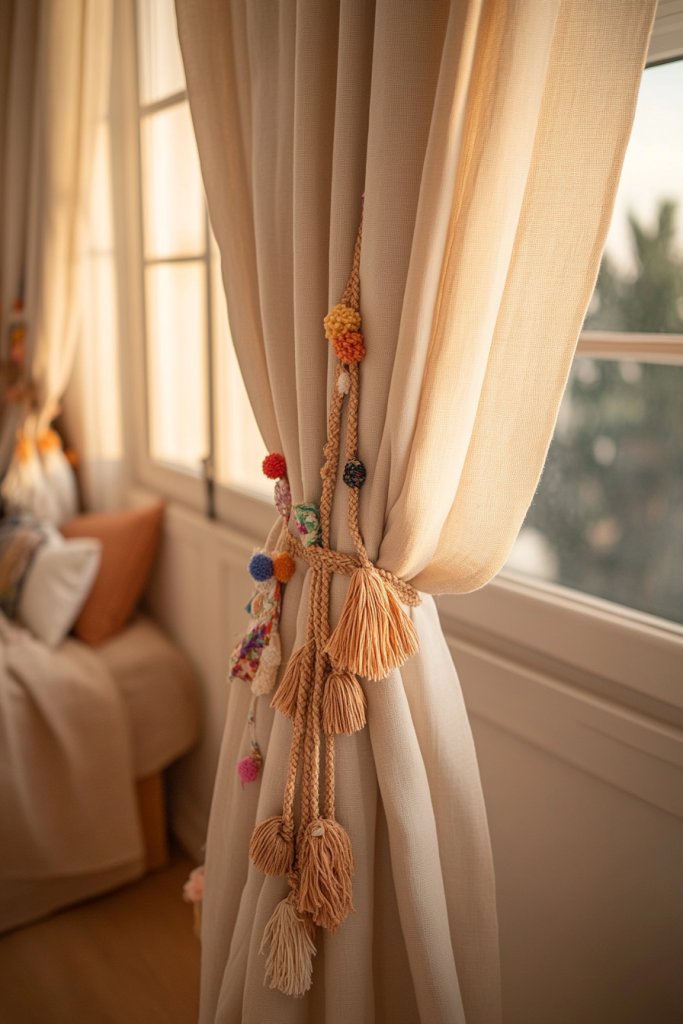
Elevate your window treatments from simple to stylish with personalized DIY curtain decorations. Whether you prefer a boho, shabby chic, or modern aesthetic, adding unique tiebacks or embellishments can instantly refresh your space without a hefty price tag.
Imagine flowing curtains in a neutral tone, enhanced by handcrafted tiebacks made from braided jute, colorful ribbons, or fabric scraps. You can also sew or glue decorative elements like tassels, pom-poms, or fabric flowers onto the curtain fabric itself for a custom look.
The result is a soft, inviting window dressing that reflects your personality and ties your decor together. When tied back, the curtains reveal more of your window view, while the embellishments add visual interest and texture, making your room feel thoughtfully curated and cozy.
To do this, gather fabric strips, ribbons, or jute twine, and optional embellishments like tassels or pom-poms. Measure your curtains to determine appropriate lengths for tiebacks.
Wrap or braid the materials to create custom designs, then secure with simple knots or sew-on stitches. For added flair, glue or sew decorative elements onto the fabric ties.
Attach the tiebacks with hooks or clips—many are inexpensive and easy to install. This simple upgrade can be completed in under an hour, making your windows look polished and personalized with minimal effort and cost.
20. Create a Cozy Reading Nook with DIY Cushions and Throws
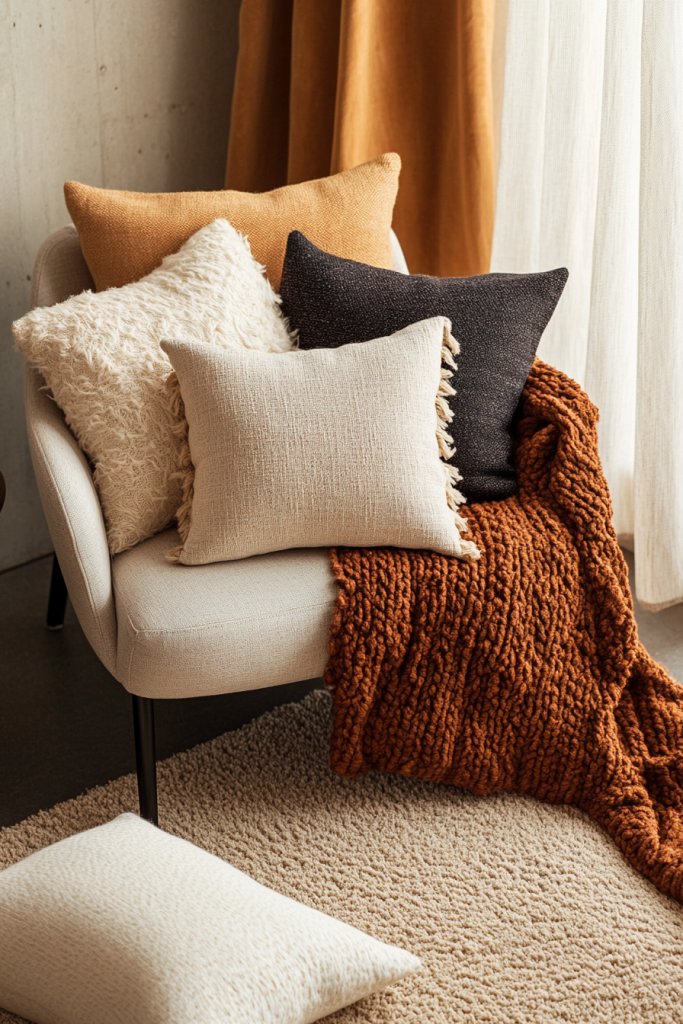
Transform a quiet corner into your personal sanctuary with a plush, inviting reading nook that combines comfort and charm. Using DIY cushions and throws, you can craft a cozy space perfect for unwinding, reading, or simply relaxing in style on a budget.
Recommended Products to replicate this idea
| # | Preview | Product | |
|---|---|---|---|
| 1 |

|
Bedsure GentleSoft White Throw Blanket for Couch - Cozy Blanket for Women, Cute Fleece Throws for... | Check Latest Price |
| # | Preview | Product | |
|---|---|---|---|
| 1 |

|
Intelligent Design Azza Floor Pillow, Large Cushions Sitting for Adults, Floor Pillow for Meditation... | Check Latest Price |
Picture a snug corner with a small armchair or floor cushion, layered with a variety of handmade pillows in soft fabrics like linen, cotton, or faux fur. Add a chunky-knit throw blanket in warm neutral or bold accent colors to invite tactile comfort.
The textures and colors create a layered, inviting atmosphere that beckons you to sit and stay a while. The space exudes warmth and personality, making it a favorite spot in your home to relax and recharge.
To create this, sew or repurpose fabric remnants to make cushions—simple pillow covers with an envelope or zipper closure work well. Use inexpensive fills like polyester stuffing or old pillows for stuffing.
For throws, knit or sew a blanket from chunky yarn or fabric strips—there are many beginner tutorials online that make it accessible. Arrange your cushions and throws on a small chair, window seat, or floor mat, and add a small side table or bookshelf to complete the scene. This project is highly customizable, affordable, and can be completed in a few hours, transforming any dull corner into a cozy retreat.
21. Personalize Storage Bins with Fabric Wraps and Labels
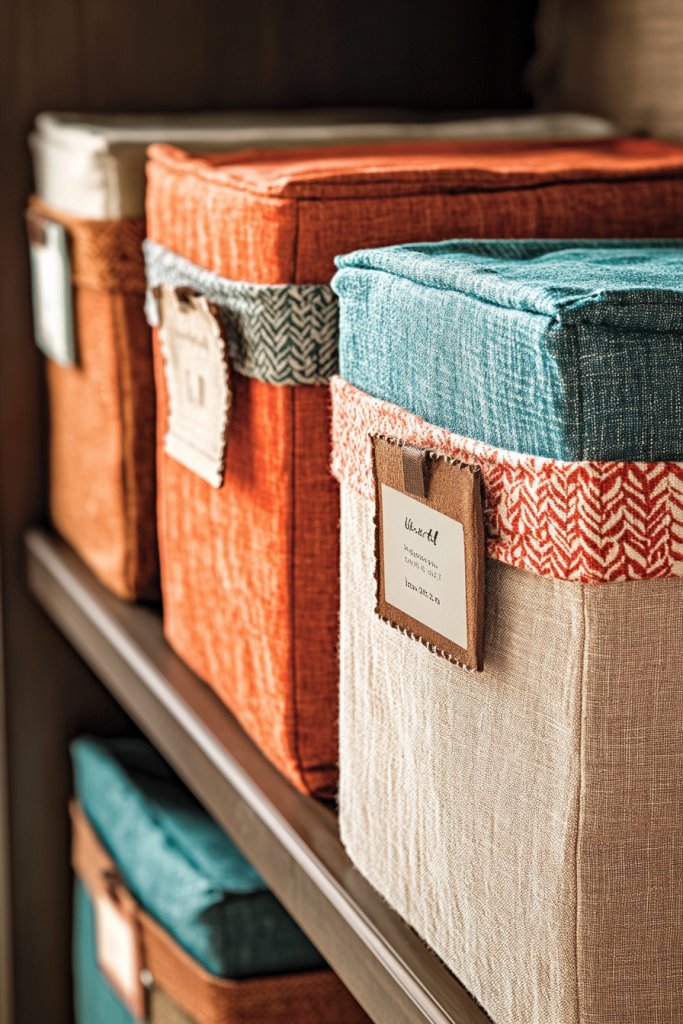
Transforming plain storage bins into charming organizational pieces is a simple yet impactful way to elevate your home decor while staying budget-conscious. Personalizing your bins adds a pop of color and personality, making clutter look intentional and stylish.
Recommended Products to replicate this idea
| # | Preview | Product | |
|---|---|---|---|
| 1 |

|
IRIS USA 72 Qt Stackable Plastic Storage Bins with Lids, 4 Pack - BPA-Free, Made in USA -... | Check Latest Price |
| # | Preview | Product | |
|---|---|---|---|
| 1 |
|
Shewmanzi Apparel Kayak Carry Handles,1 Pair Worldwood Durable Canoe Boat Handle Replacement... | Check Latest Price |
Imagine a set of sturdy plastic or cardboard bins wrapped in vibrant fabrics like soft linen, cozy flannel, or patterned cotton. The fabric is neatly secured around the bins with a hot glue gun or double-sided tape, creating a smooth, tailored appearance.
Add matching or contrasting fabric handles for easy access and decorate the front with handmade or typed labels, affixed with washi tape or adhesive stickers. These customized bins blend seamlessly into your space, offering both function and flair, whether in a closet, craft room, or kitchen.
To recreate this look, gather storage bins—plastic, cardboard, or wicker—and select fabric that complements your decor, such as patterned quilting cotton or textured burlap. Cut the fabric slightly larger than the surface area, then secure it with a hot glue gun or double-sided tape, smoothing out wrinkles.
For labels, use a label maker, printable paper, or handwrite on a piece of cardstock, attaching with decorative washi tape or adhesive. Finish by attaching fabric handles if desired, and organize your space with a fresh, personalized touch.
22. Craft Unique Wall Art with Washi Tape and Stencils
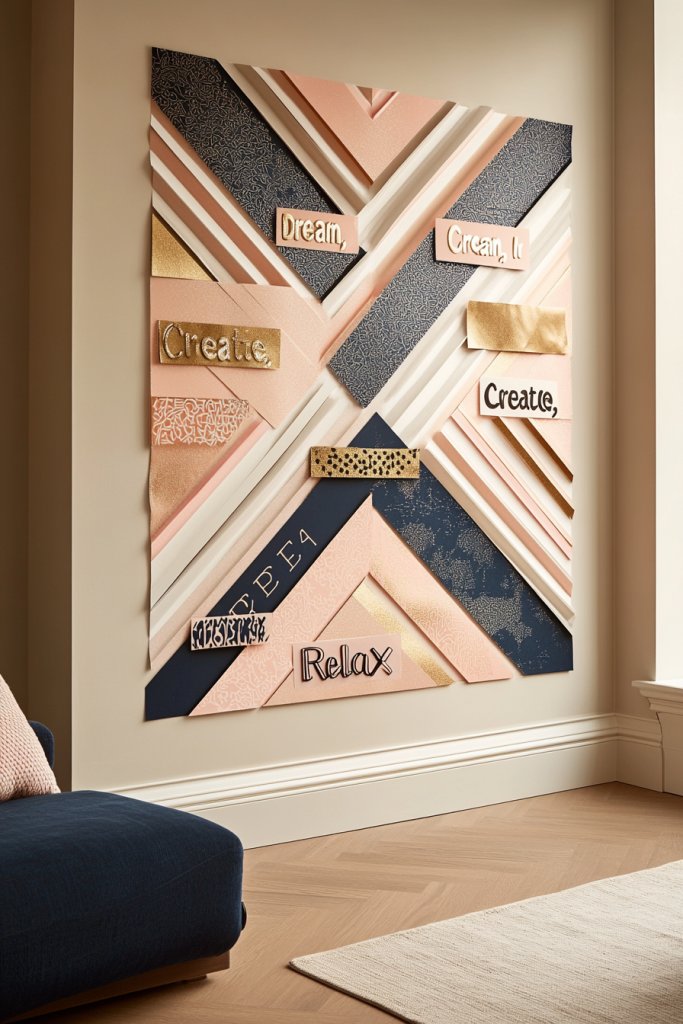
Creating eye-catching wall art on a budget can be as simple as using colorful washi tape combined with stencils to produce modern, geometric designs or inspiring quotes. This DIY approach allows for customization and instant visual impact without expensive framing or art purchases.
Recommended Products to replicate this idea
| # | Preview | Product | |
|---|---|---|---|
| 1 |

|
Mr. Pen- Washi Tape Set, 10 Pack, Decorative Tape, Washi Tapes, Colored Tape, Scrapbook Tape,... | Check Latest Price |
| # | Preview | Product | |
|---|---|---|---|
| 1 |

|
Stencils for Painting on Wood, Reusable Flower Stencils Painting Crafts Templates Drawing Stencil... | Check Latest Price |
Visualize a blank wall transformed by bold strips of patterned washi tape arranged in chevron, stripes, or abstract shapes. Layering different colors, such as blush pink, navy, and gold, adds depth and vibrancy.
Pair these with stenciled words, like “Dream,” “Create,” or “Relax,” using a chalky or metallic paint for a sophisticated finish. The combination of textures—smooth tape and crisp stencil lines—creates a dynamic focal point that looks polished yet playful, perfect for living rooms, bedrooms, or home offices.
To craft this, start with washi tape in your favorite patterns and colors, and select stencils with simple designs or words. Tape off sections of your wall or canvas to create your desired layout, then carefully apply the washi tape, pressing firmly to avoid peeling.
Use a small brush or sponge to apply paint through your stencil, ensuring clean lines. Once dry, remove the tape and stencil, revealing a custom piece that reflects your style and adds personality to your space.
23. Make a Rustic Photo Display Using Clothespins and String
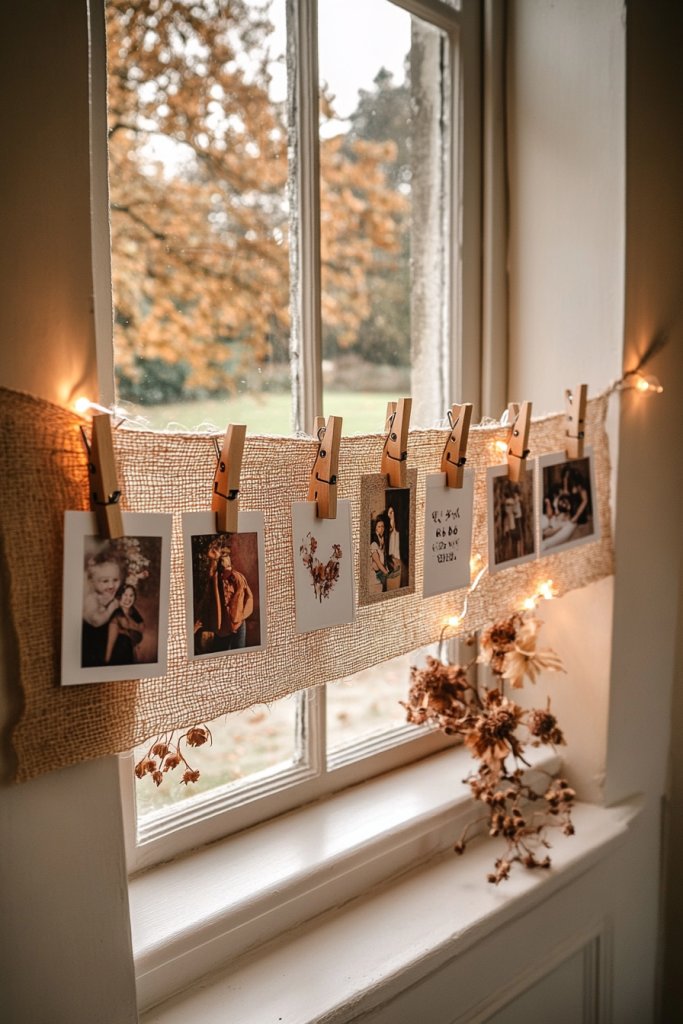
Showcasing your favorite memories with a charming, rustic photo display adds warmth and personality to any room. This budget-friendly idea combines simple materials for a versatile and customizable decoration.
Recommended Products to replicate this idea
| # | Preview | Product | |
|---|---|---|---|
| 1 |
|
Brightever LED Outdoor String Lights 100FT Patio Lights with 52 Shatterproof ST38 Vintage Edison... | Check Latest Price |
| # | Preview | Product | |
|---|---|---|---|
| 1 |
|
(Pack of 50) Wooden Clothespins About 2-7/8" Long | Check Latest Price |
Picture a length of jute or twine stretched across a wall or along a window frame, anchored with nails or removable hooks. Small wooden or metal clothespins clip onto the string, holding photos, postcards, or small artwork.
For a cozy touch, add decorative elements like mini fairy lights, dried flowers, or stamped tags between the photos. The overall effect is a casual, inviting vignette that’s easy to update and perfect for displaying snapshots from family trips, holidays, or everyday moments.
To make this, gather string or twine, clothespins (wooden or metal), and photos—printed in your home printer or developed at a local shop. Secure the string with hooks or nails at both ends, ensuring it’s taut.
Attach your photos using the clothespins, spacing them evenly or in a loose cluster. For added charm, decorate the clothespins with paint or washi tape, or weave in fairy lights for a subtle glow. This simple display turns your cherished memories into art with minimal effort and cost.
24. DIY Faux Fireplace Using Cardboard and Decorative Tiles
Creating a cozy, inviting focal point in your living space doesn’t require a real fireplace—just some creative DIY with budget-friendly materials. A faux fireplace adds charm and warmth, especially in apartments or rooms without a chimney.
Recommended Products to replicate this idea
| # | Preview | Product | |
|---|---|---|---|
| 1 |

|
Hopeak Red Brick Wallpaper Self-Adhesive Peel and Stick Wallpaper Waterproof and Removable Good for... | Check Latest Price |
| # | Preview | Product | |
|---|---|---|---|
| 1 |

|
Vinkor Flameless Candles Battery Operated Candles Real Wax Pillar LED Candles with 10-Key Remote and... | Check Latest Price |
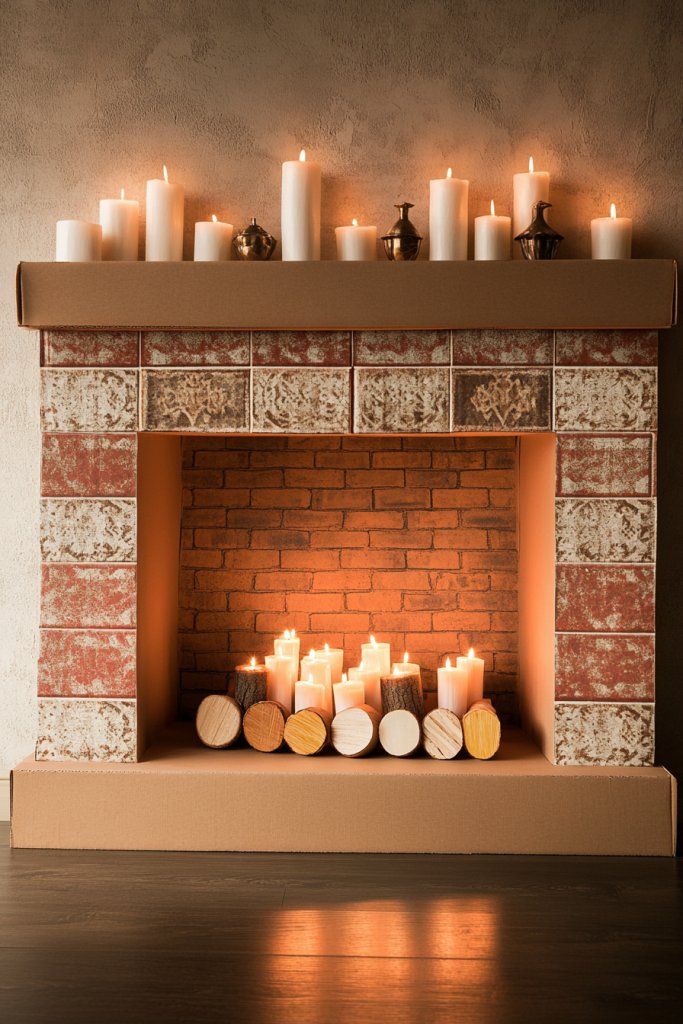
Visualize a sturdy structure built from large cardboard boxes, cut and assembled to resemble a traditional fireplace with a mantel. Cover the exterior with faux brick or stone wallpaper or decorative tiles made from adhesive paper or painted cardboard to give it a realistic look.
Inside, place a collection of candles, LED flameless lights, or decorative logs made from painted foam or wood slices to mimic a fire. The finished piece looks authentic and enhances your decor with a rustic or modern vibe, depending on your style.
To build this, gather cardboard boxes, decorative tiles or wallpaper, hot glue or tape, and candles or LED lights. Cut the cardboard into panels, assemble into a box shape, and reinforce with tape or glue.
Cover the surface with your chosen decorative material, then add a faux hearth with painted wood or foam logs. Finish by arranging candles or lights inside to create a warm, inviting glow. This project is straightforward, affordable, and transforms a blank wall into a cozy centerpiece.
25. Assemble a Stylish Entryway Organizer from Repurposed Materials
A clutter-free entryway sets the tone for your home’s style and function—and creating an organizer from repurposed materials keeps it budget-friendly and eco-conscious. This project combines practicality with a personalized aesthetic.
Recommended Products to replicate this idea
| # | Preview | Product | |
|---|---|---|---|
| 1 |

|
Optish 2 Pack Coat Rack Wall Mount, Coat Hooks Wall Mount, Wall Hooks for Hanging, Hat Rack for... | Check Latest Price |
| # | Preview | Product | |
|---|---|---|---|
| 1 |

|
DUMOS 5 Tiers Bookshelf, Classical Modern Book Shelf, Tall Display Shelves in Living... | Check Latest Price |
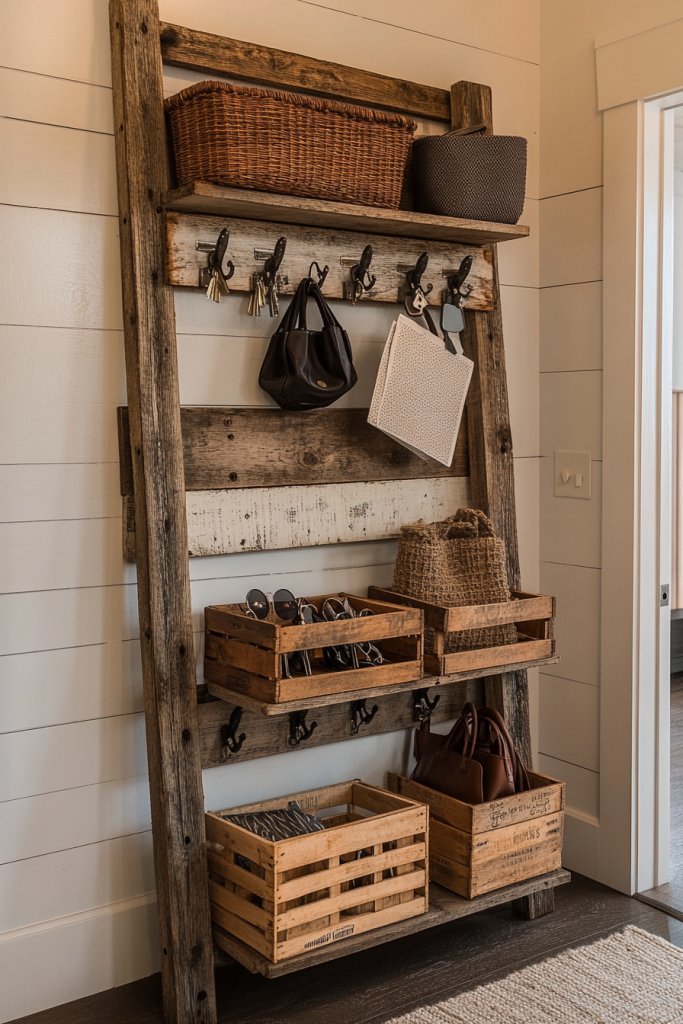
Envision a multi-purpose station built from reclaimed wood, vintage crates, or an old ladder. Attach hooks or small baskets to hold keys, sunglasses, and mail.
Use a repurposed wooden pallet or an old picture frame as a backing, painting or staining it to match your decor. Add a small shelf for handbags or shoes, and incorporate labels or tags for organization.
The result is a charming, custom piece that keeps essentials handy while adding rustic charm to your entryway. To make this, source reclaimed wood, vintage crates, or an old ladder from thrift stores or your garage.
Securely attach hooks, baskets, or small shelves using nails or screws. Paint or stain the wood for a cohesive look, and add labels with chalk or adhesive letters. Place your organizer near the door, and enjoy a tidy, stylish entry that’s uniquely yours—crafted from what you already have or can find affordably.
Conclusion
With these 25 creative and budget-friendly DIY home decor ideas, transforming your space into a stylish sanctuary has never been easier or more affordable. From upcycled mason jars and repurposed ladders to personalized gallery walls and cozy reading nooks, there’s a project for every style and skill level. Give these ideas a try and infuse your home with personality and charm—your perfect space is just a DIY project away! Start creating today and enjoy a beautiful, customized home without breaking the bank.
Leave a Reply