I have been, or can be if you click on a link and make a purchase, compensated via a cash payment, gift, or something else of value for writing this post. As an Amazon Associate, I earn from qualifying purchases. Please read my full Affiliate Disclosure for more information.
Imagine transforming your backyard into a cozy oasis where friends and family gather around crackling flames under the stars. DIY fire pits have become a popular trend because they allow you to customize your outdoor space while adding warmth and charm effortlessly.
In this article, you’ll find a variety of creative and budget-friendly fire pit ideas that cater to different styles and skill levels. Whether you prefer rustic, modern, or eclectic designs, there’s something here to spark your inspiration and help you craft the perfect centerpiece for memorable outdoor moments.
1. Rustic Stone Circle Fire Pit with Reclaimed Bricks
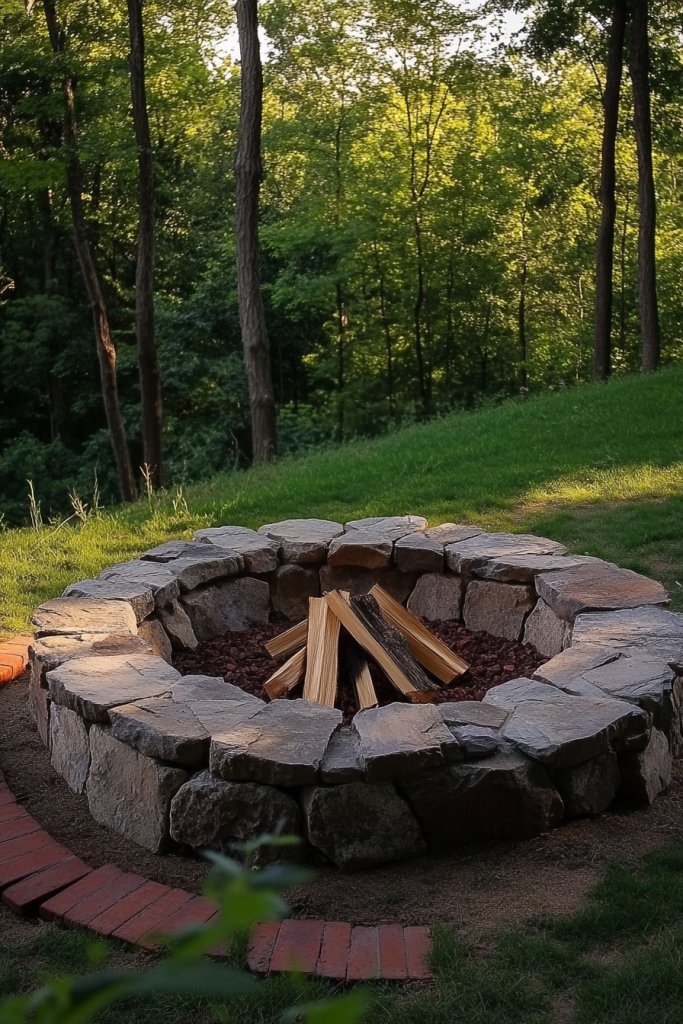
Ever wanted a cozy outdoor spot that looks like it belongs in a rustic retreat? A fire pit that blends seamlessly with natural surroundings can transform your backyard into a warm gathering space. But buying a ready-made one often feels impersonal and pricey. DIY options give you control, style, and that satisfying feeling of creating something with your own hands. Plus, who doesn’t love a project that turns out both functional and charming?
Picture a circular fire pit made from weathered reclaimed bricks, each one telling its own story. The stones are stacked unevenly, giving an organic, rugged appearance that feels timeless. Surround the circle with mismatched wooden benches or even large logs for seating, completing the natural vibe. The flickering flames cast dancing shadows on the uneven brick surface, creating a welcoming and relaxed atmosphere. It’s like having a piece of rustic countryside right in your backyard.
You can customize this idea by choosing different types of reclaimed bricks or stones, depending on your style. For a more polished look, use uniform bricks and a symmetrical circle. In contrast, irregular shapes and sizes enhance the rustic charm. Seasonal touches like string lights or lanterns hung from nearby trees can add cozy ambiance in winter. For smaller yards, consider a partial circle or a smaller diameter to maximize space.
Start by selecting sturdy reclaimed bricks or natural stones that fit your aesthetic. Dig a shallow trench to set the base level and ensure stability. Lay the bricks in a circular pattern, using a mortar or dry stacking with gravel for drainage. Fill the interior with fire-safe gravel or sand to protect the bricks and improve safety. You might need a friend’s help to hold bricks in place while you adjust the pattern. Finish with a top layer of larger stones for a polished look or leave it natural for that rugged feel.
Add personal touches like a carved stone centerpiece or engraved bricks for a sentimental feel. Incorporate decorative elements such as vintage lanterns, textured textiles on nearby benches, or even sculptures made of metal or wood. You can also paint or stain bricks in subtle earthy tones to match your landscape. Consider adding a built-in firewood holder made from reclaimed wood or metal for convenience. These small details turn a simple fire pit into a personalized retreat.
Building a stone circle fire pit is more than just a DIY project; it’s creating a warm gathering spot that invites friends and family to linger. With natural materials and a bit of patience, you get a stunning feature that elevates your outdoor space. Imagine chilly evenings around the fire, sharing stories and making memories—your own rustic oasis. It’s a perfect way to embrace outdoor living with a touch of handcrafted charm.
2. Modern Concrete Block Fire Pit with Built-in Seating
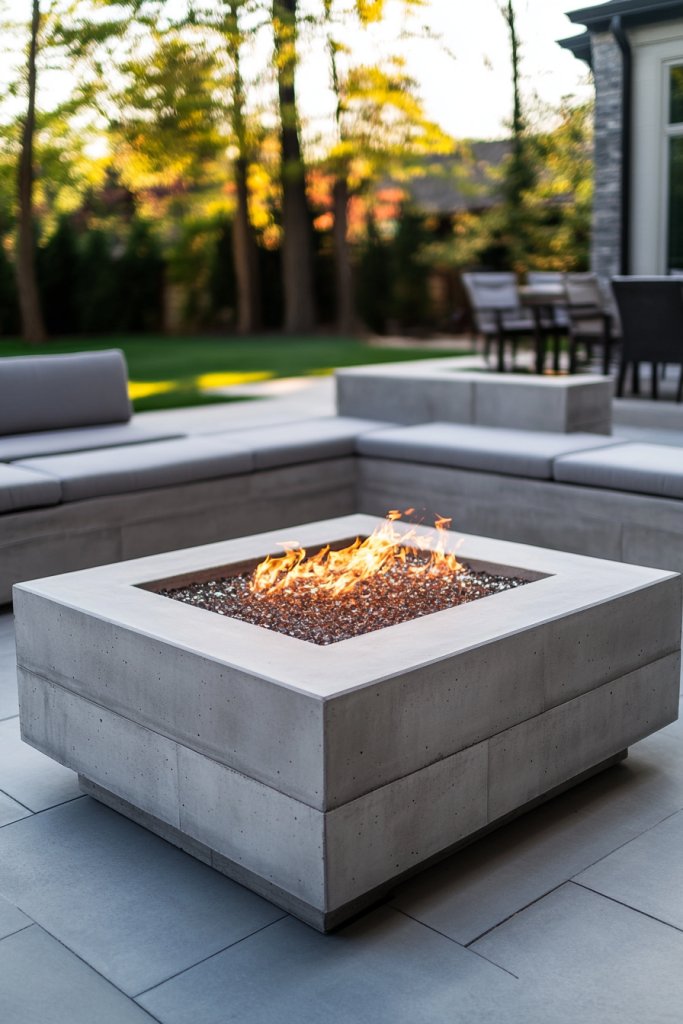
Looking for a sleek, modern fire feature that doubles as functional outdoor furniture? Conventional fire pits often look out of place or require extra seating arrangements. What if your fire pit could be part of the seating itself, blending style and practicality? Building your own concrete block fire pit allows you to customize size, shape, and integrated seating, making your outdoor space both cool and comfortable. Who says DIY can’t be chic?
Imagine a rectangular or circular fire pit made from smooth, gray concrete blocks, with a broad, flat top serving as a bench. The blocks are stacked precisely for a clean, geometric appearance, and the seating area surrounds the fire for easy access. The fire burns brightly within, casting angular shadows on the sleek concrete surfaces. String lights or modern lanterns hang overhead, completing the contemporary aesthetic. It’s minimalistic, functional, and perfect for hosting friends.
You can customize the size and shape based on your yard’s dimensions. For a softer look, cover the concrete blocks with textured paint or stain in earthy tones. For a more vibrant vibe, add colorful mosaic tiles or painted patterns to the sides. Incorporate cushions or weather-resistant pillows on the seating for extra comfort and style. Seasonal decor like outdoor rugs or throw blankets can make the space inviting year-round.
Begin by planning your design, deciding on a circle, square, or rectangular shape that fits your space. Use concrete blocks designed for outdoor use, which are easy to stack and durable. Lay the blocks on a level, compacted gravel base, stacking them in your chosen pattern. Seal the joints with mortar if you want extra stability, or opt for dry stacking for easier disassembly. Install a fire-safe insert or metal bowl inside the structure to contain the flames. Finish with a concrete or stone top that doubles as seating.
Personalize your fire pit by adding decorative elements like geometric patterns, signage, or built-in LED lighting underneath the seating edge. Incorporate weatherproof cushions with bold patterns or colors to make the seating more inviting. For extra flair, embed mosaic tiles into the surface or paint the blocks with metallic or matte finishes. You can also add side tables or small shelves attached to the structure for drinks and snacks.
This concrete block fire pit with integrated seating is a modern twist that elevates your outdoor entertaining. It’s a project that combines durability with style, perfect for DIY enthusiasts who crave a sleek look. Once finished, it becomes the centerpiece of your outdoor gatherings, encouraging relaxed conversations around flickering flames. Building it yourself proves that with a bit of planning and effort, you can craft a high-end look on a budget.
3. DIY Fire Pit Using Large Stepping Stones

Ever dreamed of a simple, budget-friendly fire pit that doesn’t look like it belongs in a construction site? Large stepping stones are often overlooked, but they can be transformed into a charming fire feature. This idea is perfect for homeowners who want a quick upgrade without heavy lifting or extensive materials. Plus, it turns a mundane garden path into a cozy outdoor nook with minimal effort.
Imagine oversized, flat stones arranged in a perfect circle or square, with a bed of gravel or fire-safe sand filling the center. The stones have a natural, earthy tone and textured surface that invites touch. When lit, the flames flicker over the rough edges, creating a rustic, inviting glow. Surround the area with simple wooden or metal chairs, and you have an instant outdoor retreat that feels both organic and functional. It’s like having a backyard campfire, minus the camping gear.
For a more polished look, choose stones with uniform size and shape, arranged symmetrically. If you prefer a wild, natural aesthetic, mix different sizes and shapes for an eclectic vibe. You can also add decorative border elements like small plants or lanterns outside the circle. Seasonal touches like string lights or cozy blankets make it perfect for year-round use. Remember, safety is key—keep a fire extinguisher nearby and only use fire-safe materials.
Start by selecting large, flat stones that can withstand heat. Measure and mark the desired shape on your yard, then dig a shallow trench to ensure stability. Lay the stones in a circular or square pattern, adjusting for levelness as you go. Fill the interior with a layer of gravel or fire-safe sand, leveling it out for safety and stability. Place a fire-safe insert or a metal bowl in the center, and light up for cozy evenings. You can easily disassemble or expand the circle later if needed.
Add a personal touch by painting or sealing some stones with outdoor-safe paint for decorative accents. Use seasonal accessories like a soft cream throw blanket with chunky knit texture or rustic lanterns for ambiance. Incorporate a small storage box nearby for firewood or marshmallows for roasting. For extra flair, embed small mosaic tiles into the stones for a subtle pop of color. These tweaks make your fire pit uniquely yours.
Using large stepping stones is an easy, low-cost way to create a functional and charming fire spot. It’s perfect for beginners or anyone wanting quick results. Imagine cool nights spent with loved ones, sharing stories around your DIY stone fire pit. It’s proof that simplicity, combined with a little creativity, can produce a stunning outdoor feature that’s both practical and pretty.
4. Pallet Wood Fire Pit with Metal Insert
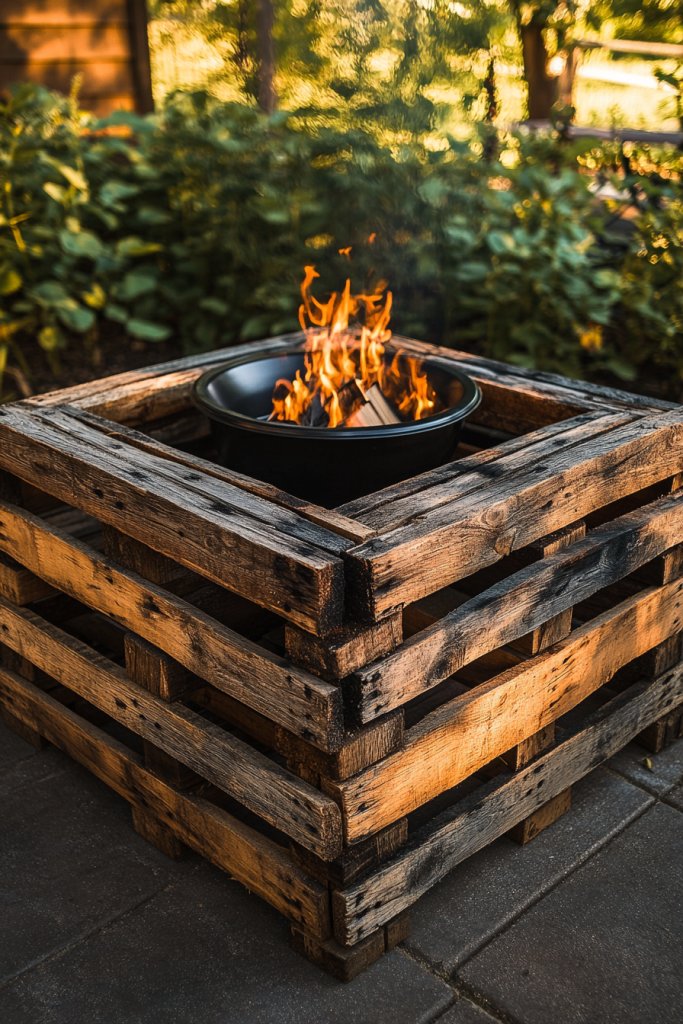
Want a cozy fire pit that feels rustic but doesn’t break the bank? Pallet wood is often discarded or left unused, but it can be turned into a charming, eco-friendly fire feature. Combining reclaimed wood with a metal fire bowl creates a warm, inviting centerpiece that’s easy to build and customize. Plus, it’s a great way to upcycle materials you might already have lying around.
Picture a rectangular or circular frame made from sturdy pallet wood, with a black metal fire bowl nestled inside. The wood is weathered and textured, adding character and warmth to the space. When lit, flickering flames dance against the rough grain of the wood, casting a cozy glow. Surround the structure with simple outdoor furniture or even hay bales for seating, making it ideal for casual gatherings. It’s a perfect blend of rustic charm and functional design.
You can customize the shape to suit your yard, from a compact square to a large circle. Stain or paint the pallet wood in colors that match your outdoor decor, or leave it natural for a raw look. Incorporate metal or rope accents for a modern touch, or add a shelf for drinks or snacks. Seasonal decorations like string lights or fabric drapes can transform the look for different occasions. The versatility makes this project suitable for almost any outdoor setting.
Start by disassembling pallets and selecting pieces with minimal damage. Construct a frame using galvanized nails or screws, creating a sturdy, weather-resistant structure. Line the inside with a fireproof metal insert, such as a cast-iron or steel fire bowl, secured in place. Optionally, reinforce the structure with metal brackets for extra stability. Fill the interior with fire-safe materials like lava rocks or fire bricks before lighting your fire. Seal or stain the wood for weather protection, and you’re ready for cozy nights.
Add personal flair by painting or staining the wood in bold or muted hues that match your outdoor palette. Decorate with metal accents, rope handles, or even carved designs for a customized look. Incorporate a small shelf or hooks for tools, roasting sticks, or utensils. Seasonal touches like fabric cushions or outdoor rugs can make the area more inviting. These small details turn a simple pallet fire pit into your personal outdoor sanctuary.
This pallet wood fire pit proves that sustainability and style can go hand-in-hand. It’s a project that’s accessible and adaptable, perfect for DIYers of all skill levels. Once complete, it becomes the heart of your outdoor evenings, gathering friends around warm flames. Creating something with recycled materials adds a layer of pride and eco-consciousness — and who doesn’t want that? Enjoy your handcrafted, cozy outdoor retreat.
5. Cinder Block Fire Pit with Colorful Paint Accents
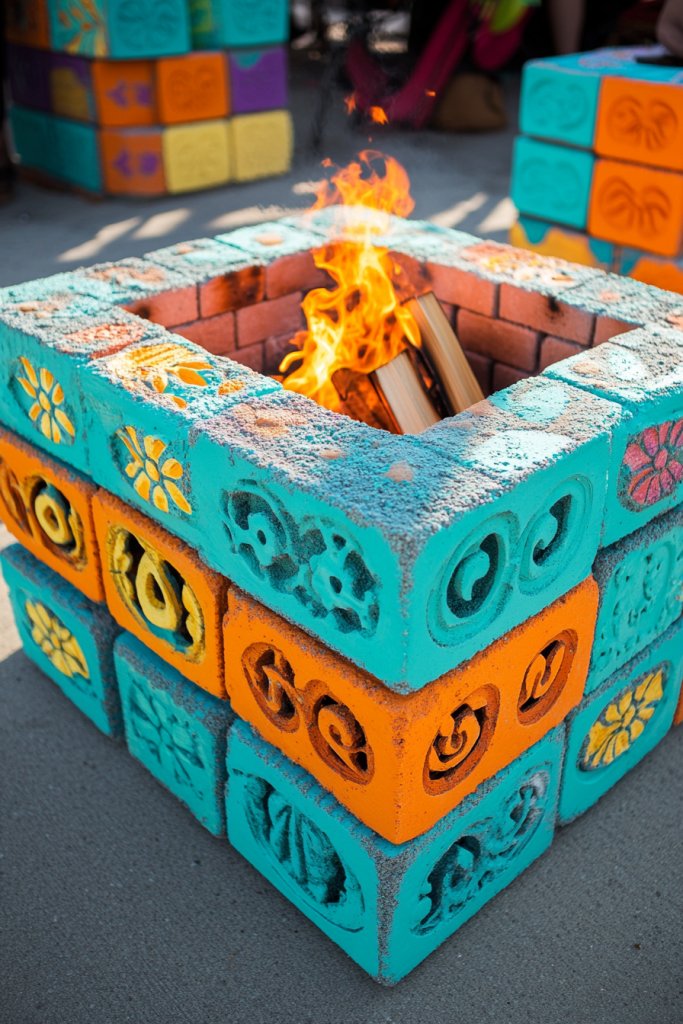
Craving a fire feature that’s durable, affordable, and full of personality? Cinder blocks are often seen as just construction material, but with a splash of creativity, they become a vibrant focal point. Painting or decorating your fire pit adds color and character, transforming basic blocks into a fun DIY project. It’s perfect for those who want a sturdy, customizable outdoor feature without spending a fortune.
Imagine a square or circular fire pit built from stacked cinder blocks, each painted in bold, lively hues. The blocks are arranged in a neat pattern, with some blocks featuring mosaic tiles or stenciled designs. When lit, the flames reflect off the painted surfaces, creating a playful, colorful glow. Surround the fire pit with simple outdoor seating, and you have a cheerful gathering spot that’s as functional as it is eye-catching. It’s a pop of personality in any backyard.
You can experiment with color schemes—bright, contrasting shades for a lively vibe or muted tones for subtle elegance. Use outdoor-safe paint designed to withstand weather and heat. Incorporate mosaic tiles or stencils for added detail, or even attach decorative metal accents. For seasonal updates, change out the paint or add themed decorations. This approach makes your fire pit adaptable to different styles and occasions.
Begin by stacking the cinder blocks in your desired shape, ensuring a stable base. Clean the surfaces thoroughly and apply outdoor-rated paint in layers, allowing drying time between coats. For extra durability, seal the painted surface with a clear, heat-resistant outdoor sealant. Install a fire-safe insert or metal bowl inside the structure, then fill with fire-safe gravel or sand. Light up and enjoy a colorful, personalized fire experience. Regular touch-ups can keep the design fresh.
Enhance the visual appeal by adding mosaic tiles or stenciled patterns to individual blocks. Use weatherproof spray paint in metallic or matte finishes for a sleek look. Incorporate decorative elements like metal charms or custom stencils to reflect your personality. Create themed designs for holidays or seasons to keep the fire pit feeling fresh and fun. Personal touches make your creation truly unique.
A painted cinder block fire pit is proof that you can turn simple materials into eye-catching decor. It’s a straightforward project with big visual impact, perfect for DIY enthusiasts wanting to add color and charm. Once completed, it becomes a lively gathering point, sparking conversations and making outdoor nights memorable. Your personalized, vibrant fire pit will be the envy of neighbors and friends alike.
6. Sunken Fire Pit with Gravel and String Lights
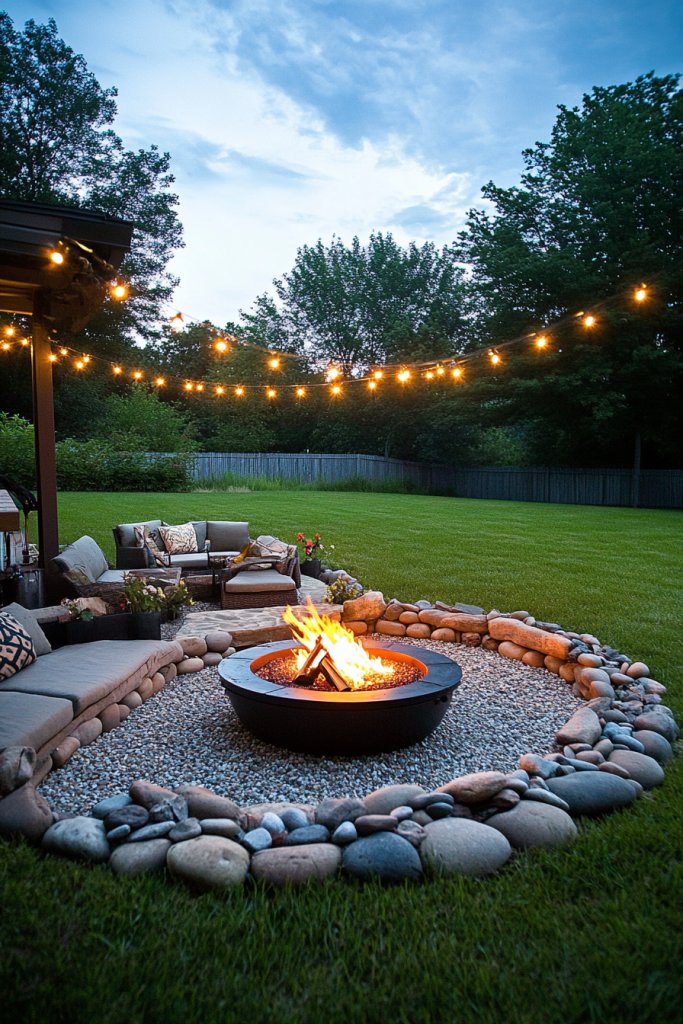
Ever wish you had a cozy, semi-private outdoor space for relaxing evenings? A sunken fire pit creates a natural, intimate setting that feels like a hidden gem in your yard. It’s perfect for those who want to enjoy a fire without the open, exposed feel of traditional pits. Plus, the sunken design makes the entire area feel more contained and inviting, ideal for small gatherings or quiet nights alone.
Visualize a circular or oval fire pit nestled into the ground, surrounded by a gravel bed that extends outward. The sunken area is enclosed with a low wall made of stone, brick, or concrete, while soft gravel or fire-safe sand fills the interior. String lights hang overhead, casting a warm, ambient glow that enhances the cozy atmosphere. Nearby, cushioned outdoor chairs or built-in benches complete the space, making it perfect for lingering fireside chats and marshmallow roasting.
This concept can be scaled to fit your yard’s size—larger for expansive lawns or smaller for tight spaces. For a natural look, use irregular stones or river rocks for the border. For a modern vibe, opt for smooth concrete or sleek bricks. Seasonal accents like outdoor cushions, fireproof planters, or lanterns can change the look throughout the year. Adding a protective canopy or pergola can further define the space.
Start by marking out your desired fire pit location and digging a shallow, level hole. Install a retaining wall or low border to contain the gravel and create the sunken effect. Fill the interior with fire-safe gravel or sand—this helps with drainage and safety. Place a metal fire bowl or insert inside, then cover the edges with decorative stone or brick. String lights are hung securely overhead, attached to nearby trees or posts, to add a warm glow. Regular maintenance ensures safety and longevity.
Personalize with outdoor cushions, weatherproof fabrics, or decorative lanterns. Incorporate built-in seating or side tables made from natural materials or reclaimed wood. For a more luxurious feel, add a fireproof rug or a small outdoor heater nearby. Seasonal decorations like lanterns or hanging ornaments can keep the space festive. The goal is creating a cozy, inviting atmosphere tailored to your style.
A sunken fire pit turns outdoor relaxation into an experience—making every evening feel special. It’s a project that combines safety, comfort, and style, perfect for DIYers ready to add a touch of luxury to their yard. Imagine sitting around a warm fire, protected from the wind, with soft lighting casting a calming glow. This setup proves that a little planning and effort create a stunning escape right outside your door.
7. Steel Drum Fire Pit with Decorative Stone Border
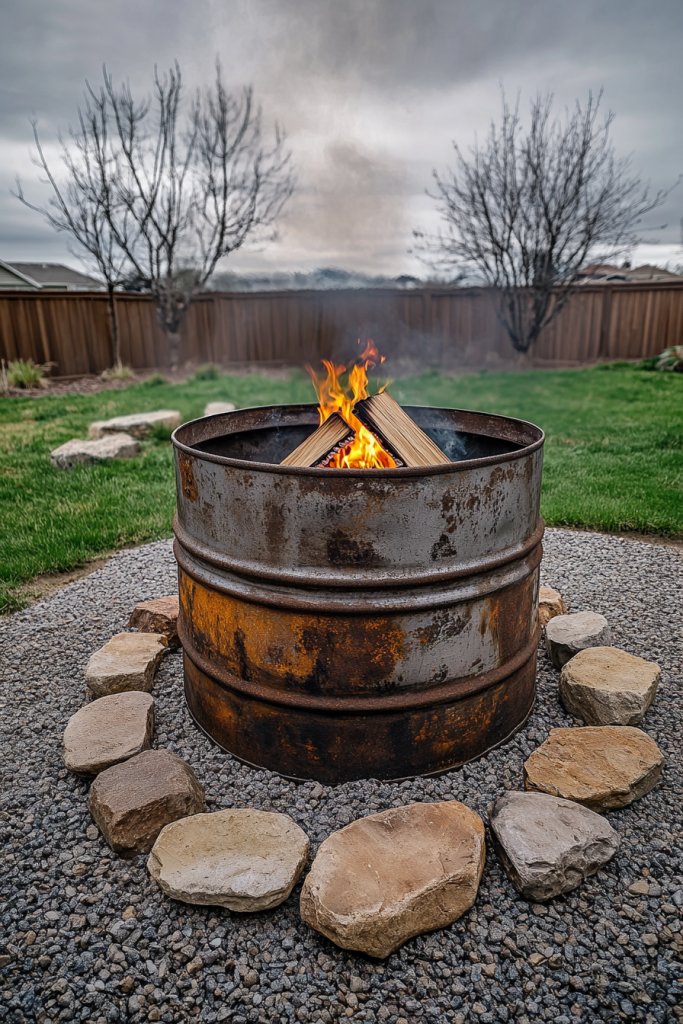
Craving an outdoor fire feature that’s rugged, eco-friendly, and totally unique? Old steel drums are often discarded, but with a bit of creativity, they become eye-catching fire pits. This project combines recycling with a striking aesthetic, perfect for those who want a durable, low-cost solution. Plus, it’s a conversation starter that adds a bit of industrial charm to any backyard.
Imagine a repurposed steel drum, cut and cleaned, sitting sturdy on a concrete pad. The drum’s surface is painted or left with its original metallic finish, giving it an industrial vibe. A decorative stone border surrounds the base, adding texture and color contrast. When lit, the flames dance inside the drum, casting flickering shadows through vents or cut-out designs. The overall look is bold and raw, perfect for modern or rustic outdoor spaces.
You can customize this idea by painting the drum with heat-resistant paint or adding patterns with cut-out designs for visual interest. The border can be made from natural stones, bricks, or reclaimed wood for a softer touch. To enhance safety and style, install a metal grate or cover for the top. Seasonal accessories like outdoor rugs or seating can make the area more inviting. It adapts well to different yard sizes and personal styles.
Start by sourcing a suitable steel drum from local scrap yards or industrial suppliers. Clean and sand the surface thoroughly, then paint with heat-resistant paint if desired. Cut the drum to your preferred height, ensuring smooth edges for safety. Dig a level spot, then set the drum on a concrete pad or stable base. Surround it with decorative stones or bricks, securing them for stability. Insert a fire-safe bowl or metal insert inside, and you’re ready for a crackling fire. Always check local regulations before lighting.
Decorate the exterior with stencils, metallic accents, or painted patterns for a personal touch. Add a metal or wooden lid to control airflow or contain sparks. Incorporate seating made from reclaimed wood or metal for a cohesive look. Seasonal decorations like string lights or outdoor sculptures can elevate the vibe. Custom touches turn a simple steel drum into a signature outdoor feature.
Transforming a discarded steel drum into a fire pit is a bold, eco-conscious choice that brings industrial chic to your yard. It’s a project that’s easy to customize and perfect for DIY enthusiasts who love repurposing. Once complete, it becomes the centerpiece of outdoor gatherings, offering warmth and style. Your innovative reuse proves that creativity and sustainability go hand-in-hand, making your outdoor space uniquely yours.
8. Vintage Tin Can Fire Pit with Sand Base
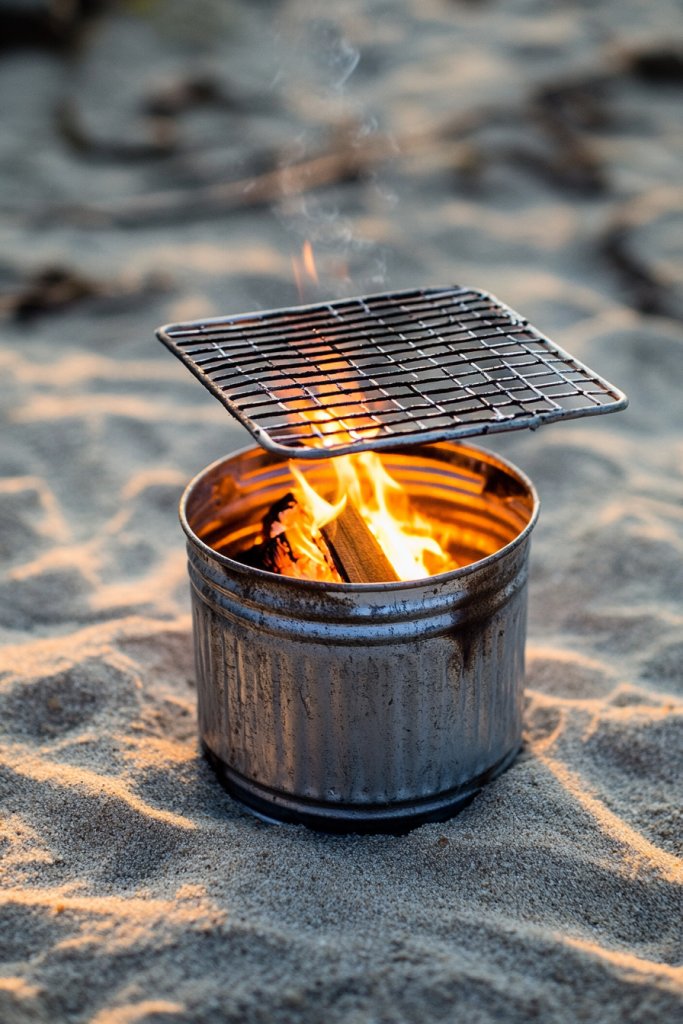
Looking for a portable, fun, and inexpensive way to enjoy outdoor fires? Vintage tin cans are often thrown away, but they can be repurposed into mini fire pits that are both charming and functional. Whether you want a small setup for patio nights or a portable option for camping, this idea is perfect. It’s an easy project that adds a nostalgic touch to your outdoor experience.
Imagine large vintage tin cans, cleaned and filled with fire-safe sand, sitting on your patio or grassy patch. The cans are arranged in a circle or scattered for a more playful look. Inside, a small fire burns brightly, with flickering flames visible through the can’s open top. The sand acts as a heat barrier, preventing heat transfer to the can’s metal. The setup is simple but evokes a rustic, retro vibe that’s both cozy and amusing.
You can paint or decorate the cans with chalkboard paint, stencils, or stickers for a personalized touch. Use different sizes and colors of cans for visual interest. For added safety, place the cans on a heat-resistant surface like pavers or a concrete slab. For mobility, attach handles or wheels if possible. Seasonal accessories like string lights or small lanterns can enhance evening ambiance.
Start by sourcing vintage or unused cans from thrift stores or scrap yards. Clean thoroughly and remove any sharp edges. Fill each can with fire-safe sand, about a few inches deep, to insulate and contain heat. Position the cans on a flat, fireproof surface, spacing them adequately for safety. Inside each, place a fire-safe insert or small wood pile. Light the fire carefully, and always supervise your mini fire pits. Be sure to follow safety guidelines for outdoor fires.
Decorate the cans with paint, decals, or stencils to match your outdoor decor. Add small accessories like metal charms or painted patterns. For extra coziness, place a soft outdoor mat underneath or nearby. You can even create themed sets for holidays or parties. These tiny fire pits are not only fun but also conversation starters, perfect for casual gatherings.
Vintage tin can fire pits show that you don’t need expensive gear to enjoy outdoor fires. They’re simple, portable, and endlessly customizable. Once set up, they provide a warm, nostalgic vibe that calls for marshmallows and good company. This project proves that with a little creativity, even scrap materials can become the highlight of your outdoor space.
9. Brick and Sand Fire Pit with Built-in Planter Edges
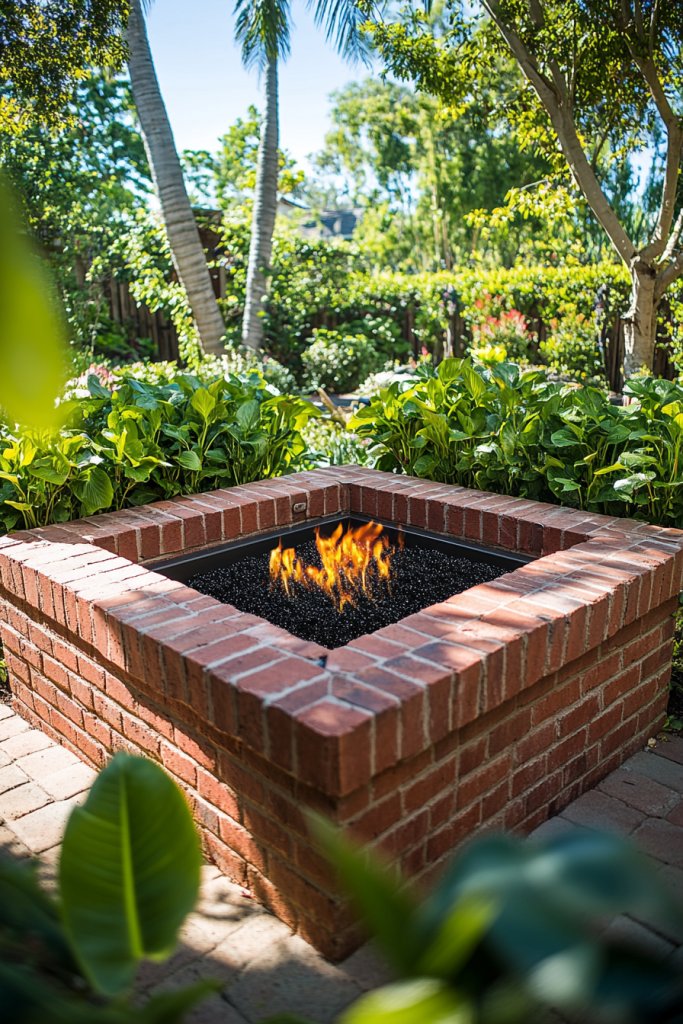
Craving a fire feature that seamlessly blends with your garden’s greenery? Combining a fire pit with a planter creates a cohesive outdoor space where fire and flora coexist beautifully. This dual-purpose design adds visual interest and functionality, making your yard look professionally landscaped. Plus, it’s a great way to incorporate your love for gardening into your outdoor gatherings.
Picture a sturdy brick structure with a wide, shallow pit filled with fire-safe gravel or sand. The outer edge is lined with built-in planters, filled with lush green plants or colorful flowers, creating a striking contrast. The flames flicker against the brick, while plants add life and freshness. Surround the setup with comfortable seating and soft lighting, making it a perfect spot for evening relaxation among fire and foliage. It’s like a garden oasis with a fiery heart.
You can customize the materials—clay bricks for a traditional look or concrete bricks for a modern vibe. The planters can be filled with herbs, succulents, or seasonal blooms, depending on your preference. For a more exotic feel, incorporate decorative tiles or mosaic accents around the planters. Seasonal changes like planting pumpkins in fall or decorating with fairy lights can refresh the space.
Begin by laying a stable, level base with compacted soil or gravel. Build the fire pit using bricks, stacking them in a circular or rectangular pattern, with mortar or dry stacking. Create the planters by leaving open spaces between bricks or attaching pre-made containers. Fill the planters with potting soil and your chosen plants. Fill the fire zone with fire-safe gravel or sand, and install a fire-safe insert or metal bowl. Finish by planting around the structure for a lush, integrated look.
Personalize the plant choices with your favorite herbs or flowers, and decorate the brick with painted accents or decorative tiles. Incorporate small garden ornaments or sculptures within the planters for added charm. Use lighting like solar-powered LEDs to highlight plants or the brickwork. Seasonal decorations, such as pumpkins or fairy lights, can make the space festive and inviting. This integrated design creates a dynamic, beautiful outdoor feature.
Blending a fire pit with built-in planters is a creative way to elevate your outdoor space. It’s a project that combines gardening, masonry, and design skills, and results in a stunning focal point. Imagine evenings spent enjoying the warmth of the fire while surrounded by your favorite plants. It’s proof that functional beauty and nature can coexist and enhance each other, making your yard truly unique.
10. DIY Fire Pit Using Large Clay Pots

Want a fire feature that’s both artistic and portable? Large clay pots are a versatile material that can be transformed into eye-catching fire pits. They’re easy to stack or arrange in creative ways, making them perfect for small patios or mobile setups. Plus, with a few simple modifications, you can enjoy a warm fire anywhere you desire.
Imagine stacking several large clay pots in a circular or tiered fashion, leaving an open space in the center for the fire. The pots have a natural earthy tone, with textured surfaces that add visual interest. When lit, the flames glow through the openings, creating a layered, artistic effect. Nearby, cozy cushions or a soft blanket invite guests to sit close and enjoy the warmth. It’s a rustic yet elegant centerpiece that captures attention.
You can arrange the pots in different configurations—stacked vertically, in a circle, or even in a stepped formation. Painting or sealing the pots with heat-resistant finishes can add color and durability. Incorporate decorative stones or gravel at the base for stability and safety. Seasonal accents like fairy lights or fabric wraps can enhance the look for different occasions. The adaptability makes this project suitable for various styles.
Select large, unglazed clay pots that are heat-resistant. Clean and dry them thoroughly. Arrange the pots in your desired pattern, stacking or placing them on a stable surface. Cut or drill small holes in the pots if you want additional airflow or decorative effects. Fill the central space with fire-safe material like lava rocks, fire bricks, or sand. Place a metal or ceramic fire bowl inside, and light carefully. Always supervise fires and ensure safety.
Add personal touches by painting or sealing the pots with vibrant colors or patterns. Use decorative stones, shells, or beads at the base for extra flair. Incorporate outdoor cushions or a small table nearby for comfort. Seasonal accessories like fabric wraps or themed decorations can make the setup festive. Your clay pot fire pit can be as simple or elaborate as you like, reflecting your style.
Transforming large clay pots into a fire feature proves that you can create artful, portable outdoor decor with humble materials. It’s a project that’s approachable for DIY beginners and offers big visual impact. Once finished, it provides a cozy, inviting atmosphere for outdoor evenings. Your creative reuse shows that beauty and function can come from the simplest of materials, giving you confidence to experiment further.
11. Gabion-Style Wire Cage Fire Pit Filled with Stones

Dreaming of a contemporary outdoor fire feature that’s both industrial and stylish? Gabion-style wire cages filled with stones create a sleek, modern statement piece. This design combines the strength of metal with the natural appeal of stones, resulting in a durable and eye-catching fire pit. It’s perfect for urban yards or those who love a minimalist, industrial vibe.
Picture a rectangular or circular wire cage made from galvanized steel, filled with decorative stones or river rocks. The cage is open at the top, allowing flames to flicker through the gaps, casting interesting shadows. The stones inside vary in color and size, adding texture and depth. The metal frame is sturdy and clean-lined, with a modern aesthetic that complements contemporary outdoor furniture. It’s an effortless blend of form and function.
You can customize the shape—square, rectangle, or round—based on your yard’s layout. The wire cage can be painted or coated for different finishes, like matte black or metallic. Inside, you can choose different types of stones—smooth river rocks, crushed glass, or colored pebbles—for visual interest. Add a protective cover or mesh lid for safety and to contain sparks. Seasonal accessories like outdoor rugs or minimalist sculptures can enhance the look.
Start by constructing or purchasing a galvanized wire cage of your preferred size. Fill the cage with decorative stones, ensuring even distribution and stability. Place the cage on a fire-resistant surface such as concrete or bricks. Inside, install a metal or ceramic fire bowl or insert, making sure it fits securely. Secure the cage with stakes or weights if necessary. Light the fire, keeping safety precautions in mind, and enjoy the modern aesthetic that’s both durable and easy to maintain.
Personalize by choosing stones that match your decor palette or add a splash of color with painted accents on the cage. Incorporate LED lighting underneath or around the base for a dramatic effect. Add a custom plaque or sign for a personal touch. Seasonal decor like metal stars, abstract sculptures, or outdoor cushions can make the space feel uniquely yours. This project lets you blend industrial chic with natural elements effortlessly.
A gabion-style fire pit proves that modern design can be simple, durable, and highly customizable. It’s a project that combines creativity with longevity, perfect for DIYers who want a statement piece. Once in place, it transforms your yard into a stylish outdoor lounge. This approach shows that with basic materials and a little effort, you can craft a stunning, contemporary outdoor feature that stands the test of time.
12. Elevated Fire Pit with Wooden Frame and Metal Bowl
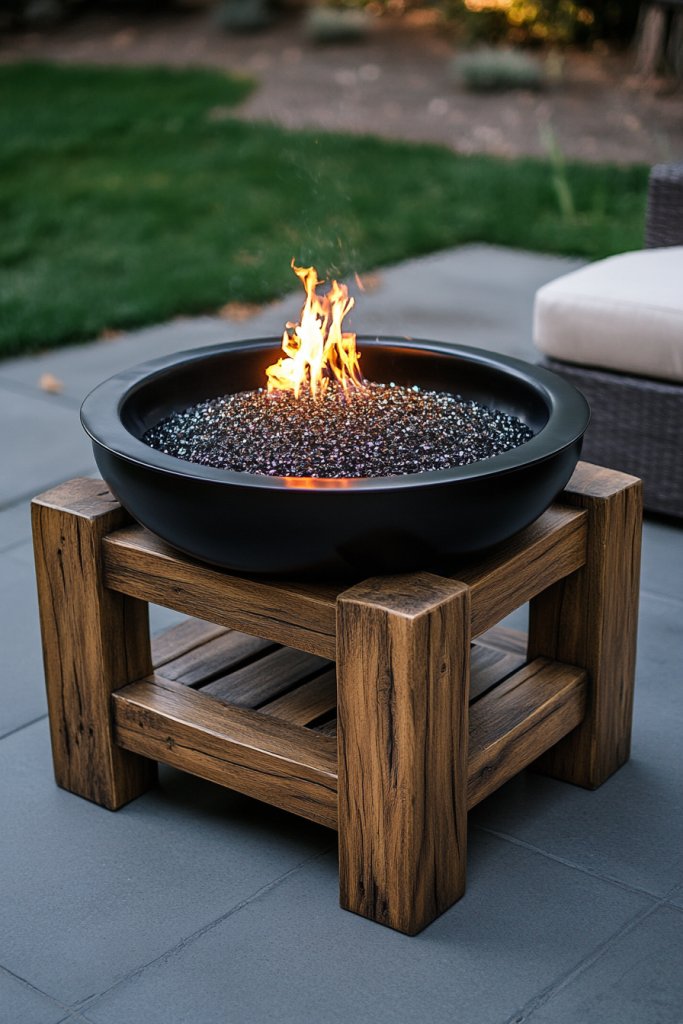
Want a fire feature that’s both stylish and accessible without bending down? An elevated fire pit offers a modern twist on traditional designs, making it easier to enjoy fireside chats. Combining a wooden frame with a metal fire bowl creates a chic, functional centerpiece. It’s perfect for outdoor spaces where comfort and aesthetics matter equally.
Imagine a sturdy wooden platform raised a few inches off the ground, with a sleek metal fire bowl sitting at its center. The wood has a natural or stained finish, adding warmth and texture. The metal bowl glows warmly from within, while the platform provides a clean, defined boundary around the fire. Surround the setup with modern outdoor furniture or cushions, creating an inviting, accessible lounge area. It’s a design that’s both practical and stylish.
You can customize the height of the platform based on your preference, from low to slightly elevated. Use weather-resistant wood like cedar, teak, or composite decking for durability. Finish with a stain or paint that complements your outdoor decor. For extra flair, add decorative metal or stone accents to the platform edges. Seasonal touches like blankets or outdoor rugs can make it cozy for cooler nights.
Construct a sturdy wooden frame using pressure-treated or weatherproof wood. Ensure a level base, and reinforce the structure with brackets or supports. Place a fire-safe metal bowl or insert inside the frame, securing it to prevent movement. Fill the space underneath with gravel or fire-resistant material for safety and stability. Finish the surface with a weatherproof stain or sealant. Light the fire, making sure all safety measures are in place, and enjoy your elevated outdoor lounge.
Add personal touches like engraved plaques, decorative stones, or painted accents on the wood. Incorporate cushions or weatherproof fabrics on nearby seating for comfort. Seasonal decorations like fairy lights, lanterns, or small potted plants can change the vibe throughout the year. Consider adding side tables or hooks for tools and drinks. This design offers both style and convenience, elevating your outdoor living experience.
An elevated fire pit with a wooden frame bridges practicality and style, showcasing DIY ingenuity. It’s a project that transforms your backyard into a modern retreat, perfect for gatherings or quiet evenings. The accessible height makes it more comfortable for everyone to enjoy the warmth and ambiance. With simple materials and a bit of effort, you create a stunning feature that enhances your outdoor space and your lifestyle.
13. Portable Fire Pit Made from Metal Fire Baskets
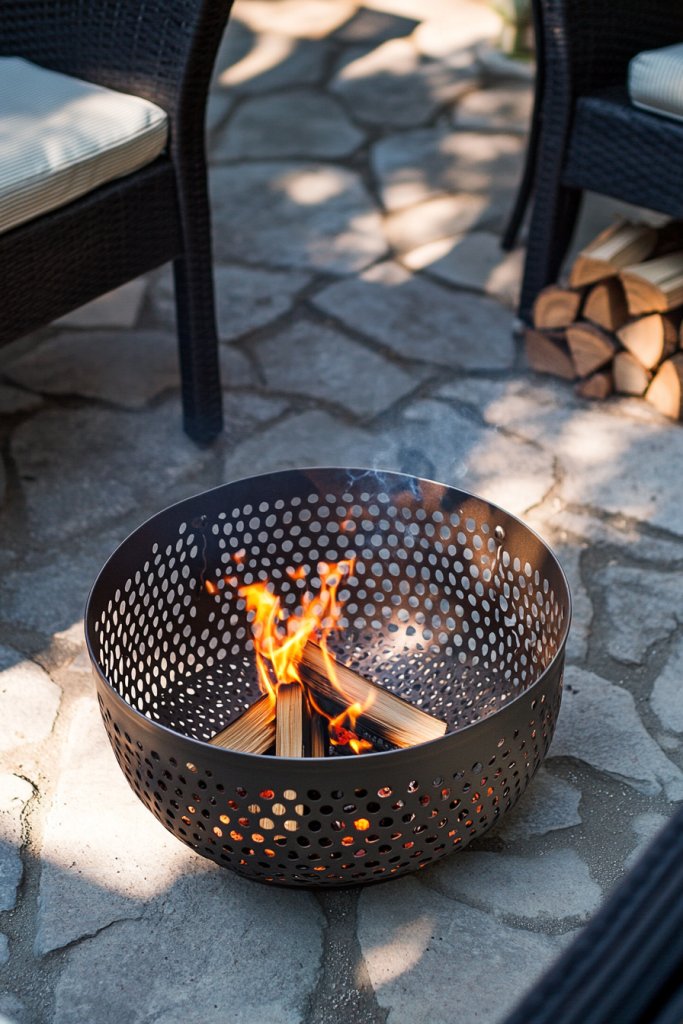
Craving a fire feature that’s portable, easy to store, and perfect for spontaneous outdoor fun? Metal fire baskets are a versatile solution that lets you enjoy fires wherever you want. Whether it’s on the patio, at the beach, or during a backyard barbecue, this DIY idea gives you flexibility. Plus, it’s a budget-friendly project that adds instant ambiance.
Visualize a sturdy metal basket, filled with fire-safe materials like lava rocks or firewood, sitting on a flat surface. The open design allows flames to flicker freely, casting warm light in all directions. You can easily move the basket around your yard or even take it to a campsite. When not in use, simply store it in a shed or garage, making it incredibly convenient. It’s a minimalist, functional piece that invites relaxation anywhere.
Choose baskets in different sizes or styles—wire, steel, or powder-coated finishes—to match your aesthetic. Add a handle for easy transport or attach wheels for mobility. Decorate the exterior with heat-resistant paint or wrap it with decorative rope or fabric. Seasonal accessories like metal charms or lightweight screens can add visual interest. It’s adaptable to any outdoor environment and style.
Start by selecting a durable metal basket that can withstand outdoor conditions. Line the interior with fire-safe stones, gravel, or fire bricks for safety. Ensure the basket is stable on a heat-resistant surface like pavers or concrete. Fill with your preferred fuel—wood, charcoal, or eco-friendly pellets. Light the fire and supervise at all times. When done, let it cool completely before storing or relocating. This portable setup is perfect for spontaneous outdoor evenings.
Personalize with decorative elements like painted or wrapped exterior, or attach hooks for roasting sticks. Use weatherproof cushions or outdoor rugs nearby for comfort. For added safety, incorporate a mesh screen or cover to contain sparks. Seasonal decorations like flags, banners, or themed motifs can make your portable fire pit festive. It’s all about convenience, style, and making outdoor fires accessible wherever you want.
A portable fire basket is a practical, customizable solution that proves you don’t need a permanent structure to enjoy outdoor fires. It’s ideal for small spaces or for those who love spontaneity. Once you see how easy it is to move and set up, you’ll wonder why you didn’t do this sooner. It’s a simple project with big benefits—warmth, ambiance, and flexibility—right at your fingertips.
14. DIY Fire Pit with Paver Stones and Built-in Storage
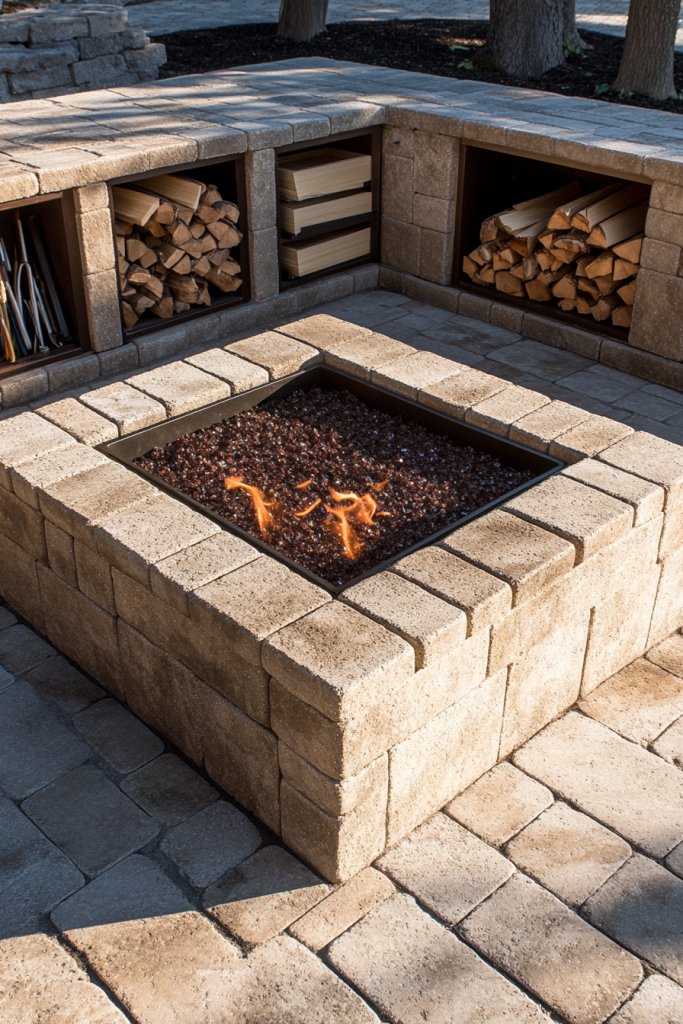
Wish your outdoor fire spot could do double duty? Combining a fire pit with built-in storage turns a simple feature into a multifunctional masterpiece. Store firewood, tools, or outdoor accessories neatly underneath, keeping your yard tidy and your essentials close at hand. It’s a smart, stylish solution for those who want functionality without sacrificing aesthetics.
Imagine a circular or rectangular fire pit constructed from paver stones, with a sturdy base and a flat top surface. Beneath the fire area, hidden compartments or open shelves hold firewood or outdoor gear. The pavers are arranged in a pattern that complements your landscape—herringbone, basketweave, or random. The fire burns brightly within, while the storage keeps your space organized. Surround it with comfortable seating for cozy outdoor gatherings. It’s a practical yet attractive centerpiece.
Choose paver stones in colors and patterns that match your outdoor decor—classic gray, warm terracotta, or even patterned tiles. For a rustic look, use natural stone; for a sleek modern vibe, opt for smooth concrete pavers. The storage can be designed as pull-out drawers, open shelves, or hidden compartments with doors. Add decorative touches like built-in lighting or plant containers nearby. Seasonal accents like blankets or outdoor candles can enhance the ambiance.
Start by designing your layout and excavating a level base. Lay the paver stones in your chosen pattern, ensuring stability with leveling sand and mortar if needed. Create storage compartments by leaving gaps or installing removable paver sections. Reinforce the structure with adhesive or mortar for durability. Install a fire-safe insert or a metal bowl inside the fire zone. Fill the interior with fire-safe gravel or sand, and light your fire. Regular maintenance ensures safety and longevity.
Personalize with decorative paver patterns, painted or stained stones, or embedded tiles. Add hooks or small shelves for tools, or incorporate outdoor lighting for evening ambiance. Use weatherproof cushions or throws nearby for comfort. You might also add a custom sign or engraved details for a personal touch. These enhancements turn a functional feature into an inviting outdoor living space.
A fire pit with built-in storage maximizes utility and style, proving that smart design elevates outdoor spaces. It’s a project that combines masonry skills with creative flair, and the result is a practical, attractive feature. Once finished, you’ll appreciate how it simplifies outdoor entertaining and keeps your yard organized. It’s proof that a little planning and effort can create a truly functional, beautiful outdoor centerpiece.
15. Circular Fire Pit with Mosaic Tile Surround
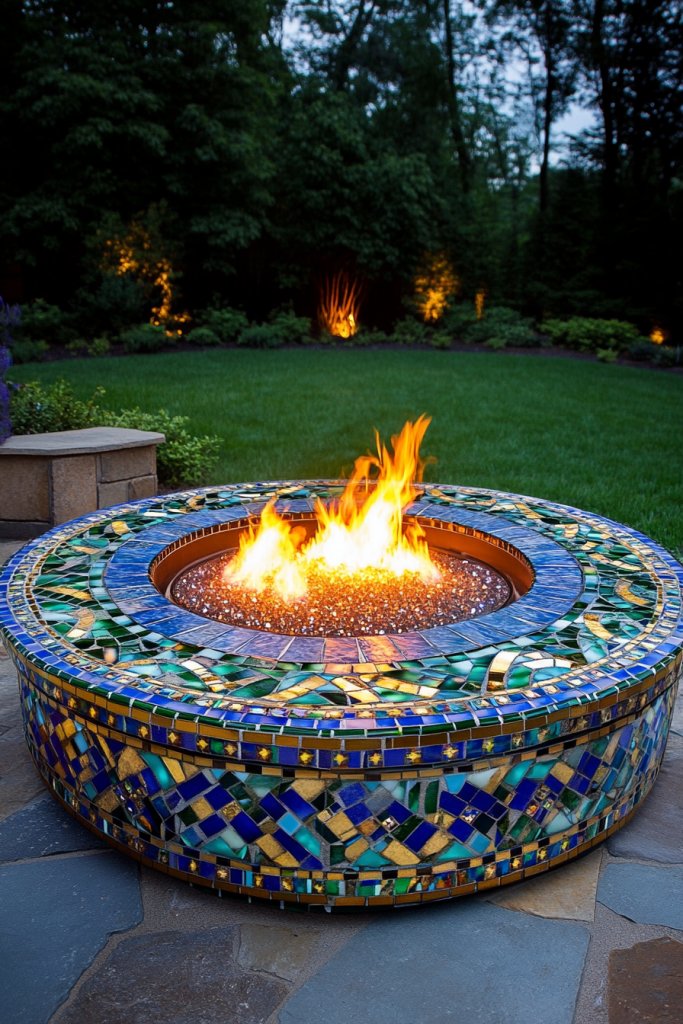
Dreaming of a fire feature that’s both artistic and inviting? A circular fire pit with a mosaic tile border instantly elevates your backyard’s aesthetic. It turns a simple gathering spot into a statement piece that showcases your personality. Plus, the colorful tiles add a touch of artistry, making every fire night feel special. Ready to turn your outdoor space into a gallery?
Visualize a round fire pit constructed from fire-resistant bricks or concrete, encircled by a vibrant mosaic tile border. The tiles feature intricate patterns, bright colors, or even personalized designs. When lit, the flames reflect off the glossy surfaces, creating a dazzling glow. The surrounding area is decorated with comfortable chairs, outdoor rugs, and string lights—completing an artistic, cozy environment. It’s a perfect blend of function and art.
Select mosaic tiles that match your style—classic, boho, or eclectic. Use outdoor-safe adhesives and sealants to protect the tiles from weather. Incorporate different shapes and colors for a dynamic look or stick to a specific color palette for cohesion. Seasonal decor like lanterns or fabric drapes can enhance the artistic theme. The design can scale from small, intimate fire pits to larger, more elaborate features.
Build your fire pit with fireproof materials, ensuring a stable, level foundation. Attach mosaic tiles using outdoor-rated adhesive, carefully placing them to avoid gaps or uneven surfaces. Seal the tiles with a waterproof, heat-resistant sealant for longevity. Install a fire-safe insert or metal bowl inside the structure, then fill with gravel or sand. Light your fire and enjoy a colorful, artistic glow that becomes the centerpiece of your yard. Regular maintenance preserves the beauty.
Add personal touches by customizing tile patterns or colors. Incorporate metallic accents or engraved tiles for a more personalized look. Use outdoor string lights or lanterns to highlight the mosaic border at night. Seasonal decorations like flowers or themed ornaments can keep it fresh. These creative details turn a functional fire pit into a visual masterpiece that reflects your style.
A mosaic tile surround proves that outdoor fires can be both practical and artistic. It invites admiration and sparks conversations, making your yard a true extension of your personality. Once completed, it encourages more outdoor gatherings and relaxing evenings. With a little planning, you transform a simple fire feature into a colorful, captivating focal point.
16. Natural Stone Fire Pit with Surrounding Lounge Area
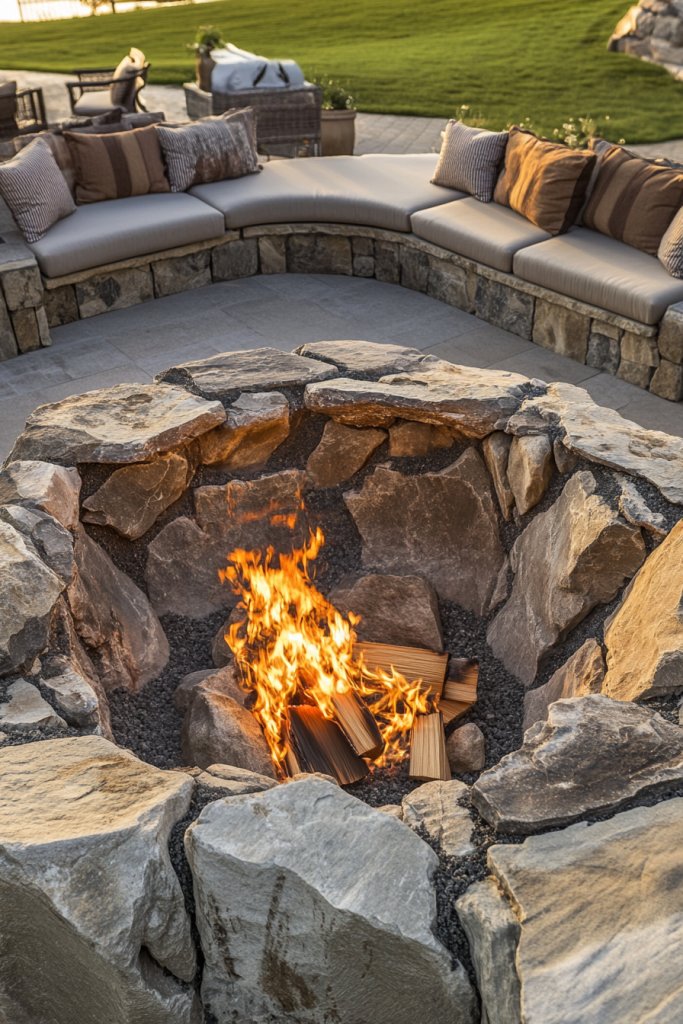
Longing for a durable, natural-looking fire feature that seamlessly blends into your landscape? A stone fire pit surrounded by a cozy lounge area creates an inviting outdoor retreat. It offers both function and aesthetic appeal, perfect for relaxing evenings or entertaining friends. Building this feature elevates your yard into a rustic yet refined oasis.
Picture a large fire pit crafted from irregular, natural stones, with a wide, sturdy top for sitting or placing drinks. The stones are stacked in an organic, uneven pattern, giving a rugged, timeless appearance. Around it, a circle of outdoor cushions or built-in stone benches provides comfortable seating. The flickering flames cast warm, shifting shadows on the stones, creating a calming, earthy atmosphere. Nearby, string lights or lanterns add a soft glow, completing the scene.
Use locally sourced stones for an authentic look or choose uniform, shaped stones for a neater appearance. The seating can be simple cushions, rustic wooden benches, or integrated stone seats. Seasonal touches like cozy throws, outdoor rugs, or fireproof planters enhance the ambiance. For smaller yards, scale down the fire pit and seating or opt for a semi-circular arrangement. Customize the layout to match your outdoor space and style.
Start by selecting durable, weather-resistant stones suited for outdoor use. Excavate a level area and build a circular or oval foundation with larger stones, securing with mortar if needed. Construct the fire pit walls to a comfortable height, ensuring stability. Fill the interior with fire-safe gravel or sand, then install a metal or ceramic fire bowl or insert. Surround the setup with a gravel or stone patio, and arrange seating around it. Regularly check for stability and safety.
Personalize with textured cushions, outdoor throws, or decorative pillows in earthy tones. Incorporate lighting like solar lanterns or LED strips embedded in the stonework. Add personal touches like engraved stones or custom-built benches. Seasonal decorations, such as pumpkins or fairy lights, keep the space lively year-round. The natural stone aesthetic invites a relaxed, timeless vibe.
A natural stone fire pit with a lounge area offers a low-maintenance, enduring centerpiece for outdoor living. It’s a project that combines craftsmanship with nature’s own materials, resulting in a stunning, organic look. Once finished, it becomes the heart of your outdoor space, perfect for making memories around flickering flames. This design reminds us that beauty in outdoor spaces often comes from simple, natural elements.
17. Concrete and Brick Hybrid Fire Pit with Custom Finish
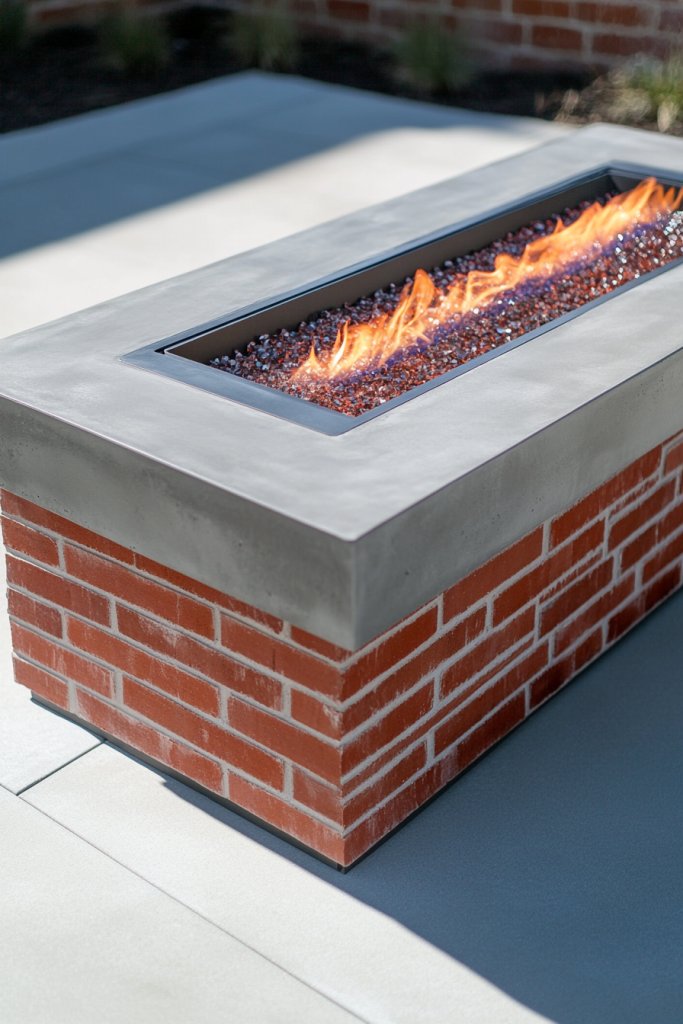
Looking for a fire feature that’s modern, durable, and customizable? A hybrid fire pit combining concrete and brick offers the perfect balance of strength and style. It’s an excellent project for DIYers who want something unique and personal. With the right finish, it can match any outdoor decor, from rustic to contemporary. Ready to craft a statement piece?
Imagine a sleek rectangular or circular structure with a concrete base and brick accents. The concrete has a smooth, textured, or patterned finish, while the bricks add warmth and character. The fire burns inside a metal insert or fire-safe bowl, with the glowing flames reflected on the textured surface. Surround it with minimalist furniture or outdoor rugs, creating a stylish gathering spot. The combination of materials adds depth and visual interest, making your yard look refined and inviting.
Choose concrete finishes that suit your style—polished, stamped, or textured. Bricks can be laid in herringbone, running bond, or stacked patterns, depending on your taste. Incorporate decorative elements like metal trim, painted accents, or embedded tiles for extra flair. Seasonal updates like outdoor cushions or lighting can change the ambiance. The design can be scaled or shaped to fit your space and aesthetic.
Build a solid foundation with compacted gravel or concrete slab. Construct the inner fire zone using fire bricks or fireproof panels. Create the outer structure with poured or pre-cast concrete, then attach brick veneer or cladding in your chosen pattern. Seal the surface with a weatherproof finish or stain to enhance durability. Install the fire-safe insert or bowl, fill with gravel or sand, and light the fire. Regular inspection and touch-ups keep it looking fresh and functional.
Customize the finish with stamped patterns or textured paint. Add metallic or glass accents embedded into the concrete or brick for a modern touch. Incorporate built-in seating or side tables made from the same materials. Use weatherproof cushions or decorative lighting to elevate the space. Seasonal décor can include potted plants or outdoor sculptures for a personalized touch.
A concrete and brick hybrid fire pit showcases how blending materials creates a unique, durable feature. It’s a project that combines craftsmanship with artistic flair, elevating your outdoor living space. Once complete, it becomes a focal point for gatherings and a testament to your DIY skills. This versatile design proves that with some effort, you can achieve a high-end look that lasts for years.
18. Fire Pit with Built-in Cupholders and Side Tables
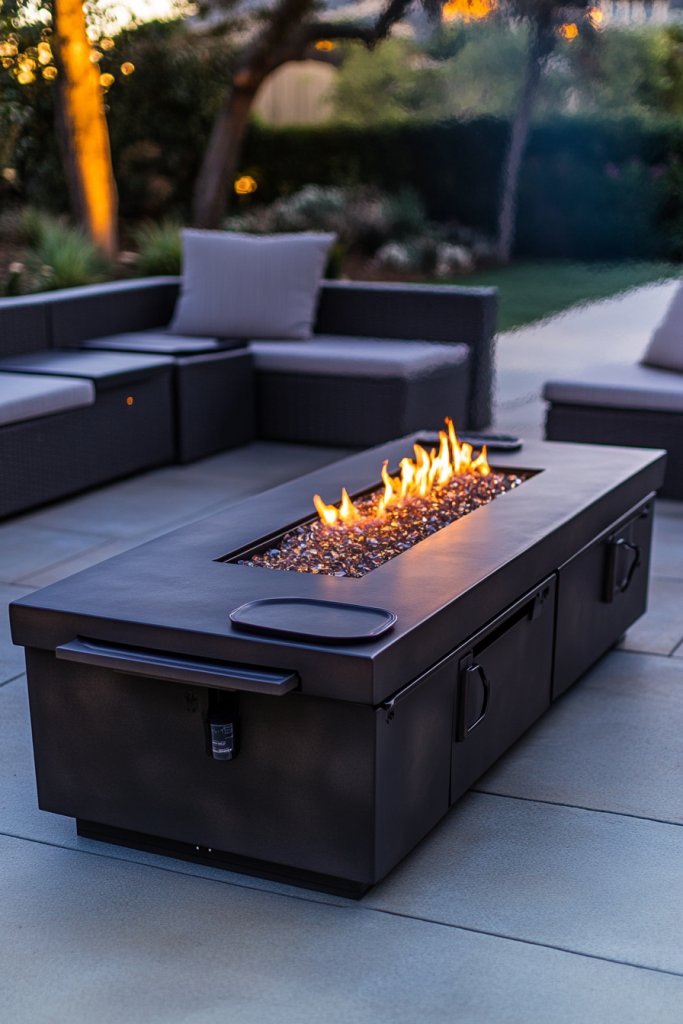
Ever wished your outdoor fire spot could also serve as a social hub? A fire pit with built-in cupholders and side tables combines warmth with convenience, making every gathering effortless. It’s perfect for outdoor parties, marshmallow roasting, or just relaxing with a drink in hand. This dual-function design elevates your backyard to a whole new level of comfort and style.
Picture a sturdy fire pit with integrated side tables made from weather-resistant wood or metal, attached to the sides for easy access. The center contains a fire-safe bowl or insert, with ample space for seating around it. Built-in cupholders are molded into the side tables, holding drinks securely. String lights or lanterns hang overhead, creating a cozy, inviting ambiance. It’s a practical centerpiece that encourages lingering conversations.
Customize the material of the side tables—wood for a rustic look, metal for a modern vibe, or composite for durability. Add removable or foldable tables for flexibility. Incorporate built-in storage compartments for fire tools or snacks. Seasonal accents like cushions, outdoor rugs, or decorative lanterns can enhance the mood. The design is adaptable to different yard sizes and personal preferences.
Start with a sturdy base, leveling the ground with gravel or concrete. Construct the fire pit using heat-resistant materials, and attach the side tables securely to the main structure. Install cupholders into the tables, ensuring they are stable and heat-resistant. Incorporate weatherproof finishes or sealants to protect the wood or metal. Set up lighting or small decorative elements, then light your fire. Regular maintenance ensures safety and longevity.
Add personal touches with engraved or painted designs on the side tables. Incorporate weatherproof cushions or outdoor throws to boost comfort. Use decorative containers or small planters on the tables for greenery (if allowed), or keep them clear for drinks. Seasonal decorations like banners or themed ornaments can keep the space lively. Your multifunctional fire pit becomes a true outdoor living centerpiece.
A fire pit with built-in cupholders and side tables proves that practicality and style can go hand in hand. It’s a project that enhances outdoor entertaining, making every moment more enjoyable. Once finished, it becomes the heart of your backyard, perfect for hosting or relaxing. Your innovative design shows that even simple ideas, when well-executed, create lasting impressions.
19. DIY Fire Pit Using Recycled Tires and Metal Rims
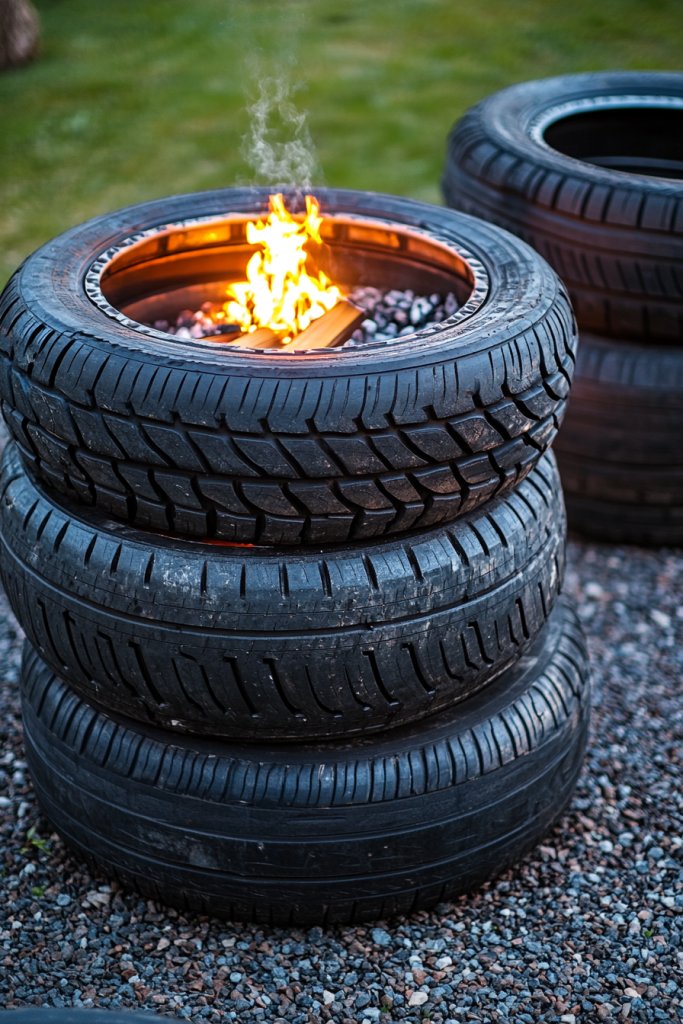
Want an eco-friendly, rugged fire feature that’s full of character? Recycled tires and metal rims can be transformed into a unique outdoor fire pit. This project combines sustainability with a bold aesthetic, perfect for DIY enthusiasts who love repurposing. It’s a budget-friendly way to add warmth and style to your yard while helping the planet.
Imagine stacked tires, arranged in a circle or oval, with a metal rim placed at the top as a safety edge or decorative border. The tires are painted or left weathered for a raw, industrial look. Inside, a fire-safe insert or a bed of fire bricks creates a contained space for burning. The flames flicker through the gaps between tires, casting shadows and creating a rustic, edgy ambiance. Nearby, simple seating completes the scene.
Choose tires of different sizes or colors for a layered, eclectic look. Paint tires with heat-resistant paint or leave them in their natural rubber state for an authentic feel. The metal rims can be decorated with stencils, metallic paint, or wrapped with rope or fabric. Incorporate a metal grate or cover for safety and spark control. Seasonal decorations like banners or outdoor art can further personalize the space.
Start by sourcing used tires from local garages or recycling centers, ensuring they are clean and free of chemicals. Stack the tires in your planned shape, securing with heavy-duty hardware or leaving them loose for easy disassembly. Place a fire-safe insert or a layer of fire bricks inside the bottom for safety. Secure the metal rim at the top for stability. Light the fire carefully, always following safety procedures. Regular inspections keep it safe and serviceable.
Decorate the tires with weather-resistant paint, stencils, or fabric wraps. Add personal touches like metal or wooden accents, or embed small decorative stones. Use outdoor cushions or a fireproof mat nearby for comfort. Seasonal accessories like banners or fairy lights can make the space festive. It’s a creative, eco-friendly way to enjoy outdoor fires with a lot of character.
Transforming recycled tires into a fire pit demonstrates that sustainability and style can coexist beautifully. It’s a statement piece that’s easy to customize and maintain. Once complete, it invites friends and family to gather around and enjoy the warmth and ambiance. Your project proves that with a little ingenuity, you can turn everyday materials into outdoor art.
20. In-Ground Fire Pit with Surrounding Flagstone Patio
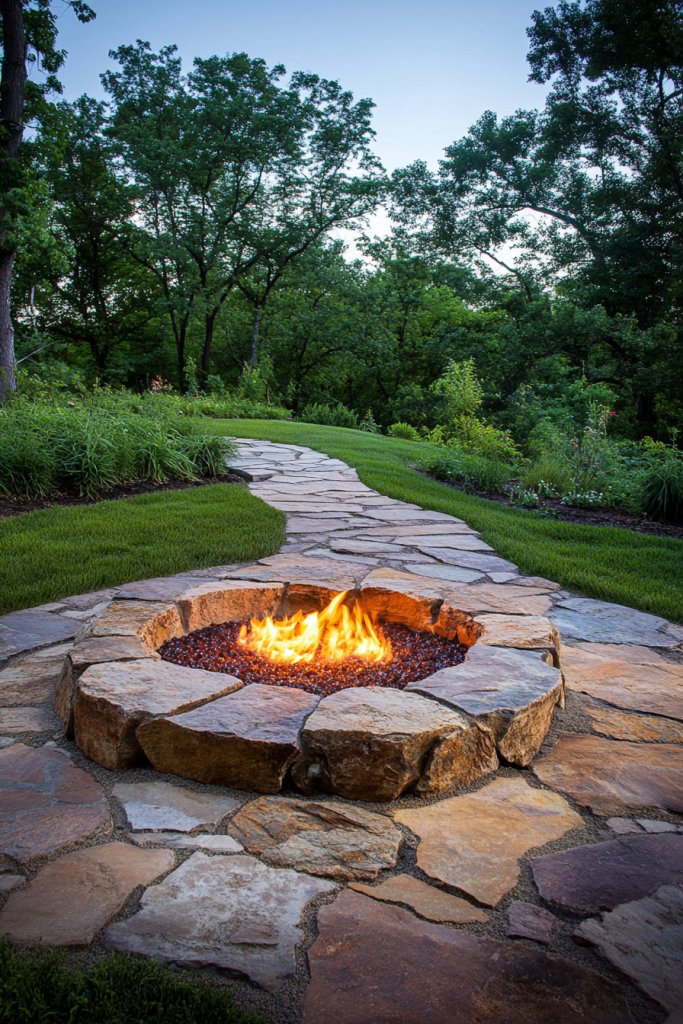
Dreaming of a seamless, natural-looking fire feature that feels like part of your landscape? An in-ground fire pit surrounded by flagstone creates a luxurious, integrated outdoor space. It offers a clean, unobtrusive aesthetic that’s perfect for those who want a sophisticated, low-maintenance feature. It’s also a great way to enhance your yard’s value and beauty.
Imagine a circular, sunken fire pit edged with large, flat flagstones, creating a smooth transition from lawn to fire area. The stones are irregular or uniform, depending on your style, and are set in mortar or sand for stability. The fire inside flickers beneath a protective grate or fire bowl. Surrounding the pit, a large flagstone patio extends outward, providing space for chairs, tables, or loungers. String lights or lanterns add warm illumination, creating an inviting atmosphere for cool evenings.
Use natural, irregular flagstones for a rustic look or uniform pavers for a contemporary feel. The fire pit can be shaped as a perfect circle or an organic, freeform design. Incorporate built-in seating or small planters made from the same flagstone for a cohesive look. Seasonal touches like outdoor cushions, fireproof rugs, or decorative lanterns can refresh the space. Adapt the size based on your yard and entertainment needs.
Excavate the area for your fire pit, ensuring a level, stable base. Lay the flagstones in your chosen pattern, using mortar or leveling sand for stability. Build a circular or oval wall with larger stones or bricks to contain the fire zone. Install a fire-safe insert or metal bowl, and fill with gravel or sand for safety. Create a surrounding patio with matching flagstones, securing them for durability. Finish with outdoor furniture and lighting for a complete setup.
Personalize your fire area with custom-stained or textured flagstones, adding engraved or painted accents. Incorporate built-in benches or low walls for seating, made from matching stones. Use weatherproof cushions, outdoor rugs, or decorative lanterns to enhance comfort and ambiance. Seasonal decor like pumpkins or holiday lights can make the space festive. The result is a luxurious, integrated outdoor living area.
Creating an in-ground fire pit with a flagstone patio elevates your outdoor space to resort-like status. It’s a durable, beautiful project that combines craftsmanship with natural beauty. Once finished, it becomes the centerpiece of your yard, perfect for relaxing or entertaining. Your effort transforms your landscape into a stunning, functional retreat everyone will admire.
21. Tiered Fire Pit with Multiple Levels for Cozy Zones
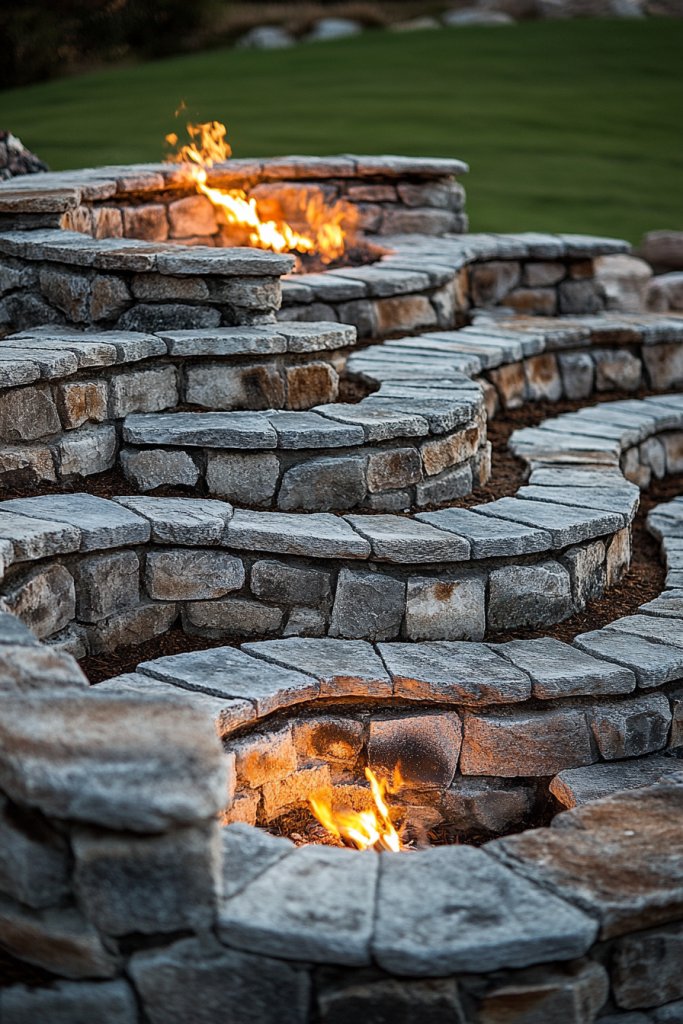
Looking to create a dynamic outdoor space with multiple intimate zones? A tiered fire pit with different levels offers a cozy, versatile setup for gatherings, storytelling, and relaxation. It mimics natural terrains or modern architectural designs, adding visual interest and functionality. This multi-level approach makes your yard feel like a curated outdoor lounge.
Imagine a series of concentric or staggered fire pits, each at a different height, connected by steps or slopes. The highest level acts as a viewing or seating area, while the lower levels contain smaller, more intimate fires. The design uses natural stone, concrete, or brick, with textured finishes. Flames flicker at various heights, casting layered shadows and creating a captivating visual. Surround the zones with comfortable seating and soft lighting for a welcoming atmosphere.
Use natural materials like stacked stone or textured concrete for a rustic look, or sleek brick and smooth finishes for a modern style. Adjust the height of each level based on space and preference, from a few inches to a foot or more. Add built-in seating, steps, or pathways between levels for easy access. Seasonal touches like outdoor cushions, throws, or decorative lighting can enhance each zone.
Plan your layout carefully, marking the different levels and pathways. Excavate and create stable foundations for each tier, ensuring proper drainage and safety. Build the tiers using durable materials—stacked stone, concrete blocks, or brick—secured with mortar or adhesive. Install fire-safe inserts or bowls on each level, filling with gravel or fireproof sand. Connect the levels with steps or gentle slopes, and finish with lighting or decorative elements.
Decorate each zone with themed cushions, outdoor rugs, or planters. Use different textures and colors to distinguish each level, creating a layered look. Add string lights, lanterns, or fireproof sculptures to highlight the tiers. Incorporate built-in features like small tables or storage at each level for convenience. These touches make your multi-level fire area both functional and visually appealing.
A tiered fire pit with multiple levels transforms outdoor space into a multi-zone retreat, perfect for various activities. It demonstrates how thoughtful design can turn a simple idea into a spectacular feature. Once built, it invites endless outdoor gatherings and cozy nights. Your creative approach proves that with planning and effort, you can craft a truly unique, multi-dimensional outdoor centerpiece.
Conclusion
From simple stone circles to elaborate repurposed structures, these DIY fire pit ideas showcase the endless possibilities to enhance your outdoor space. Don’t hesitate to try out different designs and make them uniquely yours. Ignite your creativity, and turn your backyard into a cozy retreat where unforgettable gatherings happen all year round!
Leave a Reply