I have been, or can be if you click on a link and make a purchase, compensated via a cash payment, gift, or something else of value for writing this post. As an Amazon Associate, I earn from qualifying purchases. Please read my full Affiliate Disclosure for more information.
Imagine transforming your plain, boring drawers into stunning focal points that reflect your personal style! DIY drawer front ideas are incredibly popular because they offer an affordable way to upgrade your cabinets, add character, and showcase your creativity. Whether you prefer rustic charm, modern chic, or vintage elegance, there’s a DIY solution for everyone.
In this article, you’ll find a variety of inspiring ideas to customize your drawer fronts, from painted designs and decorative panels to unique hardware and creative textures. Get ready to unleash your inner DIY enthusiast and turn your cabinets into eye-catching masterpieces that truly make your space stand out!
1. Shiplap Wooden Drawer Fronts for Rustic Charm
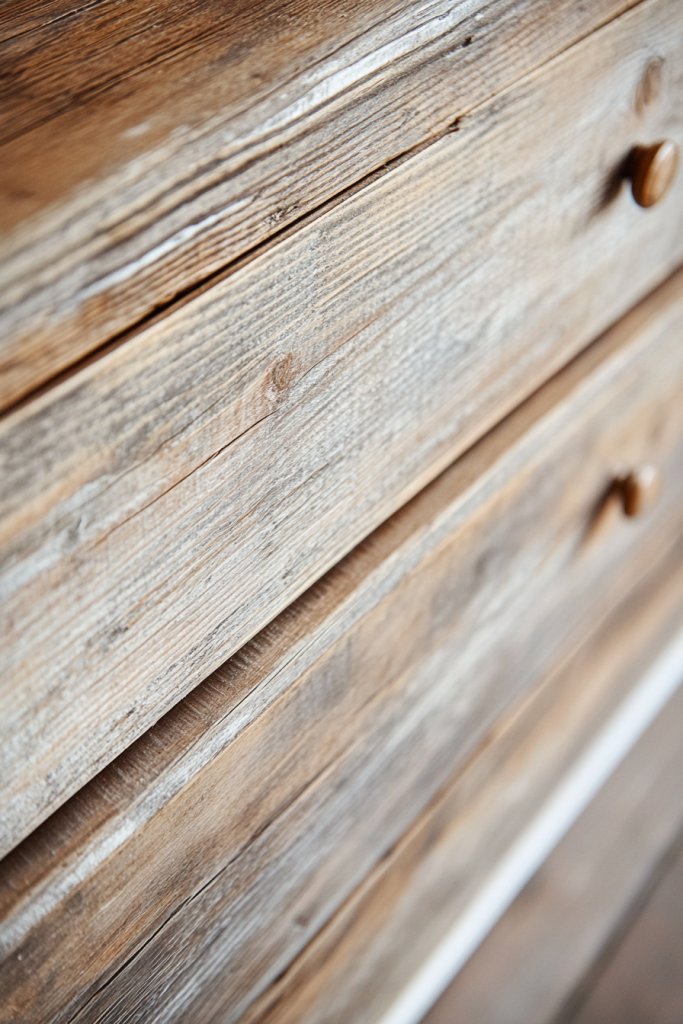
Ever wanted your cabinets to look like they belong in a cozy farmhouse? Sometimes, standard drawer fronts just don’t cut it when you’re aiming for that warm, inviting vibe. Shiplap offers an easy way to add rustic charm without breaking the bank. This idea appeals to DIYers craving a textured, handcrafted look that feels lived-in yet stylish.
Imagine horizontal wooden planks with slight gaps, painted in soft whites or weathered gray tones. The rough texture of the shiplap creates a tactile surface that catches light differently, giving depth to your cabinetry. You see the natural knots and grains peeking through, adding character. The overall effect transforms plain drawers into architectural focal points that evoke cozy country kitchens.
You can customize shiplap by choosing different wood types, like reclaimed pine for vintage appeal or smooth plywood for a sleek look. For a more modern twist, paint the shiplap in bold colors or high-gloss finishes. Seasonal updates could include staining for warmer tones in winter or whitewashing for a breezy summer feel. It’s versatile enough to blend with farmhouse, rustic, or even eclectic styles.
Start by measuring each drawer front accurately. Select durable, thin wood planks or pre-cut shiplap panels. Use wood glue and finishing nails or a nail gun for secure attachment. Sand the edges for smoothness and paint or stain as desired. For a seamless look, consider applying a clear protective finish. The key is to keep the boards level and evenly spaced for a professional appearance. Basic woodworking skills suffice, but patience is essential.
Add decorative accents like metal corner brackets or distressed paint effects for a vintage feel. Incorporate contrasting colors on the edges or inside the gaps to create visual interest. For a more personalized touch, stencil or paint patterns over the shiplap surface. Layering with different textures—like a linen drawer liner—can further elevate the rustic charm. The goal is to make each set of drawer fronts uniquely yours.
Shiplap drawer fronts are a simple way to infuse warmth into your home. With minimal tools and a bit of patience, you can achieve a professional-looking finish. This project proves that rustic charm isn’t just for professionals—DIY enthusiasts can handle it too. Your cabinets will look stylish, cozy, and totally custom, just like in your Pinterest dreams.
2. Stenciled Geometric Patterns for Modern Flair
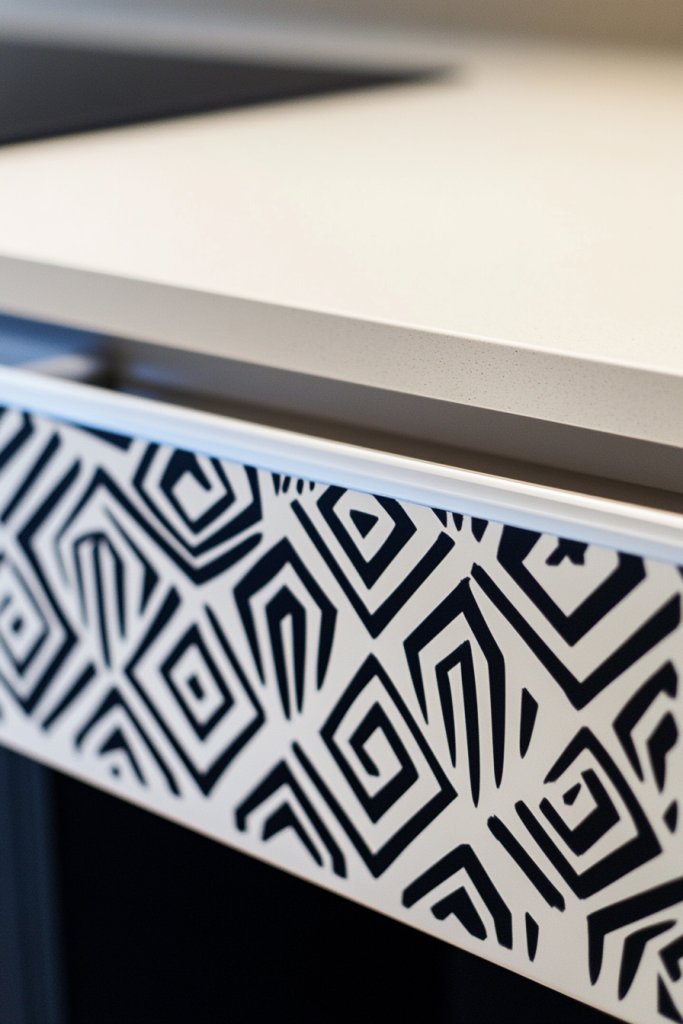
Tired of plain, boring drawer fronts that lack personality? Want to add a punch of modern style without replacing your entire cabinetry? Stenciled geometric patterns are the answer, offering a sleek, artistic upgrade that’s surprisingly easy to do. They let you incorporate trendy designs while keeping costs low.
Picture crisp lines and symmetrical shapes—triangles, hexagons, or chevrons—painted in bold colors or monochrome palettes. The stencil creates sharp edges and clean patterns that instantly modernize your space. When light hits the surface, the geometric shapes pop, adding visual interest and depth. It’s like turning your drawers into mini canvases with a contemporary twist.
Choose stencils with intricate designs or simple patterns depending on your style. Use metallic paints for a luxe feel or matte shades for a more understated look. For smaller spaces, opt for subtle patterns, while larger drawers can handle bold, large-scale designs. Seasonal variations could include using metallics for festive occasions or soft pastels for spring refreshes.
Begin by cleaning the drawer fronts thoroughly and taping off edges for precision. Use painter’s tape to secure your stencil in place, then apply paint with a sponge or stencil brush, dabbing gently to avoid bleeding. Remove the stencil carefully before the paint dries to prevent smudges. Multiple coats may be necessary for vibrant colors. Finish with a clear sealant for durability. Practice on scrap material before tackling your actual drawers.
Mix and match different geometric shapes for a unique pattern. Incorporate metallic or glitter paints to add a touch of glam. You can also customize by adding initials or symbols within certain shapes. Creating a repeating pattern or asymmetrical design offers endless personalization options. Pair with modern hardware or matte finishes for a cohesive look.
Stenciled geometric patterns are a fantastic way to make a bold statement without a big budget. They’re perfect for DIYers who want a professional finish with minimal experience. Plus, it’s satisfying to see your creative vision come to life on everyday furniture. Your cabinets will look fresh, modern, and totally personalized—ready to impress everyone who visits.
3. Reclaimed Wood Panels for Vintage Appeal
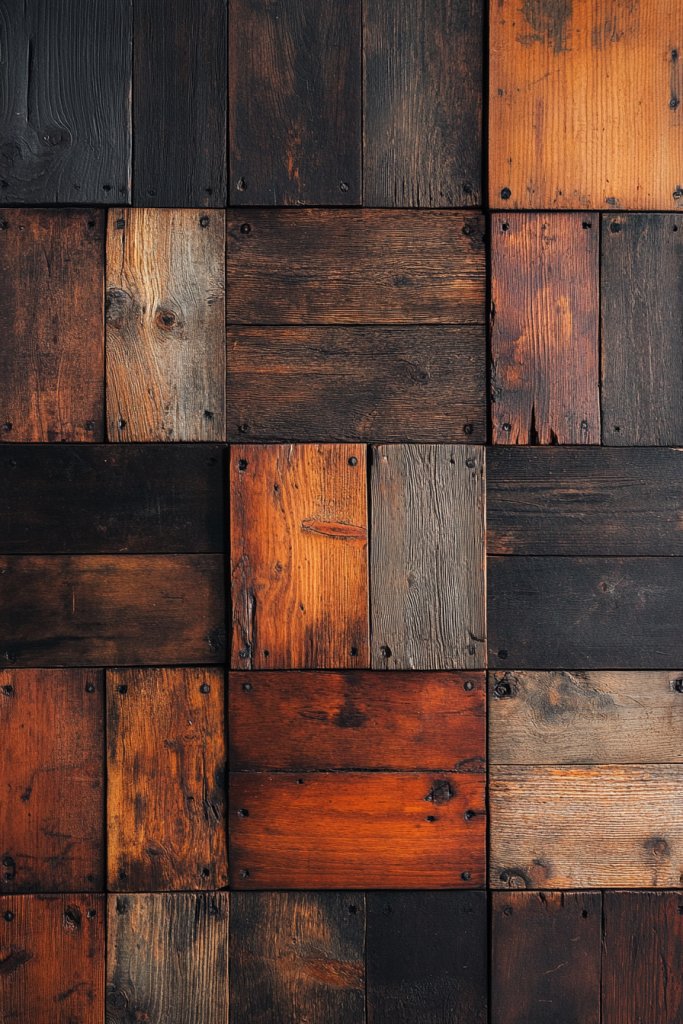
Craving that authentic vintage vibe but don’t want to spend a fortune? Reclaimed wood panels are your best bet for a timeless, eco-friendly upgrade. They add character and history to your cabinets while helping the planet. Plus, nothing beats the charm of imperfections and weathered textures.
Visualize weathered planks with peeling paint, knots, and natural cracks, giving each drawer front a story to tell. The varied tones—warm browns, faded grays—bring depth and richness. When installed, the panels create a patchwork of history, making each piece feel unique. The rustic finish pairs beautifully with vintage hardware or modern minimalist accents, striking a perfect balance.
Use different reclaimed woods—like barn wood, pallet slats, or old flooring—to match your style. For a cleaner look, sand the surface lightly but leave some textures intact. Combine with metal accents or painted details for contrast. Seasonal updates might include darker stains in winter or lighter, sun-kissed finishes for summer. This approach suits farmhouse, shabby chic, or industrial decor.
Start by sourcing reclaimed wood from local salvage yards or online marketplaces. Cut the panels to size, then sand lightly to remove splinters while preserving character. Attach with wood glue and nails or screws, ensuring the panels are flush. Seal with a clear protective finish to prevent further weathering. For a seamless look, paint or stain the edges to match your decor. This project requires patience but yields a highly personalized result.
Add decorative hardware like vintage knobs or handles to enhance the antique appeal. Incorporate painted or stenciled designs for a layered look. You can also distress the surface further with sandpaper for an even more aged appearance. Layering different reclaimed woods creates visual interest and depth. Personal touches like small metal charms or leather accents further customize the look.
Reclaimed wood panels are a sustainable way to add vintage charm, proving that eco-friendly choices can be stylish. The process is straightforward and rewarding, especially if you love DIY craftsmanship. Your cabinets will radiate warmth and history—perfect for creating a cozy, inviting space. It’s a project that boosts confidence and proves your decorating skills can be both beautiful and responsible.
4. Mirrored Surfaces for a Glamorous Touch
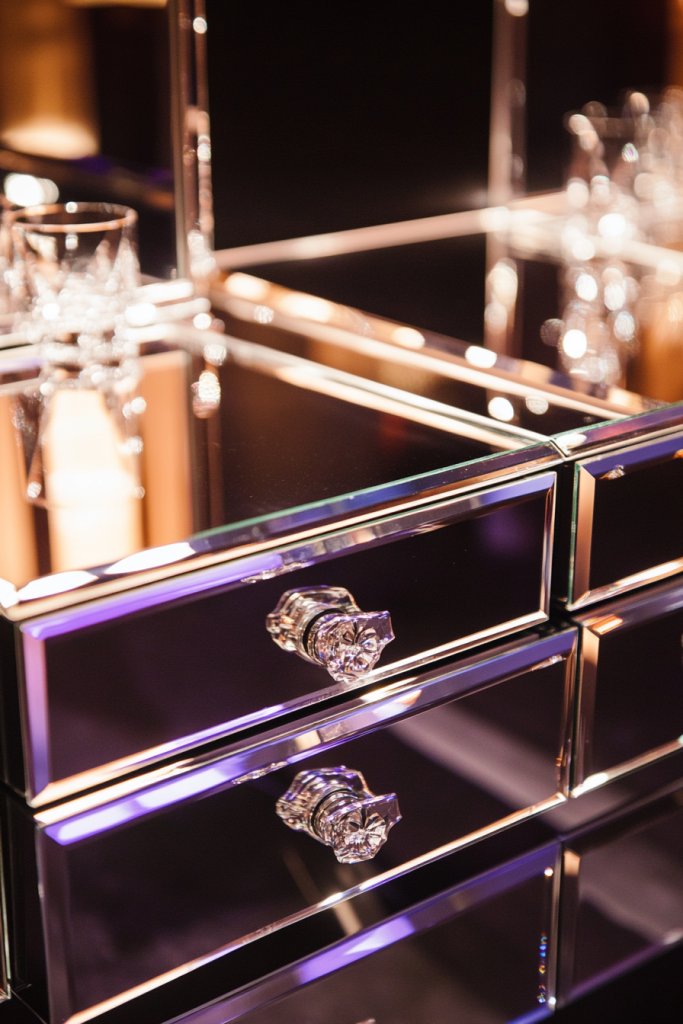
Looking to add a luxurious, glamorous feel to your space without a full renovation? Mirrored drawer fronts are an instant upgrade that reflects light and creates a sense of openness. They’re perfect for small rooms or areas where you want to make a statement. Plus, mirrors are surprisingly easy to incorporate into DIY projects.
Imagine sleek, frameless or ornate-framed mirror panels replacing your standard drawer fronts. The reflective surface catches ambient light, bouncing it around and brightening the room. When closed, the mirrors create a seamless, glossy finish. Opened, they reveal your storage with a hint of sophistication. The reflective quality adds depth, making even tiny spaces feel larger and more elegant.
Choose frameless mirrors for a minimalist look or decorative frames for vintage or art deco styles. Tinted or textured mirrors can add subtle color or visual interest. For seasonal updates, switch to frosted or stained glass panels for a different ambiance. Pair mirrored fronts with chrome or crystal hardware for extra glamour. This idea adapts well to contemporary, glam, or eclectic interiors.
Start by measuring your drawer fronts accurately. Purchase mirror sheets with a protective backing—cut them to size with a glass cutter or have them professionally cut. Attach with mirror adhesive or strong double-sided tape designed for glass. For a finished look, add a frame or trim to hide edges and secure the mirror further. Be cautious to avoid bubbles or fingerprints during installation. Seal edges with clear silicone if needed, and clean the surfaces thoroughly.
Decorate the edges with metallic or painted trim for a custom look. Embellish with decorative hardware to complement the glamorous vibe. Use patterned or textured mirrors for subtle visual effects. Incorporate LED backlighting or perimeter lighting to enhance the reflective quality and create a stunning glow at night. The goal is to make your drawers feel like a piece of art.
Mirrored drawer fronts instantly elevate any space with a touch of luxury. They’re a bold yet achievable DIY project that adds both function and style. Once installed, you’ll love how light and space seem to multiply. It’s a clever way to bring glamour into your home without a hefty price tag or extensive remodeling. Go ahead—shine bright!
5. Chalkboard Paint for Functional and Fun Design
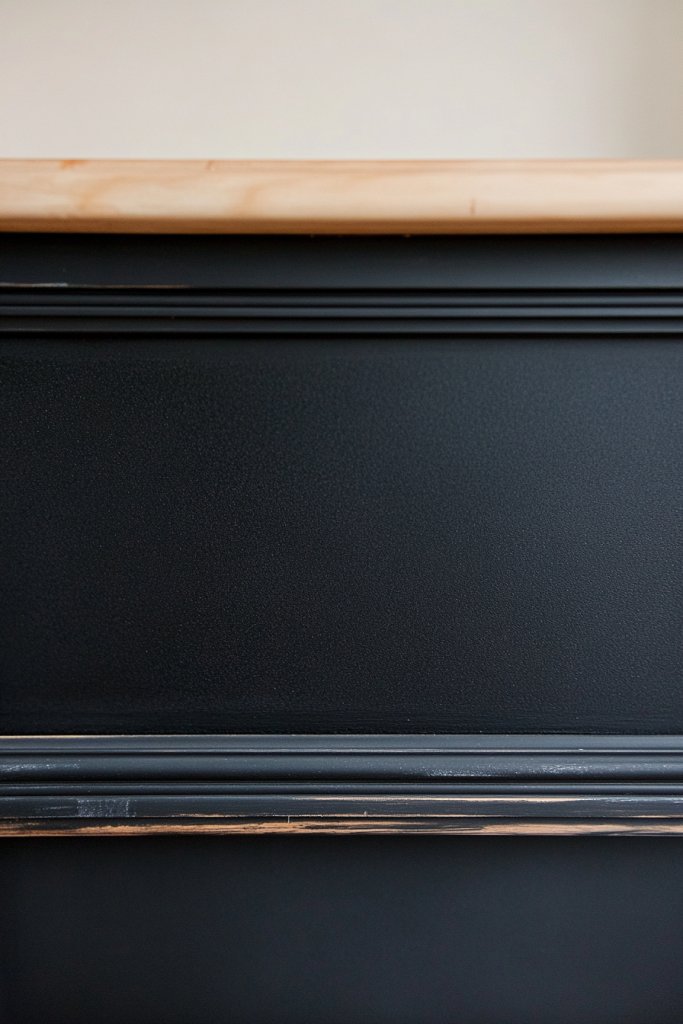
Ever wish your cabinets could serve as both storage and a place to jot down quick notes? Chalkboard paint transforms ordinary drawer fronts into functional, playful surfaces. It’s perfect for busy households, creative spaces, or anyone who loves a bit of interactive decor. Plus, it’s a budget-friendly way to add personality to your furniture.
Picture matte black or dark-colored chalkboard surfaces framed by colorful trims or contrasting hardware. You can write grocery lists, reminders, or doodles directly on your drawers. The matte finish gives a smooth, writable surface that invites interaction. When you close the drawers, the chalk marks disappear, leaving a sleek, clean look until you want to personalize again. It’s like having a giant notepad right in your kitchen or craft room.
Choose vibrant chalkboard colors like deep blues, greens, or even metallic shades for a modern twist. Add decorative borders or stenciled designs for a custom touch. For seasonal updates, switch the chalk or wipe clean easily, making it perfect for holiday messages or seasonal artwork. Pair with playful hardware or colorful knobs to maximize the fun factor. It adapts well to playful, eclectic, or modern interiors.
Start by cleaning and lightly sanding the drawer fronts. Apply a primer if necessary, then paint with chalkboard paint using a roller or brush. Follow manufacturer instructions for curing time and second coats. Once dry, condition the surface with chalk by rubbing the entire surface and erasing it. Use chalk markers for more vibrant or detailed designs. Regular cleaning with a damp cloth keeps it looking fresh and functional.
Frame the chalkboard area with decorative trim or paint a border for a finished look. Use colorful chalks or markers to match your decor. Create themed messages for holidays or special occasions. Add small shelves or hooks nearby for chalk or erasers. Personal touches make the space more engaging and uniquely yours.
Chalkboard paint on drawer fronts combines practicality with fun, making everyday routines more interactive. It’s a simple project that anyone can do, and the results are endlessly customizable. Your home will feel more lively and organized, with a touch of whimsy. Ready to turn your cabinets into the ultimate message boards? Let’s do it!
6. Decorative Tile Inserts for Colorful Accents
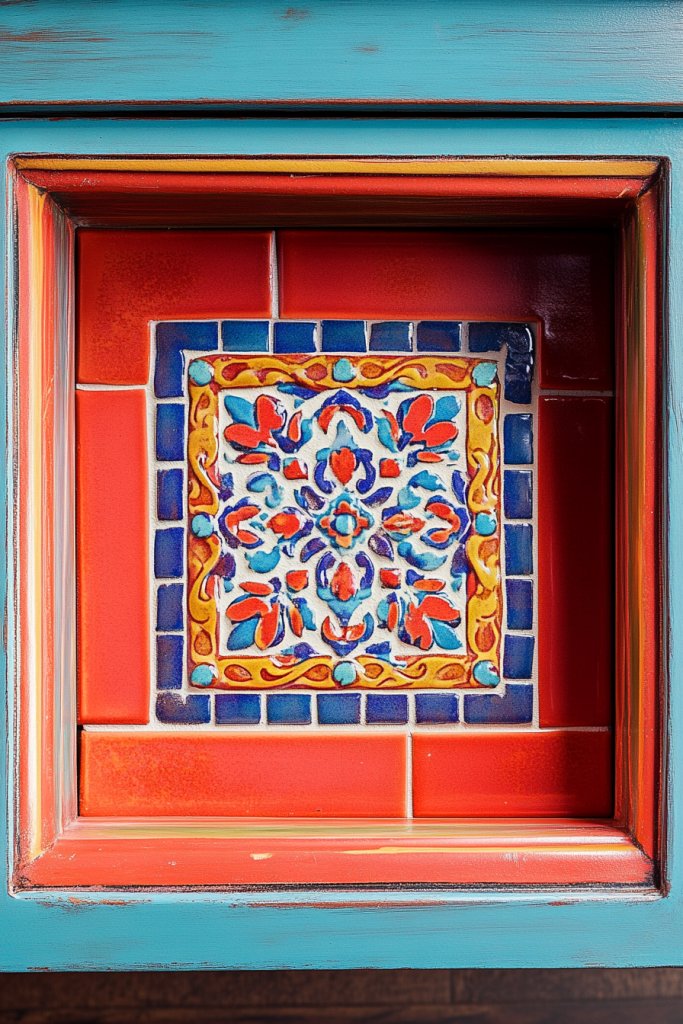
Looking to add vibrant color or artistic patterns without repainting or wallpapering? Tile inserts are an eye-catching solution that brings personality and flair to your cabinets. They’re perfect for creating a focal point or a splash of color. Plus, they’re relatively easy to install with the right tools and a bit of patience.
Imagine small, colorful ceramic tiles arranged in a mosaic pattern or a single bold patterned tile framed by neutral surrounds. The glossy surfaces catch light, adding dimension and vibrancy. You see intricate geometric designs or floral motifs that make each drawer front a mini piece of art. The varied textures and finishes create a dynamic visual that elevates the overall aesthetic.
Use bright, bold tiles for a playful look or subdued, patterned tiles for elegance. Mix different shapes—square, hexagon, or octagon—for a custom mosaic. For seasonal updates, swap out tiles or add decorative borders with contrasting colors. Pair with sleek hardware or minimalist handles to keep the focus on the tile design. It suits eclectic, Mediterranean, or modern styles.
Begin by selecting tiles that fit your design vision. Cut or grout tiles to fit your drawer dimensions if needed. Clean the surface thoroughly before applying a strong adhesive suitable for tiles. Place the tiles carefully, ensuring even spacing and alignment. Allow adhesive to set fully before grouting and sealing for protection. Finish with a clear, non-yellowing sealant to preserve the vibrant colors. Patience at each step results in a professional-looking finish.
Create custom patterns or initials within the tile layout for a personalized touch. Use different colors or textures to highlight certain areas. Incorporate metallic or glass accent tiles for added sophistication. Frame the tile inserts with a decorative trim or molding for a polished look. These details make each drawer front uniquely tailored to your style.
Decorative tile inserts turn simple cabinets into statement pieces, proving that small details make a big impact. The DIY process is accessible with basic tools and a bit of patience. Your space will feel more vibrant and artistic, reflecting your personality. It’s a creative project that boosts confidence and showcases your design skills—go ahead, make your cabinets a work of art!
7. Woven Rattan or Cane Panels for Textural Contrast
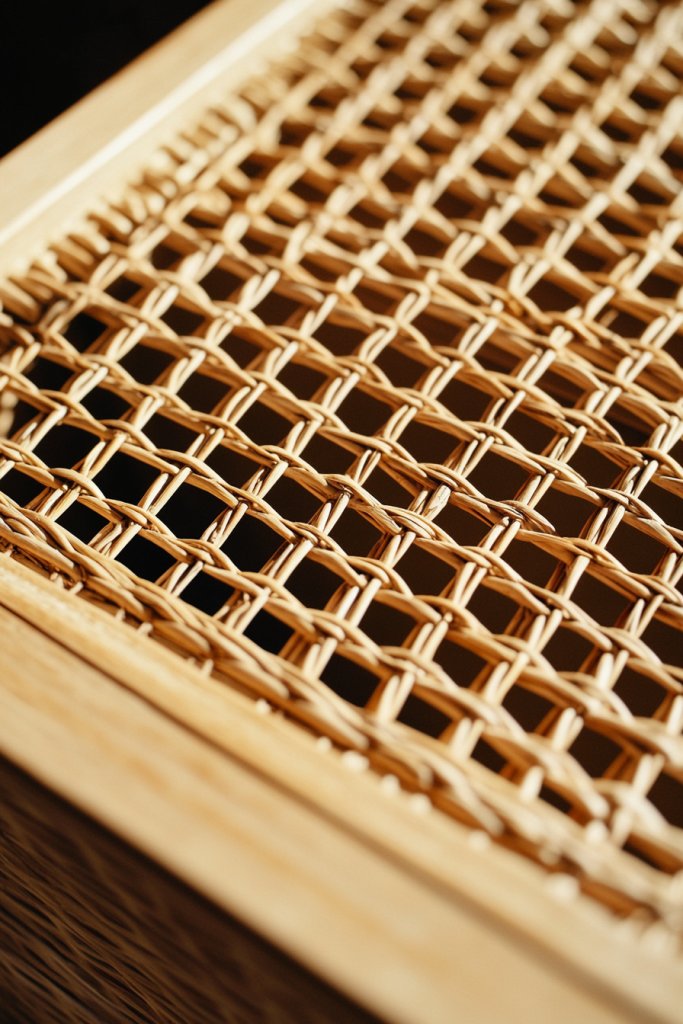
Feeling like your cabinets need a natural, textural upgrade? Woven rattan or cane panels offer an organic, boho-chic vibe that instantly adds warmth and tactile interest. They’re perfect if you want a softer, more inviting look that balances modern and rustic elements. Plus, they’re surprisingly simple to incorporate into DIY projects.
Visualize light-colored cane or rattan weaving, creating a subtle pattern that catches the eye without overwhelming. The natural fibers add a tactile dimension, inviting touch and interaction. When installed, these panels soften the overall look, creating a cozy yet stylish atmosphere. The woven texture contrasts beautifully with smooth painted surfaces or sleek hardware, adding depth and dimension.
Choose different weaving styles—from tight, uniform patterns to looser, more relaxed weaves—depending on your aesthetic. Combine materials like wood frames with cane inserts for a mixed-material look. For seasonal updates, consider darker stains or protective finishes to enhance durability outdoors or in humid areas. Pair with natural fiber or ceramic hardware to complete the organic aesthetic.
Start by measuring and cutting your woven panels to size. Secure with wood glue or staple gun, making sure the weave is tight and even. Attach the panels to your drawer fronts with nails or adhesive, ensuring they are flush and stable. Seal with a clear varnish or protective coating to prevent fraying or damage over time. The process requires patience to get the weave aligned perfectly, but the results are worth it.
Add decorative touches like leather or tassel accents for a boho vibe. Incorporate contrasting trims or painted borders to frame the woven panels. Use different natural fibers or colors for a layered, textured look. Personalize by adding small charms or metal accents that complement your overall decor style. The result is a warm, inviting, and highly personalized cabinet front.
Woven rattan or cane panels are a charming way to enhance your cabinets with natural textures. They demonstrate that you don’t need to be a master carpenter—simple tools and patience create stunning results. Your space will radiate warmth and laid-back elegance, perfect for cozy homes or beach-inspired decor. It’s a project that feels both fresh and timeless—dive in and enjoy the process!
8. Painted Ombre or Gradient Finishes for Subtle Depth
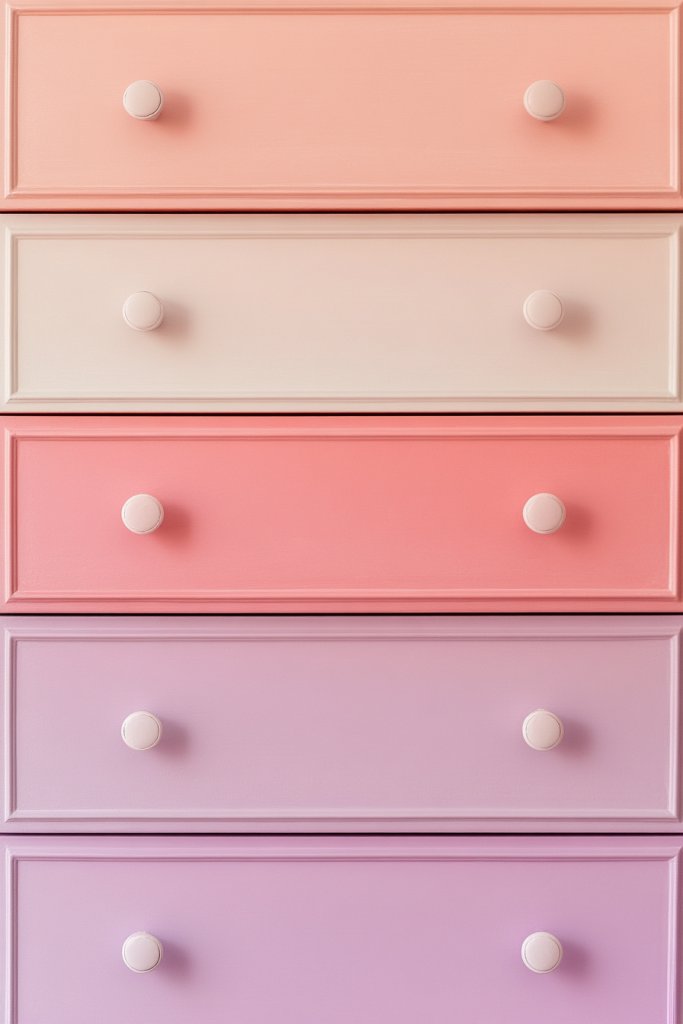
Want to add a sophisticated, artsy touch to your cabinets? Ombre or gradient finishes create a smooth transition of colors that add depth and visual interest without overwhelming the space. They’re perfect if you love subtle elegance and want your furniture to stand out with understated style. Plus, they’re a fun project for DIY enthusiasts eager to experiment with color blending.
Picture a drawer front that fades from a soft blush pink at the top to a deep wine hue at the bottom. The gentle color shift creates a calming, almost watercolor-like effect. When light hits the surface, the gradient seems to shimmer softly, adding dimension. The transition can be bold or subtle, depending on your preference, making your cabinetry a true focal point. It’s like a piece of living art in your home.
Choose two or more shades within the same color family for a monochromatic look, or go for contrasting colors for more impact. Experiment with different blending techniques—dry brushing, sponging, or airbrushing—for varied effects. Seasonal variations include lighter pastels for spring or rich jewel tones for fall. Pair with neutral hardware to keep the focus on the gradient.
Start by taping off the edges and choosing high-quality paints suitable for furniture. Apply a base coat in the lightest shade and let dry. Use a sponge or brush to blend the darker color from the bottom up, working quickly to achieve a seamless gradient. Use a clean sponge or brush to soften the transition. Finish with a clear sealant to protect the design. Practice blending on scrap wood before tackling your actual drawers.
Add metallic or glitter accents at the transition points for extra sparkle. Incorporate stenciled patterns or subtle textures over the gradient for layered effects. Use different brushes or sponges for varied blending textures. Personalize with initials or small motifs at the center or edges to make the design uniquely yours. The possibilities are endless for artistic expression.
Ombre finishes transform simple drawers into elegant statements, proving that color blending can be both easy and impressive. It’s a creative project that boosts your confidence in painting and decorating skills. Your cabinets will radiate subtle sophistication, elevating your entire space. Ready to add depth and dimension with just a few brushes? Let’s get started!
9. Vinyl Decals or Wallpaper for Customizable Designs
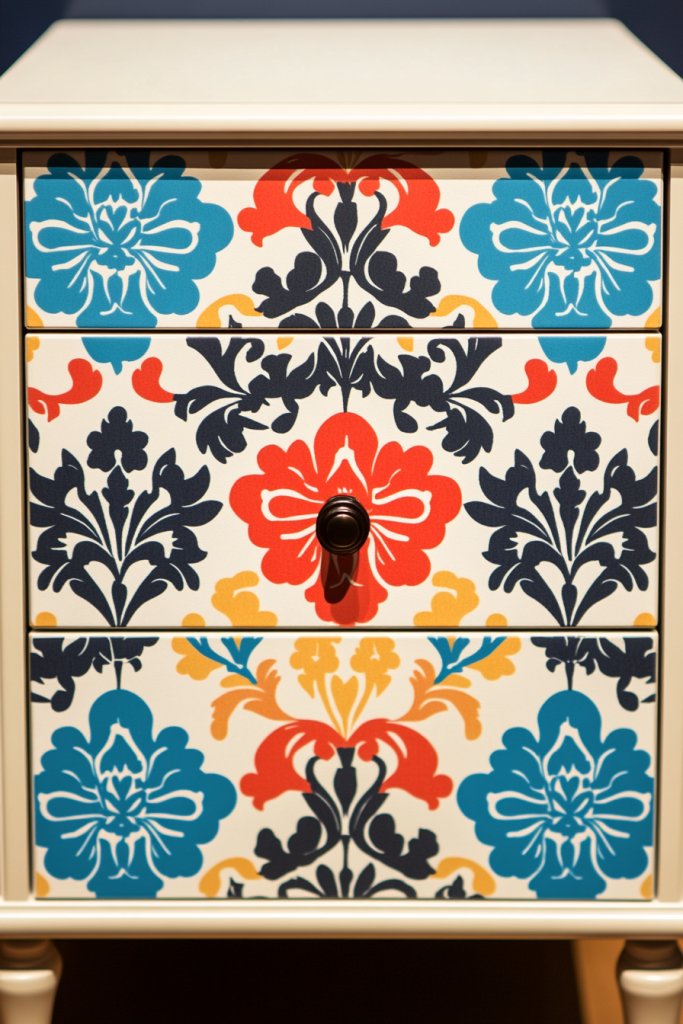
Looking for a quick, affordable way to personalize your cabinets? Vinyl decals and wallpaper offer endless options for custom patterns, images, or textures. They allow you to change your decor easily and frequently without any permanent commitment. If you love variety and DIY flexibility, this idea is perfect for you.
Envision bold floral or geometric decals that instantly catch the eye, or textured wallpaper mimicking natural materials like linen or stone. The peel-and-stick nature makes application straightforward—no messy glue required. The designs can be vibrant or subtle, depending on your style. When you close the drawers, the decals or wallpaper add a layer of visual intrigue, transforming plain fronts into personalized masterpieces.
Select decals with metallic, matte, or gloss finishes to match your decor. Use removable wallpaper for seasonal updates or to test different styles before committing. Combine patterns or create a collage effect for a gallery-inspired look. For a cohesive design, coordinate with other decorative elements like knobs or trims. It’s adaptable for modern, boho, or eclectic aesthetics.
Clean and dry the drawer fronts thoroughly before applying. Cut decals or wallpaper to the exact size, then peel off backing and carefully position. Use a squeegee or credit card to smooth out air bubbles and ensure a flat finish. For wallpaper, seal edges with clear adhesive or trim to prevent peeling. Avoid stretching or pulling during application. Finish by cleaning the surface and ensuring no residue remains.
Layer with additional decals or trim for a more intricate look. Use stencils or paint pens to add custom details over the decals. Mix different patterns or textures for a personalized collage. Incorporate themes that reflect your personality, like travel icons or floral motifs. These small touches make your cabinets uniquely yours.
Vinyl decals and wallpaper are accessible ways to refresh your space with minimal effort. They demonstrate how DIY can be both fun and transformative. Your cabinets will look modern and personalized, impressing friends and family alike. Go ahead—change your decor as often as you like and enjoy the creative process!
10. Carved Wooden Panels with Intricate Details
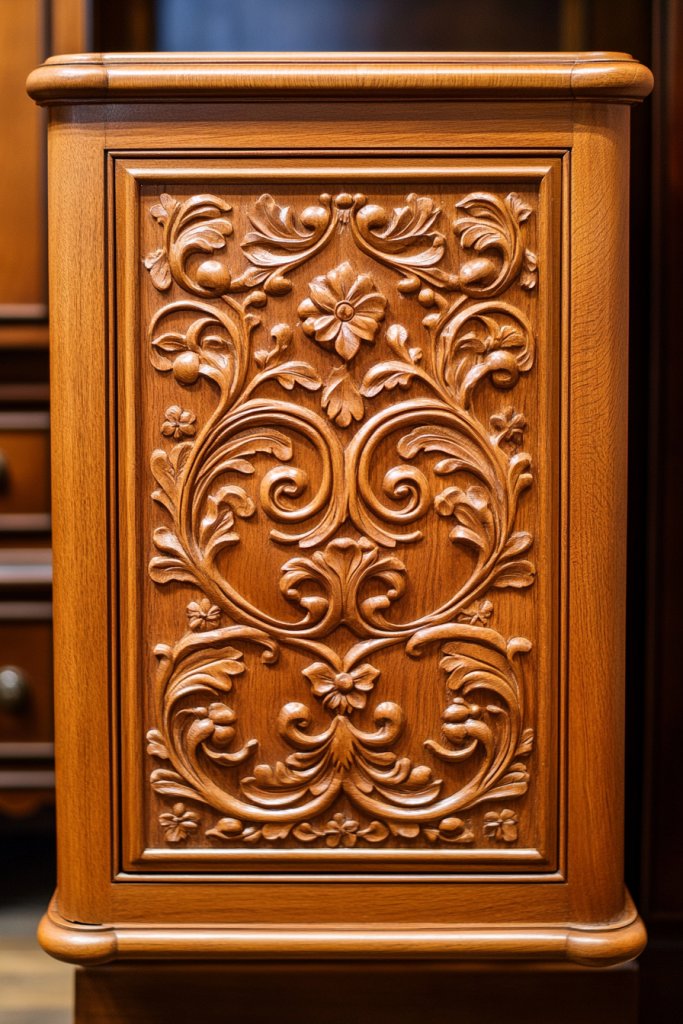
Dreaming of a handcrafted, artisanal look for your cabinets? Carved wooden panels add a touch of elegance and craftsmanship that instantly elevates any space. They work well in traditional, vintage, or eclectic interiors and give a sense of luxury. If you appreciate detailed work, this idea offers a way to showcase your DIY skills.
Visualize ornate floral motifs, geometric patterns, or abstract designs carved into wood. The intricate details create shadows and depth, making each drawer front unique. Rich wood tones or painted finishes can highlight the carvings, adding a layer of sophistication. When light hits the carvings, the shadows emphasize the craftsmanship, turning simple drawers into focal points.
Choose different carving styles—from delicate filigree to bold motifs—based on your decor. Paint the carved panels in contrasting or matching colors for different effects. Incorporate gold or metallic accents into the carvings for a regal look. Seasonal or thematic updates include adding paint or stain to enhance or mute details. It suits classic, vintage, or even boho styles.
Start with high-quality, easy-to-carve wood like basswood or oak. Use templates or freehand the designs with carving tools, ensuring precision. Sand the edges smooth after carving to prevent splinters. Attach the carved panels to your drawer fronts with glue and finishing nails for stability. Finish with stain, paint, or varnish to highlight details and protect the surface. Patience and steady hands are key.
Add metallic or contrasting paint accents to highlight carved details. Incorporate small decorative hardware that complements the ornate look. Personalize by engraving initials or symbols into the carvings. Use different staining techniques to create a distressed or aged appearance. Custom carvings can tell a story or reflect your personal style.
Carved wooden panels showcase craftsmanship and add a luxurious feel to your home. They prove that even complex designs are achievable with patience and the right tools. Your cabinets will exude elegance, and you’ll gain confidence in tackling detailed projects. It’s a timeless way to infuse artistry into everyday furniture—dare to create!
11. Metallic Foil or Leaf Accents for a Luxe Look
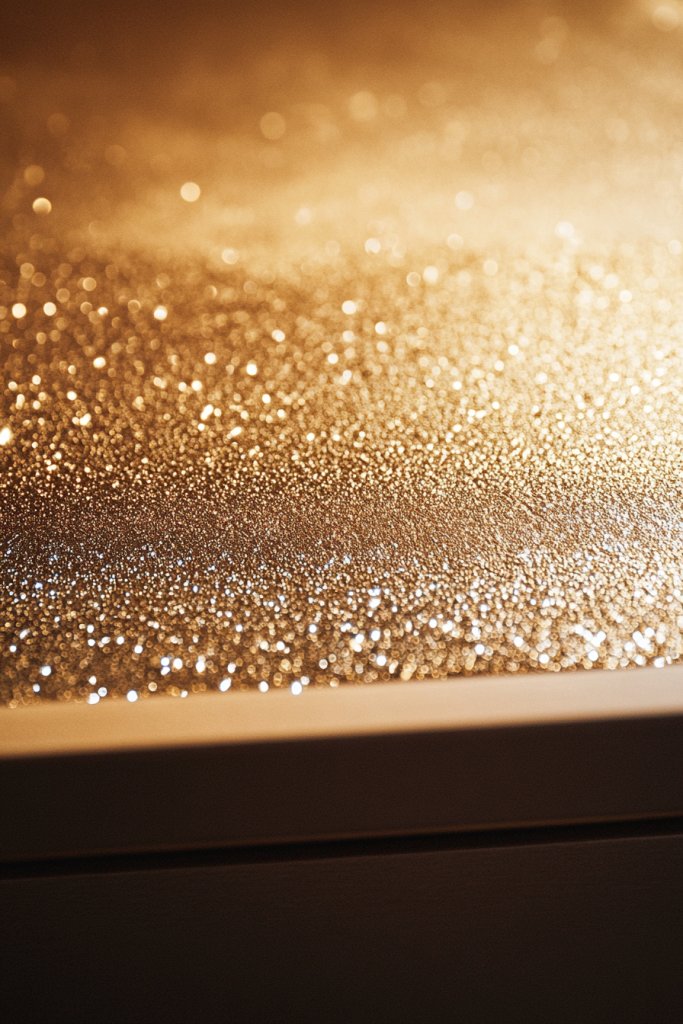
Craving a touch of opulence without a full remodel? Metallic foil or leaf accents on drawer fronts create instant glamour and sophistication. They’re perfect for adding shimmer and shine in a subtle or dramatic way. If you love luxe decor, this DIY idea offers a high-end look with a relatively simple process.
Imagine gold or silver leaf applied to the edges or entire surfaces of your drawer fronts, catching light and creating a luminous glow. The textured metallic surface reflects ambient light, adding depth and richness. When paired with matte or glossy paint, the foil or leaf provides a stunning contrast. The result is a sophisticated, jewelry-like finish that elevates your cabinetry.
Choose between real or imitation leaf foil, depending on budget. Use contrasting metallics for a layered, contemporary look or match tones for a more subtle effect. Incorporate geometric patterns or borders with foil for a modern touch. Seasonal updates include switching between gold, silver, or copper for different vibes. Pair with sleek hardware or minimalistic handles for a cohesive aesthetic.
Clean and prepare the surface thoroughly before application. Apply adhesive or sizing specifically designed for foil or leaf. Carefully lay the foil or leaf onto the surface, smoothing out bubbles with a brush or cloth. Use a soft brush to burnish and ensure adhesion. Seal with a clear, non-yellowing varnish to protect. Patience and gentle handling ensure a flawless finish, and small repairs can be made with additional foil or leaf.
Add decorative accents or borders with foil to frame your drawer fronts. Combine with painted or stained backgrounds for layered effects. Use contrasting metallics or multiple layers for a more dramatic look. Personalize further with stenciled patterns or initials over the metallic accents. These details turn simple cabinetry into statement pieces.
Metallic foil and leaf accents elevate your cabinets with a touch of luxury, showing that DIY can rival high-end finishes. The process is straightforward and results in a stunning transformation. Once done, your space will radiate sophistication and style. It’s a small project with a big impact—dazzle yourself and others!
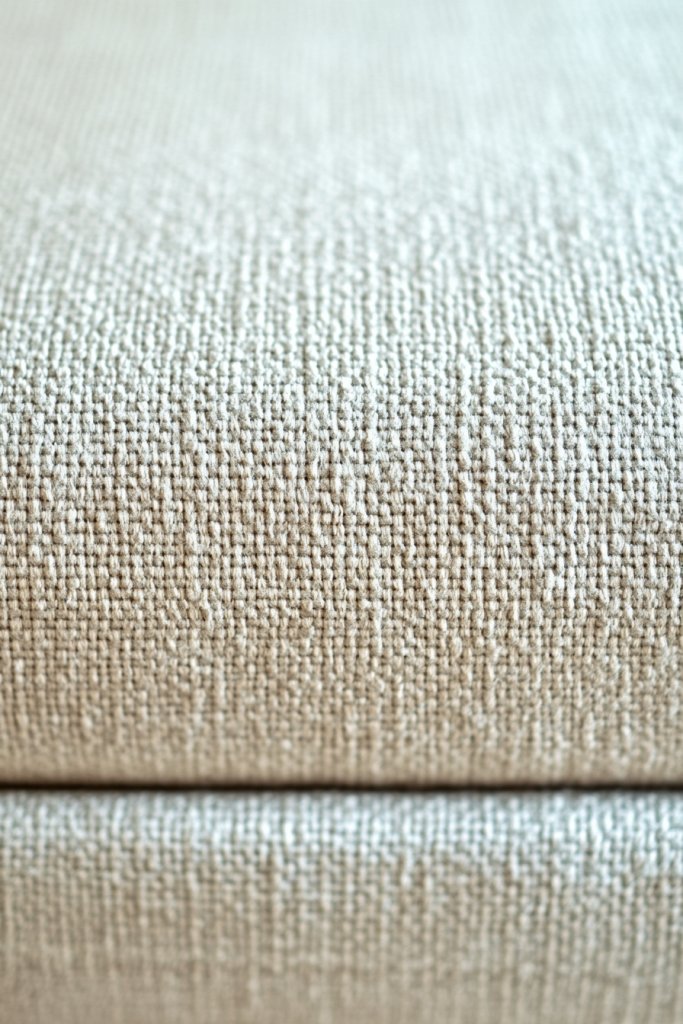
12. Fabric-Covered Drawer Fronts for Soft Textures
Looking to add warmth and softness to your cabinets? Fabric-covered drawer fronts offer a cozy, inviting feel that’s perfect for bedrooms, nurseries, or any space craving a tactile upgrade. They’re an affordable way to introduce texture and color, plus they provide a quiet, plush effect. If you love textiles, this project will make you smile.
Imagine smooth fabric stretched over a sturdy frame, secured with adhesive or staples. The fabric features patterns—florals, geometrics, or solids—that complement your decor. When you run your hand over the surface, it feels plush and inviting. The fabric adds a layer of softness against the sleekness of other finishes, creating a balanced, layered aesthetic.
Choose durable, washable fabrics for easy maintenance. Use contrasting piping or trim to frame the fabric and add visual interest. Change seasonally by swapping out fabric or adding decorative buttons or appliques. For a luxe look, incorporate velvet or silk, while cotton or linen offer a more casual vibe. Pair with simple hardware to keep the focus on the fabric.
Remove drawer fronts and cut fabric slightly larger than the surface. Apply a strong, washable adhesive or spray mount evenly, then smooth out wrinkles and air bubbles. Wrap the edges around the sides of the drawer for a clean finish, securing with staples or glue. Reattach the drawer fronts once the adhesive is dry. For extra durability, add a clear sealant or spray to protect the fabric.
Add decorative buttons, bows, or embroidery to personalize your fabric. Mix fabrics for a patchwork look or coordinate with your room’s color scheme. Incorporate decorative trims or lace for a vintage touch. You can also add small pockets or pouches for storage or decorative purposes. These details make your furniture uniquely yours.
Fabric-covered drawer fronts are a cozy, creative way to refresh your space. They show that textiles aren’t just for upholstery—they can transform furniture too. The project is accessible to DIYers of all skill levels, and the result is a soft, inviting cabinet that feels custom-made. Ready to add some plush personality? Let’s get sewing!
13. Glass Inserts with Colored or Textured Glass
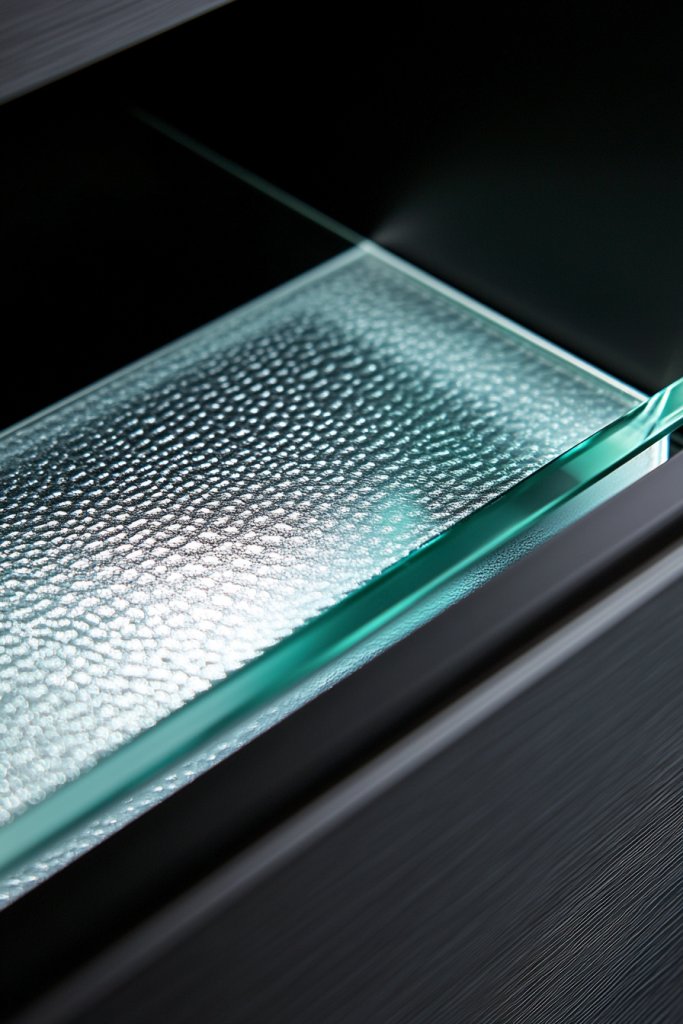
Want to showcase your storage while adding a modern, elegant touch? Glass inserts turn plain drawer fronts into semi-transparent displays that reflect light and create openness. They’re perfect for showing off organized interiors or adding a sophisticated element. If you love sleek design, this idea will take your cabinets to the next level.
Picture frosted, stained, or textured glass panels replacing solid fronts. The semi-opaque surfaces diffuse light, softening the overall look while adding visual interest. Colored glass introduces vibrant hues that brighten the space, while textured glass adds depth and tactile appeal. When light passes through, it creates a beautiful glow, making your cabinetry a true statement piece.
Choose clear, frosted, or stained options depending on your privacy needs and style preferences. Incorporate textured glass with ripple, rain, or pebbled patterns for added dimension. Match glass colors to your decor palette or use contrasting shades for impact. Frame the glass with sleek or ornate trim to suit contemporary or traditional styles. It’s versatile enough for any aesthetic.
Remove the drawer fronts carefully and cut glass sheets to size with a glass cutter or by professional service. Attach with specialized glass adhesive or a strong, clear silicone sealant, ensuring no gaps or bubbles. Secure with decorative trims or frames for a polished look. Before final installation, clean the glass thoroughly to avoid fingerprints or smudges. Seal edges to prevent moisture or dust intrusion.
Decorate the glass with etching or stained effects for extra flair. Incorporate decorative hardware that complements the glass’s style—brushed metals or ornate handles work well. Use contrasting or matching colors to coordinate with your room’s theme. Adding LED lighting behind the panels can create a stunning backlit effect that elevates the whole look. It’s all about customizing to your taste.
Glass inserts provide a sleek, contemporary upgrade that’s surprisingly easy to DIY with the right tools. They prove that transparency and texture can create a refined, airy feel. Your cabinets will look sophisticated, and the process boosts your confidence in handling delicate materials. It’s a chic choice that makes your space feel bright and open—ready to impress!
14. Mosaic Tile Borders for Artistic Detailing
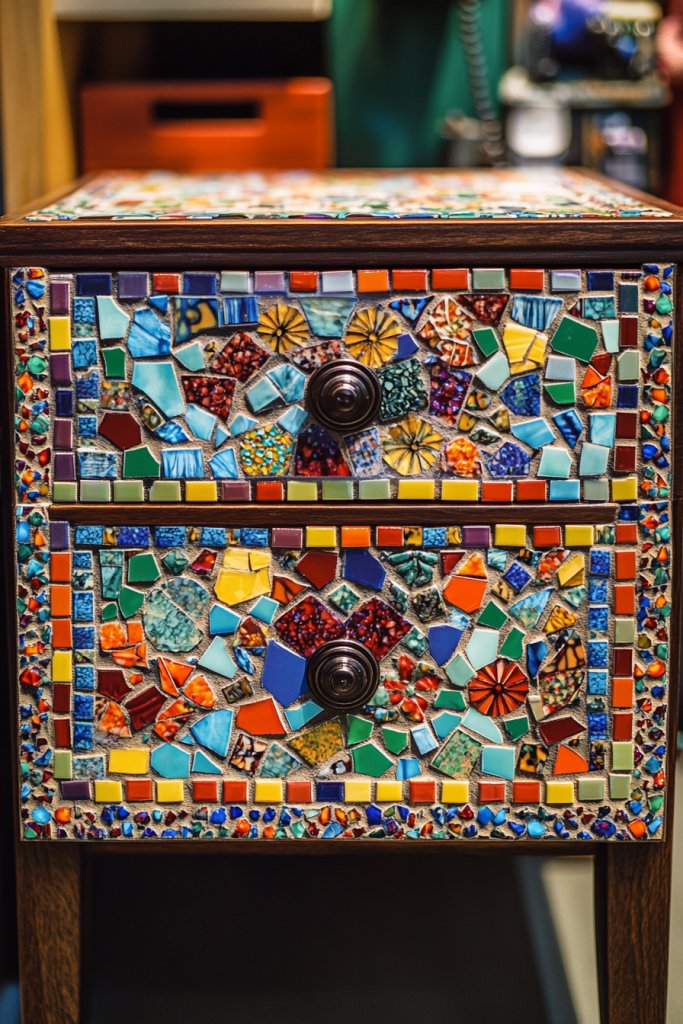
Craving that handcrafted, artistic look for your cabinets? Mosaic tile borders add intricate detail and vibrant color that turn boring drawers into eye-catching focal points. They’re perfect for DIYers who want to express creativity and add an artisanal touch. Plus, they’re surprisingly manageable with the right approach.
Envision tiny, colorful tiles arranged in a border or central pattern—think floral motifs or geometric designs. The glossy, textured surface catches light, creating a dynamic visual effect. When installed, these mosaics add a sense of craftsmanship and personality, making each drawer front a mini masterpiece. The varied colors and shapes offer endless customization possibilities.
Opt for bold, bright colors for a lively vibe or subdued palettes for elegance. Mix different tile shapes—square, hexagon, or triangle—for visual interest. Incorporate metallic or glass tiles for a luxe touch. Seasonal variations include switching color schemes or creating themed patterns like holiday motifs. Pair with simple hardware to let the mosaic shine. It suits eclectic, Mediterranean, or bohemian styles.
Start by planning your pattern and sourcing small mosaic tiles or broken pieces. Clean the surface thoroughly and apply a strong adhesive suitable for tiles. Carefully place each tile, ensuring even spacing and alignment. Use grout to fill gaps, then clean excess grout with a damp sponge. Seal with a clear, waterproof sealant for durability. Patience and precision yield the best results, but the effort pays off.
Add metallic or contrasting grout lines for extra detail. Incorporate personal symbols or initials into the mosaic design. Use different tile colors or textures to create focal points. Frame the border with decorative trim or paint for a finished look. Personal touches make your cabinets truly unique and artistic.
Mosaic borders demonstrate that artistry and DIY can go hand in hand. They show that small, detailed projects can have a big impact. Your cabinets will look handcrafted and vibrant, adding personality and charm. It’s a project that fosters pride and inspires further creative adventures—dive in and create your masterpiece!
15. Peel-and-Stick Wood Veneer for Quick Transformation
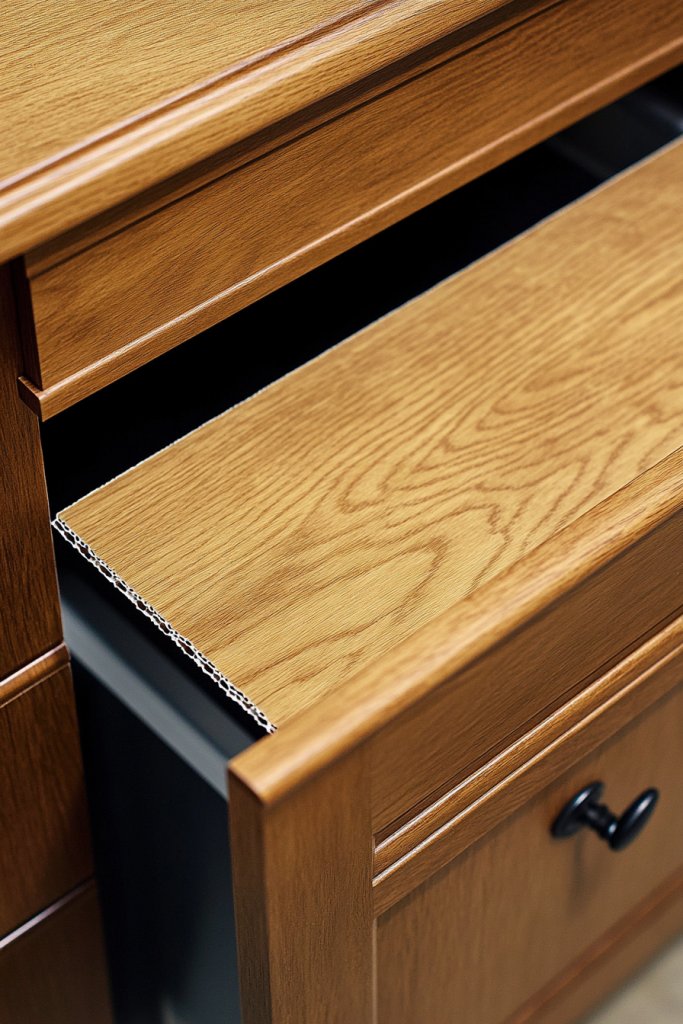
Want the look of real wood without the mess or skill? Peel-and-stick wood veneer sheets offer an easy, affordable way to upgrade your cabinets instantly. They’re perfect for DIYers who want a high-end finish with minimal effort. If you’re short on time but craving warmth and natural beauty, this is your go-to solution.
Visualize smooth, real-wood grain patterns in rich tones like walnut, oak, or cherry, applied seamlessly over your existing drawer fronts. The surface adds warmth and texture, elevating the overall aesthetic. When light hits the veneer, the natural grain is highlighted, creating a cozy, polished look. The thin sheets mold easily to contours and edges, making the transformation quick and mess-free.
Choose different wood species and finishes to match your decor. Use darker stains for a dramatic vibe or natural tones for a light, airy feel. For seasonal updates, layer with paint or decorative accents—like stenciled borders or painted handles. Pair with minimalist hardware for a modern look or vintage pulls for a classic touch. Versatile enough for various styles.
Clean surfaces thoroughly and measure carefully before cutting veneer sheets to size. Peel off backing and carefully apply, smoothing out air bubbles with a squeegee or cloth. Overlap edges slightly for a seamless appearance. Secure with a roller or pressing tool for good adhesion. Finish by sealing edges with clear caulk or paint for extra durability. It’s quick, clean, and effective.
Add contrasting painted borders or inlays for visual interest. Incorporate decorative hardware that complements the wood tone. Use staining or tinting to customize the veneer further. Personalize with engraved or painted details on the surface. The veneer acts as a neutral yet rich backdrop for your creative ideas.
Peel-and-stick veneer proves that high-end looks can be DIY-friendly. It’s a quick upgrade that boosts your confidence in tackling woodworking projects. Your cabinets will look luxurious and natural, making your home warmer and more inviting. It’s a simple step towards a more stylish, personalized space—go ahead, try it!
16. Vintage Doorknob or Hardware Accents
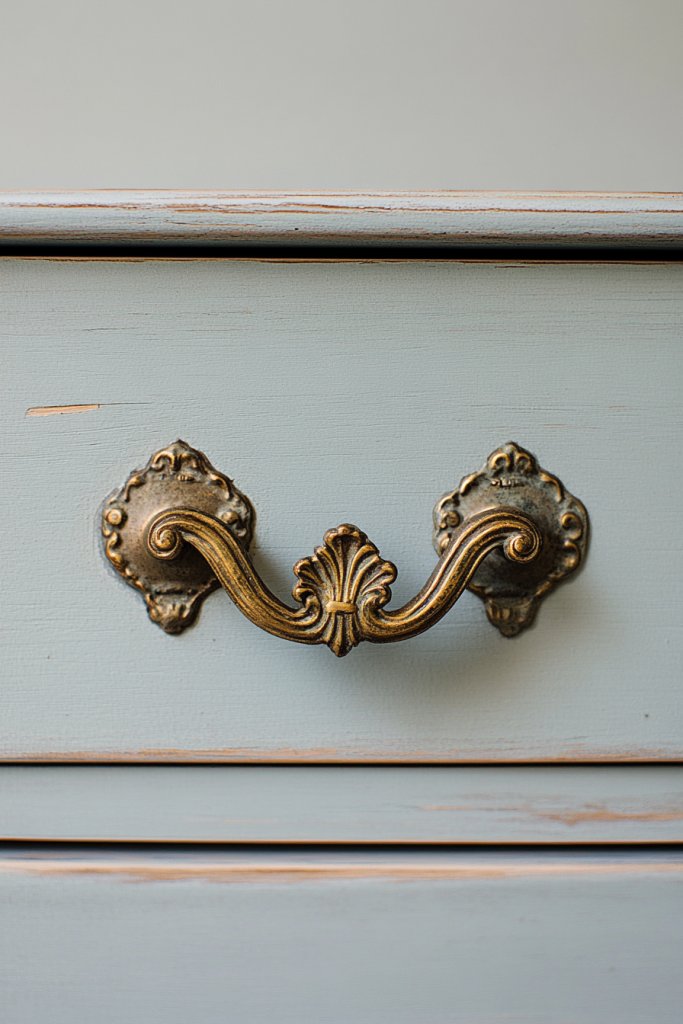
Want to add instant charm and personality to your plain cabinet drawers? Vintage or decorative hardware can completely change the look and feel. They’re a simple, cost-effective way to personalize your space and evoke nostalgia or elegance. If you love small details, this is a quick upgrade that makes a big impact.
Picture ornate brass pulls, distressed ceramic knobs, or antique crystal handles adorning your drawers. The hardware reflects light and adds a touch of luxury or vintage flair. When paired with minimalist surfaces, these accents become focal points. The variety of styles—from rustic to glam—allows you to customize according to your decor theme.
Mix vintage hardware with modern or industrial styles for eclectic charm. Use contrasting finishes—matte black with polished brass—for visual interest. Seasonal updates include switching hardware to match holiday themes or special occasions. Coordinate hardware across your space for a cohesive look or mix different styles for an eclectic vibe.
Remove existing hardware and clean the surface thoroughly. Measure screw holes carefully or drill new ones if needed. Attach the new hardware securely with screws, ensuring proper alignment. Tighten everything well to prevent loosening over time. For a more authentic vintage look, consider polishing or lightly distressing new hardware. It’s a straightforward upgrade with an immediate visual payoff.
Add decorative backplates or layered hardware for a more elaborate look. Personalize by engraving initials or symbols onto the knobs or pulls. Use themed hardware for holidays or special occasions. Combine different styles for a curated, personalized collection. Small hardware changes can dramatically upgrade your cabinetry’s style.
Hardware accents are an easy way to upgrade your cabinets with minimal effort and cost. They show that the right details can transform furniture from plain to stunning. Your space will look more polished and intentional, boosting your decorating confidence. It’s a small change that makes a big difference—time to get shopping!
17. Chalkboard or Whiteboard Frames for Practicality
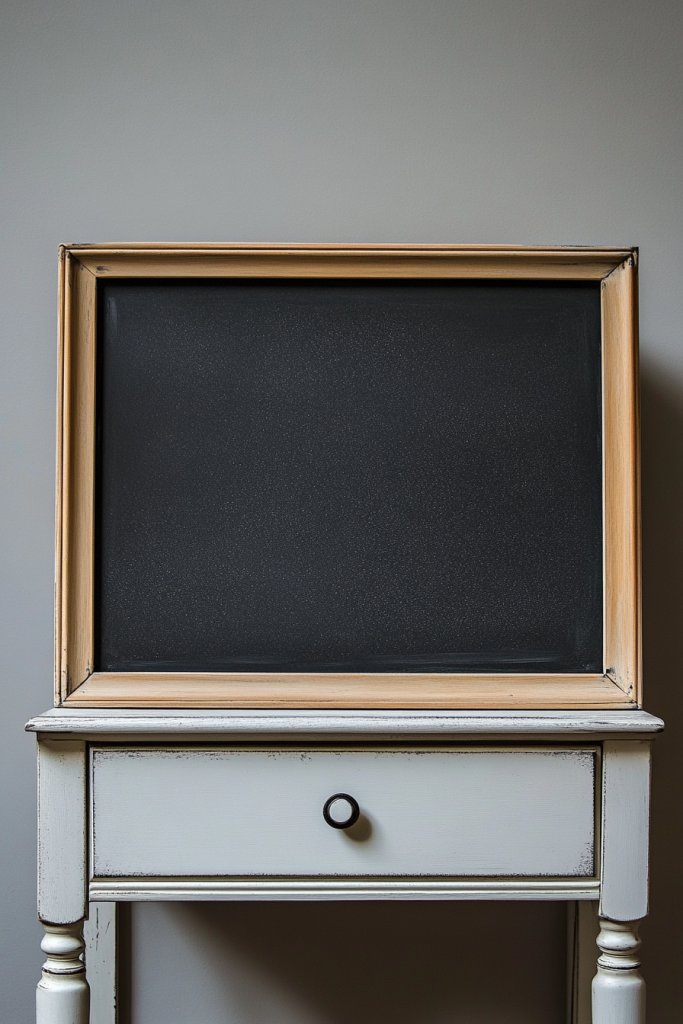
Ever wish your cabinets could do more than just store stuff? Framing drawer fronts with chalkboard or whiteboard paint turns them into functional message boards. Perfect for busy families, offices, or creative spaces, this idea combines practicality with fun. If you love organizing with a personal touch, you’ll find this project irresistible.
Imagine sleek, matte black chalkboard frames or glossy whiteboards surrounding your drawers. You can write reminders, grocery lists, or inspiring quotes directly on the surface. When not in use, the fronts look clean and modern, blending seamlessly with your decor. The writable surface invites interaction, making everyday routines more engaging.
Choose between matte, glossy, or textured finishes based on your aesthetic. Add decorative trims or painted borders to enhance the look. For seasonal updates, change the messages or add themed stickers or drawings. Pair with colorful hardware or minimalist handles for a fresh, contemporary vibe. Suitable for modern, eclectic, or playful interiors.
Prepare the surface by cleaning thoroughly and lightly sanding if needed. Apply chalkboard or whiteboard paint in thin, even coats, following manufacturer instructions. Let dry and cure completely before writing on it. Use high-quality chalks or markers for clean lines and easy erasing. Seal the edges with painter’s tape or trim for a polished finish. Regular cleaning keeps it looking sharp and functional.
Decorate the borders with colorful or patterned trims for added flair. Personalize with stenciled designs or initials. Incorporate small hooks or clips nearby for keys or notes. Change messages seasonally or for special occasions to keep it fresh. The result is a functional, fun, and highly personalized cabinet front.
Framed chalkboard and whiteboard surfaces turn utilitarian furniture into interactive art. They’re simple, customizable, and practical—perfect for any DIYer. Your cabinets will be more than just storage; they’ll be conversation starters that improve daily life. Ready to add a playful, useful touch? Let’s do it!
18. Layered Paint Techniques with Textured Finishes
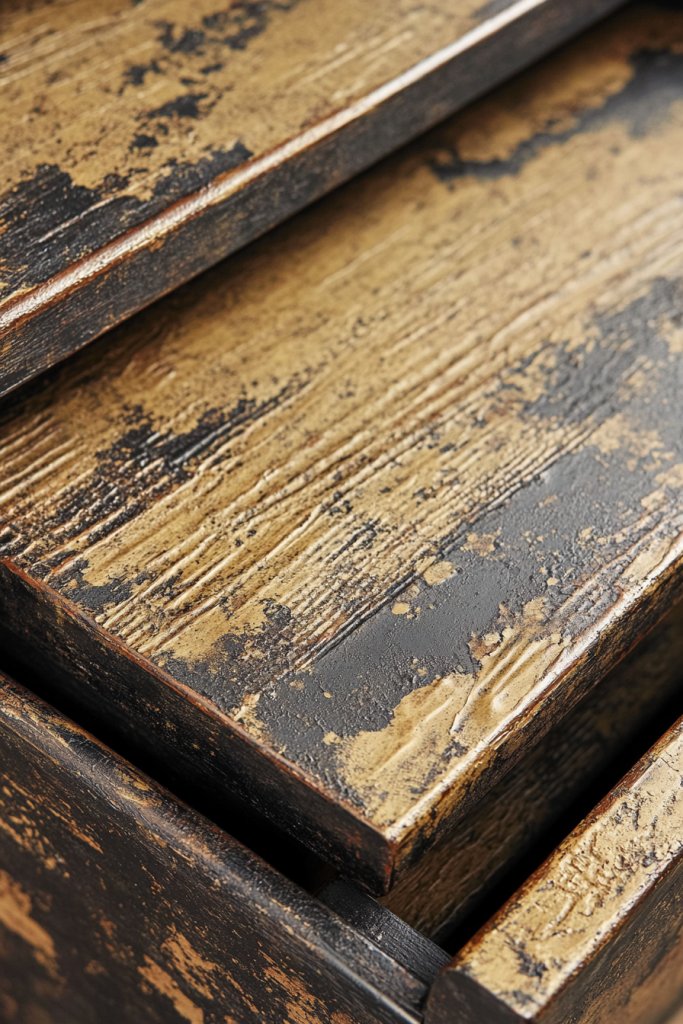
Looking to add a rich, artistic look to your cabinets? Layered paint techniques and textured finishes create depth and visual interest that make your furniture stand out. They’re perfect for adding a handcrafted feel or a touch of artistic flair. If you love experimenting with paint, this approach invites endless creativity.
Picture a surface with multiple layers of color, dry brushing, sponging, or stippling creating a complex, textured effect. The surface may have subtle ridges, cracks, or brush strokes that catch light and shadow. When finished, it looks like a vintage or artistic piece, full of character. The textures invite touch and curiosity, making your cabinets a focal point.
Use contrasting colors or shades within the same color family for subtle or bold effects. Incorporate metallics or glazes to add shimmer or richness. For seasonal updates, layer lighter or darker shades, or add distressing for a shabby chic look. Pair with minimal hardware to keep the focus on the textured surface. It suits rustic, vintage, or eclectic styles.
Start by applying a base coat and letting it dry thoroughly. Use dry brushing, sponging, or stippling techniques to add subsequent layers, blending as you go. Experiment on scrap wood to perfect your technique before working on your actual drawer fronts. Seal with a matte or satin finish to protect the textured layers. Multiple coats and careful blending create a rich, layered look.
Add metallic accents or crackle effects for added visual interest. Use stencils or freehand designs over the textured background. Incorporate personal symbols or motifs that reflect your style. Consider adding a protective topcoat to preserve the layered appearance. It’s a highly customizable method that showcases your artistic side.
Layered paint techniques prove that furniture can be both functional and artistic. They foster confidence in your painting skills and encourage experimentation. Your cabinets will exude depth and personality, elevating your whole space. It’s a creative journey worth exploring—ready to add texture and artistry?
19. Custom Stamped or Embossed Patterns for Unique Texture
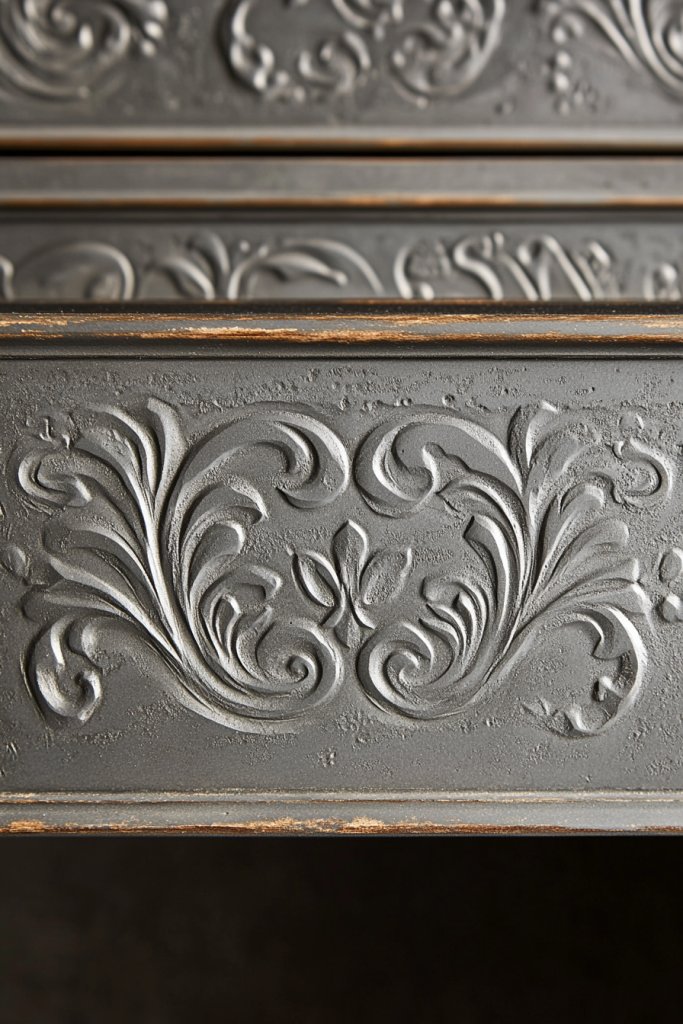
Want your cabinets to stand out with a truly one-of-a-kind look? Custom stamped or embossed patterns add tactile and visual interest that’s impossible to replicate with paint alone. They’re perfect for making your furniture reflect your personal style. If you love detailed craftsmanship, this idea will inspire you to create something special.
Imagine intricate floral, geometric, or abstract motifs pressed into the surface of your drawer fronts. The embossed patterns add a tactile dimension that invites touch, while the stamped designs create a layered, artistic effect. When finished, your cabinets look handcrafted and bespoke, like museum-quality furniture. The textured surface catches light differently, giving depth and character.
Use custom stamps or create your own designs with carving tools or molds. Incorporate motifs that reflect your personality or decor theme. Paint or stain over the embossed patterns for contrast, or leave the surface natural for a subtle effect. Seasonal or thematic updates include changing colors or adding additional stamping details. It suits vintage, boho, or eclectic aesthetics.
Start by preparing the surface, ensuring it’s clean and smooth. Use rubber stamps or carving tools to create patterns, applying pressure evenly. For embossed effects, apply a thick layer of modeling paste or a similar medium before stamping. Once dry, paint or stain the surface to highlight the patterns. Seal with a clear protective finish to preserve the detailed work. Patience and precision are key.
Add metallic or contrasting paint accents to emphasize the embossed designs. Incorporate initials, symbols, or motifs that hold personal meaning. Use different colors or finishes for layered effects. Frame or border the stamped areas with decorative trims or paint for a finished look. Personalization makes each piece uniquely yours.
Stamped or embossed patterns demonstrate that detailed craftsmanship is achievable at home. They add texture and interest, making your cabinets true conversation starters. Your confidence in DIY decorating will grow as you see your artistic vision come alive. It’s a creative process that rewards patience and precision—dare to craft something special.
Conclusion
With a wide range of DIY drawer front ideas, you have all the inspiration you need to personalize your cabinets and elevate your home decor. Don’t hesitate to try out these creative projects and add your own unique touch to your space. Remember, the best home improvements come from your own hands—so dive in and start transforming your drawers today!
Leave a Reply