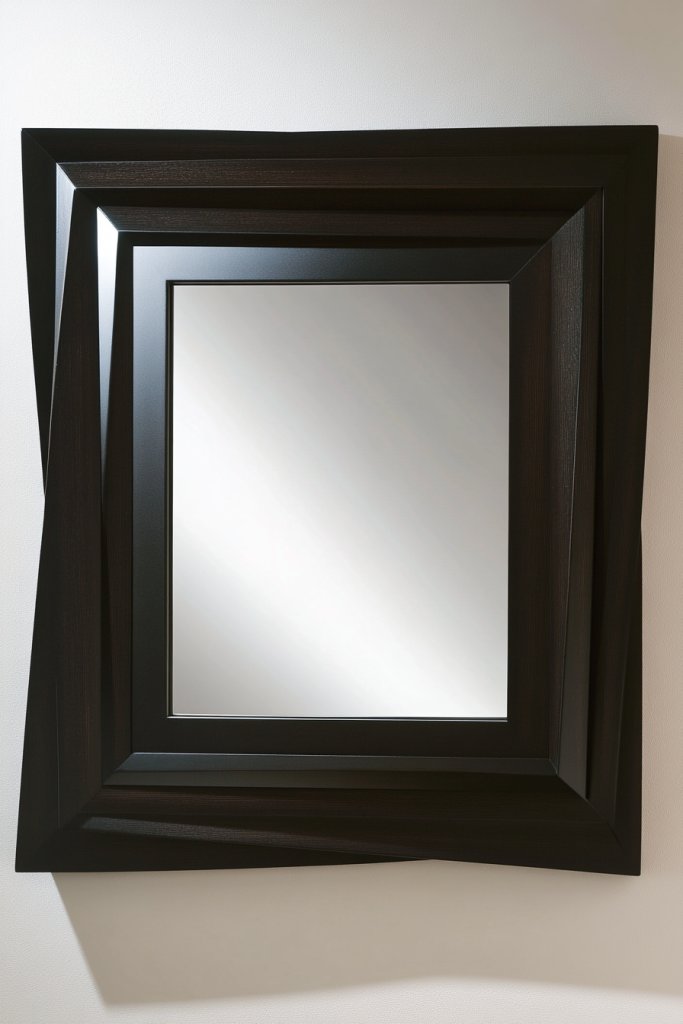
21 Decorated Mirror Ideas for Reflective Style
I have been, or can be if you click on a link and make a purchase, compensated via a cash payment, gift, or something else of value for writing this post. As an Amazon Associate, I earn from qualifying purchases. Please read my full Affiliate Disclosure for more information.
A beautifully decorated mirror can instantly transform the vibe of any room, adding both style and a touch of personality. Decorated mirrors are incredibly popular because they serve as functional pieces that double as eye-catching art, making them a versatile decor choice for any space.
In this article, you’ll uncover a variety of creative ideas to elevate your mirrors—from ornate frames to DIY embellishments—that will inspire you to personalize your home. Get ready to explore different styles, materials, and techniques that can turn a simple mirror into a stunning focal point and reflect your unique taste.
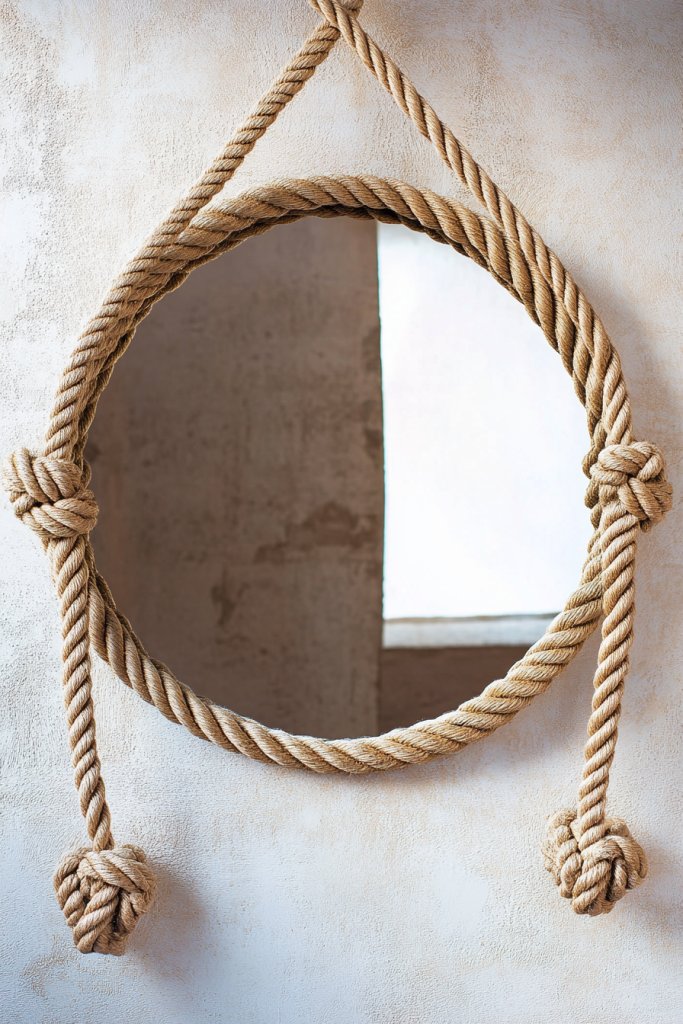
1. Rustic Wooden Frame with Rope Accents for Cozy Charm
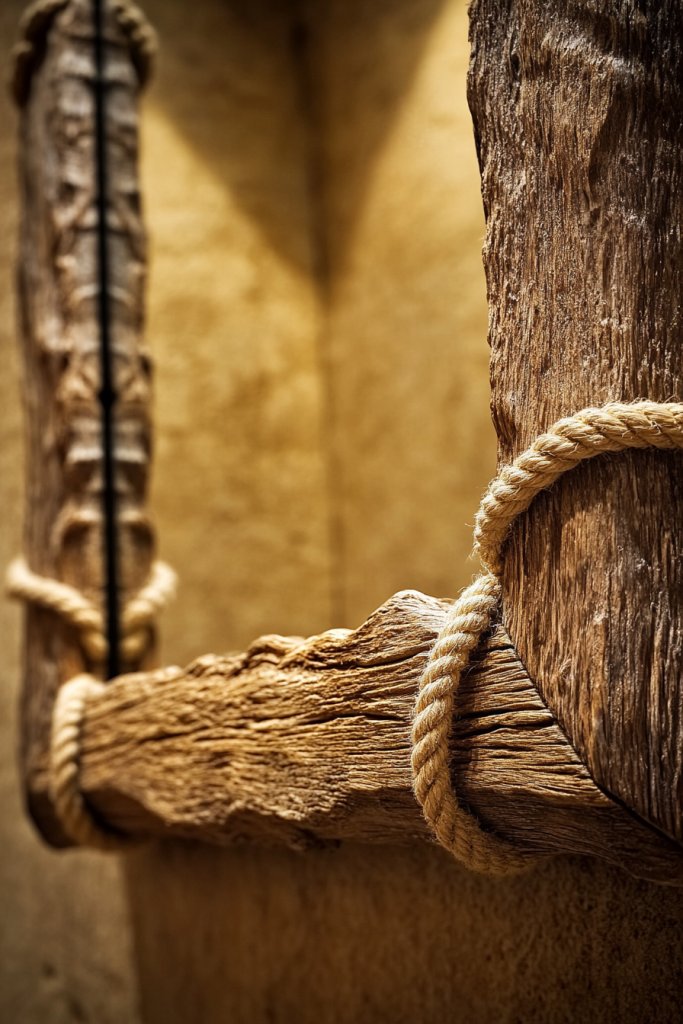
Ever wish your mirror could feel like a warm hug? Sometimes, standard frames just don’t cut it when you want your space to radiate comfort. A rustic wooden frame with rope accents offers that cozy, inviting vibe. It’s perfect if you crave a touch of countryside charm or just want something different from shiny, modern borders. This idea hits that sweet spot between rustic and stylish, making your mirror a statement piece.
Picture a sturdy reclaimed wood frame with a natural, slightly rough texture, complemented by thick braided ropes running along the edges. The ropes add a tactile element, inviting you to run your fingers over them while you admire your reflection. Think warm honey tones paired with soft beige or cream ropes—creating a layered, textured look. Light filters through nearby windows, casting gentle shadows that emphasize the natural materials. This combo creates a cozy nook that feels both homey and crafted.
You can customize this look with darker stains for a more vintage vibe, or paint the wood for a cleaner finish. Incorporate different rope colors—perhaps a deep navy or vibrant red—to match your room’s palette. For small spaces, a compact frame with delicate rope accents works well; in larger rooms, go bold with oversized, chunky rope details. Seasonal tweaks like adding a plaid fabric or a soft throw blanket nearby enhance the cozy feel. This style adapts easily to farmhouse, cottage, or even boho themes.
Start by sourcing reclaimed wood or sturdy craft plywood, then cut it to your desired size. Sand the edges lightly for a smooth finish, unless you prefer a more rugged look. Attach the rope accents using strong adhesive or small finishing nails, ensuring they’re taut but not overstretched. For added durability, seal the wood with a clear matte finish. Hang your mirror using sturdy hooks placed into the wooden frame’s back. Optional: add a small decorative nail or metallic accent for extra charm. This project requires basic carpentry skills, but it’s straightforward enough for DIYers.
Personalize by staining or painting the wood in shades that match your decor, from weathered gray to rich mahogany. Embellish the rope with decorative tassels or charms for a whimsical touch. For an extra cozy vibe, place a soft, chunky-knit throw or a plush cushion nearby. You can also carve initials or meaningful symbols into the wood for a bespoke feel. The goal is to make your mirror uniquely yours, blending rustic warmth with your personal style.
This rustic wooden frame with rope accents can transform a plain mirror into a charming focal point. It’s perfect for creating a cozy retreat or a country-inspired bathroom. Plus, it’s a project that you can tailor perfectly to your space and skill level. Once finished, you’ll feel proud knowing you crafted something beautiful and functional. Ready to bring a touch of rustic charm into your home?
2. Gold Leaf Detailing for Glamorous Elegance
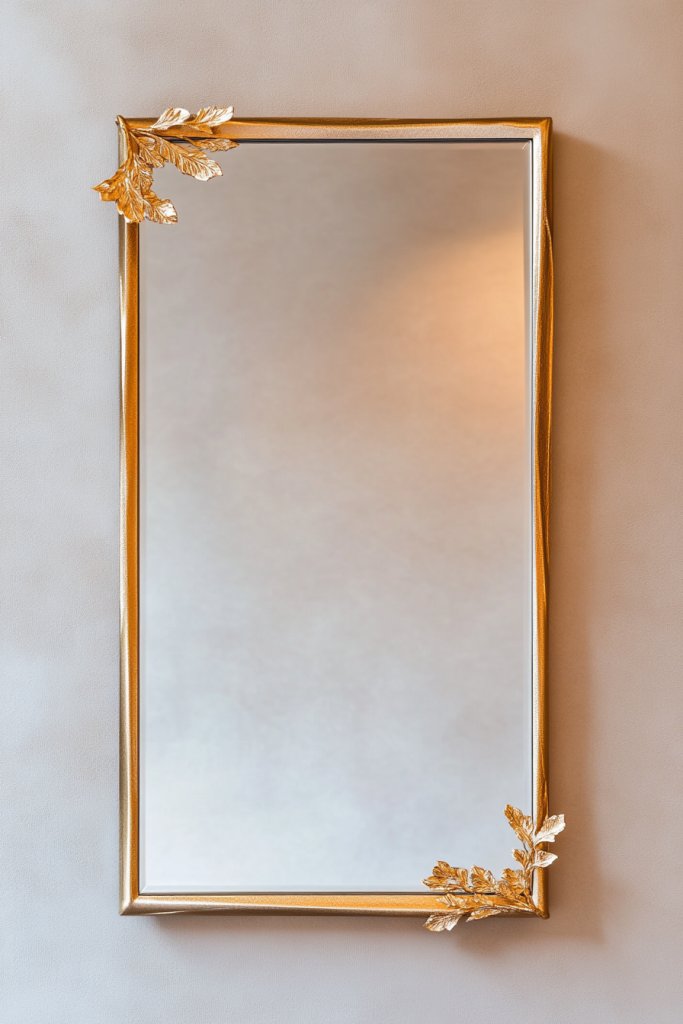
Ever dreamed of adding a touch of luxury to your space without breaking the bank? Gold leaf detailing can instantly elevate a plain mirror into a glamorous statement piece. It’s perfect if you want your decor to feel lavish and sophisticated, yet still approachable. Gold accents catch the light beautifully, creating an aura of elegance. This idea makes your mirror a true showstopper, perfect for dressing rooms or luxe bathrooms.
Imagine a sleek, matte black or crisp white frame with delicate gold leaf accents applied along the edges or intricate carvings. The gold gleams subtly in the light, contrasting with the matte background for a high-end effect. The textured gold surface catches reflections, adding depth and richness. Think of a mirror that commands attention, with shimmering details that draw the eye. The overall aesthetic is timeless, blending classic opulence with modern minimalism.
You can opt for a minimalist approach with just a thin line of gold leaf along the border, or go all out with ornate, baroque-style carvings highlighted in gold. Combining gold leaf with contrasting colors like navy or emerald creates a regal vibe. Seasonal adaptations include adding subtle touches of metallic paint for holiday glam or pairing with velvet and silk textiles for a sumptuous look. This concept fits well in vintage, modern glam, or eclectic interiors.
Start with a clean, dry surface and choose a high-quality gold leaf kit suitable for DIY projects. Use a soft brush to apply adhesive in the desired areas, then carefully lay down the gold leaf sheets, pressing gently with a soft cloth. Seal the gold with a protective varnish to prevent tarnishing and ensure longevity. For intricate details, use fine-tipped brushes or stencil templates. Attach the finished frame to your mirror with a strong adhesive or mounting brackets, depending on the weight.
Add a personalized touch by customizing the gold leaf with engraved initials or symbols. Pair the mirror with luxe textiles like silk curtains or velvet cushions for a complete glam look. Consider using different metallic tones—rose gold or platinum—to match your existing decor. You could also incorporate subtle mosaic patterns or geometric designs with metallic paints for a modern twist. The goal is to craft a mirror that radiates sophistication.
Gold leaf detailing can turn an ordinary mirror into a piece of art that defines a space. It’s a simple upgrade that offers a high-impact result, perfect for elevating your decor. Once you see the shimmering effect, you’ll be inspired to explore more luxe DIY projects. This style suits anyone aiming for a chic, polished vibe. Get ready to bask in the glow of your own glamorous creation.
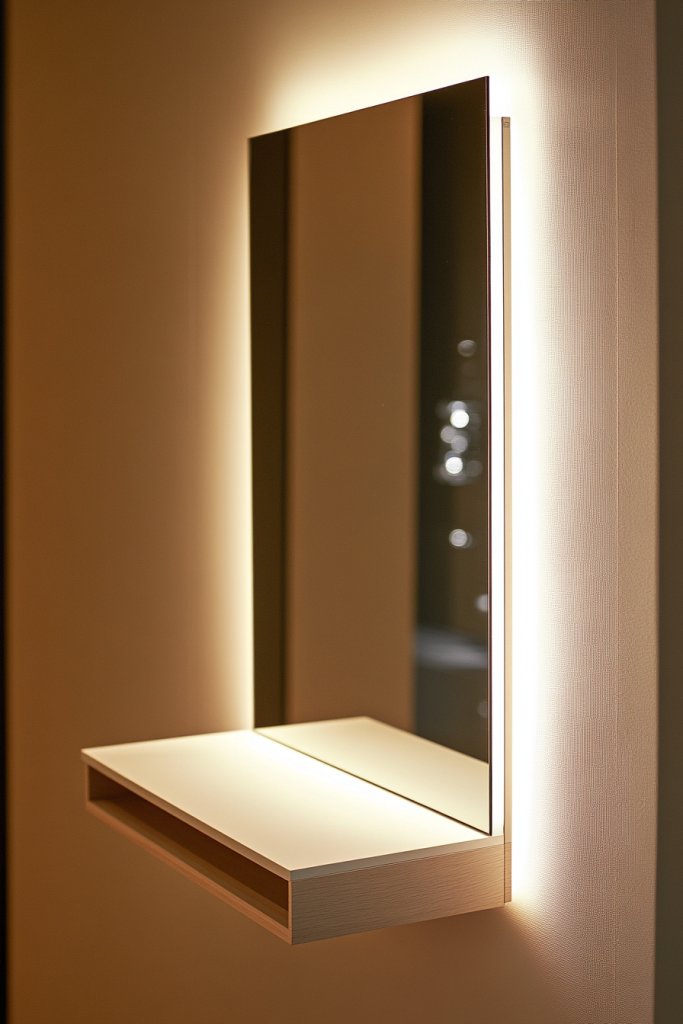
3. Floating Mirror with LED Backlighting
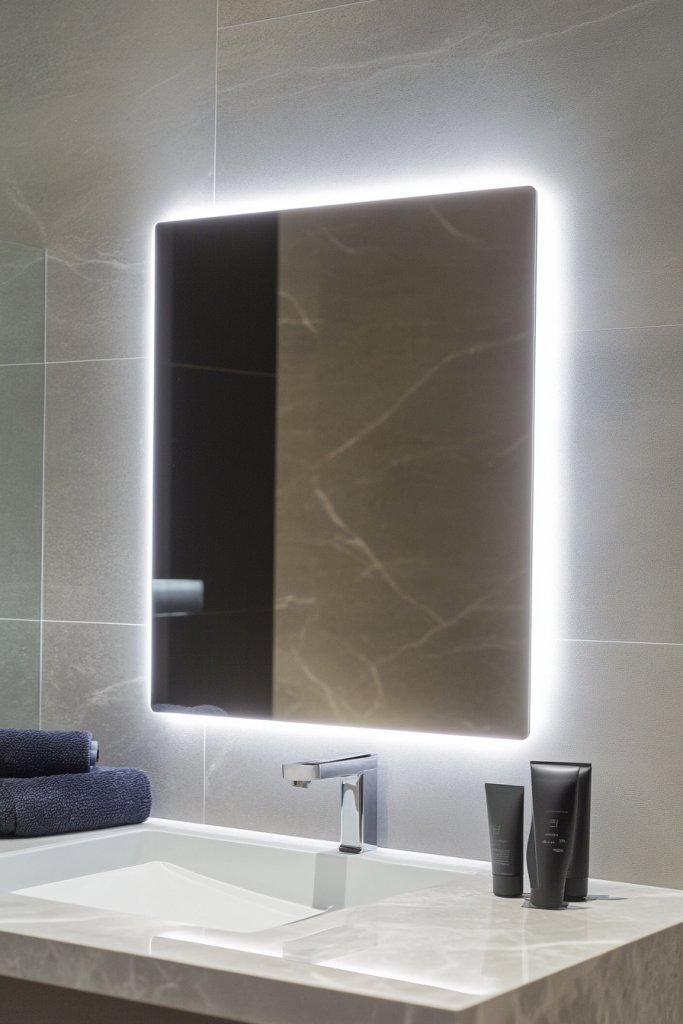
Tired of dull, uninspired lighting that makes your reflection look flat? A floating mirror with LED backlighting solves that problem by adding a luminous glow that enhances your features and mood. It’s perfect if you love modern aesthetics and want your space to feel brighter and more inviting. Plus, the sleek, frameless design makes your room appear larger and more open. This setup is a game-changer for makeup, skincare, or just feeling fabulous.
Visualize a large, seamless glass mirror seemingly floating on the wall, with hidden LED strips tucked behind the edges. The soft, warm or cool light emanates evenly, creating a halo effect that highlights the mirror’s contours. The glow reflects softly onto surrounding walls, casting a gentle ambiance. The minimalist style complements contemporary decor, with the light adding a high-tech, futuristic feel. It’s like having your own personal spotlight that never distracts but always enhances.
Choose LED lights with adjustable brightness and color temperature for different moods or times of day. For smaller spaces, a compact frameless mirror with backlighting works well; larger bathrooms can feature expansive versions with multiple light zones. You can also combine this with textured wall finishes like matte paint or textured wallpaper to create contrast. Seasonal options include adding dimming controls for cozy winter mornings or bright summer mornings. This style adapts easily to modern, minimalist, or even industrial interiors.
Begin by selecting a sturdy, frameless mirror of your preferred size. Install discreet mounting hardware on the wall, ensuring it’s level. Attach LED strips behind the mirror’s edges using adhesive backing, then connect the strips to a power source with a dimmer switch or remote control. Conceal wiring within the wall or behind a decorative trim for a clean look. Test the lighting to ensure even illumination without hotspots. For safety, use LED strips designed for indoor, damp locations, especially in bathrooms.
Customize by choosing different light colors, from soft white to vibrant hues, to match your decor or mood. Mount small shelves or hooks nearby for essentials like skincare tools or jewelry, maintaining the sleek look. Add a smart control app for voice-activated lighting adjustments. For a sophisticated touch, frame the mirror with a slim metallic or wooden border that complements the backlighting. This setup makes your space feel both high-tech and personalized.
A floating mirror with LED backlighting elevates everyday routines into a luxury experience. It’s a practical upgrade that adds both style and function, making your reflection pop. Once installed, you’ll feel more confident tackling makeup or grooming with perfect lighting. Plus, it’s a futuristic touch that impresses guests and boosts your interior’s wow factor. Ready to illuminate your space?
4. Mirrored Tile Border for a Geometric Touch
Looking to add some visual punch to a plain mirror? A mirrored tile border introduces a striking geometric element that transforms dull into dynamic. It’s a clever way to create depth and movement without a full overhaul. Perfect if you love modern design with a hint of sparkle, this idea instantly elevates your space. Plus, it’s a fun DIY project that pays off big in style.
Picture a large mirror encircled by small, shiny mirrored tiles arranged in a precise geometric pattern—think hexagons, squares, or triangles. The reflective surfaces catch and bounce light, creating a dazzling frame that seems to extend the mirror’s size visually. The pattern adds movement and rhythm, making the mirror a focal point. Light reflects off the tiles, casting tiny flashes across the room, adding a lively, energetic vibe. This setup works beautifully in modern, eclectic, or art deco interiors.
Use uniform tiles for a sleek, minimalist look, or mix different sizes and shapes for a more eclectic vibe. Metallic or colored mirrored tiles can add extra flair, matching your room’s color scheme. In small spaces, a narrow border with tight tile patterns maximizes impact without overwhelming. Seasonal tweaks could include adding a few decorative elements like LED accents or textured wall paint. This pattern is highly adaptable, fitting both bold statement walls and subtle accents.
Begin by measuring your mirror’s perimeter and planning your tile layout. Use painter’s tape or a stencil to mark the pattern for accuracy. Clean the mirror surface thoroughly and apply a strong, clear adhesive suitable for glass and tile. Carefully press each mirrored tile into place, maintaining consistent spacing. Once the adhesive sets, seal the edges with a clear grout or silicone for durability. Ensure the tiles are flush and level, then let everything cure before hanging or using.
Create a unique look by choosing tiles with different shapes or finishes—like matte or high-gloss. Incorporate subtle LED strip lighting behind the border for a backlit effect. For festive seasons, add small decorative elements within the pattern or around the border for a personalized touch. Pair with geometric or textured wall coverings that echo the tile pattern. The goal is a seamless, eye-catching frame that elevates your mirror.
A mirrored tile border turns a simple mirror into a modern art piece. It’s a creative way to add depth and sparkle without major renovations. Once completed, you’ll have a custom feature that’s both functional and stylish. This project proves that small details make a big difference in home decor. Ready to craft your own geometric masterpiece?
5. Vintage Ornate Frame with Distressed Finish
Ever wish your mirror had a bit more character? A vintage ornate frame with a distressed finish brings timeless elegance with a touch of shabby chic charm. It’s perfect for adding a romantic or antique vibe to your space. This look makes your mirror feel like a treasured heirloom rather than a mass-produced piece. If you love a blend of elegance and imperfection, this is your style.
Imagine an elaborately carved frame with intricate scrolls and floral motifs, painted in a soft pastel or muted metallic hue. The distressed finish reveals hints of the underlying material, adding depth and history. It looks like a piece that’s traveled through time, with subtle cracks and chipped paint that tell a story. The overall effect is charmingly imperfect, creating a warm, inviting focal point in your room. Light bounces softly off the textured surface, enhancing the vintage feel.
Choose a frame with gilded accents for a regal feel, or opt for a matte, chalk-painted finish for a more rustic look. Pair it with vintage-inspired decor or modern pieces for eclectic contrast. Seasonal updates include swapping out accessories like lace or soft textiles to change the mood. You can also customize the color—think faded teal, blush pink, or antique gold—to match your aesthetic. This style adapts well in shabby chic, cottage, or traditional interiors.
Start with a sturdy, vintage-style frame—either repurposed or handcrafted. Sand lightly to enhance the distressed look, then apply a chalk or milk paint finish. Use a small brush to add intentional chips or cracks for authenticity. Attach the mirror to the back of the frame with heavy-duty adhesive or brackets. Finish with a clear matte sealer to protect the paint and texture. Hang your masterpiece securely with appropriate wall anchors, ensuring it’s level and stable.
Add personalized touches by engraving initials or dates into the frame’s carved details. Incorporate soft textiles like lace or velvet ribbons for a feminine touch. Pair with vintage-inspired lighting or soft-colored textiles to complete the look. You might also distress a newly purchased frame yourself for a truly bespoke finish. The aim is to evoke nostalgia while keeping it fresh and unique.
A vintage ornate frame with a distressed finish instantly adds charm and character to any room. It’s a statement piece that combines history with style, making your space feel warm and lived-in. Plus, creating your own distressed finish allows for a personal touch and a sense of accomplishment. Once you see it hung, you’ll realize how much personality it adds to your decor. Ready to craft your own vintage treasure?
6. Frame Made from Repurposed Picture Frames for Eclectic Style
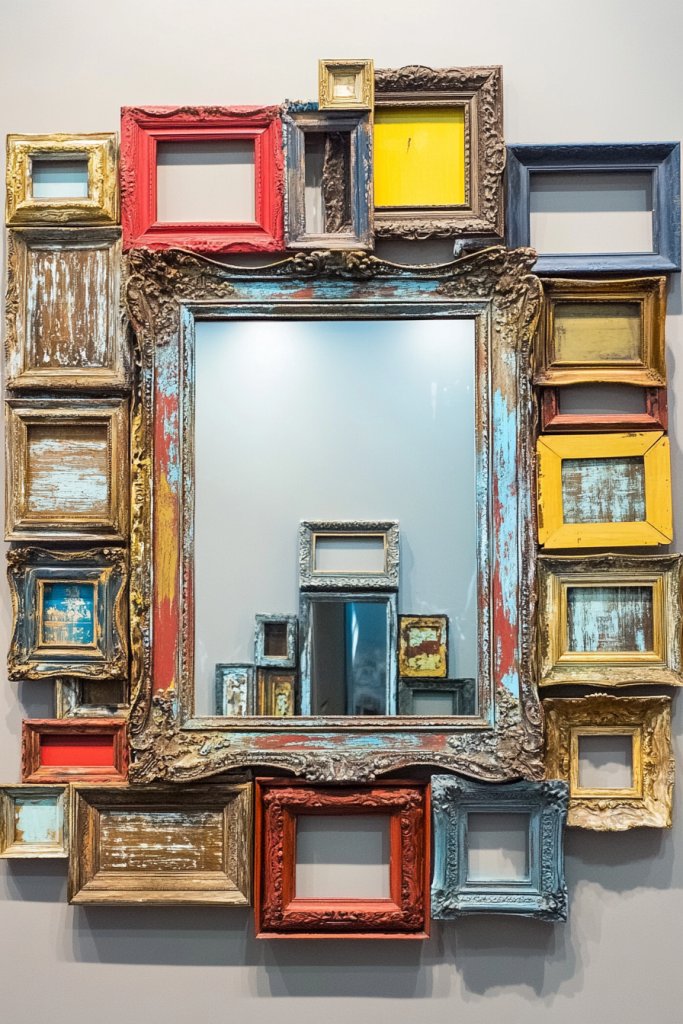
Tired of boring, uniform mirrors that lack personality? Creating a frame from mismatched or vintage picture frames offers an eclectic, artsy vibe. It’s a fun and budget-friendly way to showcase your collection of old frames or thrift finds. This layered look adds depth, character, and a hint of nostalgia. If you love mixing styles and eras, this idea turns your mirror into a curated gallery.
Visualize a large mirror surrounded by a collage of various picture frames—some ornate, some simple, some painted in bold colors. The frames overlap and intertwine, creating a lively, textured border that draws attention. The different shapes and finishes reflect light in unique ways, giving your space an energetic, curated feel. It’s like a window into your personality, showcasing a mix of memories and styles all in one place. The overall effect is playful yet sophisticated.
Mix vintage with modern frames for a contemporary eclectic look. Use bold colors or patterns on some frames to make certain areas pop, or keep everything neutral for a more cohesive feel. You can also vary the frame sizes—large central frames with smaller accents around. Seasonal updates include swapping out frames or adding decorative elements like fabric or ribbons. This approach suits casual, boho, or artistic interiors.
Gather your collection of picture frames and decide on a layout before attaching anything. Use painter’s tape or string to map out the design on the wall. Secure each frame with strong hooks or brackets, ensuring they’re level and evenly spaced. For larger or heavier frames, use wall anchors or mounting hardware designed for weight. Arrange the frames with some space between for a dynamic look, or layer them for more impact. Finally, insert the mirror into the central or most prominent frame.
Personalize by painting some frames in your favorite colors or adding decorative accents like washi tape or fabric linings. Mix in small mementos or photos behind certain frames for a personal touch. Incorporate a variety of textures—metal, wood, painted finishes—to keep the look interesting. You can also add string lights or small plants in some frames for a lively, personalized display. This DIY project celebrates your unique style.
A collage of repurposed picture frames turns a simple mirror into a distinctive art piece. It’s a creative, budget-friendly way to infuse your space with personality. Plus, it’s flexible—change the layout whenever you feel like a refresh. This approach proves that mismatched isn’t messy, it’s stylish. Ready to assemble your own eclectic masterpiece?
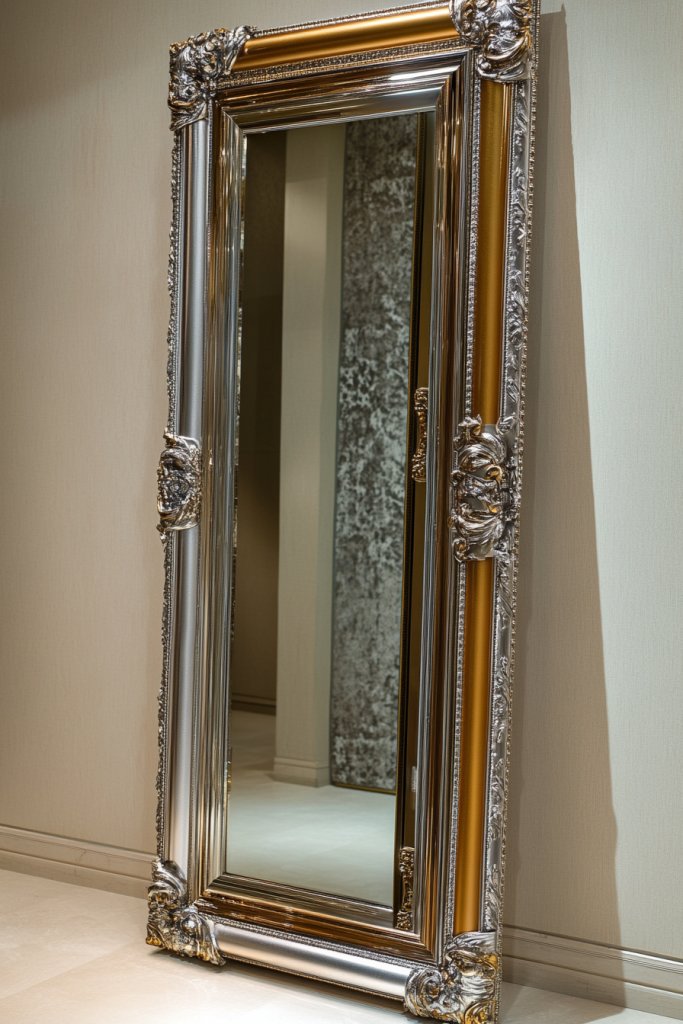
7. Beveled Edge Mirror with Intricate Carved Frame
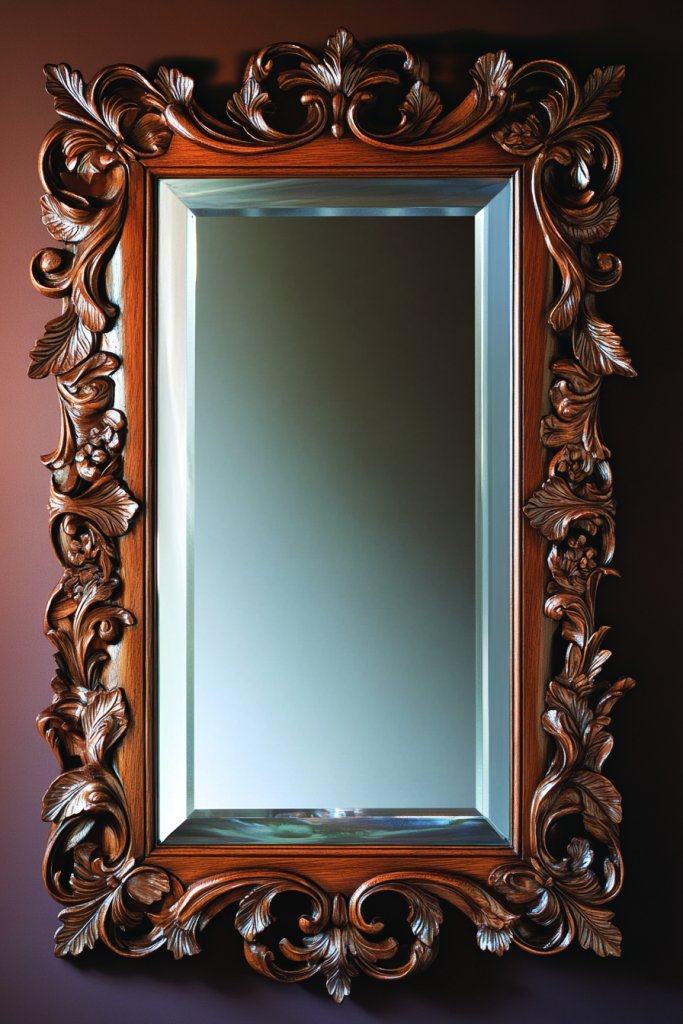
Ever want a mirror that exudes timeless elegance and detailed craftsmanship? A beveled edge mirror with an intricate carved frame offers that luxurious, sophisticated vibe. It’s ideal if you’re aiming for a classic or vintage look that feels refined. This style adds depth and dimension, elevating your decor from simple to stunning. If you love ornate details, this is your go-to upgrade.
Imagine a large mirror with beveled glass edges that catch light from every angle, surrounded by a deeply carved frame featuring floral, scroll, or geometric motifs. The detailed carvings add texture and shadow, emphasizing craftsmanship. The beveled edges reflect light beautifully, creating a subtle prism effect. The overall aesthetic is regal and intricate, perfect for traditional or Victorian-inspired interiors. The mirror becomes a centerpiece that commands attention and admiration.
Choose a frame with gold or silver leaf accents for a regal look, or opt for a distressed finish for a shabby chic vibe. Pair it with antique furniture or ornate lighting fixtures for a cohesive style. For a more modern twist, select a frame with geometric or abstract carvings painted in bold colors. Seasonal updates could include adding velvet drapes or silk accessories nearby. This style adapts well to formal living rooms, grand bathrooms, or boutique bedrooms.
Select a high-quality beveled mirror and a detailed carved frame—either vintage or custom-made. Ensure the frame’s dimensions match your mirror, then carefully attach the mirror to the back of the frame with appropriate adhesive or brackets. Clean the beveled edges and frame thoroughly before assembly. Mount the finished piece securely on your wall with heavy-duty anchors, ensuring it’s perfectly level. You may want a professional to help with very large or heavy pieces for safety.
Add a personalized touch by engraving a quote or initials into the frame’s carved surface. Complement the ornate frame with luxurious textiles like velvet or silk for nearby decor. Incorporate matching fixtures such as vintage chandeliers or brass hardware to highlight the classic feel. For a modern twist, consider painting the frame in bold, contemporary colors—think matte black or metallic shades. The goal is a timeless yet personalized masterpiece.
A beveled, carved frame elevates your mirror into a work of art, perfect for creating a luxurious ambiance. It’s a statement of craftsmanship and style that instantly upgrades any space. Once hung, it exudes confidence and elegance, inspiring you to curate more refined decor. It’s proof that details matter and craftsmanship endures. Ready to add a touch of regal sophistication?
8. Mirror with Embedded Decorative Hardware for Industrial Chic
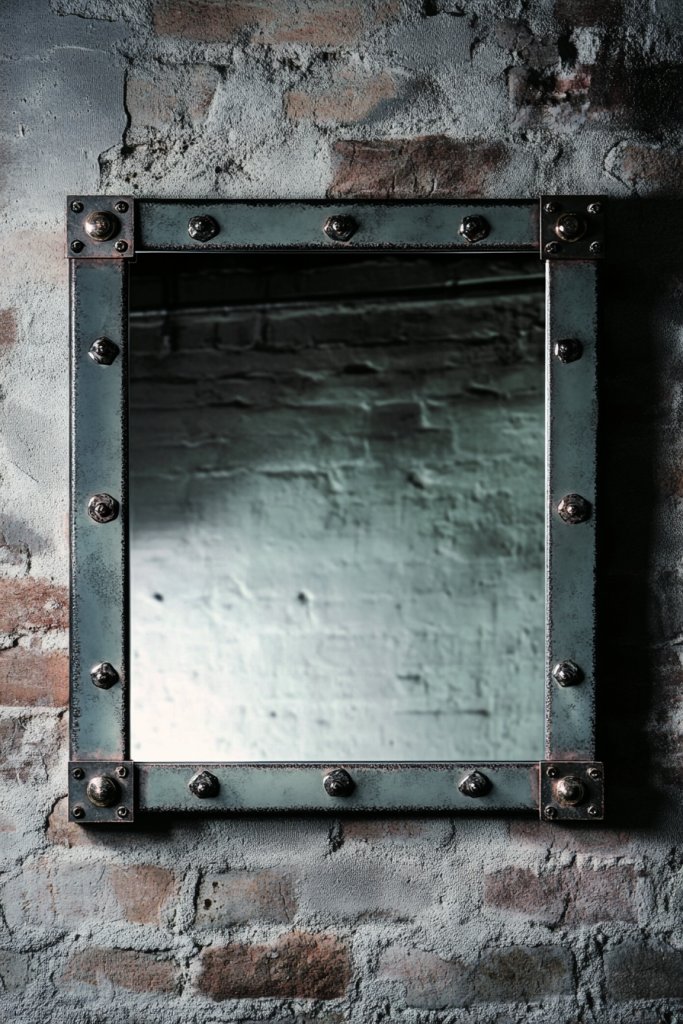
Craving a bold, edgy look that stands out in your space? A mirror with embedded decorative hardware delivers that industrial-chic vibe effortlessly. It’s perfect if you want a raw, unfinished feel that hints at factory or loft aesthetics. This style makes a statement while remaining versatile enough to blend with modern, rustic, or vintage decor. If you love metal accents, this idea is just what you need.
Visualize a sleek, frameless mirror with metal bolts, studs, or rivets embedded along the edges or corners. The hardware appears as if it’s part of the mirror’s structure, adding texture and visual interest. The metal finishes—antique brass, matte black, or brushed steel—contrast beautifully with reflective glass. The overall effect is rugged yet refined, creating an eye-catching focal point. The hardware’s texture catches light, adding subtle sparkle and contrast.
Use different hardware styles—large, industrial bolts for a bold look, or small rivets for subtle detail. Combine with other metal accents like pipe shelving or metal light fixtures for a cohesive theme. For a softer touch, incorporate wood elements with exposed metal hardware. Seasonal variations include adding warm lighting or textured textiles to soften the industrial edge. This style suits open-plan lofts, modern apartments, or rustic studios.
Choose a large, frameless mirror and plan where to embed hardware. Drill small holes or insert metal brackets at strategic points, then attach decorative bolts or studs using strong fasteners. Ensure they’re evenly spaced for a balanced appearance. Seal the hardware with rust-proof coating if needed. Mount the mirror securely on the wall with appropriate anchors, making sure it’s level. This project requires basic metalworking tools and some patience for precise placement.
Personalize by choosing hardware in different finishes or shapes—like gears or nuts—for added character. Pair with reclaimed wood or concrete furniture to reinforce the industrial aesthetic. Incorporate LED strip lighting behind or around the mirror for a modern glow. Add some vintage or distressed accessories nearby to balance the rugged hardware with softer textures. This look is all about mixing raw materials with refined design.
A mirror with embedded hardware gives your space an unmistakable industrial charm. It’s a bold statement that shows off your style and DIY skills. Once installed, it becomes a conversation starter and a reflection of your personality. This project proves that with a little creativity, hardware can be both functional and decorative. Ready to bring some factory flair into your home?
9. Round Mirror with Decorative Chain Frame

Ever wanted a mirror that feels both playful and modern? A round mirror framed with decorative chains or links offers a unique, edgy twist on traditional designs. It’s perfect if you love industrial, boho, or eclectic styles. This idea adds movement and texture, making your mirror a lively focal point. Plus, it’s a simple DIY project that adds big visual impact.
Picture a sleek, circular mirror encased in a border of interlinked metal chains, hanging freely from the wall. The chains can be matte black, antique brass, or silver, depending on your taste. They drape loosely or are tightly linked, creating a dynamic frame that extends beyond the mirror’s edge. Light reflects off the shiny metal links, creating subtle glints. The overall look is bold yet balanced, bringing a touch of industrial chic or bohemian flair.
Use thick, chunky chains for a statement look, or delicate links for a more refined style. Layer different chain types or finishes for added depth. Pair with other metal accents, such as sconces or shelving, to reinforce the theme. Seasonal updates include swapping out chains for colorful or textured ribbons for a softer vibe. This concept works well in casual, artistic, or modern interiors.
Start with a sturdy, round mirror and gather your decorative chains. Attach hooks or small brackets around the mirror’s circumference to hold the chains in place, ensuring they’re evenly spaced. Use strong, rust-proof fasteners to secure the chains to the wall, creating a balanced look. Adjust the length and drape of the chains to your liking. Hang the entire piece at eye level, and double-check stability before use. It’s a straightforward project with a high visual payoff.
Personalize by choosing chains in different finishes—matte, shiny, antique—to match your decor. Add charms or pendants to some links for a personalized touch. Incorporate small LED lights within the chains for a glowing effect. Complement the look with textured textiles, such as woven rugs or layered throws, to create a cozy, eclectic space. This style invites creativity and personality.
A chain-framed mirror is a bold, playful addition that instantly upgrades your decor. It’s a statement piece that’s easy to customize and replicate. Once hung, it creates a lively, textured focal point that’s sure to impress. This project shows how simple materials can become a standout feature. Ready to link your style with this unique look?
10. Mirror Surrounded by Floating Shelves for Functional Decor
Looking for a way to combine style and storage? Framing your mirror with floating shelves creates a functional yet chic decor feature. It’s perfect for small spaces where every inch counts, offering a place for essentials without clutter. This setup adds depth and interest, making your mirror more than just a reflective surface. If you love multitasking decor, this idea is a winner.
Imagine a large mirror mounted on the wall, with sleek, minimalist floating shelves arranged symmetrically or asymmetrically around it. The shelves hold small decorative objects, skincare, or everyday essentials—keeping everything within reach. The clean lines of the shelves contrast beautifully with the reflective glass, adding a modern touch. Light bounces off the mirror and shelves, creating an open, airy feel. The overall effect is practical, stylish, and organized.
Use floating shelves in different materials—wood, glass, or metal—to match your decor style. Vary the shelf lengths and heights for visual interest, or keep symmetry for a sleek look. Seasonal swaps include replacing decor items on the shelves or adding decorative boxes for storage. This setup works in bedrooms, bathrooms, or entryways, especially in compact spaces where functionality is key.
Start by choosing your mirror and determining shelf placement. Install wall anchors or brackets for the floating shelves, ensuring they are level and secure. Arrange your decor items on the shelves, balancing aesthetics and practicality. Use a level to keep everything straight during installation. Attach the mirror securely with appropriate hardware, ensuring it’s centered or aligned with the shelves. This project is straightforward but requires attention to detail for a polished look.
Personalize by choosing shelves in finishes that complement your color scheme. Incorporate decorative containers or baskets on the shelves for tidiness. Add small potted plants, candles, or framed photos to make the display more personal. Consider installing LED strip lighting underneath the shelves for added glow and ambiance. This approach makes your mirror a dynamic, multi-purpose feature.
Surrounding your mirror with floating shelves turns a simple fixture into a practical display. It’s a clever way to keep essentials handy while elevating your decor style. Once done, you’ll enjoy a space that’s both beautiful and functional. It’s proof that thoughtful design can enhance everyday routines. Ready to create your own functional centerpiece?
11. Sunburst Mirror with Radiating Metallic Rays
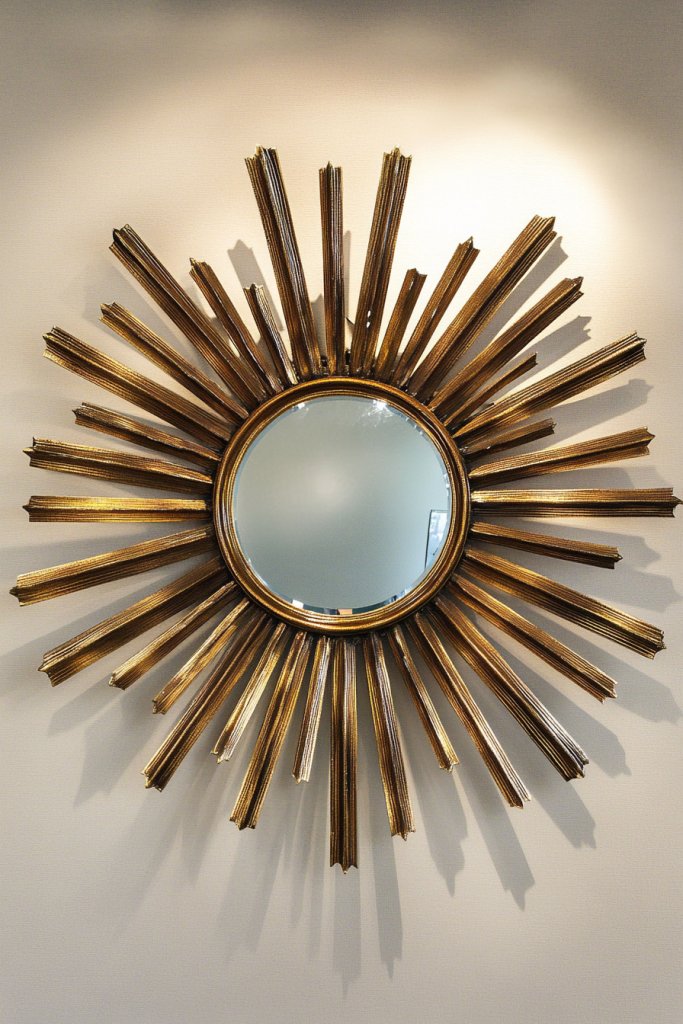
Ever want a statement mirror that commands attention? A sunburst design with radiating metallic rays instantly adds drama and vintage charm. It’s perfect for creating a focal point in any room, from entryways to living rooms. The rays reflect light outward, making the space feel brighter and more expansive. If you love retro-inspired decor with a modern twist, this is your perfect pick.
Visualize a round mirror at the center, surrounded by metallic rays extending outward like sunbeams. The rays can be in gold, silver, or bronze, with finishes ranging from shiny to matte. They vary in length and thickness, creating a dynamic, energetic silhouette. Light bounces off the rays, casting subtle reflections across the room. The overall look is bold, radiant, and full of vintage glamour, perfect for adding a sense of warmth and vitality.
Choose metallics that match your decor—brushed gold for luxe, matte black for modern, or mixed metals for eclectic. Play with different ray lengths for a more abstract or traditional sunburst. Incorporate this mirror in spaces with neutral walls to make it pop, or pair with colorful accents for a lively vibe. Seasonal updates include adding string lights or metallic confetti for festive occasions.
Select a sunburst mirror with pre-attached rays or create your own with individual metal pieces. Secure the rays with strong adhesive or small nails, ensuring they radiate symmetrically. Attach a sturdy mounting hook or bracket on the back of the mirror. Hang at eye level, ensuring the rays extend outward without obstruction. Adjust the placement for maximum impact and stability. This project combines DIY with high design impact.
Add personal touches by customizing the colors or finishes of the rays, perhaps distressing or antiquing them for a vintage look. Combine with other metallic decor items—like lamps or frames—to unify the theme. For a contemporary twist, opt for sleek, geometric rays instead of traditional spikes. Incorporate LED backlighting behind the rays to create a stunning glow at night. The goal is a show-stopping centerpiece that brightens your space.
A sunburst mirror radiates positivity and style, making any room instantly more lively. It’s a classic design that’s easy to adapt to your personal taste and decor. Once hung, it becomes a conversation starter and a reflection of your bold style. It proves that a little sparkle and radiance go a long way in home decor. Ready to shine?
12. Framed Mirror with Fabric or Leather Accents
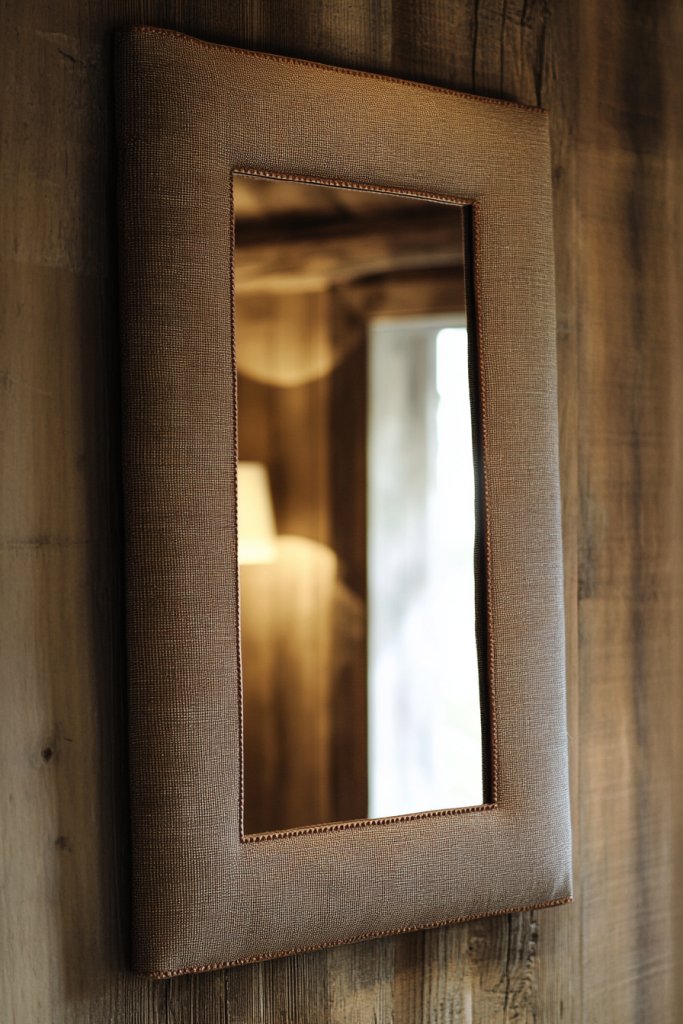
Want to add a cozy, tactile element to your mirror? Wrapping the frame in fabric or leather accents transforms a simple piece into a warm, inviting focal point. It’s ideal if you’re into boho, rustic, or luxe aesthetics, or just crave something softer and more tactile. This idea combines comfort with style, making your mirror feel like a curated piece of art. Plus, it’s surprisingly easy to DIY.
Imagine a rectangular or oval mirror with a slim wooden or metal frame, wrapped tightly in soft linen, velvet, or leather strips. The textures add depth and contrast, inviting touch and creating visual interest. For a boho look, opt for natural linen or jute, while sleek leather suits modern, luxe interiors. The fabric or leather accents give the frame a plush, tactile quality while softening the overall look. Light plays softly on the textured surface, creating a subtle glow.
Choose neutral fabrics like beige, gray, or black for versatile styles, or go bold with patterned or brightly colored textiles. Wrap the frame completely or create a layered, tasseled border for extra flair. Seasonal updates include swapping in different textiles or adding decorative trims like tassels or fringes. This style works well in bedrooms, dressing areas, or cozy corners, especially when paired with plush textiles or layered rugs.
Start with a clean, smooth frame and measure its perimeter. Wrap fabric or leather strips around the frame, securing with glue, small nails, or staples at the back. Tightly wrap and smooth out wrinkles for a polished look. For a more refined finish, hide edges with decorative trims or piping. Attach the assembled frame to your mirror with adhesive or clips, then hang securely on the wall. This project requires basic upholstery tools and patience for neat results.
Personalize by choosing fabrics with patterns or textures that reflect your style. Add decorative elements like metallic studs, embroidery, or tassels for extra flair. Incorporate small charms or badges that hold sentimental value. Pair with textiles and decor in complementary tones for a layered, cozy vibe. This approach creates a bespoke, tactile masterpiece that invites touch and admiration.
A fabric or leather-accented frame adds warmth and personality, making your mirror a focal piece. It’s a simple DIY upgrade that elevates your decor and feels luxurious to the touch. Once you see the cozy effect, you’ll be inspired to experiment with textures in other areas. It proves that small details can make a big impact, blending comfort with style. Ready to craft your tactile masterpiece?
13. Mirror with Step-Back Frame for a Layered Look
Looking to add dimension and sophistication to your mirror? A step-back or layered frame creates a modern, architectural effect that adds depth. It’s perfect if you love clean lines with a twist or want to make your mirror a focal point without overwhelming the space. This design offers visual interest while maintaining sleekness. If you crave a contemporary, multi-dimensional style, this idea is ideal.
Visualize a mirror with a frame made of multiple layers—perhaps a narrow inner border, a wider middle band, and a thin outer rim—each set back slightly from the other. The layered effect creates shadow lines, enhancing the mirror’s overall presence. The materials can range from painted wood to metallic finishes, emphasizing the geometric layers. Light plays across the stepped edges, emphasizing the depth and creating a subtle shadow box effect. It’s like a piece of modern sculpture that doubles as a mirror.
Use contrasting colors or finishes for each layer—think matte black, metallic, or wood tones—to maximize visual impact. This style suits minimalist, modern, or art-inspired interiors. For small spaces, keep the layers slim to avoid bulk; in larger rooms, experiment with wider bands for drama. Seasonal updates include changing paint colors or adding decorative trims for special occasions. It’s a versatile look that adapts to your evolving style.
Start with a high-quality mirror and plan your layered border design. Cut strips of wood or MDF for each layer, then paint or finish them accordingly. Attach each layer to the mirror with strong adhesive, staggering their positions to create the step-back effect. For more stability, use small brackets or hidden fasteners. Hang the finished piece with secure wall anchors, ensuring it’s perfectly level. Precision in measurements ensures a seamless layered look.
Personalize by choosing bold or metallic colors, or by adding decorative patterns to each layer. Incorporate LED strip lighting behind the layers for a backlit, glowing effect. Mix textures—matte, glossy, or burlap-finished layers—for extra richness. Pair with sleek, modern furniture and minimal accessories to highlight the geometric design. The result is a sophisticated, layered statement piece.
A step-back frame transforms a simple mirror into a piece of modern art. It’s a clever way to add depth and visual interest without clutter. Once installed, it elevates your decor and sparks admiration. This style shows that simple geometric ideas can create stunning focal points. Ready to build your own layered masterpiece?
14. Hanging Mirror with Decorative Chain or Rope Hangers
Want a casual, nautical-inspired way to hang your mirror? Decorative chain or rope hangers add an effortless, relaxed vibe that’s perfect for beach houses, boho, or industrial spaces. They also make hanging easier, especially for heavy mirrors. This method combines function and style, giving your mirror a slightly undone, trendy look. If you like a bit of edge with a touch of laid-back charm, this idea is for you.
Imagine a large mirror suspended by thick, decorative chains or braided ropes, hanging from hooks or eyelets. The chains come in matte black, rustic bronze, or natural jute, adding texture and visual interest. The mirror appears to float against the wall, with the chains providing a bold frame of their own. Light filters through the links, creating subtle shadows and a sense of movement. The overall effect is relaxed, stylish, and slightly industrial.
Choose chains or ropes in different finishes—metallic, matte, or natural fibers—to match your decor. For a more refined look, add decorative clasps or hooks at the connection points. In boho spaces, add charms or beads to the ropes. Seasonal updates include swapping out ropes for colored cords or adding tassels. This style suits casual, coastal, or rustic interiors, especially when paired with other natural textures.
Attach sturdy hooks or eyelets to the back of your mirror, then secure decorative chains or ropes to these points. Hang the chains from ceiling hooks or wall anchors, ensuring they are evenly spaced and level. Adjust the length of the cords to achieve your preferred height and floating effect. Seal the hardware if needed to prevent tarnishing. Make sure the weight distribution is balanced for a safe, secure hanger.
Personalize by choosing chains or ropes in colors that match your room’s palette. Add decorative charms, beads, or tassels for playful details. Pair with other nautical or natural decor elements like driftwood or linen textiles. You can also incorporate LED fairy lights along the chains for a magical glow. The key is to keep the look casual yet intentional, highlighting your personal style.
A mirror with decorative chain or rope hangers brings a fresh, relaxed charm into your space. It’s an easy upgrade that adds texture and visual interest without complex DIY skills. Once hung, it creates an inviting, approachable vibe that’s perfect for casual or coastal decor. This project proves that sometimes, the simplest ideas make the biggest splash. Ready to hang your own effortlessly stylish mirror?
15. Minimalist Frameless Mirror with Hidden Mounts
Craving a clean, sleek look that makes your space feel open and uncluttered? A frameless mirror with hidden mounts offers that minimalist aesthetic. It’s perfect if you love contemporary or Scandinavian styles, emphasizing simplicity and function. This design creates the illusion of a floating reflection, adding depth and a modern vibe. If you want your decor to breathe, this idea is just right.
Imagine a large, crystal-clear mirror seamlessly mounted on the wall with discreet hardware unseen from the front. The mirror appears to hover, with no visible frame or supports. Light reflects smoothly across the surface, enhancing the sense of space and openness. The subtle mounts are tucked into the edges or back of the mirror, making them invisible without close inspection. The overall aesthetic is pure, modern, and refined, perfect for bright, airy rooms.
Choose oversized or rectangular shapes for a dramatic effect, or round mirrors for softness. Use wall finishes like matte paint, textured plaster, or smooth wallpaper to complement the sleek mirror. Seasonal updates include adding textured textiles, minimal accessories, or subtle lighting to highlight the mirror’s clean lines. This style adapts to a variety of contemporary interiors, emphasizing light, space, and simplicity.
Select a mirror with pre-installed, concealed mounting hardware or purchase specialized invisible mounts. Measure and mark exact placement on the wall, then install the mounts using level and appropriate anchors. Attach the mirror securely, ensuring it’s flush against the wall. Check stability and alignment carefully before finishing. For safety, use anchors rated for the mirror’s weight, and consider professional installation for large or heavy pieces. The goal is a seamless, floating appearance.
Enhance the minimalist effect with integrated LED lighting behind the mirror for a soft glow. Keep surrounding decor simple—think sleek furniture and neutral tones. For visual interest, add textured wall finishes or subtle color accents nearby. Personalize by engraving or etching a small, meaningful pattern along the edge if the mirror allows. The result is a sophisticated, unobtrusive reflection station.
A frameless, hidden-mount mirror elevates your space into a modern sanctuary. It demonstrates the power of simplicity and precision in design. Once installed, it exudes confidence and elegance, making everyday routines feel special. This style proves that less can truly be more, emphasizing clarity and openness. Ready to embrace the sleek minimalism?
16. Shabby-Chic Mirror with Painted Floral Details
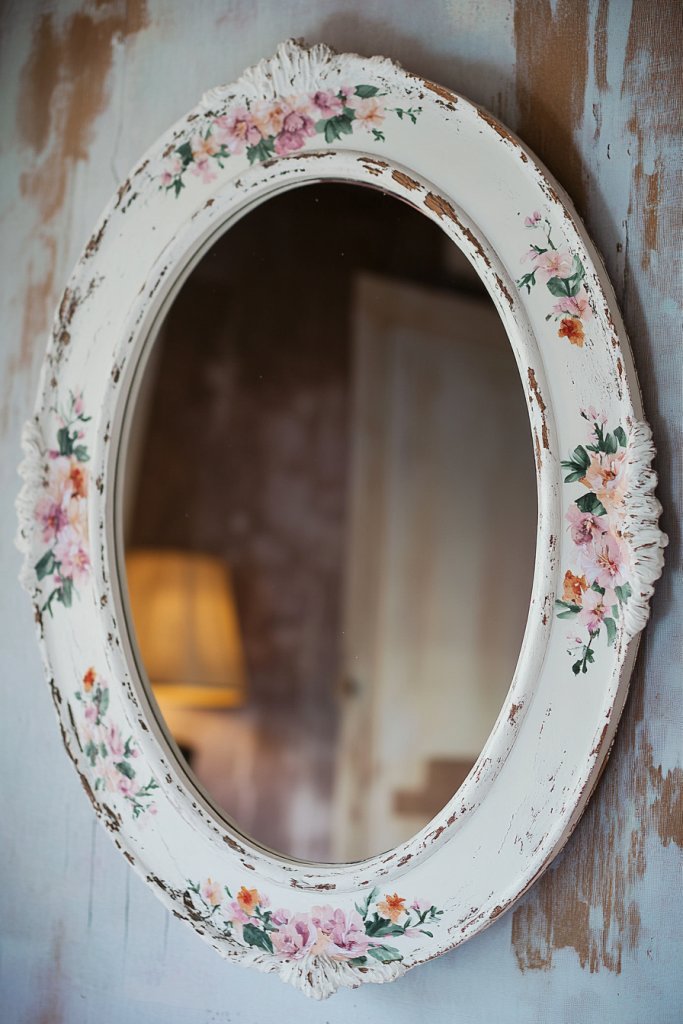
Want to add a romantic, vintage touch to your mirror? A shabby-chic style with painted floral details offers that soft, nostalgic charm. It’s ideal for creating a cozy, feminine vibe or adding a touch of handcrafted artistry. This look blends worn finishes with delicate floral motifs, making your mirror feel like a treasured keepsake. If you love DIY projects with a romantic twist, this is your perfect idea.
Visualize a slightly distressed frame painted in a soft pastel hue, decorated with hand-painted flowers and vines. The floral motifs can be subtle or bold, depending on your style, with gentle brushstrokes and layered colors. The distressed finish reveals hints of the underlying wood or paint, adding authenticity and character. The overall aesthetic is charmingly imperfect, evoking vintage garden parties or country cottages. Light plays softly on the textured, painted surface, enhancing the romantic appeal.
Choose pastel shades like blush, mint, or lavender for a delicate look, or go for more vibrant floral colors for a lively vibe. Incorporate lace or soft textiles nearby to complement the romantic theme. Seasonal updates include adding ribbons, bows, or small fabric flowers for special occasions. This style works beautifully in shabby chic, cottage, or French country interiors, blending handcrafted charm with a touch of elegance.
Start with a plain frame or an existing mirror, then lightly sand for a worn look. Use fine brushes and floral stencils or freehand your designs with acrylic or chalk paint. Layer colors for depth and add subtle shading for realism. Seal the painted floral details with a matte protective finish. Attach the painted frame to the mirror using strong adhesive or brackets, then hang securely. This project requires patience and a steady hand but offers a stunning, personalized result.
Create meaningful motifs—perhaps your favorite flowers or initials intertwined with floral designs. Incorporate metallic or glitter accents for a touch of glamour. Pair with vintage-inspired textiles, such as lace curtains or embroidered cushions, to complete the romantic look. You can also add small decorative elements like bows or charms for extra charm. The goal is a bespoke, romantic mirror that reflects your personality.
A painted floral shabby-chic mirror adds warmth and story to your decor. It’s a handcrafted piece that shows off your artistic side and love for vintage style. Once finished, it becomes a cherished focal point that invites compliments and admiration. DIY floral painting is a rewarding process that proves beauty can be handmade. Ready to bring a garden-inspired touch into your home?
17. Mirror with Built-in Storage or Hidden Compartments
Struggling to keep your essentials organized? A mirror with built-in storage or hidden compartments offers a sleek solution. It combines practicality with style, perfect for small bedrooms or bathrooms. No more cluttered countertops or overflowing drawers—just a clean, streamlined look. If you love multifunctional furniture, this idea will save your space and sanity.
Picture a large, elegant mirror with a subtle, integrated lid or sliding panel that reveals small shelves or compartments behind. The compartments can hold jewelry, skincare, or small accessories, hidden from view but easily accessible. The mirror appears seamless, with no visible hardware. When opened, it offers a clever storage solution that maintains the mirror’s aesthetic. The design is sleek, modern, and discreet, blending function with elegance.
Opt for a mirror with multiple compartments or a single hidden drawer, depending on your needs. Use finishes that match your decor—white, black, wood grain, or metallic. Seasonal updates include changing the interior organizers or adding small decorative touches inside the compartments. This style is especially suited for bedrooms, dressing rooms, or narrow hallways, where space is limited but organization counts.
Choose a mirror with a built-in storage feature or modify an existing mirror with a sliding or hinged panel. Install the mirror on the wall with heavy-duty anchors, ensuring stability. If customizing, cut a hole or slot in the back of the frame for access, then attach small shelves or containers inside. Seal edges to prevent dust ingress. Use a level and measure carefully to ensure the hidden compartments align perfectly. This project combines DIY ingenuity with practical design.
Personalize compartments by adding dividers, small baskets, or labeled sections for easier organization. Use decorative liners or fabric inside the compartments to match your style. Incorporate a small LED light inside for visibility at night. Pair the mirror with matching storage boxes or trays for a cohesive look. The goal is a hidden storage solution that’s as stylish as it is functional.
A mirror with built-in storage transforms your space into a clutter-free oasis. It’s a smart, space-saving solution that complements your decor while keeping essentials tidy. Once installed, it boosts your confidence in maintaining an organized environment. It’s proof that clever design can make daily routines smoother and more enjoyable. Ready to hide your clutter behind a beautiful mirror?
18. Geometric-Shaped Mirror with Bold Frame Colors
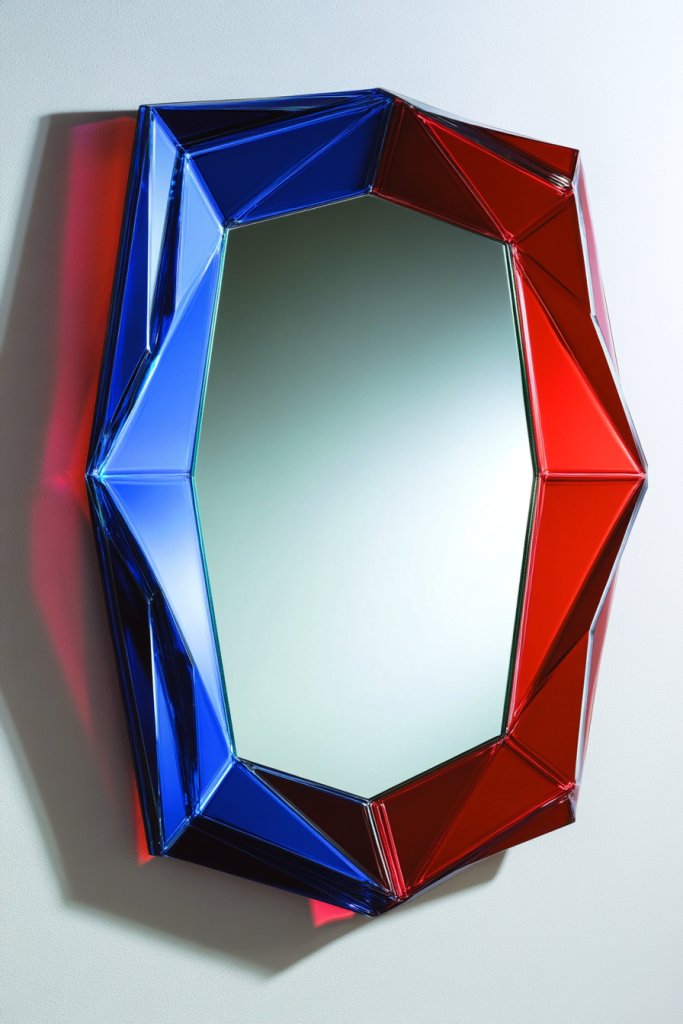
Want a mirror that’s more than just functional? A geometric-shaped mirror with bold frame colors adds an artistic punch to any space. It’s perfect if you love modern design and want your decor to stand out. Bright hues and unique shapes turn a simple reflective surface into a statement piece. If you’re all about making bold style choices, this idea is your new favorite.
Visualize a hexagon, octagon, or irregular polygon mirror with a vivid, painted frame in colors like emerald green, hot pink, or electric blue. The geometric shape creates visual interest, breaking away from traditional round or square mirrors. Light bounces off the sharp angles and vibrant hues, energizing the room. It’s like a piece of contemporary art that also serves as a reflection point, energizing your decor with color and shape.
Choose a shape that suits your space—small and subtle or large and commanding. Pair with neutral walls to make the colors pop, or match with other colorful decor for a lively atmosphere. Seasonal updates include swapping out colors or adding metallic accents. This style is versatile, fitting in modern, eclectic, or playful interiors, and works well as a focal point or accent piece.
Select a geometric mirror with a sturdy frame in your chosen color, or paint an existing one with high-quality outdoor or craft paint. Mount using sturdy brackets or hooks, ensuring it’s level and securely anchored. Consider adding a clear protective coat for longevity, especially if painted. Hang at eye level and pair with minimalist furniture to let the mirror shine. For larger pieces, professional installation may be advisable.
Personalize by choosing colors that complement your decor palette or add metallic accents for extra glam. Incorporate matching accessories like cushions, rugs, or artwork to unify the look. You could also add a small shelf or ledge beneath for decorative objects. The aim is a lively, eye-catching piece that reflects your personality and style choices.
A geometric-shaped mirror in bold colors turns the everyday into a bold statement. It’s a playful, artistic upgrade that boosts your confidence in expressing style. Once installed, it becomes a mood-lifter and conversation starter. It shows that functional decor can be vibrant and full of personality. Ready to shape your space with color and form?
19. Mirrored Wall Panel with Decorative Etching
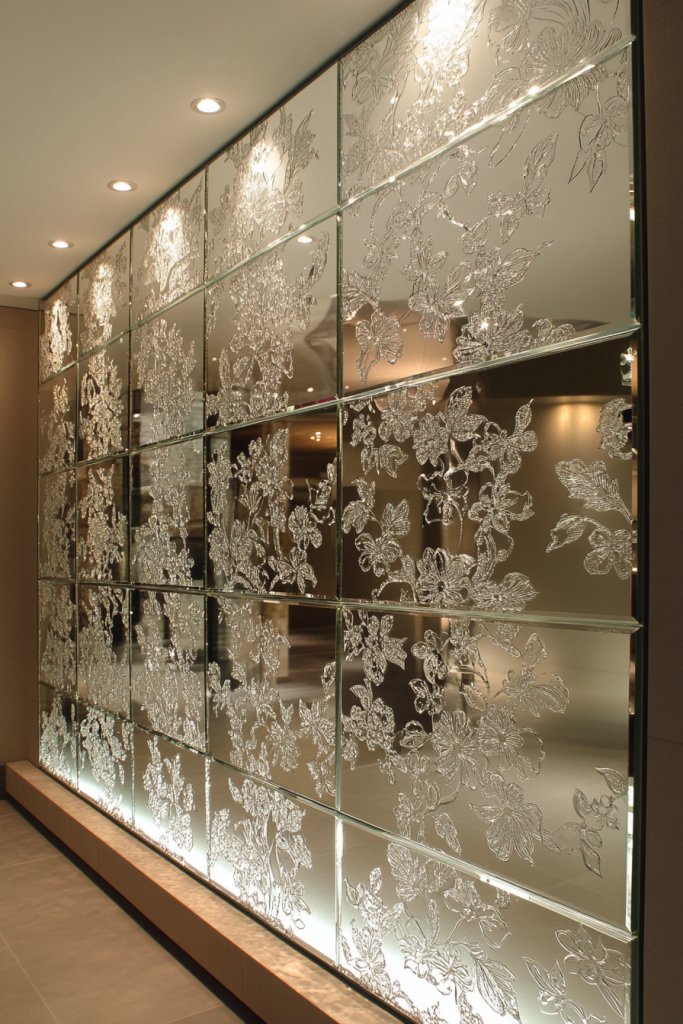
Looking to add sophistication and texture to your walls? Mirrored wall panels with decorative etching create a luxurious, reflective feature that transforms an ordinary space. They’re ideal for making a statement in foyers, living rooms, or bedrooms. The etched patterns add an artistic touch, breaking the mirror’s smooth surface with intricate designs. If you love a blend of function and artistry, this idea is perfect.
Visualize large mirrored panels with frosted or engraved patterns—think floral motifs, geometric grids, or abstract art. The etching creates a semi-transparent, textured surface that catches and diffuses light. The reflective quality amplifies the room’s brightness, while the patterns add depth and elegance. The overall effect is a high-end, customized wall feature that becomes a focal point. It’s like having a piece of modern sculpture integrated into your decor.
Choose etched designs that match your decor style—classic, modern, or eclectic. Mix frosted and clear mirrored panels for contrast, or add metallic accents for extra luxe. Seasonal updates include changing lighting to highlight the patterns or adding decorative accessories around the panels. This approach works well in formal spaces, entryways, or behind beds for an upscale look.
Order custom-cut mirrored panels with your desired etching or engravings. Install mounting hardware that supports the weight and ensures stability, such as heavy-duty brackets or clips. Use a level and spacers to align panels precisely, especially if creating a large wall feature. Seal edges with silicone or decorative trim for a finished look. Consider professional installation for large or complex designs to ensure safety and precision.
Personalize by selecting etching patterns that hold special meaning or match your decor theme. Incorporate lighting—like LED strips or spotlights—to accentuate the etched designs. Pair with sleek, modern furniture and minimal accessories to let the panels shine. You can also add painted or metallic accents within the etching for additional visual interest. The result is a sophisticated, reflective art piece.
A mirrored wall panel with decorative etching elevates your space with artistry and elegance. It’s an investment in decor that pays off with a stunning, personalized feature. Once installed, it transforms your walls into a gallery of light and design. This project shows how a little customization can create a luxurious, bespoke atmosphere. Ready to make your walls a work of art?
20. Mirror with Layered Metallic Frames for a Luxe Look
Want your mirror to feel rich and layered without overwhelming your space? A mirror with layered metallic frames offers a luxe, opulent aesthetic that’s surprisingly versatile. It adds depth and dimension, making your reflection and wall pop with metallic shine. Ideal for glam, modern, or eclectic interiors, this style elevates any room from simple to spectacular. If you love a touch of luxury, this idea is a must.
Imagine a large mirror framed with several thin metallic borders stacked in different finishes—brushed gold, matte silver, or rose gold—creating a layered, framed effect. The multiple frames add a sense of depth, making the mirror seem like a multi-dimensional piece of art. Light reflects off the different finishes, creating a shimmering, dynamic surface. The overall look is luxurious and contemporary, perfect for making your wall a focal point.
Use metallic frames in different shades and textures—smooth, hammered, or brushed—to add visual interest. Layer the frames in varying widths for a more dramatic effect, or keep them close for a sleek, modern look. Pair with metallic accessories like lamps, picture frames, or hardware to unify the theme. Seasonal updates include mixing in colored or antiqued metallics for variety. This style suits upscale living rooms or entryways.
Start with a large mirror and multiple metallic frames or strips. Attach each frame with strong adhesive or small brackets, staggering their placement for a layered effect. Ensure the frames are flush and aligned, using a level and measuring tape. Mount the entire piece on the wall with heavy-duty anchors, ensuring the layers are secure and stable. Adjust the spacing for the desired depth and visual effect. This project combines DIY skills with high-end style.
Customize by choosing metallic shades that match your decor—mixed metals for eclectic, monochrome for sleek elegance. Incorporate decorative elements like small embedded mirrors or textured metal pieces. Pair with plush textiles or glossy furniture to reinforce the luxe vibe. Add LED accent lighting behind the layers for a glowing, layered effect at night. It’s about creating a dynamic, personalized focal point.
Layered metallic frames turn your mirror into a luxe centerpiece that exudes sophistication. It’s a visual upgrade that makes a bold statement without clutter. Once installed, it boosts your confidence in mixing textures and finishes. It’s proof that thoughtful layering adds depth and richness to your decor. Ready to stack your style with this luxurious look?
21. Customized Mirror with Personal Engravings or Designs
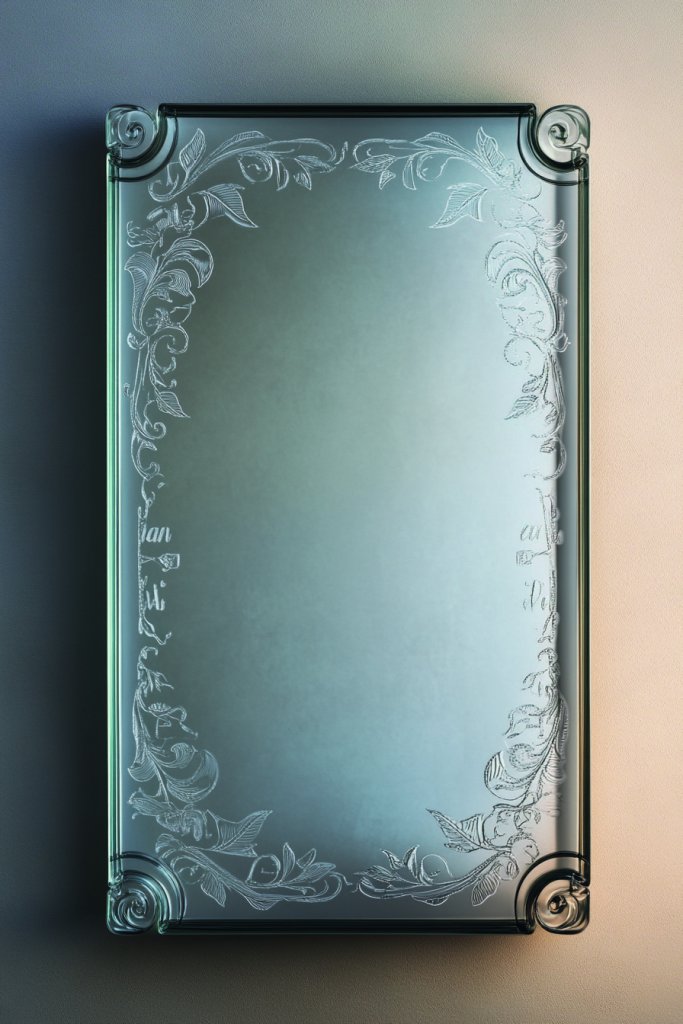
Want a mirror that’s uniquely yours? Custom engravings or designs turn an ordinary mirror into a personal statement piece. It’s perfect for adding initials, meaningful symbols, or decorative motifs that reflect your personality or heritage. This idea makes your decor one-of-a-kind, blending function with heartfelt artistry. If you love personalized touches, this project is a perfect way to showcase your individuality.
Imagine a sleek, modern mirror with delicate engravings along the edges or a central motif etched into the glass. The designs can be floral, abstract, or symbolic—whatever resonates with you. The engraved details catch the light differently, adding subtle depth and texture. It’s like a piece of jewelry for your wall, combining elegance with sentimentality. The overall effect is both stylish and meaningful, perfect for bedrooms, entryways, or personal retreats.
Choose engraving styles—etching, laser, or sandblasting—based on the detail and permanence you desire. Personalize with initials, dates, quotes, or symbols that hold significance. Pair with other personalized decor items—monogrammed cushions, custom art—to create a cohesive theme. Seasonal or special occasion updates include adding decorative borders or color accents to the engravings. This style fits various decor themes, from modern chic to rustic vintage.
Work with a professional engraver or use DIY kits for small projects. Select a mirror with a smooth, high-quality surface suitable for engraving. Decide on the design and placement, then carefully apply the engravings using the chosen method. For laser or sandblasting, professional help ensures precision. Seal the engraved areas with a clear protective coating to prevent fading. Mount the finished piece securely, ensuring the design remains intact and visible.
Add extra personal touches by including engraved dates or quotes that inspire you. Pair your engraved mirror with personalized frames or decorative hardware. Incorporate your favorite colors or metallic accents around the engraving for contrast. Use the mirror in spaces where reflection and sentiment are equally important—like a personal dressing area or a gift corner. The goal is a functional piece that’s infused with your story.
A customized engraved mirror is more than a reflection—it’s a piece of your story. It elevates your decor to a personal level and creates a meaningful focal point. This project shows that personalization doesn’t have to be complicated or expensive. Once hung, it offers daily inspiration and a reminder of what matters most. Ready to create your own personalized masterpiece?
Conclusion
With this diverse collection of decorated mirror ideas, you have plenty of inspiration to refresh your living space and add reflective style. Whether you prefer elegant, whimsical, or modern designs, these ideas can be tailored to suit any decor aesthetic. Don’t hesitate to try out new techniques and make each mirror a reflection of your personality—your home deserves to shine with creativity!