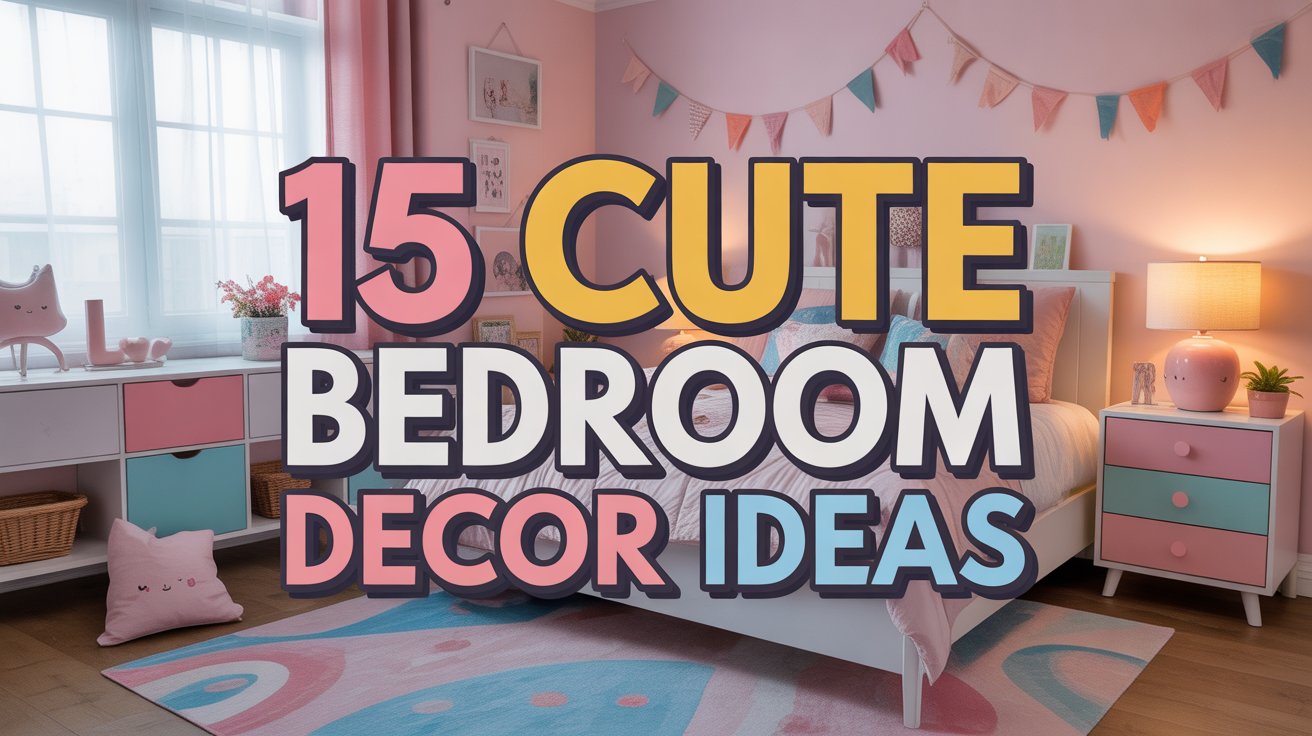
15 Cute Bedroom Decor Ideas with Playful Touches
I have been, or can be if you click on a link and make a purchase, compensated via a cash payment, gift, or something else of value for writing this post. As an Amazon Associate, I earn from qualifying purchases. Please read my full Affiliate Disclosure for more information.
Imagine walking into a bedroom that instantly makes you smile—the perfect blend of comfort and charm. Cute bedroom decor ideas have taken the spotlight because they transform ordinary spaces into cozy, playful retreats that reflect personality and joy. Whether it’s adorable accents, whimsical color schemes, or unique decor pieces, these touches make your space feel warm and inviting while showcasing your personal style.
In this article, you’ll discover a variety of cute decor ideas that add playful touches to any bedroom. From charming wall art to cozy accessories, each idea is designed to inspire creativity and help you craft a space that feels uniquely yours. Get ready to elevate your bedroom with fun, stylish ideas that will make every day feel special!
1. Colorful Bed Canopy with Tassels for a Whimsical Vibe
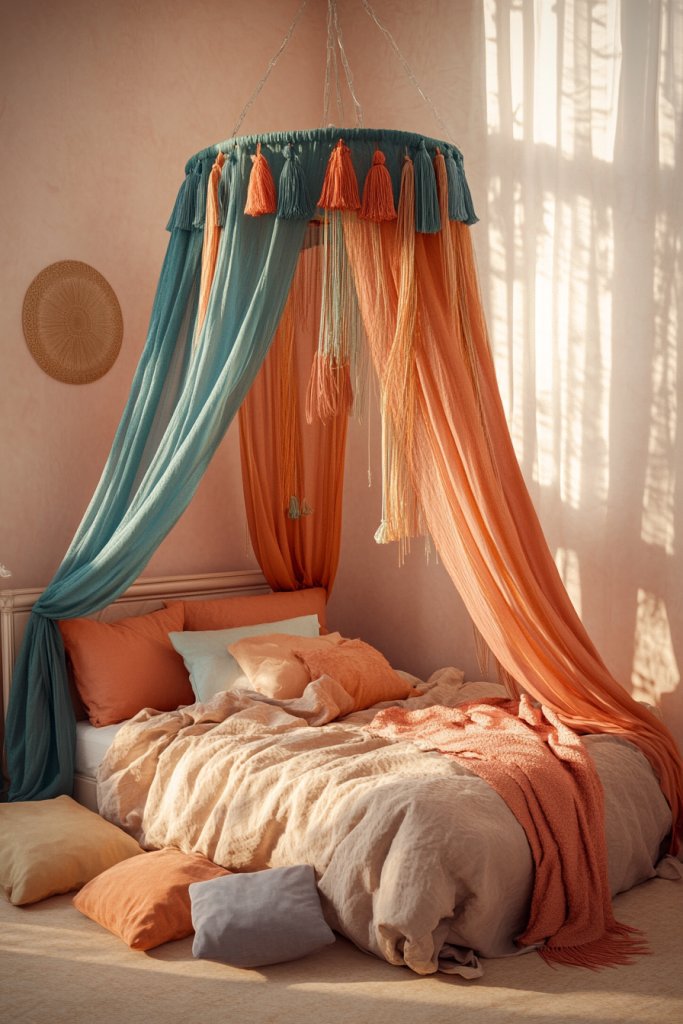
Ever wish your bedroom felt more like a fairy tale rather than just a place to sleep? A colorful bed canopy with tassels can turn a dull space into a playful haven. It’s about creating that cozy, magical atmosphere that makes you want to lounge all day. Plus, who doesn’t want to feel like they’re sleeping under a cloud of fun?
Recommended Products to replicate this idea
| # | Preview | Product | |
|---|---|---|---|
| 1 |

|
Stainless Steel Canopy Bed Frame Full Size, Thicken Full Size Canopy Frame for Metal Bed Wood Bed... | Check Latest Price |
| # | Preview | Product | |
|---|---|---|---|
| 1 |

|
Brightown 12 Pack LED Fairy Lights Battery Operated String Lights - 7ft 20LED Waterproof Silver Wire... | Check Latest Price |
Picture a light, airy fabric draped over your bed, bursting with vibrant hues and playful tassels that sway gently with the breeze. The fringe of pom-poms or tassels adds a lively texture, catching the light in a way that instantly draws attention. The canopy frames your bed like a whimsical fortress, transforming your room into a dreamy escape filled with color and movement. It’s like having your own little carnival right above your head.
You can go bold with bright neon shades or keep it soft with pastels for a more subtle look. Seasonal swaps are easy: switch to darker reds and golds for fall or bright yellows and pinks for spring. Want a boho vibe? Layer different fabrics and tassel styles. For smaller rooms, choose a lightweight, semi-sheer fabric to keep it from overwhelming the space.
Start by selecting a light, durable fabric like chiffon or cotton in your favorite color. Attach tassels or pom-poms along the edges using hot glue or sewing for a secure hold. Suspend the canopy from the ceiling with a tension rod, hooks, or a ceiling-mounted ring — whatever suits your space best. Make sure it’s high enough to avoid feeling cramped but low enough to create that cozy cocoon effect. Keep the fabric clean and wrinkle-free by gently washing or steaming it as needed.
Add personalized touches like initials embroidered on the fabric or custom-colored tassels that match your room accents. Incorporate fairy lights or small decorative charms hanging from the tassels for extra flair. You could also layer different fabrics for a textured look or add hanging plush toys for a playful twist. Whatever your style, the key is making it feel uniquely yours.
A colorful canopy with tassels can instantly elevate your bedroom’s vibe and boost your mood daily. It’s a simple DIY project that yields big visual rewards, making your space feel more inviting and fun. Ready to turn your room into a whimsical retreat? Go ahead, sprinkle some color and tassel magic — you deserve it!
2. Chalkboard Wall for Personalized Art and Messages
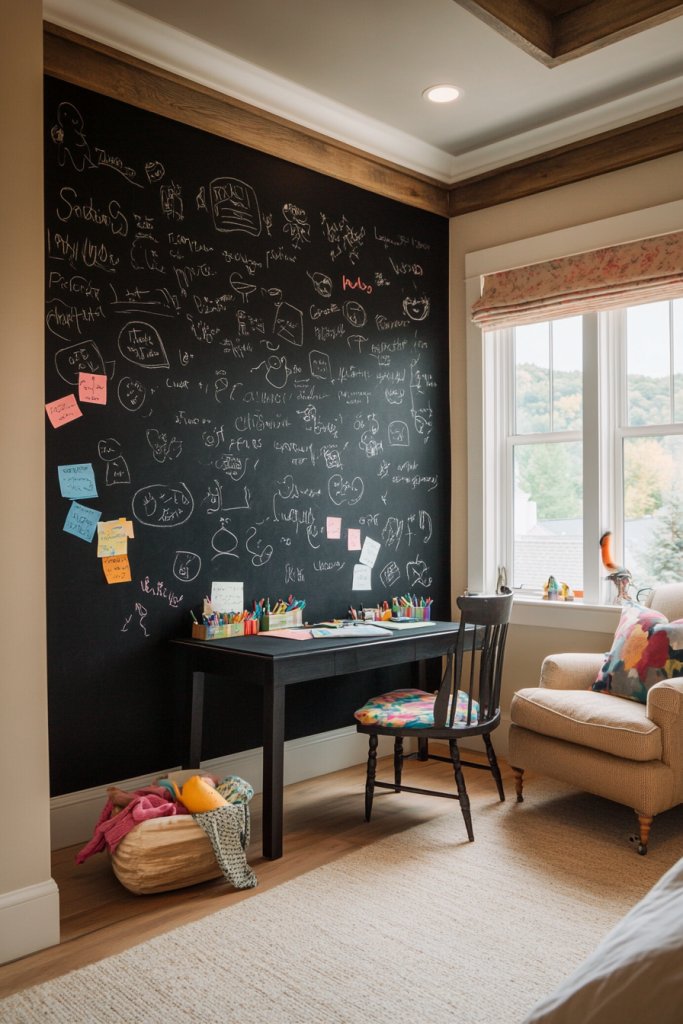
Tired of cluttered notes, sticky notes, and random doodles on your desk? Imagine having a dedicated space where you can express yourself freely without mess. A chalkboard wall offers a playful, interactive canvas to showcase your creativity and keep your room organized. Plus, it’s a fun way to add personality to your space without permanent changes.
Visualize a large section of your wall coated in matte black chalkboard paint, ready for endless doodles, quotes, or reminders. Chalk dust dances in the air as you sketch or write in colorful chalks, creating a constantly evolving artwork. The contrast between the dark background and vibrant chalk creates an eye-catching focal point. It feels like a giant art journal right in your bedroom, inviting spontaneous creativity and messages.
Choose a small section if you prefer subtlety, or go big for a statement wall. Frame the chalkboard with decorative trim or paint a border for a finished look. For a more playful vibe, incorporate sections with magnetic paint for attaching photos or notes. Seasonal themes can be added with removable decals or temporary markers, making it adaptable to your mood or decor updates.
Start by cleaning the wall thoroughly to remove dust and grease. Apply a primer if necessary, then paint with high-quality chalkboard paint in at least two coats for durability. Once dry, use colorful chalks to sketch your designs or write messages. For ease of cleaning, keep a damp cloth nearby and wipe the surface regularly. You can also add a small shelf underneath for chalk and erasers, keeping everything neat. Consider using painter’s tape to create sections or patterns for a more sophisticated look.
Personalize your chalkboard wall with themed borders, custom lettering, or inspirational quotes that motivate you. Incorporate magnetic paint for a dual-purpose surface where you can pin photos, tickets, or small decorative items. Use colorful chalk or chalk markers for bold, vivid designs. You can also add small hooks or clips for hanging jewelry, keys, or accessories nearby, turning it into a multi-functional feature.
A chalkboard wall turns your bedroom into a creative playground, fostering self-expression and daily motivation. It’s an inexpensive, customizable project that can evolve with your style. Plus, it reminds you to have fun and stay inspired every day. So, why not give your wall the freedom to be a masterpiece or a message board? Your room, your rules!
3. DIY Wall String Lights with Colorful Shades
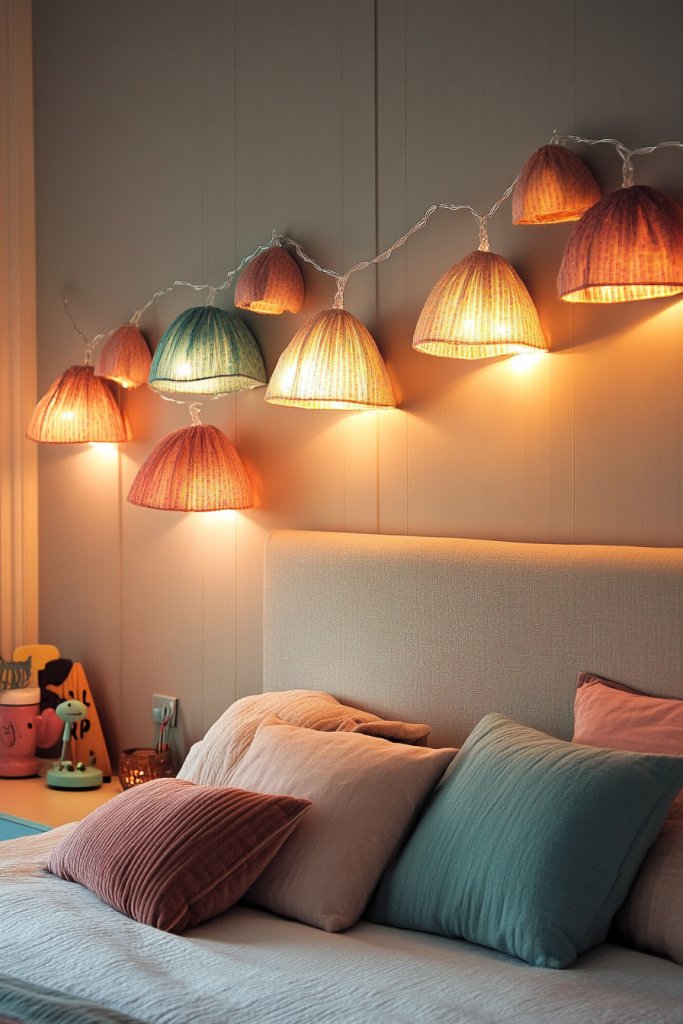
Ever want to add a cozy, magical glow to your bedroom without resorting to boring lamps? DIY wall string lights with colorful shades offer a fun, affordable way to create ambiance. They turn your space into a dreamy retreat, perfect for unwinding or hosting friends. Plus, they’re super customizable, so you can match any color scheme or vibe.
Recommended Products to replicate this idea
| # | Preview | Product | |
|---|---|---|---|
| 1 |

|
WASTROYAL 210 LEDs Warm White LED String Lights – 70FT Transparent Wire, Waterproof & Connectable... | Check Latest Price |
| # | Preview | Product | |
|---|---|---|---|
| 1 |

|
Colorful Macaron Lamp Shade with Acrylic Bead Droplets, Elegent Whimsical Fabric Light Shade for... | Check Latest Price |
Picture a wall adorned with a delicate string of fairy lights, each bulb nestled inside a vibrant, whimsical shade—think pastel pinks, bright yellows, or deep purples. The soft glow filters through the shades, casting playful patterns and a warm ambiance across your room. They hang loosely, draping along the wall or framing your bed, adding a touch of enchantment. This DIY setup transforms plain walls into captivating focal points that feel both inviting and personal.
Choose shades that match your decor—ruffled, fringed, or smooth for different textures. For a minimalist look, opt for simple monochrome shades, or go bold with multicolored patterns. Drape the lights along your headboard, window frame, or create a canopy. Change the bulb colors seasonally or for mood shifts, making your lighting adaptable and fun.
Gather string lights and a variety of colorful shades—these can be purchased or DIYed from fabric, paper, or plastic. Fix hooks or adhesive strips along your wall at desired intervals. Attach the shades to the bulbs securely with glue or clips, ensuring they won’t fall off with movement. Drape or stretch the string lights across your wall, adjusting the length for desired coverage. For extra flair, intertwine additional decorative elements like ribbons or beads. Test the setup to ensure all connections are safe and lights work smoothly.
Add personalized touches such as custom shades with painted designs or fabric prints. Incorporate LED bulbs with adjustable color settings for versatility. Use the lights to highlight specific areas or create a backdrop for photos or videos. You can also hang small charms or lightweight ornaments from the string for a playful, layered effect.
DIY string lights with colorful shades provide a cozy, magical atmosphere that’s perfect for relaxing or entertaining. They’re a simple project that yields high visual impact without breaking the bank. Brighten your nights with your own creative touch — your bedroom will feel like a dreamscape every time!
4. Creative Shelf Displays with Fun Collectibles
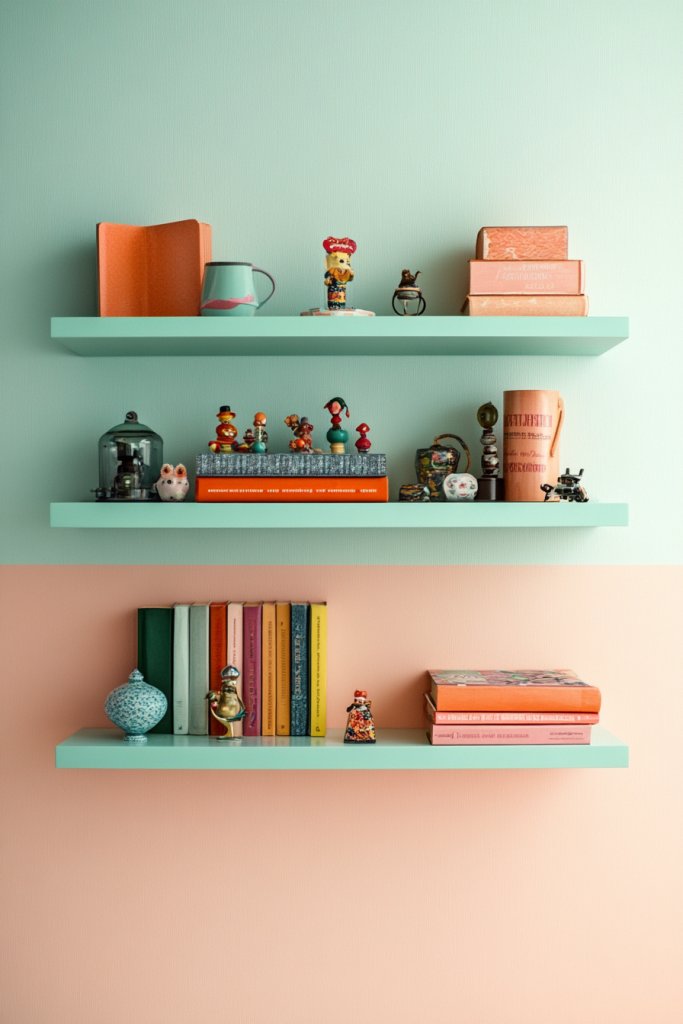
Looking for a way to showcase your personality without cluttering your space? Creative shelf displays filled with fun collectibles turn empty wall space into a lively gallery. They serve as conversation starters and give your room a personalized touch. Plus, they’re easy to update whenever your mood or collection changes.
Recommended Products to replicate this idea
| # | Preview | Product | |
|---|---|---|---|
| 1 |

|
BAYKA Floating Shelves for Wall, Wall Mounted Rustic Wood Shelves for Bathroom, Bedroom, Living... | Check Latest Price |
| # | Preview | Product | |
|---|---|---|---|
| 1 |

|
BROTTAR Display Cabinet with Glass Doors, 4-Tier Curio Cabinet with 3 Color Lights for Collectibles,... | Check Latest Price |
Imagine floating shelves lined with quirky figurines, miniatures, or themed decor objects—like tiny vintage cameras, playful robots, or cute plushies. The shelves are arranged in different heights and styles, creating visual rhythm and interest. Brightly colored or patterned backgrounds behind the shelves make each display pop. These collections tell a story about your hobbies, interests, or favorite themes, turning your wall into a mini museum of your personality.
Use different shelf materials—wood, acrylic, or metal—to match your decor style. Arrange collectibles by color, theme, or size for a cohesive look, or mix it up for an eclectic vibe. For seasonal updates, swap out items or add themed decorations like holiday ornaments or summer trinkets. Incorporate small plants or decorative boxes to add layers and depth. The key is balancing visual weight and creating a curated, fun display.
Install floating shelves at varying heights using appropriate anchors and screws for your wall type. Arrange your collectibles thoughtfully, considering color schemes and visual flow. Use small stands, risers, or riser pads to elevate some items and add dimension. Keep frequently changed items easily accessible for quick updates, and consider using clear display cases for delicate or special pieces. Regularly dust and refresh the arrangements for a lively, engaging look.
Personalize displays with custom name tags, mini frames, or themed backdrops. Incorporate your favorite colors or motifs to tie everything together. Use decorative ledges or shadow boxes for a more dramatic effect. Mix collectibles with functional items like decorative jars or boxes to keep the space tidy while still showing off your treasures. The goal is a display that evolves with your tastes and collections.
Creative shelf displays turn your wall into a reflection of your passions, making your space uniquely yours. They boost your confidence by showcasing your interests and achievements. Plus, they’re a fun way to get creative and experiment with different styles. Your room becomes more than just a sleeping area — it’s a personal gallery!
5. Floating Nightstand with Quirky Design Elements
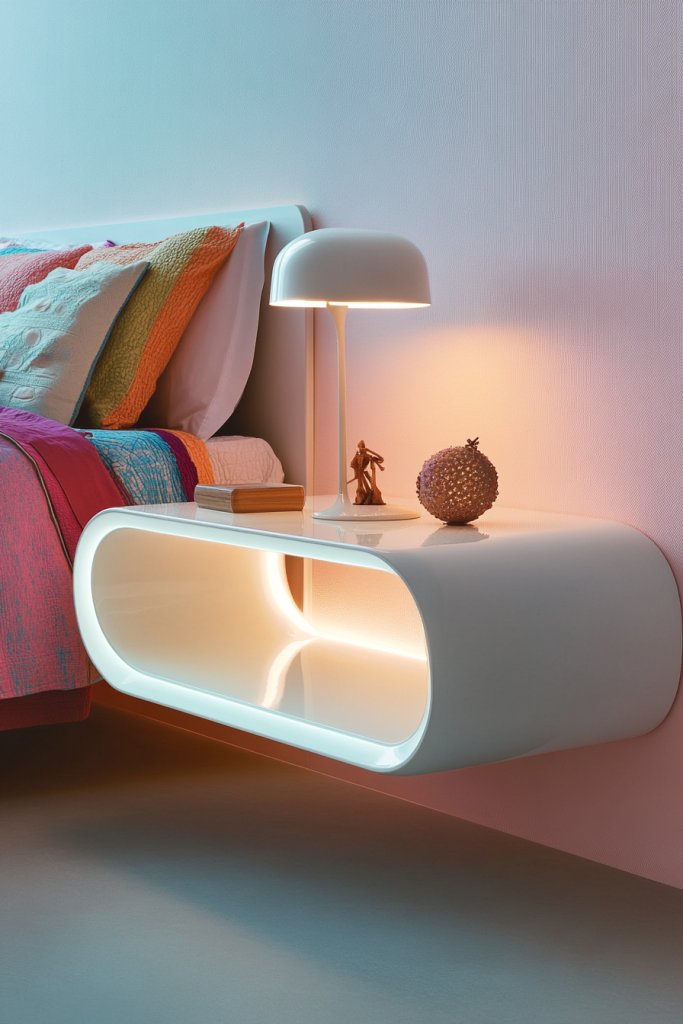
Cluttering your bedside table with random stuff? A floating nightstand offers a sleek, modern solution that also adds a quirky twist. It creates more space on the floor and introduces a fun design element that makes your room stand out. Plus, it’s an easy DIY project or an affordable buy that upgrades your bedroom instantly.
Visualize a small, wall-mounted table shaped like a whimsical house, a cloud, or an abstract sculpture. The floating design gives your room an airy, uncluttered feel, making the space appear larger. Bright colors or bold patterns on the stand add personality, while the minimalistic design keeps things feeling fresh. It’s like having a piece of functional art right next to your bed, blending form and function seamlessly.
Choose quirky shapes or bright colors to match your theme—think neon accents for a playful look or pastel tones for a softer vibe. You can also opt for a multi-level design for extra storage or display space. For small spaces, a slim, wall-mounted shelf might be enough, while larger rooms can handle more elaborate, sculptural pieces. Change the look seasonally by repainting or adding decals.
Start by measuring the space to ensure proper placement. Choose a sturdy wall with enough support for mounting hardware. Select a design that complements your decor—wood, acrylic, or painted MDF work well. Secure the stand using appropriate anchors and screws, ensuring it can hold your essentials. Decorate with small books, decorative objects, or plants (if allowed), but keep the surface clear for functionality. Regularly check stability and clean the surface to keep it looking fresh.
Personalize your stand with custom paint, decals, or patterns. Add small, quirky accessories like a miniature lamp, a tiny sculpture, or a decorative box that matches your style. Use colorful or patterned drawer pulls or knobs if your stand has storage. Incorporate LED strips underneath for subtle lighting that highlights its shape. This way, your nightstand reflects your personality and adds character.
A quirky floating nightstand makes your bedroom feel more playful and modern. It’s a simple upgrade that adds both style and space, boosting your confidence in DIY or shopping choices. When your nightstand stands out, it turns your entire room into a reflection of your creative spirit. Ready for a functional and fun upgrade? Go for it!
6. DIY Dreamcatcher with Bright Feathers and Beads
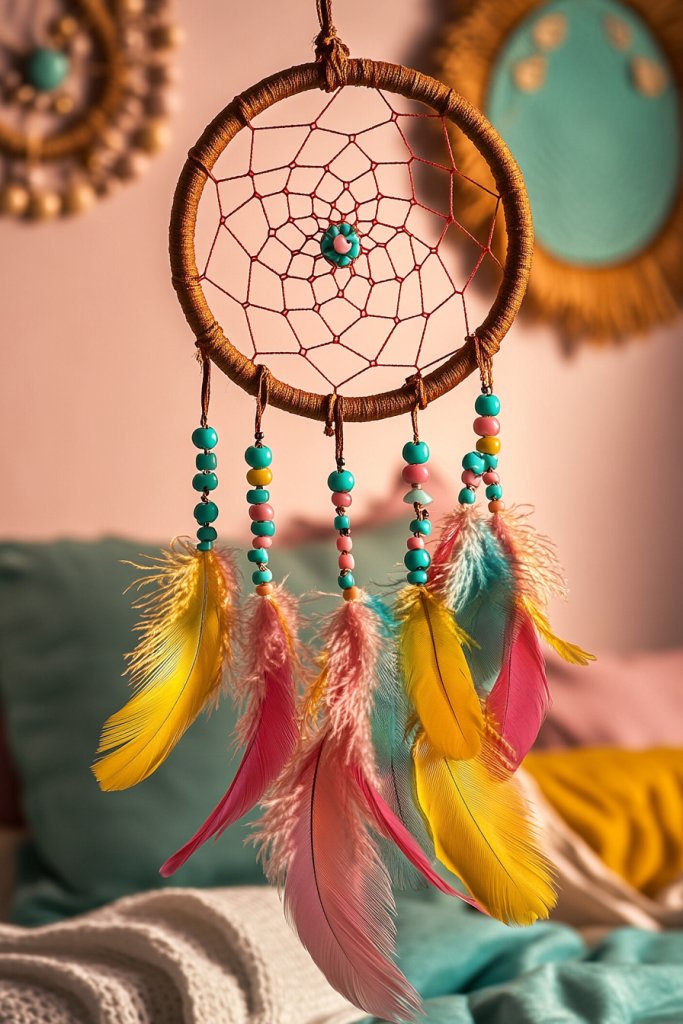
Ever wanted a whimsical touch that also feels personal and calming? A DIY dreamcatcher with bright feathers and beads combines handmade charm with playful colors. It’s a simple project that adds an artistic, boho vibe to your room. Plus, it’s believed to bring good dreams—what’s not to love?
Recommended Products to replicate this idea
| # | Preview | Product | |
|---|---|---|---|
| 1 |
|
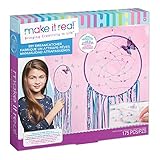
Make It Real: DIY Dreamcatcher - Purple Pink Blue Butterfly, 175 Piece All-in-One DIY Kit, Tweens &... | Check Latest Price |
| # | Preview | Product | |
|---|---|---|---|
| 1 |

|
Holmgren 48pcs Natural Feathers Bulk - 6 Styles Assorted Peacock, Pheasant, Turkey Feathers for... | Check Latest Price |
Imagine hanging a colorful web adorned with vibrant feathers, shiny beads, and ribbons above your bed. The feathers fan out in cheerful hues—hot pink, turquoise, or sunny yellow—creating a lively focal point. The intricate web, combined with dangling charms, catches the light and moves gently with the breeze. It adds a textured, dynamic element that makes your space feel both peaceful and playful, like a little piece of art you made yourself.
Use different color schemes to match your mood or decor—monochrome for minimalist, rainbow for maximalist. You can also incorporate natural materials like wooden beads or metallic accents for a more eclectic look. Hang smaller dreamcatchers on windows or doorways for consistency. Seasonal variations, such as incorporating faux snow or autumn leaves, can make your decor feel fresh throughout the year.
Gather materials: a metal or wooden hoop, colorful thread or yarn, feathers, beads, and ribbons. Start by wrapping the hoop with thread, creating a secure base. Weave a web inside the hoop using a knotting technique like spiral or crisscross, leaving spaces for feathers and beads. Attach feathers and beads with thin wire or thread, spacing them evenly. Hang the finished dreamcatcher using a loop of ribbon or string. Keep the web tight and symmetrical for best results. Hang it in a spot where it can gently sway and catch light.
Add your own touches—like charms, charms, or small trinkets—inside or hanging from the web. Use feathers in your favorite colors or incorporate metallic accents for a modern twist. Personalize the hanging strings with braided or decorative ribbons. You can also create mini versions as charms for bags or keychains. The goal: a dreamcatcher that’s as vibrant and unique as you are.
Making your own dreamcatcher is a rewarding way to express creativity and craftiness. The bright feathers and beads add a cheerful, boho flair that instantly makes your space more relaxing. Plus, it’s a fun project that boosts confidence in DIY skills. Ready to spin your own web of good vibes? Go ahead and craft your own magic!
7. Fun, Multi-Colored Bed Frame or Headboard
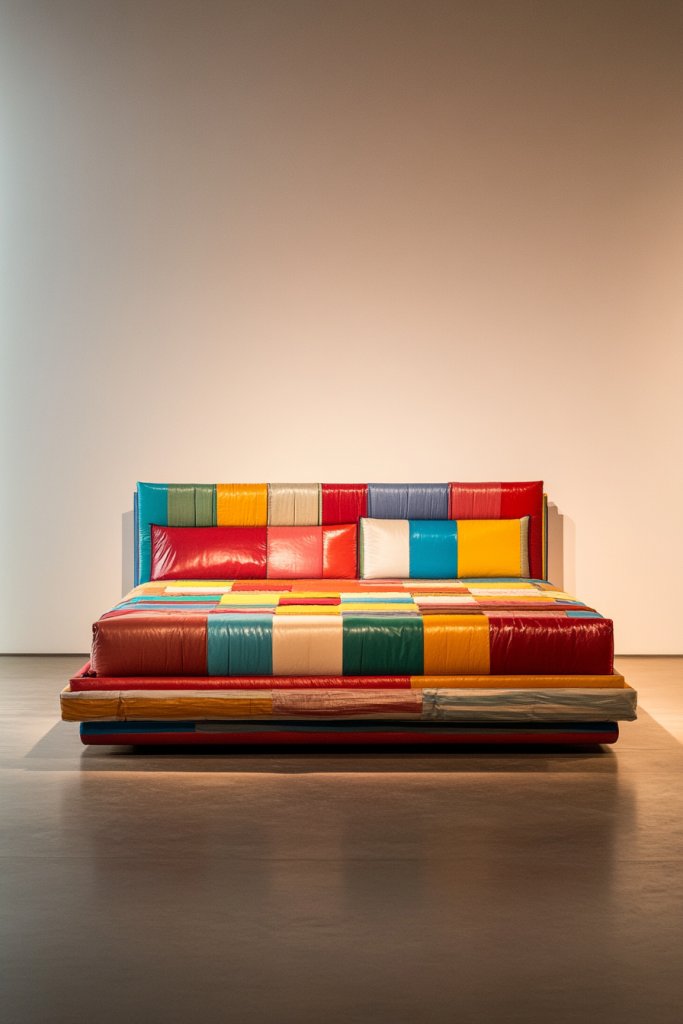
Feeling like your bed is missing that wow factor? A fun, multi-colored bed frame or headboard can turn your sleeping area into a bold statement piece. It’s about making your bedroom reflect your personality and adding a splash of color where you least expect it. Plus, it’s surprisingly easy to DIY or find affordable options that look amazing.
Recommended Products to replicate this idea
| # | Preview | Product | |
|---|---|---|---|
| 1 |

|
Art3d Peel and Stick Black King Headboard, 12-Pack Upholstered Headboard for Queen, Full-Size Bed,... | Check Latest Price |
| # | Preview | Product | |
|---|---|---|---|
| 1 |

|
Rolanstar Bed Frame Queen Size with USB Charging Station, LED Bed Frame with Wood Storage Headboard,... | Check Latest Price |
Picture a bed with a headboard painted in vibrant stripes, polka dots, or abstract patterns—imagine hot pink, electric blue, and sunshine yellow all together. The colors pop against neutral walls, instantly energizing the space. The textured or painted surface adds depth and interest, making your bed the centerpiece of your room. It’s playful, eye-catching, and totally Instagram-worthy.
Opt for bold patterns or multiple colors for a maximalist look. For a more subtle approach, choose pastel hues or monochrome palettes with contrasting textures. Use removable wallpaper or fabric panels for easy updates. You can also add fun decals or shapes to an existing headboard for a DIY upgrade. Seasonal themes can be incorporated with fabric covers or paint touch-ups.
Start by selecting a sturdy wood or MDF frame, or repurpose an existing one. Paint or decorate with non-toxic, vibrant paints or adhesive-backed decals. For an easier route, attach fabric or wallpaper panels to a plain headboard with staples or adhesive strips. Seal the surface with a clear coat for durability. For a multi-colored effect, tape off sections before painting. Regular touch-ups keep it looking fresh, and a protective layer preserves the colors.
Add decorative elements like faux buttons, stickers, or textured paints for more flair. Personalize with favorite color schemes or motifs that reflect your interests—like music, travel, or abstract art. Incorporate LED strips or glow-in-the-dark paint for nighttime effects (if aligned with restrictions). Switch up the look seasonally by repainting or adding decorative overlays. Your bed becomes a canvas of your personality.
A fun, multi-colored bed frame or headboard instantly makes your bedroom more lively and personalized. It’s a creative project that boosts your confidence in DIY and decorating skills. When your bed stands out, you’ll feel more excited about your space and more confident in your style choices. Ready to make your bed the star of the room? Go bold and have fun!
8. Playful Curtain Tiebacks Using Bright Ribbons or Ruffles
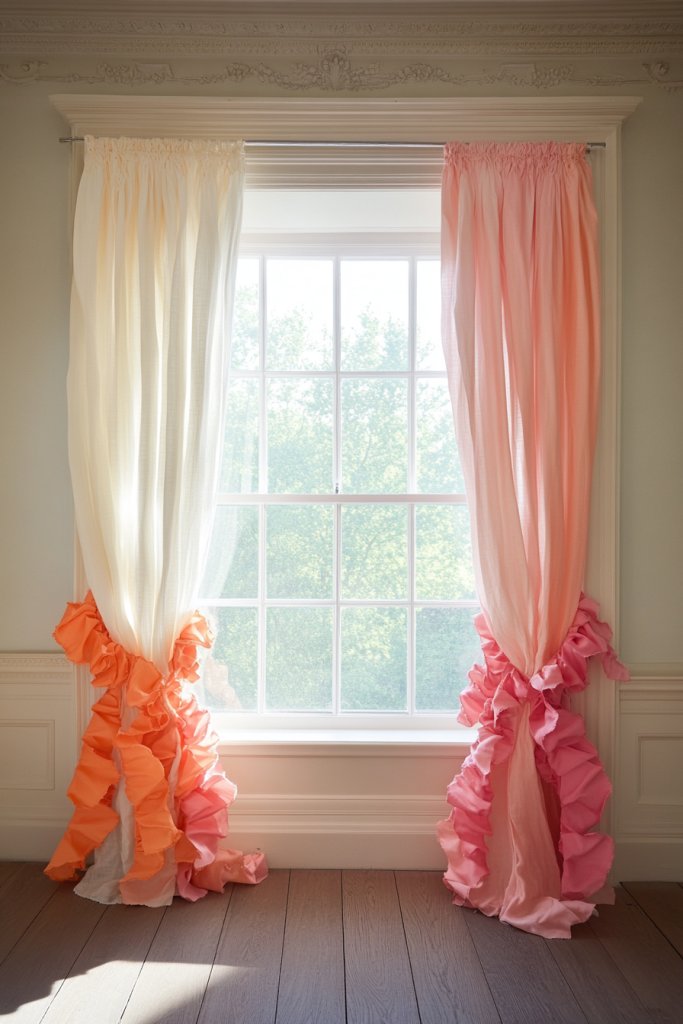
Curtains often get overlooked in decor, but playful tiebacks can add a surprising pop of personality. Using bright ribbons or ruffles turns a simple window treatment into a charming detail that elevates the room’s vibe. It’s a small change with a big impact, perfect for adding a dash of fun without much effort.
Recommended Products to replicate this idea
| # | Preview | Product | |
|---|---|---|---|
| 1 |

|
Hion Curtain Holdbacks Black 2pcs, Curtain Tiebacks Wall Mounted Curtain Hooks Holders for Drapes | Check Latest Price |
| # | Preview | Product | |
|---|---|---|---|
| 1 |

|
The_Curtain_Shop Classic Ruffle Extra Tieback Pair Pair Natural, Extra Tieback Pair (2 pieces)... | Check Latest Price |
Imagine curtains pulled back with wide, colorful ribbons tied in big bows or ruffled fabric loops. Bright pinks, sunny yellows, or bold patterns create a cheerful frame for your window. The playful textures and colors draw the eye, making your windows a focal point rather than just an afterthought. The movement of ribbons or ruffles when you open or close the curtains adds a lively, dynamic touch to your space.
Choose ribbons in your favorite colors or patterns—think polka dots, stripes, or glittery finishes—for a whimsical look. For a more boho vibe, opt for ruffled fabric strips in natural textiles like burlap or linen. Use large, decorative knots or bows for maximum visual impact. Change tiebacks seasonally or for special occasions to keep things fresh and playful.
Select wide ribbons or fabric strips, making sure they’re long enough to tie comfortably around your curtains. Attach hooks, clips, or sew loops onto the curtains or wall to secure the tiebacks. For a DIY touch, create your own decorative tassels or bows with leftover fabric. Wrap the ribbons around the curtain tie or hook, then tie in a big, playful bow or knot. Adjust for a balanced, cheerful look each time.
Create custom tiebacks with initials or themed charms sewn or glued onto the ribbons. Mix textures and colors for a layered, eclectic look. Use metallic or glittery ribbons for extra sparkle for special nights or parties. Incorporate small decorative elements like bells, charms, or mini pom-poms to add whimsy and movement. Your window treatments then become a fun, personalized detail.
Bright, playful curtain tiebacks give your room a cheerful finishing touch that’s easy to change and update. They’re a simple, budget-friendly way to add personality and charm. When your curtains are styled with fun ribbons or ruffles, your space instantly feels more inviting and lively. Ready to tie on some personality? Your windows will thank you!
9. Quirky, Themed Wall Art or Canvas Prints
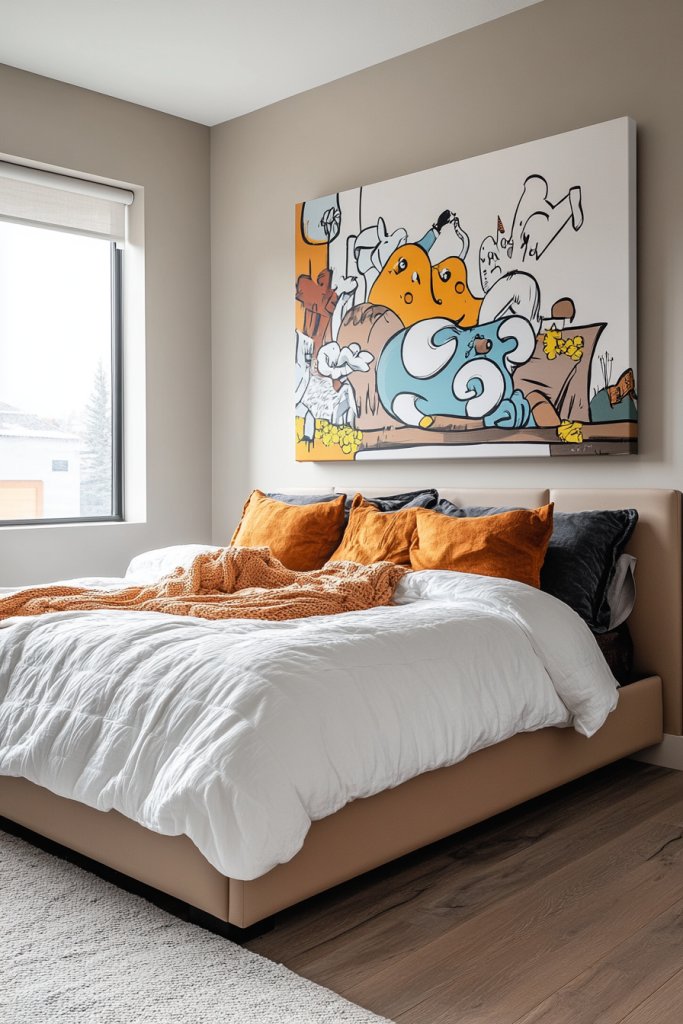
Plain walls can make a room feel dull and uninspired. Quirky, themed wall art or canvas prints inject personality and humor into your space. They’re an easy way to showcase your interests or sense of humor without a huge commitment. Plus, they instantly make your bedroom feel more curated and fun.
Recommended Products to replicate this idea
| # | Preview | Product | |
|---|---|---|---|
| 1 |

|
Large Framed Black and White Neutral Abstract Wall Art for Living Room, 3 Piece Boho Canvas Prints... | Check Latest Price |
| # | Preview | Product | |
|---|---|---|---|
| 1 |

|
Trends International Poster Frame, 24" x 36", Collector's Edition Black | Check Latest Price |
Picture a wall adorned with oversized prints of cartoon characters, abstract shapes, or funky animal illustrations. Bright colors and bold lines create a lively backdrop that energizes the room. Themed art, like vintage travel posters or pop art, adds a playful or nostalgic vibe. Arranged in a gallery style or asymmetrically, these pieces turn your wall into a visual playground that reflects your personality.
Mix and match different styles—vintage, modern, or eclectic—for a personalized gallery. Use canvas prints, framed posters, or even DIY art projects for variety. Change out prints seasonally or when your interests evolve. Pair with other decor elements like decorative pillows or rugs that complement the theme. Keep the display balanced with a mix of large statement pieces and smaller accents.
Select artwork that resonates with your style—online shops, print shops, or DIY projects work well. Frame or mount your pieces using simple hooks or adhesive strips suited for your wall type. Arrange the art in a way that creates visual flow—symmetrical, grid, or asymmetrical for a more playful look. Consider grouping related pieces for a themed gallery wall. Regularly update or rotate artwork to keep the vibe fresh and exciting.
Create custom prints with your favorite quotes, photos, or doodles. Use colorful frames or mats to add contrast and highlight each piece. Incorporate quirky elements like 3D embellishments or metallic accents for extra flair. Mix in small decorative items like fairy lights or small shelves (if permitted) to add layers. The goal: a wall full of personality that sparks conversation.
Quirky wall art transforms blank space into an expression of your style and humor. It’s an affordable, impactful way to make your room uniquely yours. When your walls showcase your personality, you’ll feel more confident and at home. Ready to hang your personality? Your walls are waiting!
10. DIY Fairy Light Curtain for a Magical Ambiance
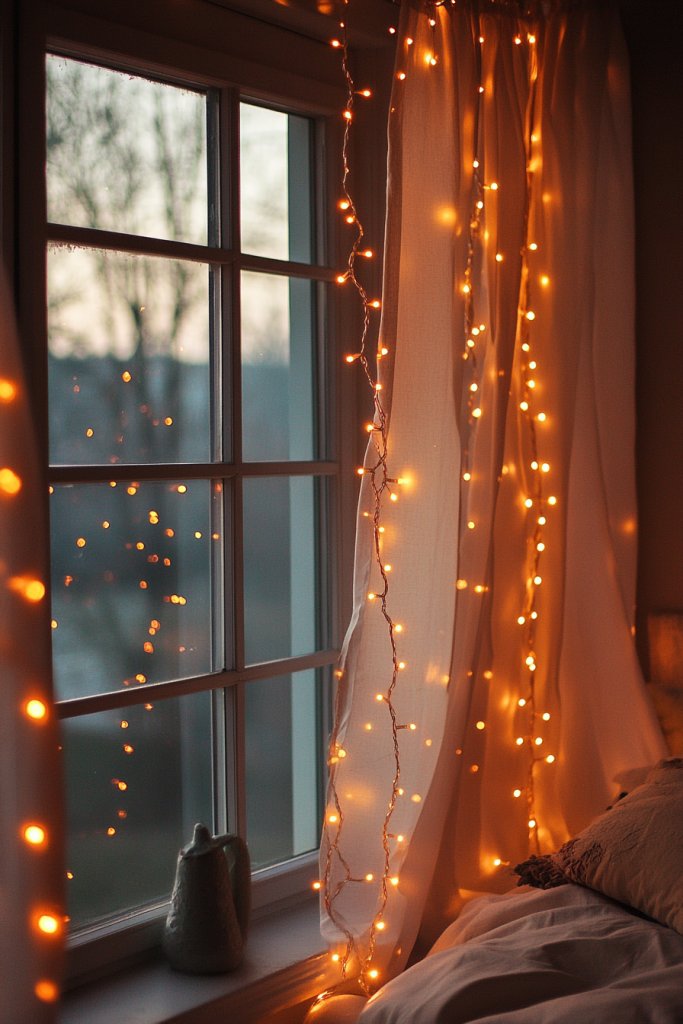
Looking for a simple way to make your bedroom feel magical and cozy? A DIY fairy light curtain can do just that, turning plain walls or windows into enchanting focal points. It’s a cost-effective project that instantly elevates your space. Plus, the soft glow creates a calming vibe perfect for winding down.
Recommended Products to replicate this idea
| # | Preview | Product | |
|---|---|---|---|
| 1 |

|
Brightown 300 LED Fairy Curtain Lights, 9.8ft x 9.8ft Warm White Curtain String Lights, USB Plug in... | Check Latest Price |
| # | Preview | Product | |
|---|---|---|---|
| 1 |

|
Titanker Shower Curtain Hooks Rings, Rust Resistant Metal Double Glide Shower Hooks Rings for... | Check Latest Price |
Imagine a cascade of tiny, twinkling lights draped behind your bed or along your window frame. The delicate glow filters softly, casting a warm, inviting ambiance. You can drape the lights in flowing curtains or create a layered effect with multiple strands. The effect is like a starry night sky or a fairy-tale scene, adding a dreamy, tranquil atmosphere to your room.
Use warm white or colored LED lights depending on your mood or decor. Create a dense curtain by hanging multiple strands closely together, or keep it light and airy with fewer strands. Incorporate fabric or sheer curtains behind the lights for added texture. For a seasonal twist, add decorative elements like faux snowflakes or hanging ornaments. Adjust the length and pattern to suit your space and style.
Gather fairy lights with a plug-in option or battery pack, and lightweight hooks or clips for hanging. Attach the strands to the wall or ceiling using command strips, hooks, or tension rods. Arrange the lights in a cascading or grid pattern, securing them as you go. Hide the wires behind curtains or furniture for a clean look. Test the lights before finalizing the placement, then enjoy the cozy glow.
Add small hanging ornaments, paper lanterns, or paper flowers for extra charm. Use different colored or shaped bulbs for a personalized effect. Incorporate remote-controlled or dimmable lights to adjust brightness easily. Create themed setups for holidays or special occasions—like fairy-tale, celestial, or fairy garden themes. Your glow-up will be both magical and uniquely yours.
A fairy light curtain transforms your bedroom into a cozy, enchanting space that’s perfect for relaxing or dreaming big. It’s a simple DIY project that delivers big on ambiance. When your room feels magical, your mood improves instantly. Ready to light up your life? Go ahead and create your own starry sanctuary!
11. Bright, Patterned Storage Bins and Baskets
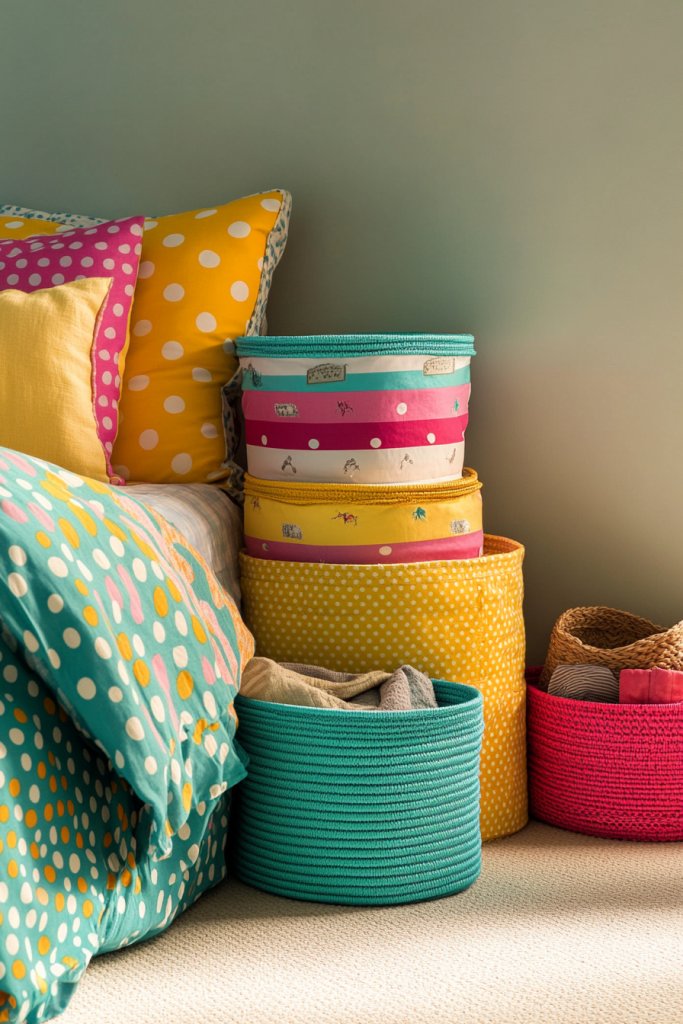
Clutter can ruin the vibe of your bedroom, but stylish storage solutions make tidying up fun. Bright, patterned bins and baskets turn organizing into a decorative act rather than a chore. They add color and personality while keeping your space neat and functional. Who says storage has to be boring?
Recommended Products to replicate this idea
| # | Preview | Product | |
|---|---|---|---|
| 1 |

|
12x12in Storage Baskets Set of 4 Water Hyacinth Baskets,Foldable Handwoven Storage Cubes,Wicker Cube... | Check Latest Price |
| # | Preview | Product | |
|---|---|---|---|
| 1 |
|
Amazon Basics Collapsible Fabric Storage Cube Bins Organizer with Handles, Sturdy, Beige,... | Check Latest Price |
Visualize colorful woven baskets with bold geometric patterns or playful motifs stacked or lined up in your closet or under your bed. Bright hues like coral, turquoise, or sunshine yellow make organization an eye-catching feature. When stored openly, these baskets become part of your decor, adding layers of color and texture. They’re perfect for hiding away toys, accessories, or laundry while still looking cute.
Choose baskets in various sizes and shapes to suit different needs. Use fun patterns or solid colors that coordinate with your overall decor. Incorporate fabric-lined or collapsible options for versatility. For a cohesive look, match the basket colors with your room’s palette or mix contrasting patterns for a lively feel. Seasonal updates can involve swapping out patterns or colors.
Select sturdy, lightweight baskets made from woven materials, fabric, or plastic. Place them in visible spots like under the bed, on shelves, or in closets. Label baskets with decorative tags or fabric patches for easy identification. Use stackable designs if space is limited, or nest smaller baskets inside larger ones. Regularly tidy and rotate contents for a fresh look. Keep them clean by wiping or hand-washing as needed.
Add decorative touches like embroidered initials, painted designs, or fabric liners that match your style. Use matching or contrasting colors to create visual harmony. Incorporate small decorative charms or ribbons for an extra playful vibe. Personalize storage with labels or tags that reflect your personality or hobbies. This way, organizing becomes a creative expression.
Bright patterned storage bins make tidying up feel less like a chore and more like decorating. They help maintain a cheerful, organized environment that inspires positivity. When everything has a place, your mood and space both improve. Ready to stash your stuff in style? Your room will thank you!
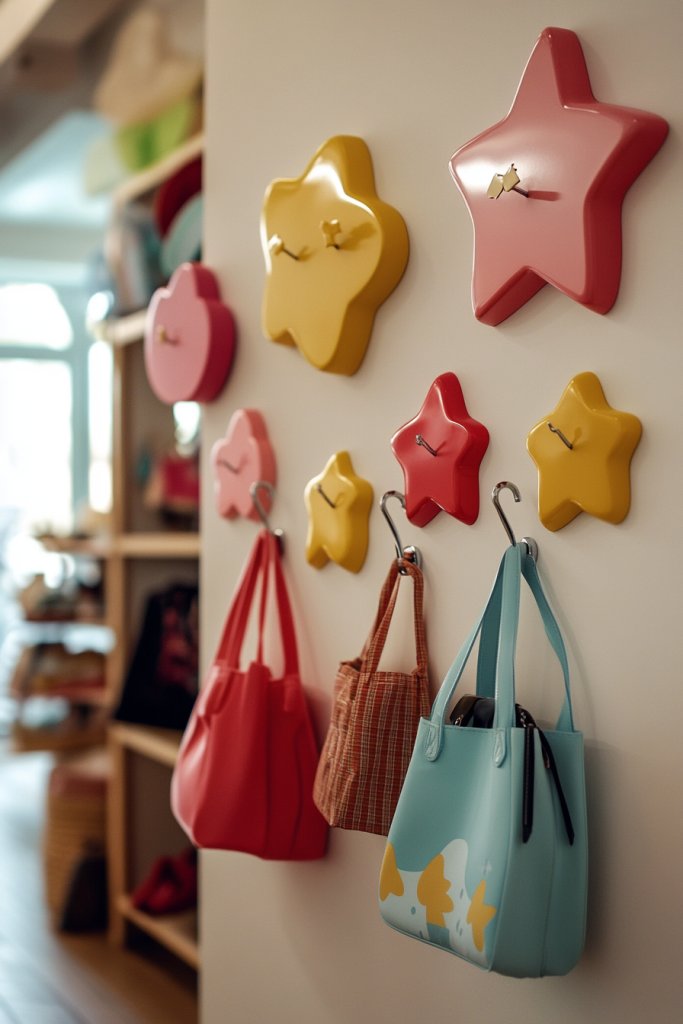
12. Playful Wall-mounted Hooks in Fun Shapes
Hanging your accessories and clothes can turn into a boring chore. Wall-mounted hooks in fun shapes turn this mundane task into a playful part of your decor. They add a whimsical touch, making your room feel lively and inviting. Plus, they’re super functional, keeping your space tidy and your style on point.
Imagine hooks shaped like stars, hearts, or animals that hold your hats, bags, or jewelry. Bright, cheerful colors like red, yellow, or aqua make these hooks pop against neutral walls. Placed strategically, they create a visual rhythm and add a playful element to otherwise plain walls. When not in use, their quirky shapes add a decorative layer, like a fun sculpture or art piece.
Mix shapes and sizes for a dynamic look or stick to a theme—like animals or celestial motifs—for consistency. Use colorful or metallic finishes depending on your decor style. Group hooks in clusters for visual impact or space them out for a more subtle effect. Seasonal updates can involve swapping out hooks or repainting them to match your mood.
Choose durable wall hooks made from plastic, metal, or wood. Mount them securely with appropriate anchors, especially if hanging heavy items. Arrange them in a pattern—rows, circles, or abstract shapes—using a level for accuracy. Hang your accessories, bags, or decorative items, balancing the visual weight across the wall. Regularly check stability and clean dust or fingerprints. For added fun, attach small decorative elements or paint details on the hooks.
Customize hooks with your favorite colors or themes—add glitter, metallic paint, or decals. Personalize with initials or small charms for a distinctive look. Use hooks for more than just hanging—try attaching small baskets for keys or jewelry. Coordinate with other decor elements like pillows or art for a cohesive playful vibe. The goal: function meets fun.
Playful wall hooks turn everyday organization into an artistic statement. They make your space more engaging and reflect your personality. When your hooks are cute and functional, you’ll feel more inspired to keep your room tidy. Ready to hang some fun? Your walls are calling!
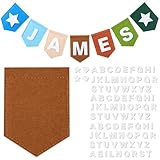
13. Personalized Name Banner with Bright Letters
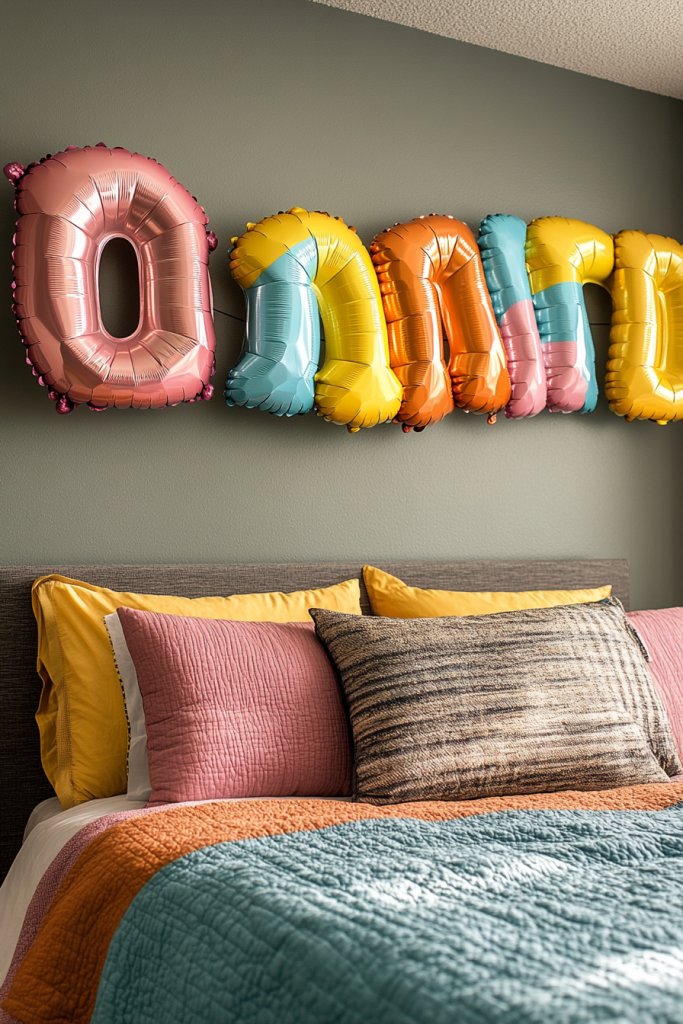
Want to add a cheerful, personalized touch to your bedroom? A name banner with bright, playful letters makes your space feel uniquely yours. It’s an easy DIY or affordable store-bought project that instantly boosts the room’s personality. Plus, it’s a fun way to celebrate your identity or special occasions.
Recommended Products to replicate this idea
| # | Preview | Product | |
|---|---|---|---|
| 1 |

|
DIY Banner Kit with Letters Glitter Banner Letters Gold Customizable Birthday Banners Graduation... | Check Latest Price |
| # | Preview | Product | |
|---|---|---|---|
| 1 |
|
Newwiee Personalized Baby Name Banner Custom Letters Banner Name Felt Bunting DIY Felt Letters... | Check Latest Price |
Picture a colorful banner spelling out your name or a favorite phrase, hung prominently above your bed or window. The letters are in bold, playful fonts—think bubble, comic, or handwritten styles—matching your room’s vibe. Bright colors like neon green, hot pink, or electric blue pop against neutral walls. The banner becomes a focal point that radiates personality and adds a lively, youthful energy.
Create a banner with paper, fabric, or cardboard letters, or choose pre-made fabric flags for a softer look. Use contrasting colors or patterns to make each letter stand out. For a seasonal touch, swap out the banner for different holidays or themes—like hearts for Valentine’s Day or stars for birthdays. Hang it with colorful ribbon, string, or twine, and experiment with different lengths and shapes for a custom look.
Cut out or buy pre-made letters in your chosen style and color. Attach each letter to a sturdy string or ribbon using glue or sewing. Hang the banner using hooks, nails, or removable adhesive strips, ensuring it’s straight and secure. Adjust the height based on your wall space and decor. Keep spare letters or change the banner periodically to keep your room fresh and fun. Ensure all components are lightweight for easy hanging.
Add embellishments like glitter, stickers, or small charms to each letter for extra personality. Use fabric paint or markers to customize further. Incorporate themed motifs that match your decor—like stars, flowers, or emojis. Personalize with your favorite colors or patterns to make it truly one-of-a-kind. It’s a simple decor piece that speaks volumes about your style.
A personalized name banner makes your space welcoming and fun, boosting your confidence and sense of ownership. It’s a creative project that’s quick to do but has a lasting impact. When your room proudly displays your name or motto, you’ll feel more at home and inspired every day. Ready to hang your own banner? Let your personality shine!
14. Quirky Clocks with Unique Designs or Colors
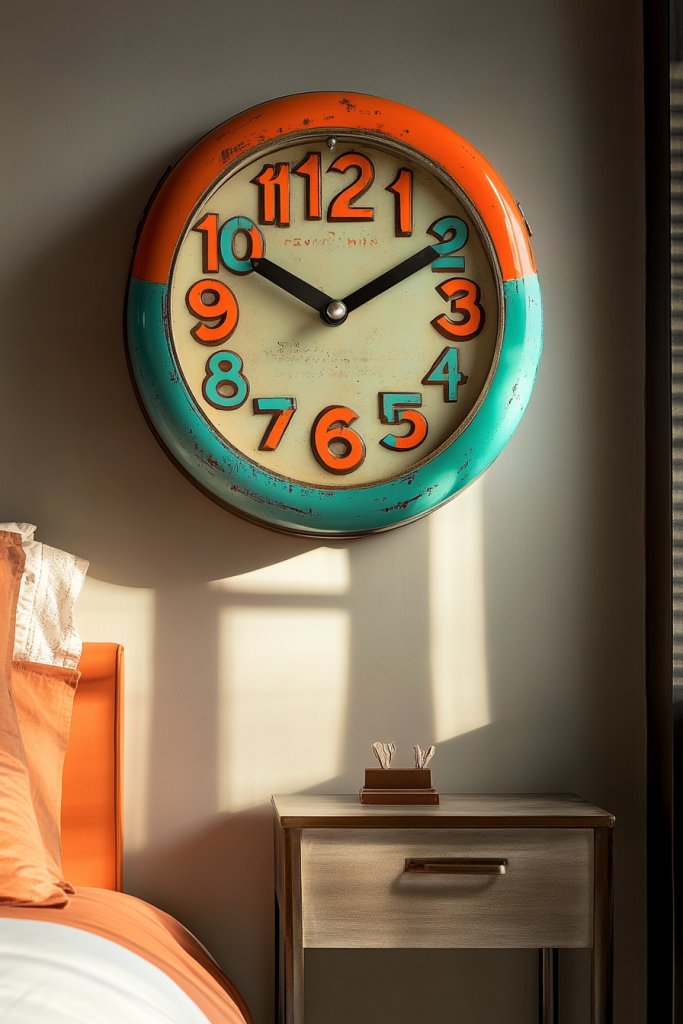
Tired of dull, boring clocks that blend into your wall? Quirky clocks with unique designs or colors add a playful touch while keeping you on time. They’re a fun way to inject personality into your bedroom decor without much effort. Who says functional items can’t be statement pieces?
Recommended Products to replicate this idea
| # | Preview | Product | |
|---|---|---|---|
| 1 |

|
Sharper Image LED Word Digital Clock, 7.75", Black Finish, Light-Up Desk & Wall Clock, Modern Time... | Check Latest Price |
| # | Preview | Product | |
|---|---|---|---|
| 1 |

|
Mxocom Geometric Striped Wall Clock Pastel Rainbow Spectrum Colors Abstract Twill 10 Inch Silent Non... | Check Latest Price |
Imagine a clock shaped like a smiling sun, a colorful geometric pattern, or an animal face that instantly grabs attention. Bright, bold colors like neon pink, lime green, or electric blue make the clock stand out against neutral walls. The playful designs turn a simple timepiece into a conversation starter and a piece of art. When the clock’s fun and functional, it brightens your mood every hour.
Choose clocks in unconventional shapes—like hearts, stars, or abstract forms—to match your personality. For a cohesive look, pick colors that complement your room’s palette, or go for contrasting hues for a pop. DIY options include painting or decorating plain clocks with stickers, decoupage, or fabric overlays. Switch styles seasonally or for special occasions to keep your decor fresh.
Select a clock with a sturdy frame and easy-to-read numbers or hands. Mount it securely on your wall using appropriate hooks or anchors. For a custom look, decorate the clock face with paint, decals, or collage materials before hanging. Ensure the clock mechanism runs smoothly and is easy to access for battery replacement. Position the clock where it’s visible from most parts of the room. Regularly clean the clock to keep it looking vibrant and fun.
Personalize your clock with custom illustrations, quotes, or motifs using paint or stickers. Coordinate the clock’s color scheme with your room’s decor for harmony. Use glow-in-the-dark paint for a fun nighttime effect. Incorporate small decorative elements like hanging charms or mini flags for extra flair. Your clock then becomes a reflection of your style and creativity.
A quirky clock adds both function and personality, making your room more vibrant and lively. It’s a simple upgrade that can redefine your space’s vibe. When your clock stands out, it reminds you to enjoy every moment and stay inspired. Ready to make time fun? Your wall awaits!
15. DIY Pom-Pom Garland for a Textured Decor Accent
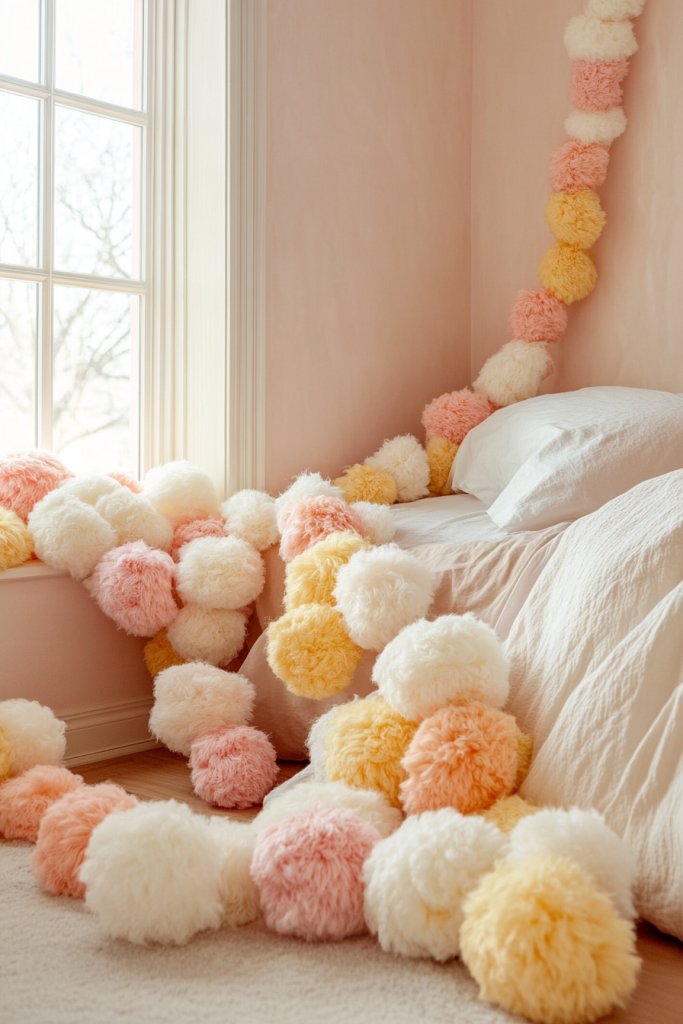
Looking to add a cheerful, textured element to your bedroom? A DIY pom-pom garland is a playful, inexpensive way to brighten up any space. It’s perfect for softening hard edges and creating a cozy, inviting vibe. Plus, it’s a fun craft project that leaves your room looking lively and personalized.
Visualize a string of fluffy, colorful pom-poms draped across your wall or headboard. Bright pinks, sunny yellows, and cool blues create a rainbow of fun. The soft, fuzzy texture adds warmth and depth, contrasting nicely with smooth wall surfaces. When hung, the garland feels like a festive decoration, making your room feel more dynamic and lively. It’s the perfect finishing touch that screams personality.
Create garlands with different sizes and shades for a more eclectic look or stick to a single color for a cleaner aesthetic. Incorporate metallic or glittery pom-poms for extra sparkle. Hang the garland in a zigzag pattern or straight for different visual effects. Seasonal themes can be achieved by choosing specific color palettes—pastels for spring or deep reds for winter. Combine with other textiles or wall decor to enhance the layered effect.
Make pom-poms using yarn and a simple fork or your fingers, wrapping and tying tightly for a full look. Attach each pom-pom to a long, sturdy string with sewing, glue, or by threading through the center. Use small hooks, clips, or clothespins to hang the garland at your desired length and placement. Ensure the pom-poms are evenly spaced and secure. Keep the garland clean by gently dusting or shaking out when needed. It’s a quick project that yields a big decorative payoff.
Add personalized touches by incorporating initials, small charms, or different textured yarns. Mix in mini tassels, beads, or ribbons for extra flair. Use colors that match or contrast with your room decor to create harmony or visual interest. Hang the garland in different spots—above your bed, window, or along shelves—to create a festive, textured backdrop. Your space then feels playful and warm.
A pom-pom garland is a joyful way to inject color and texture into your bedroom. It’s a DIY project that’s simple enough for beginners but looks professionally crafted. When your space feels cozy and vibrant, your mood and confidence naturally lift. Ready to craft your own fluffy masterpiece? Your room will thank you!
Conclusion
With a delightful mix of charming accessories, playful color schemes, and creative decor tips, this collection offers endless inspiration to refresh your bedroom. These ideas are easy to implement and perfect for adding a personal, joyful touch to your space. Don’t be afraid to try something new—your dream cute bedroom is just a few creative steps away! Embrace the fun and start transforming your space today!