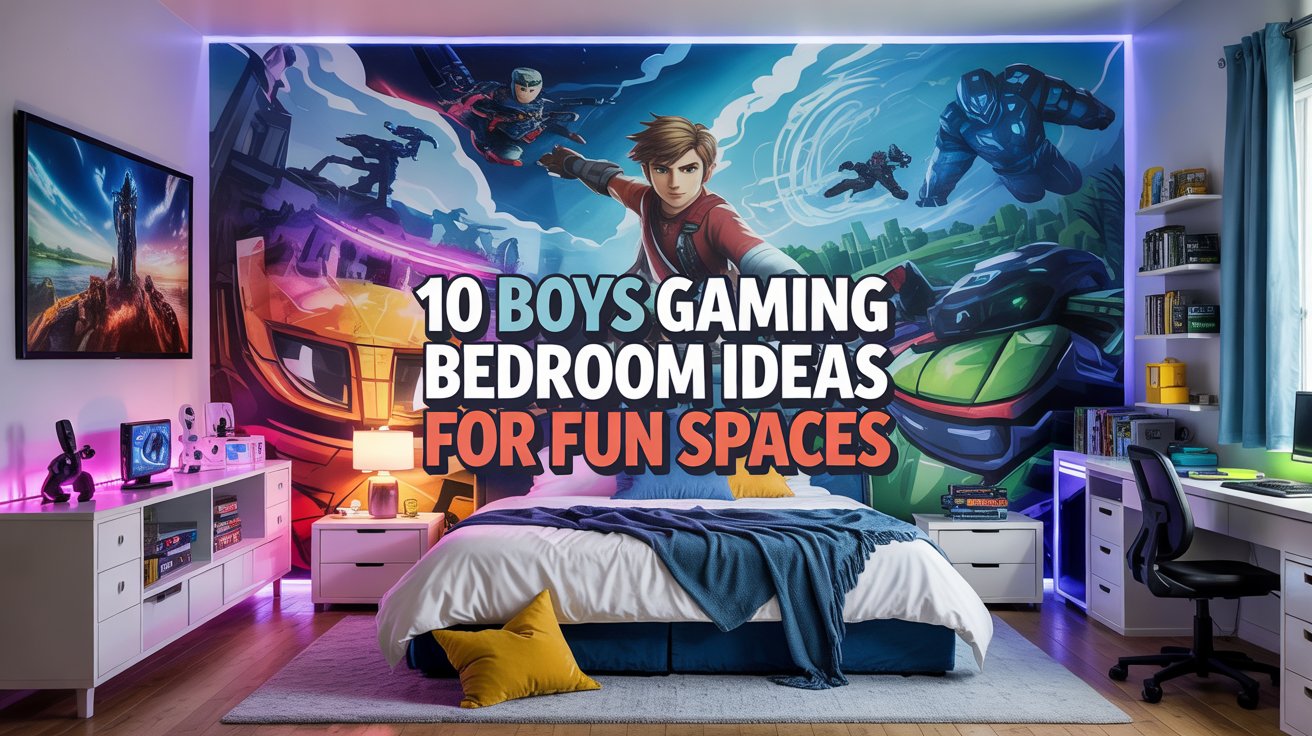
10 Boys Gaming Bedroom Ideas for Fun Spaces
I have been, or can be if you click on a link and make a purchase, compensated via a cash payment, gift, or something else of value for writing this post. As an Amazon Associate, I earn from qualifying purchases. Please read my full Affiliate Disclosure for more information.
Looking to transform a plain bedroom into an epic gaming haven? Boys’ gaming bedroom ideas are incredibly popular because they blend fun, creativity, and personal passion into one exciting space. Whether it’s the latest tech, themed decor, or cozy zones for friends, these ideas help create a personalized retreat that sparks imagination and provides endless entertainment.
In this article, you’ll discover a variety of inspiring ideas—from cool wall art and themed setups to smart storage solutions and comfy lounging areas. No matter your style or budget, these tips will help you craft a dynamic gaming environment that’s both functional and fun. Get ready to turn any room into the ultimate gaming paradise!
1. Themed Gaming Wall Mural Backdrop for Immersive Play
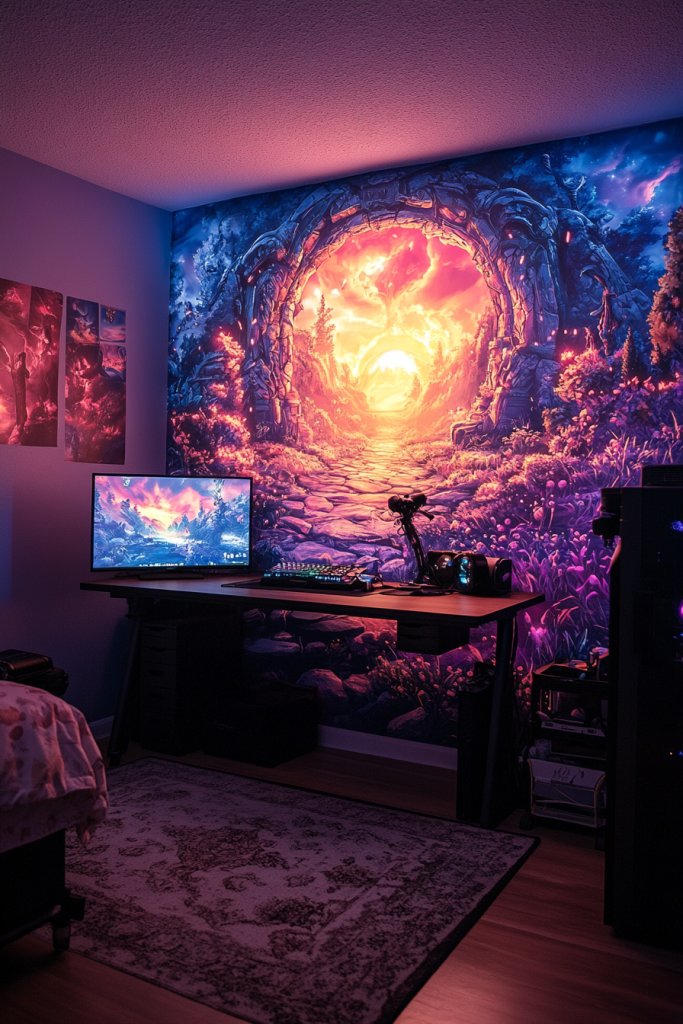
Ever tried to get fully lost in a game only to be distracted by a boring, blank wall behind your setup? A themed mural transforms your space into a portal to another world, making every gaming session feel epic. It’s like stepping into your favorite game universe without leaving your room. Who wouldn’t want an immersive backdrop that fuels their gaming obsession?
Recommended Products to replicate this idea
| # | Preview | Product | |
|---|---|---|---|
| 1 |

|
BWCXXZH Large White Flower Wall Stickers, 50"x74" Removable DIY Romantic Cherry Blossom Tree Wall... | Check Latest Price |
| # | Preview | Product | |
|---|---|---|---|
| 1 |

|
KSIPZE 100ft Led Strip Lights RGB Music Sync Color Changing Led Lights with Smart App Control Remote... | Check Latest Price |
Imagine a massive wall decal featuring vibrant landscapes from your favorite game, complete with dynamic characters and detailed scenery. The colors pop, from deep blues to fiery reds, creating a lively, energetic environment. The mural’s textured finish gives a sense of depth, making it feel like you’re peering into a living world. It’s a bold statement piece that instantly elevates your entire gaming zone.
Opt for removable decals if you like switching themes often or prefer a more subtle look with muted tones for a calmer vibe. For a more mature aesthetic, go for stylized silhouettes or minimalist designs inspired by pixel art. Seasonal themes can also be swapped out—like snowy landscapes in winter or tropical scenes for summer—keeping the room fresh and exciting.
Start by choosing a mural that matches your gaming interests and room size. Measure your wall carefully and select a decal or mural kit with easy peel-and-stick application. Prepare the wall by cleaning thoroughly and marking guidelines to ensure straight placement. Use a level to align the decal perfectly, and smooth out air bubbles with a squeegee or credit card. For larger murals, enlisting a friend makes the process smoother. Keep extra decals handy for touch-ups or repositioning.
Add other themed accessories like LED strip lights around the mural edges for a glow effect, or incorporate themed posters and figurines on shelves nearby. Personalize further by framing sections of the mural with sleek trim or adding glow-in-the-dark elements for nighttime surprises. Customizing the mural with your in-game username or favorite quotes can deepen the connection to your gaming identity.
A themed wall mural creates an environment where gaming feels like stepping into a different universe, boosting your enthusiasm and focus. It’s a simple upgrade that makes your space uniquely yours while impressing friends. Ready to turn your wall into a game world? You’ll never want to leave your room once it’s this epic.
2. Customizable LED Gaming Zone Lighting
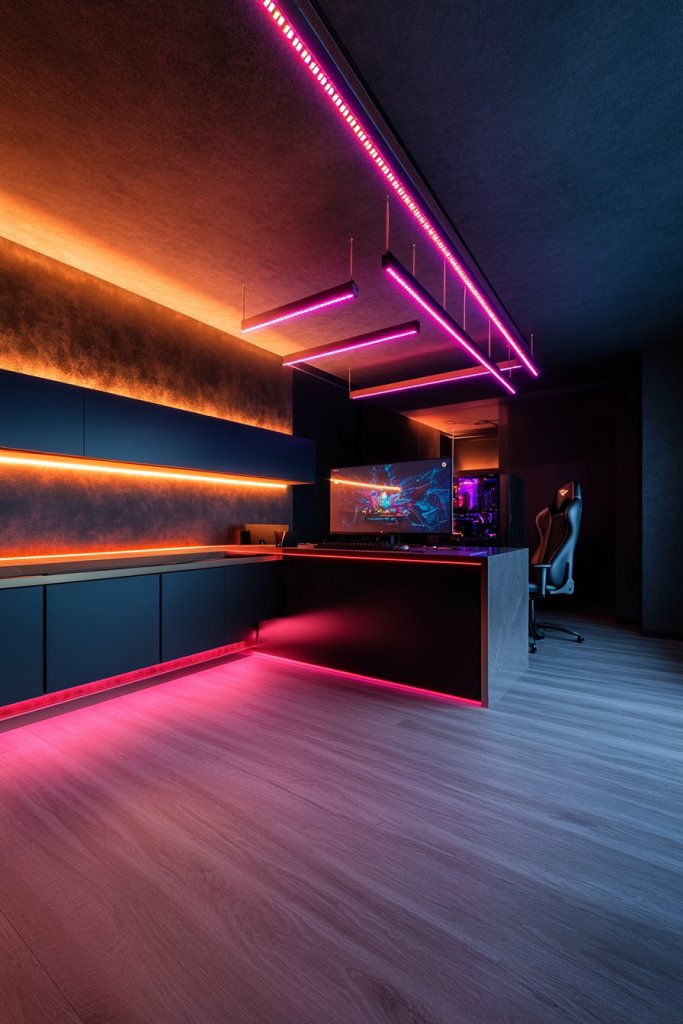
Ever played in a dim room and wished your lighting could match the intensity of your game? Customizable LED lights turn your gaming space into a dynamic environment that reacts to your mood. They boost immersion, making every game feel more alive. Plus, who doesn’t love a bit of colorful glow that you can tweak anytime?
Picture a row of sleek LED strips lining your desk edges, pulsating in sync with your game’s action. The lights change from cool blues to fiery reds, casting a vibrant glow that amplifies the atmosphere. When you switch modes, the room transforms—from a calm, focused zone to a high-energy battleground. The flexible strips bend easily around corners, creating a seamless, futuristic look that’s both functional and fun.
Choose from single-color LEDs for a minimalist vibe or full RGB strips for endless color options. Sync the lighting to your music or game sounds using smart apps for a truly immersive experience. For smaller spaces, install LED backlighting behind monitors for a subtle glow, while larger setups can incorporate wall-mounted light panels. Seasonal options include softer, warmer tones for cozy winter nights or bright, vibrant hues for summer gaming marathons.
Start by selecting high-quality, dimmable LED strips compatible with your smart home system. Measure your desk, shelves, or walls to determine length needs. Clean surfaces thoroughly before applying adhesive-backed strips to ensure they stick well. Connect the strips to a power source and sync them to your preferred app or controller. Experiment with different color schemes and modes—like strobe, fade, or pulse—to find what suits your style. Mount control hubs discreetly for easy access. Regularly update firmware to keep the lights functioning smoothly and add new effects.
Create custom lighting profiles for different games or moods, saved in your app for quick switching. Add diffusers or textured covers to soften the glow or create unique patterns. Incorporate remote controls or voice commands for instant changes. For an extra touch, combine with smart curtains or blinds to dim the room further and maximize the light show. Personalizing your setup makes every gaming session feel like an exclusive event.
Smart LED lighting elevates your gaming experience, making your setup look professional and futuristic. It’s an easy way to impress friends and add a layer of fun to your routine. Plus, it encourages experimenting with colors and effects, keeping your space fresh and exciting. Ready to glow up your gaming zone? The possibilities are endless!
3. Wall-Mounted Display Shelves for Collectibles and Accessories
Cluttered desks and floor space make your gaming room look chaotic. Wall-mounted display shelves provide a stylish way to showcase your collectibles, trophies, and accessories without sacrificing floor space. They turn your room into a personal museum of your gaming achievements. Plus, they add a cool, modern vibe that screams gamer chic. Who wouldn’t want their favorite stuff on display?
Recommended Products to replicate this idea
| # | Preview | Product | |
|---|---|---|---|
| 1 |

|
upsimples Floating Shelves for Wall, Wall Shelves for Decor Storage Set of 6, Wall Mounted Wood... | Check Latest Price |
| # | Preview | Product | |
|---|---|---|---|
| 1 |
|
KSIPZE 100ft Led Strip Lights RGB Music Sync Color Changing Led Lights with Smart App Control Remote... | Check Latest Price |
Visualize sleek floating shelves installed at eye level, lined with your prized action figures and rare game memorabilia. The shelves are made of matte black metal or clear acrylic for a minimalist look that doesn’t distract from the items. Backlit with soft LED strips, your collectibles glow subtly, making each piece pop. The arrangement allows you to curate your display, mixing small trophies with framed game art or signed collectibles. It’s a curated gallery that reflects your gaming journey.
Choose modular shelves that can be rearranged as your collection grows or changes. For a more eclectic look, mix different sizes and shapes, or add decorative brackets for an industrial feel. Seasonal swaps—like themed shelves for Halloween or holiday seasons—keep the display dynamic. You can also incorporate small hooks or baskets for accessories like cables or controllers, blending functionality with aesthetic appeal.
Start by selecting a wall that’s free from obstructions and measuring available space. Use a level and pencil to mark shelf positions. Install sturdy anchors suited for your wall type, then mount the shelves securely. Arrange your collectibles thoughtfully, balancing size and visual weight for a harmonious look. Consider adding subtle backlighting to highlight the display, but avoid overly bright lights that might cause glare. Regularly dust and rotate items for freshness.
Create themed displays—like matching game genres or favorite characters—and add small decorative elements like themed stands or bases. Use clear acrylic risers to give height variation and focus on key pieces. Incorporate personalized plaques or name tags for trophies to add a professional touch. You can also add a small framed certificate or digital screen for displaying recent achievements or game stats.
Showcasing your collection enhances your pride and motivation, making your gaming space uniquely yours. A curated display elevates your room’s style and invites admiration from friends. It’s a simple but impactful way to elevate your entire setup. Ready to turn your wall into a gallery of greatness? Your collection deserves the spotlight.
4. Creative Wall Art with Game-Inspired Prints or Quotes
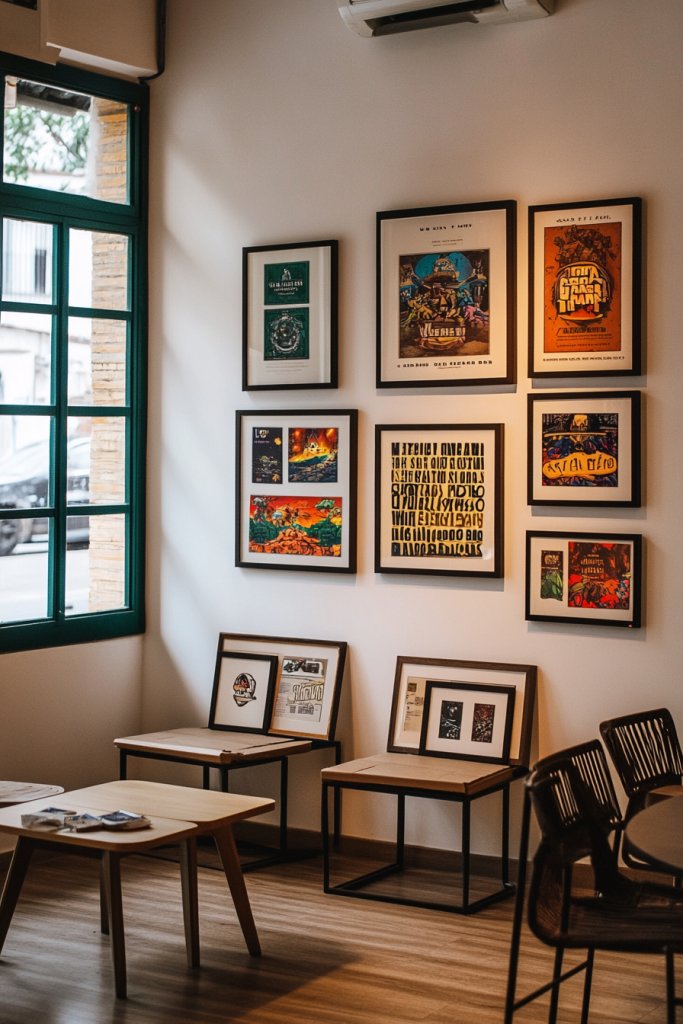
A plain wall can make your gaming room feel dull and uninspired. Creative wall art featuring game-inspired prints or iconic quotes injects personality and motivation into your space. It’s a quick way to showcase your gaming passions and set the mood. Plus, it’s a conversation starter for friends and fellow gamers alike.
Recommended Products to replicate this idea
| # | Preview | Product | |
|---|---|---|---|
| 1 |

|
Gaming Room Canvas Wall Art Set of 9, Game Posters Wall Decor, Gamer Paintings Picture Print for... | Check Latest Price |
| # | Preview | Product | |
|---|---|---|---|
| 1 |

|
30 PCS Push Pins Picture Hangers Wall Hooks, Double Headed Thumb Tacks for Wall Hangings, Renter... | Check Latest Price |
Imagine a series of framed posters with minimalist designs of your favorite characters or memorable game quotes in bold typography. The prints use vibrant colors or sleek monochrome palettes to match your style. Strategically placing them above your desk or gaming setup creates a focal point that draws the eye. The artwork combines modern aesthetics with your gaming identity, making the room feel alive and personalized.
Mix and match different styles—like comic book art, minimalist line drawings, or vintage posters—for a layered, eclectic look. For a more subtle approach, opt for canvas prints with muted tones. Seasonal updates can include new quotes or artist collaborations. Consider creating a gallery wall with a variety of sizes and frames for visual interest or sticking to a single large piece for impact.
Choose high-quality prints or posters that reflect your favorite games or themes. Measure wall space and select appropriate frames or mounting options. Use command strips or hooks for damage-free hanging, especially for larger pieces. Arrange the art in a balanced layout, mixing sizes and orientations for a dynamic look. Keep the display tidy by regularly dusting or replacing worn frames. Personalize further with custom decals or overlays if desired.
Add small decorative elements like themed shelf accents or LED backlighting behind the artwork for added drama. Incorporate your favorite quotes in different fonts or styles, and consider custom-printed canvases with your gamer tag or tagline. Regularly rotate or update the art to reflect new games or achievements. Personal touches make your space uniquely yours and inspire your daily gaming routine.
Wall art energizes your room, making it a source of inspiration and pride. It reflects your personality and gaming journey, boosting your confidence. When friends visit, they’ll admire your curated space, and you’ll feel more motivated to crush your goals. Ready to turn blank walls into a gallery of greatness? Your personalized art awaits!
5. Themed Storage Bins for Toys and Accessories
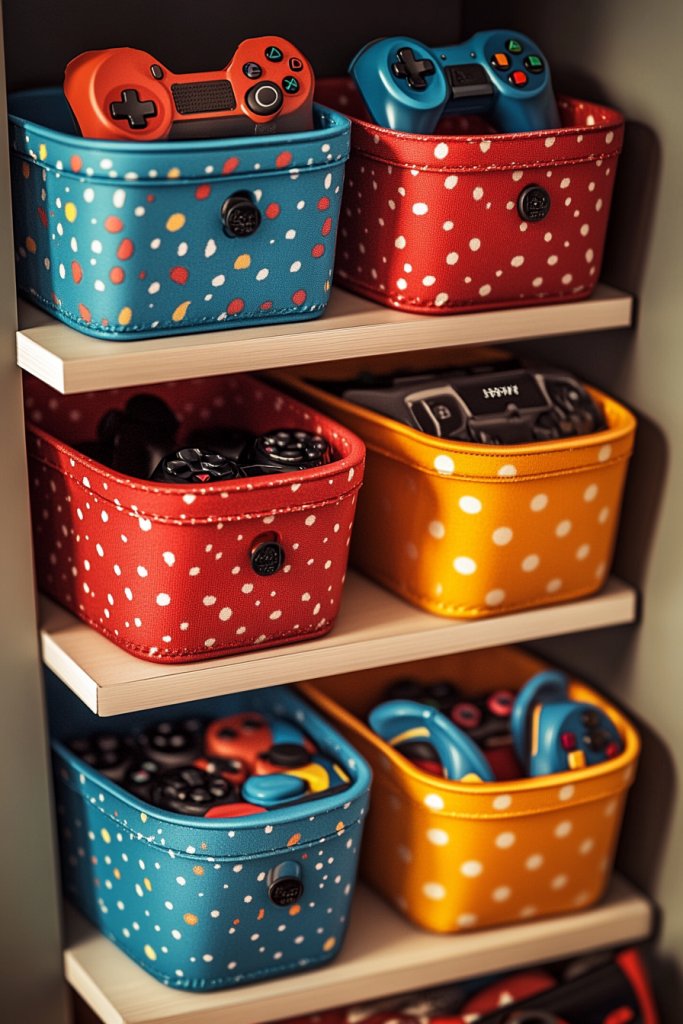
Messy rooms with controllers, gadgets, and toys scattered everywhere ruin the vibe. Themed storage bins keep your space tidy and add a fun, playful touch. They make cleanup quick and easy, so you spend less time hunting for gear and more time gaming. Who doesn’t love a room that looks organized and cool?
Picture colorful bins with game-inspired graphics or characters, stacked neatly in a corner or under your desk. The bins come in various sizes, some with lids, others open for quick access. Bright colors like neon green, electric blue, or fiery red make your storage fun and lively. Labels with bold fonts or icons help you identify contents at a glance, maintaining order without sacrificing style. It’s a simple trick that keeps clutter out of sight.
Choose bins that match your room’s theme—cartoony, futuristic, or minimalist. Use stackable bins to maximize vertical space or place small ones on shelves for easy reach. Seasonal themes can be swapped out for holidays or special occasions. Incorporate transparent bins for visibility or textured fabrics for a softer look. Personalize with stickers or custom labels to reflect your gaming personality.
Start by assessing your storage needs—what items need quick access versus long-term storage. Select bins made of durable plastic, fabric, or woven materials based on your budget and style. Label each bin clearly, using waterproof markers or printed labels. Arrange the bins in a way that’s accessible and visually appealing, possibly creating dedicated zones for controllers, toys, or cables. Keep frequently used items in the front or on top for convenience. Regularly tidy and reorganize to keep everything in check.
Decorate bins with themed stickers, decals, or paint to match your gaming setup. Add handles or wheels to make moving them easier. Incorporate small fabric liners or cushions inside for extra protection of fragile items. You can also craft custom bins with foam inserts or dividers for specialized storage. Personal touches like monograms or gamer tags turn simple bins into part of your room’s personality.
Themed storage bins keep your space neat and showcase your style, boosting your pride in your setup. An organized room improves your focus and creates a welcoming environment for friends. When everything has a designated place, gaming sessions become smoother and more fun. Want a room that’s both playful and tidy? Start with personalized bins today!
6. DIY Gaming Headphone Station with Hooks and Shelves
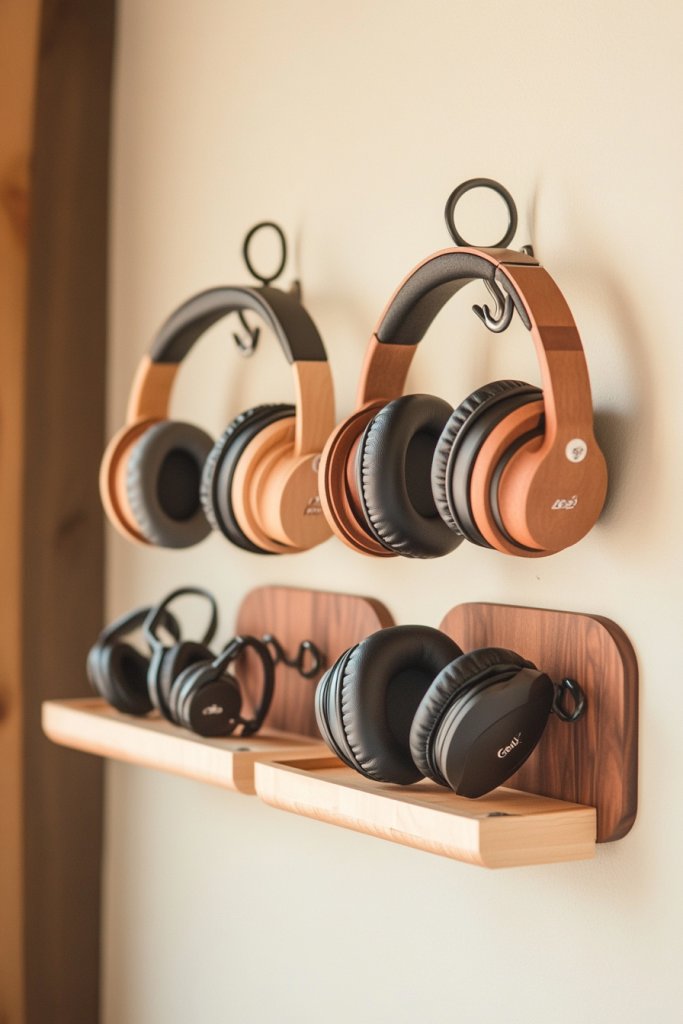
Tangled cables and misplaced headphones make your gaming area look messy and cause frustration. A DIY headphone station with hooks and shelves keeps everything organized and within arm’s reach. It stops you from hunting under the desk and prolongs the life of your gear. Plus, it adds a cool, techy vibe that makes your setup look pro.
Recommended Products to replicate this idea
| # | Preview | Product | |
|---|---|---|---|
| 1 |

|
BrightRow Classroom Wall Mounted Headphone Storage Rod, 2 Headphone Storage Rods with 4 Adhesive... | Check Latest Price |
| # | Preview | Product | |
|---|---|---|---|
| 1 |
|
KSIPZE 100ft Led Strip Lights RGB Music Sync Color Changing Led Lights with Smart App Control Remote... | Check Latest Price |
Picture a sleek wall-mounted panel with multiple hooks holding your gaming headphones, all neatly hung in a row. Small shelves above store your mic or other accessories, while cable clips keep cords tidy and prevent tangling. The station’s modern design features a mix of matte metal and textured wood for a rugged, industrial feel. LED accents or backlit elements can add an extra layer of tech style. It’s a functional centerpiece that declutters your space while looking awesome.
Use different materials—wood, metal, or acrylic—for a customized look. Incorporate themed decals or paint to match your room’s aesthetic. For small spaces, opt for a compact, wall-mounted panel; larger rooms can feature a multi-tiered shelf system. Seasonal updates might include new hooks or decorative elements. Adding a small message board or digital display nearby can personalize it even more.
Start by selecting a wall or section near your gaming setup for installation. Measure to ensure hooks and shelves are positioned for easy access. Use appropriate anchors and screws for your wall type, and secure the panel firmly. Hang your headphones by the ear cups or headbands, and organize cables with clips or sleeves. Regularly check for loose screws or damage, and clean the station to prevent dust buildup. Personalize with stickers or paint to match your theme.
Add LED strip lighting behind or around the station for a glow effect. Use themed hooks—like character symbols or icons—to match your favorite games. Incorporate a small chalkboard or whiteboard nearby for quick notes or game plan sketches. Personalize with your gamer tag or a custom logo painted or applied with decals. Keep the station adaptable for new gear or accessories as your collection grows.
A dedicated headphone station keeps your gear in top shape and your space looking sharp. It reflects your attention to detail and love for gaming, making your setup stand out. When friends see your organized, stylish station, they’ll be impressed—and maybe even inspired to do the same. Ready to upgrade your gear organization? Your perfect headphone hub is waiting!
7. Themed Ceiling Decor with Floating Cloud or Star Elements

A plain ceiling can make your gaming room feel flat and uninspired. Themed ceiling decor with floating clouds or star elements adds a whimsical, playful touch that makes the entire room feel magical. It’s like bringing a piece of the sky into your personal space. Who wouldn’t want a dreamy atmosphere that sparks imagination?
Visualize soft, plush cloud shapes suspended from the ceiling with nearly invisible threads, giving the illusion of floating in the sky. Small LED or fiber optic stars twinkle gently, creating a night-sky effect. The clouds are crafted from light foam or fabric, with some featuring hidden pockets for LED lights or sound modules. The stars shimmer subtly, adding depth and wonder. The overall effect transforms your room into a dreamy, immersive environment perfect for relaxing or strategizing.
Use different sizes and shapes of clouds and stars for a dynamic look. For a more subtle effect, opt for glow-in-the-dark or reflective materials that catch ambient light. Seasonal themes could include moon and planet decor or colorful LED constellations. For a minimalist style, keep the elements in neutral tones; for a vibrant look, choose bright, contrasting colors. The decor can be temporary or part of a long-term room upgrade.
Select lightweight, fire-retardant materials suitable for hanging from ceilings. Use strong fishing line or clear nylon thread to suspend clouds and stars securely. Arrange the elements in a balanced pattern, ensuring they are evenly spaced for visual harmony. Install small hooks or adhesive strips on the ceiling to anchor the cords. Incorporate LED lights inside clouds or behind stars for a glowing effect, powered by discreet batteries or a power source. Regularly check the stability and replace worn cords or lights.
Add personal touches like custom painted clouds or stars with your gamer tag or favorite symbols. Incorporate small mobiles or wind chimes for extra charm. Use remote-controlled LED lights for adjustable brightness and color. Create themed night scenes for special occasions or game launches. This decor makes your room feel like a fantasy or space adventure, inspiring creativity.
Ceiling decor elevates the atmosphere, making your gaming space uniquely fun and enchanting. It sparks imagination and makes your room a memorable place to hang out. When friends visit, they’ll be wowed by the whimsical sky above. Want to turn your ceiling into a dreamscape? The sky’s the limit!
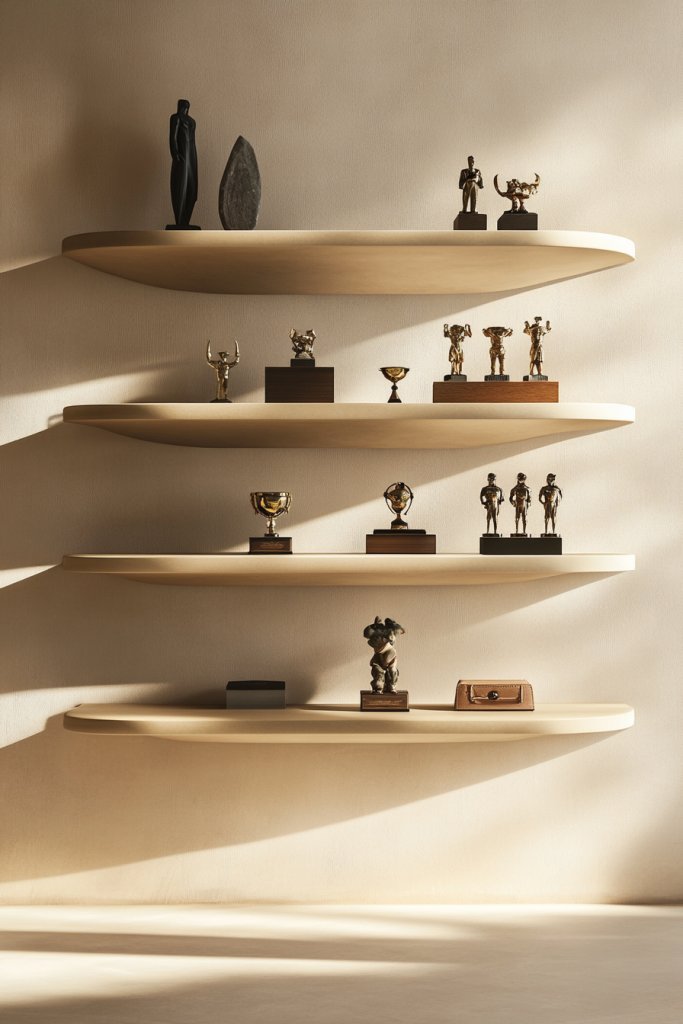
8. Personal Trophy or Achievement Display Corner
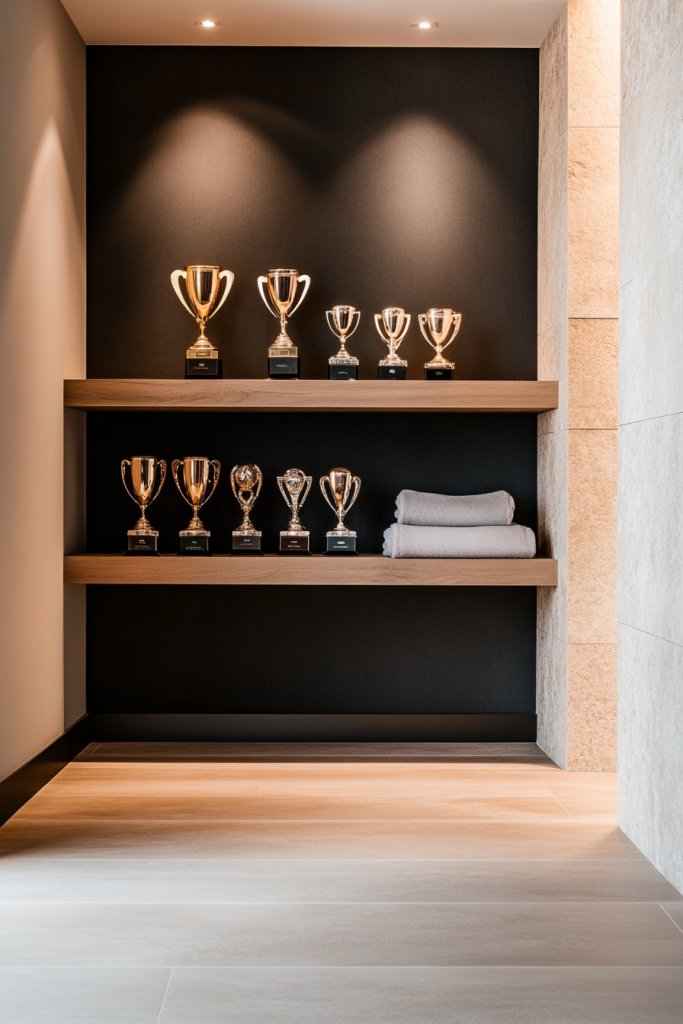
Nothing boosts your confidence like seeing your hard-earned trophies and medals on display. A dedicated achievement corner turns your gaming successes into a source of pride and motivation. It’s a visual reminder of your progress and skill. Who doesn’t want a space that celebrates their wins and inspires future victories?
Recommended Products to replicate this idea
| # | Preview | Product | |
|---|---|---|---|
| 1 |

|
iBobbish Metal Medal Hanger Display, Non-Slip Trophy Shelf with 20 Hooks, Wall Mount, Heavy Duty,... | Check Latest Price |
| # | Preview | Product | |
|---|---|---|---|
| 1 |

|
Americanflat 11x14 Shadow Box Frame with Shatter-Resistant Glass - Silhouette Collection - Large... | Check Latest Price |
Picture a small, stylish shelf or wall-mounted display with your trophies, medals, and plaques arranged neatly. The display uses sleek stands or mounts to highlight each achievement, with some framed or shadow-boxed for a premium look. Spotlights or LED backlights accentuate the awards, making them pop against the wall. Nearby, framed photos or certificates add context, telling your story of dedication and success. It’s a mini hall of fame for your gaming journey.
Choose a dedicated corner near your gaming station or create a floating shelf for a clean look. Incorporate themed mounts or custom plaques matching your favorite game or team. For a more casual vibe, use cubed storage or baskets for medals and trophies. Seasonal updates might include adding new awards or changing the display layout. Personalize with engraved nameplates or decorative accents for a more polished appearance.
Select a wall or corner that’s visible and easy to access. Install sturdy shelving or mounts suited for the weight of your trophies. Arrange items by size or importance, balancing the visual weight across the space. Use adjustable stands or frames for flexibility. Keep the display dust-free and add protective glass or acrylic covers for long-term preservation. Regularly update the display as you earn new achievements to keep it fresh.
Add themed elements like gaming logos or character decals to the background. Incorporate small LED strips or spotlights for dramatic effect. Personalize with engraved plaques or custom trophies that reflect your style. Use decorative framing or mats to enhance the visual appeal. Make it a proud showcase that you can update and grow over time, truly reflecting your gaming accomplishments.
A trophy corner boosts your confidence and reminds you of your dedication. It motivates you to keep improving and reaching new goals. When friends see your achievements, they’ll be inspired to level up their own spaces. Want a room that celebrates your success? This display is your personal hall of fame.
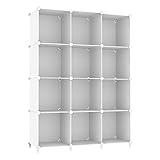
9. Modular Storage Cubes with Custom Labels
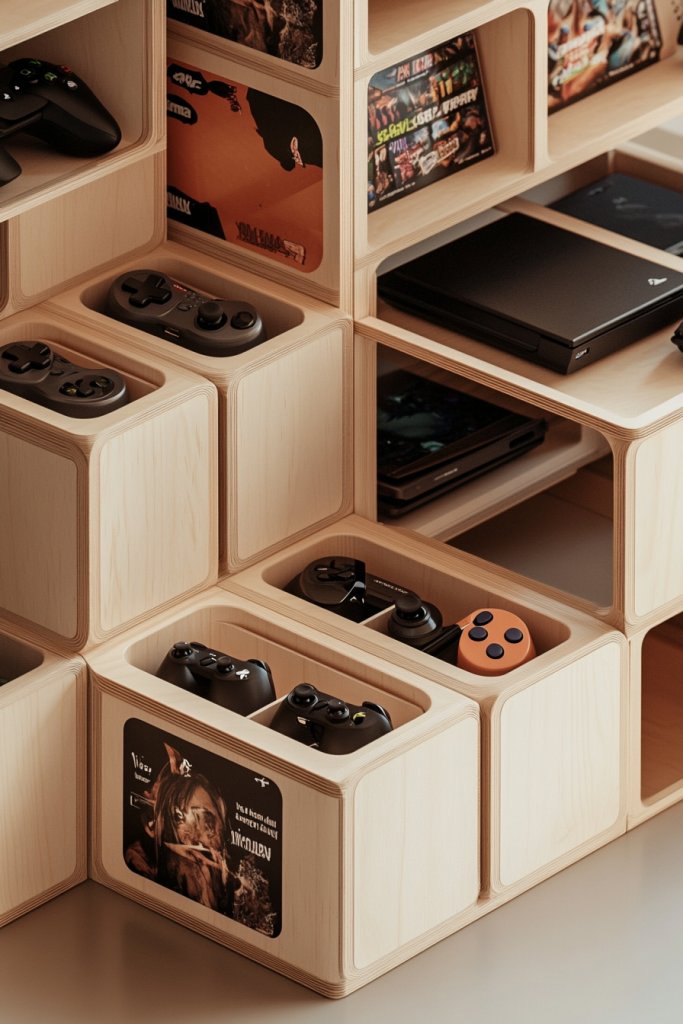
Messy storage solutions make your gaming room chaotic and stressful. Modular storage cubes with customizable labels organize everything neatly, making cleanup a breeze. They turn chaos into order and give your space a polished, intentional look. Who wouldn’t want a room where every item has a home—and a label?
Recommended Products to replicate this idea
| # | Preview | Product | |
|---|---|---|---|
| 1 |
|
AWTATOS Cube Storage Organizer Storage 12 Cube Bookshelf DIY Plastic Closet Clothes Storage Shelves... | Check Latest Price |
| # | Preview | Product | |
|---|---|---|---|
| 1 |

|
Nelko Label Maker Machine with Tape, P21 Bluetooth Label Printer, Wireless Mini Label Makers with... | Check Latest Price |
Imagine colorful cubes stacked in a geometric pattern, each clearly labeled with game titles, accessories, or gear categories. The labels use bold fonts or icons for quick identification, creating a visual map of your collection. The cubes can be made of plastic, fabric, or wood, matching your room’s aesthetic. Bright hues or monochrome tones suit different styles, from playful to sleek. The organized look makes your space feel professional and inviting.
Use different sizes and colors for a dynamic, layered effect, or keep it uniform for a minimalist vibe. Labels can be handwritten, printed, or custom-designed for a personal touch. Incorporate transparent cubes for visibility or textured finishes for added style. Seasonal labels or themes can refresh the look periodically. The key is flexibility—these cubes grow with your collection and style.
Start by assessing your storage needs and space layout. Choose cubes that fit your items and room dimensions. Label each cube clearly with durable, waterproof labels or printed stickers. Stack and arrange the cubes to optimize accessibility and aesthetics. Use modular units that can be expanded or reconfigured over time. Keep the system tidy by regularly reviewing and updating labels and contents. Incorporate small accessories like dividers or inserts for specialized items.
Add themed labels with custom fonts or icons matching your favorite games or genres. Incorporate decorative stickers or decals on the cubes for extra flair. Use matching baskets or fabric liners inside for fragile items. Personal touches like handwritten notes or motivational quotes on labels can add charm. Keep the setup adaptable so it remains fresh and functional as your collection evolves.
A modular, labeled storage system makes your room look professional and boosts your confidence in your organization skills. It encourages regular tidying and shows off your collection with pride. When friends visit, they’ll admire your neat, thoughtful setup. Ready to organize like a pro? Your space is waiting for a smart, personalized storage system.
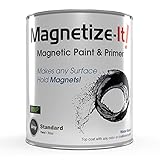
10. Fun, Interactive Wall Decals with Magnetic or Chalkboard Features
A static wall can feel dull and uninspiring, especially during long gaming marathons. Interactive wall decals that are magnetic or chalkboard-ready add a playful, functional element to your space. They let you jot down notes, game scores, or doodles, making your room more engaging. Want a space that’s both fun and practical? This is the upgrade you need.
Recommended Products to replicate this idea
| # | Preview | Product | |
|---|---|---|---|
| 1 |

|
YOUNGJQ Magnetic Chalkboard Contact Paper for Wall 40" x 18" Self Adhesive Blackboard Wallpaper Peel... | Check Latest Price |
| # | Preview | Product | |
|---|---|---|---|
| 1 |
|
Magnetize-It! Magnetic Paint & Primer (Water Based) – Standard Yield 32oz, MISTD-1530 | Check Latest Price |
Picture a large, smooth wall decal that doubles as a chalkboard or magnetic surface. You can write game strategies, keep score during friendly competitions, or doodle while waiting. The decal might feature colorful borders, game icons, or character silhouettes, blending seamlessly into your decor. When not in use, it’s a sleek backdrop that adds to your room’s style. It’s like having a giant, interactive whiteboard that sparks creativity and planning.
Choose decals with themed designs—like pixel art, geometric patterns, or game-inspired graphics—that suit your style. Use magnetic paint or sheets for a DIY approach, or buy ready-made decals for ease. Seasonal or themed decals can be swapped out to match new games or moods. Keep the writing tools handy—chalks, markers, or magnets—to encourage frequent use and creativity. The design can be playful or minimalist, depending on your taste.
Clean the wall thoroughly before applying decals or magnetic paint. For decals, follow instructions for smooth, bubble-free installation. If using magnetic paint, apply multiple coats and let each dry completely before adding magnets or chalk. Mount the decal at a comfortable height for writing or doodling. Use different colored chalks or magnets to organize or decorate. Regularly clean or update the surface to keep it functional and inviting. Incorporate a small container nearby for writing tools.
Decorate the edges with themed decals or LED accents to match your room’s style. Personalize with your gamer tag or favorite characters. Use custom magnets or stickers to mark achievements or favorite game info. Incorporate a small shelf or clip strip for quick access to notes, posters, or game plans. Turn your wall into a dynamic, interactive hub that fuels your creativity.
Interactive wall decals make your room more fun and functional, boosting your motivation and planning skills. It’s a space that encourages creativity, collaboration, and strategic thinking. When friends see your setup, they’ll want one too. Want a room that’s playful and practical? Your interactive wall is ready to inspire!
Conclusion
These boys’ gaming bedroom ideas showcase a diverse range of styles and features, from sleek modern setups to vibrant themed spaces. Each concept offers practical tips and creative inspiration to make a gaming room uniquely yours. Feel empowered to experiment and bring your vision to life—your perfect gaming sanctuary is just a few steps away. Dive into these ideas and create a space where fun and gaming go hand in hand!